F21: Skeh-lleybones
Contents
Block Breaker
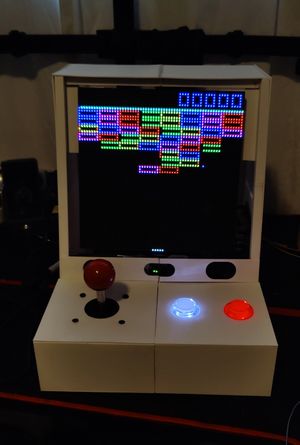
Block Breaker is a fun game in which you control a paddle and destroy blocks with a moving ball. The player controlled paddle deflects the ball at different angles to target different blocks and destroy them.
Grading Criteria
- How well is Software & Hardware Design described?
- How well can this report be used to reproduce this project?
- Code Quality
- Overall Report Quality:
- Software Block Diagrams
- Hardware Block Diagrams
- Schematic Quality
- Quality of technical challenges and solutions adopted.
Abstract
As the capstone project for this class, we were instructed to create a video game using a few required elements. As the cornerstone of development in this class, we were required to use the SJ2 development board. Additionally, we were required to use a LED matrix as means of displaying the video game movement. Finally, we were required to facilitate the usage of an external peripheral or sensor that would contribute to the end result in a meaningful way.
Introduction
In order to realize the requirements of this project, we constructed a plan to verbally prototype a few different elements of the project:
- The idea of the game - we discussed two player snake as a potential idea, but ultimately decided on block breaker.
- The task logic - it made sense to run a single task that would serve as the "clock" task to operate the game at a stable refresh rate. Another task could serve to update the data structure that held the state of the LED matrix at any given moment in time.
- The LED matrix driver - because of the nature of the LED matrix's operation, a consistent order of operations is required to update each pixel. More on this will be discussed in later sections.
- The enclosure - since we had access to a 3D printer, we concluded that a tabletop arcade cabinet would serve to house all necessary components.
- The music - we decided to use the theme song from the video game Geometry Dash since we used rectangular blocks and doing so pull us in scope of using the theme song.
Objectives & Introduction
In order to accomplish the objective of the game, we split the project into a few sub-topics that could be tackled individually:
- Main "clock" task for updating the LED matrix.
- Main gameplay loop task that would update the position of the ball, paddle, and blocks.
- Design of various game screens via a state machine.
- Game logic to determine the ball's bounce relative to its current trajectory.
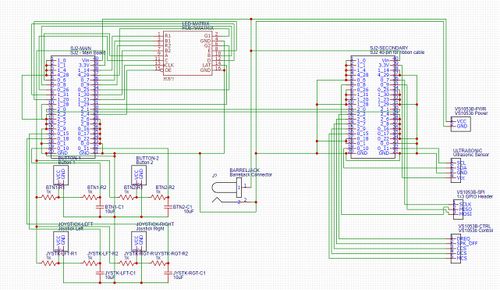
- Design of PCB to utilize a ground plane and avoid excessive loose wiring.
- Design of a 3D printed enclosure to display a clean look.
- MP3 background track during gameplay.
- Speaker volume adjustment based on user proximity to enclosure.
Team Members & Responsibilities
Prabjyot Obhi
- Core MP3 module driver development.
- Task logic for sending music data to MP3 module.
Justin Stokes
- Core game logic development.
- Debugging and testing of game logic and LED Matrix functionalities.
Manas Abhyankar
- Develop LED Matrix driver.
- Design and print enclosure for project.
- Design and send PCB for manufacturing.
Schedule
| Week# | Start Date | End Date | Task | Status |
|---|---|---|---|---|
| 1 |
|
|
|
|
| 2 |
|
|
|
|
| 3 |
|
|
|
|
| 4 |
|
|
|
|
| 5 |
|
|
|
|
| 6 |
|
|
|
|
| 7 |
|
|
|
|
| 8 |
|
|
|
|
| 9 |
|
|
|
|
Parts List & Cost
| Part | Link | Price | Quantity |
|---|---|---|---|
| LED Matrix | Sparkfun | $80 | 1 |
| Power Supply | Adafruit | $30 | 1 |
| Barreljack connector | Adafruit | $0.95 | 1 |
| Joystick | Sparkfun | $16.95 | 1 |
| Button | Adafruit | $2.50 | 2 |
| Quick connect wires | Adafruit | $4.95 | 1 |
| Resistors/Capacitors | N/A | N/A | 3 of each |
| Ultrasonic Sensor | Adafruit | $3.95 | 1 |
| MP3 Module | Adafruit | $34.95 | 1 |
| Speakers | Adafruit | $7.50 | 1 |
| 3D Printed Enclosure | To be 3D printed | N/A | 1 |
| 40-pin ribbon cable | Adafruit | $2.95 | 2 |
Design & Implementation
The design section can go over your hardware and software design. Organize this section using sub-sections that go over your design and implementation.
Hardware Design
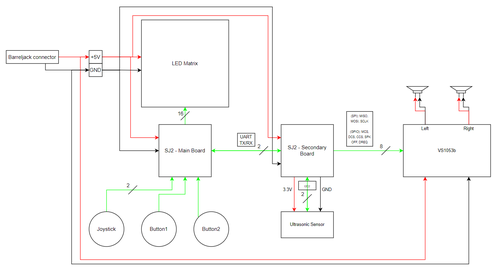
- SJ2 Interconnect
- SJ2 connection to LED matrix
- SJ2 connection to VS1053b
- SJ2 connection to ultrasonic sensor, buttons, joysticks
Hardware Interface
In this section, you can describe how your hardware communicates, such as which BUSes used. You can discuss your driver implementation here, such that the Software Design section is isolated to talk about high level workings rather than inner working of your project.
Software Design
Below are the list of the tasks we used to create our project. This includes, the task name, task priority, and high-level view of what the task performed.
| Task Name | Task Priority | Comments |
|---|---|---|
| left_button_task | PRIORITY_HIGH | This task was used to receive inputs from the left button. Used interrupts to send binary semaphore on each press. |
| right_button_task | PRIORITY_HIGH | This task was used to receive inputs from the right button. Used interrupts to send binary semaphore on each press. |
| joystick_task | PRIORITY_MEDIUM | This task was used to monitor movement of the joystick. This task was polled rather than using interrupts |
| game_state_machine_task | PRIORITY_HIGH | Task responsible for running the game. Accessed the main state machine used to drive the game logic. |
| update_display_task | PRIORITY_HIGH | Updated the physical matrix based on the 2D array in code. |
| check_for_speed_up_task | PRIORITY_MEDIUM | Checked if the 'current power up' was a speed related power up. If yes, changed the delay of game_state_machine_task to reflect the speed up/down. |
Software Implementation
This section includes implementation, but again, not the details, just the high level. For example, you can list the steps it takes to communicate over a sensor, or the steps needed to write a page of memory onto SPI Flash. You can include sub-sections for each of your component implementation.
MP3 and Ultrasonic Hardware Design and Interface
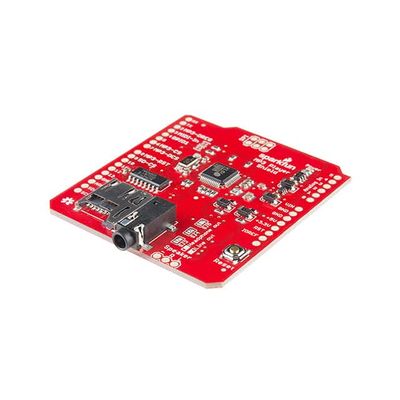
The overall hardware design of the MP3 module was very straightforward as the means of communication between the SJ2 and the VS1053B board was an SPI interface. The MP3 control pins such as CS, DCS, DREQ, and RESET were simple GPIO pins that were available on the SJ2 board. The largest component was to select which GPIO pins and SPI interface to employ as everyone had to be consistent due to the fact that this would be connected onto a PCB. The thought process behind selecting pins to choose was the spacing between each grouping of pins as well the ease of putting wires in.
The pins that we decided to use for the MP3 control signals are as follows: DREQ to 2.2, RESET to 2.5, DCS to 2.7, and CS to 2.9. We chose these pins because they are in a straight line. Also, the MP3 pins are away from the SPI pins which are as follows: Clock to 0.7, MISO to 0.8, and MOSI to 0.9. Below are images of the VS1053B connected to the SJ2 Board
*insert image of wires on SJ2*
Once all of the wires were set up we had to use the 3.5-millimeter wire to connect the module to different speakers, headphones, and other audio devices to ensure that we could hear the music being played and that the quality of the sound was decent. This is shown below.
- Insert Image*
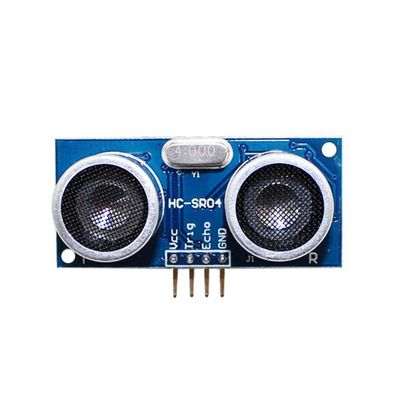
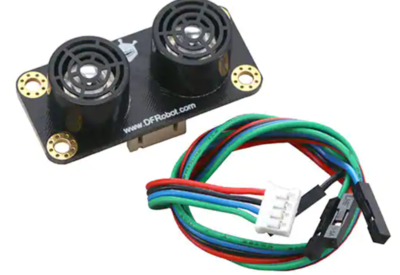
The final component was the ultrasonic sensor, and we initially used a spare $4 component. We quickly realized it would be easier to simply use a higher quality, better sensor for our project. Luckily, we were able to take apart a previous project which used a better ultrasonic sensor to use for this. Below is an image of the cheap ultrasonic sensor and the more expensive, easier to use ultrasonic sensor.
The ultrasonic sensor that we ended up using utilized I2C to communicate with the SJ2 board. Initially, we tried to use I2C1 because we had recently finished the I2C lab and when we used I2C busses to communicate on one board, and thought we could continue the process. We quickly realized that we could simply use the I2C2 bus because it would already be initialized and ready to use to read data.
MP3 and Ultrasonic Software Design
Show your software design. For example, if you are designing an MP3 Player, show the tasks that you are using, and what they are doing at a high level. Do not show the details of the code. For example, do not show exact code, but you may show psuedocode and fragments of code. Keep in mind that you are showing DESIGN of your software, not the inner workings of it.
On startup, there is only one task that is created in main, namely the ultrasonic_sensor_task. This task reads the value that the ultrasonic sensor is sensing, and when the value is below 25, three tasks related to MP3 playback are created and begin running. There is a mp3_reader task, a mp3_player_task, and a mp3_contoller task. The controller task combs through the songlist and sends the name to the mp3_reader task to begin reading, and ultimately played. The reason this methodology was used was to make sure that the song title did not need to be hardcoded, so anyone could name their files whatever they wanted and the song would still play. The mp3_reader reads the data from an SD card to a buffer which will be transmitted to the mp3_player_task via a queue. Finally, the mp3_player_task sends the data to the MP3 module to be played.
Below are two snippets, one of our reader task, and another of the player task.
Reader Task:
if (FR_OK == result) {
      fprintf(stdout, "File opened: %s\nPlaying: %s", song_name_reader, song_name_reader);
      while (!f_eof(&file)) {
        f_read(&file, song_data, sizeof(song_data), &br);
        .
        .
        .
        xQueueSend(Q_songdata, &song_data[0], portMAX_DELAY);
Player Task:

  .
  .
  .
  while (true) {
    xQueueReceive(Q_songdata, &song_data[0], portMAX_DELAY);
    for (int i = 0; i < sizeof(song_data); i++) {
      while (!mp3_decoder_needs_data()) {
        ;
      }
      spi_send_data_to_mp3_decoder(song_data[I]);
  .
  .
  .
The ultrasonic_sensor_task is also the means of pausing, replaying, and restarting the song that is being played. Once a song is playing, if the person playing the game wants to pause the music he/she would have to wave their hand approximately 4-10 millimeters away from the ultrasonic sensor. Since the ultrasonic_sensor_task sleeps for 500 milliseconds, the user would need to make sure that their hand goes in and out at a reasonable pace. He/She would need to ensure that they do not keep their hand in front of the sensor for too long as that would cause the playback to pause and play continuously.
Finally, if the player wants to restart the song, he/she would need to be within 3 millimeters of the ultrasonic sensor. The most brute force way that this was done was to essentially create a situation where the SJ2 would reboot itself and restart main and in turn the ultrasonic_sensor_task. This worked in our situation, but we would not recommend this form to restart playing the song.
  static void ultrasonic_sensor_task(void *p) {
  bool pause = true;
  // MP3_START_PLAYING = false;

  while (1) {
    int value_from_sensor = get_sensor_value_for_task();
    fprintf(stderr, "Value = %u\n", value_from_sensor);
    // MP3_START_PLAYING = false;

    if (!MP3_START_PLAYING) {
      if (value_from_sensor < 25) {
        MP3_START_PLAYING = true;
        song_list__refresh();
        for (size_t song_number = 0; song_number < song_list__get_item_count(); song_number++) {
          printf("Song %3d: %3ld: %s\n", (1 + song_number), song_count + 1, song_list__get_name_for_item(song_number));
          song_count++;
        }

        xTaskCreate(mp3_reader_task, "reader", (6 * kilobyte) / sizeof(void *), NULL, PRIORITY_LOW, NULL);
        xTaskCreate(mp3_player_task, "player", (6 * kilobyte) / sizeof(void *), NULL, PRIORITY_HIGH,
                    &mp3_player_task_handle);
        xTaskCreate(mp3_control_task, "control", (8 * kilobyte) / sizeof(void *), NULL, PRIORITY_LOW, NULL);
      }
    } else if (MP3_START_PLAYING && value_from_sensor <= 10 && value_from_sensor >= 4) {
      pause ? vTaskSuspend(mp3_player_task_handle) : vTaskResume(mp3_player_task_handle);
      pause = !pause;
    .
    .
    .
    .
    vTaskDelay(500);
  }
}
MP3 and Ultrasonic Implementation
We don't want to give too much information here, but at a high level, the process of initializing requires the initialization of the SPI1 bus, the SPI1 peripherals, and the mp3_initialization. The communication between the SJ2 and the decoder is through SPI, so this was similar to the SPI lab. The most important portion of the SPI communication is to ensure that we are waiting until the MP3 decoder is no longer busy. Much of this can be seen in the following code snippets.
void spi1__init(uint32_t max_clock_mhz) {
  spi1__init_pins();
  spi1__init_peripherals(max_clock_mhz);
  mp3_decoder__init();
}
static void mp3_decoder__init(void) {
mp3_decoder_rst();
mp3_set_volume(0x0);
uint16_t mp3_mode = mp3_read_register(SCI_MODE);
uint16_t mp3_status = mp3_read_register(SCI_STATUS);
uint16_t mp3_volume = mp3_read_register(SCI_VOL);
mp3_write_register(SCI_CLOCKF, 0xc800); // 12.288 * 3.5 = 43.0108/7 = 6.1444Mhz
uint16_t mp3_clock = mp3_read_register(SCI_CLOCKF);
fprintf(stderr, "Mode:0x%04x Status:0x%04x Clock:0x%04x Vol:0x%04x\n", mp3_mode, mp3_status, mp3_clock, mp3_volume);
spi1__init_clock_prescalar(7);
}void mp3_write_register(uint8_t address_byte, uint16_t data) {
uint8_t low_byte = data;
uint8_t high_byte = data >> 8;
uint8_t write_op = 0x02;
while (!mp3_decoder_needs_data()) {
;
}
mp3_decoder_cs_activate();
(void)spi1__exchange_byte(write_op);
(void)spi1__exchange_byte(address_byte);
(void)spi1__exchange_byte(high_byte);
(void)spi1__exchange_byte(low_byte);
mp3_decoder_cs_deactivate();
}The communication between the ultrasonic sensor and the SJ2 is a simple I2C write to a register on the ultrasonic and read back. As the sensor would be directly in front of the player, we only need to read the lower bits of the distance register due to proximity.
uint8_t ultrasonic_sensor__get_value(void) {
  uint8_t sensor_value = 0;
  uint8_t value_to_write = 1;
  i2c__write_slave_data(I2C__2, 0x24, 0x08, &value_to_write, 1);
  i2c__read_slave_data(I2C__2, 0x24, 0x04, &sensor_value, 1);
  return sensor_value;
}
Testing & Technical Challenges
Describe the challenges of your project. What advise would you give yourself or someone else if your project can be started from scratch again? Make a smooth transition to testing section and described what it took to test your project.
Include sub-sections that list out a problem and solution, such as:
<Bug/issue name>
Discuss the issue and resolution.
Conclusion
Ultimately, we were able to fully replicate the block breaker game with a geometry dash soundtrack that the player would be able to control. This a was a fun project that allowed us to employ all of the knowledge that we learned about in class. We used a handful of the communication protocols in the project, and these would most definitely be used in industry as they are foundational pieces of knowledge. Regardless of if people decide to pursue this field, there are still characteristics that are shown through the project that would be useful in other areas.
Advice for Future Students:
The largest piece of advice for future students is to decide on and order your hardware quickly. The chip shortage may have had an impact, but our packages took quite a long time to arrive. It’s very difficult to make progress on a project when you do not have the necessary hardware to even start the project. Also, we received multiple defective matrices throughout the semester, so the sooner you order these the sooner you can return bad ones. Finally, getting a head start on your parts allows you to start designing your PCB, which may need to do multiple iterations due to an error you did not expect, like a noisy ground.
What we learned/Where we improved:
- PCB Design
- 3D Printing
- Software Design
- Software Planning
- Communication
- Debugging
Project Video
Upload a video of your project and post the link here.
Project Source Code
Block Breaker project source code
References
Acknowledgement
We'd like to thank Preet for giving us the opportunity to develop and learn through an interactive team project. We would also like to acknowledge the TAs Ellis and Tirth for their feedback throughout the semester.
