F12: Unified Wireless Health Monitoring System
Contents
Unified Wireless Health Monitoring System
Abstract
Our project will take in sensor data (pulse sensor + temperature sensor) through the LPC2148 submit it to an online database. The purpose of the project is to simplify health monitoring for patients while allowing them some mobility. Both the patient and their doctor will be able to see the patient's progress via a WEB GUI.
Objectives & Introduction
Show list of your objectives. This section includes the high level details of your project. You can write about the various sensors or peripherals you used to get your project completed.
Objectives
- Create a mobile device that attaches to a user in order to retrieve health data from the user.
- Use 2 health monitoring sensors to retrieve 2 different types of data.
- Submit the sensor data wirelessly to an online database via Xbee & HTTP protocol.
- Give verified users and their doctors access to their health data on the online database.
- Display the health data from the online database to a WEB GUI, using charts to monitor progress.
Team Members
- Gurpreet Singh
- Michelle Chen
- Hai Do
Roles & Responsibilities
| Task | Responsibility |
|---|---|
| Xbee Wireless Configuration |
Gurpreet |
| Xbee UART driver for LPC2148 |
Gurpreet |
| PulseSensor A2D driver for LPC2148 |
Michelle |
| TMP102 I2C driver for LPC2148 |
Michelle |
| UART to SQL data conversion on PC-End |
Hai |
| Online Database Configuration |
Hai |
| Web GUI Configuration |
Hai |
Schedule
Show a simple table or figures that show your scheduled as planned before you started working on the project. Then in another table column, write down the actual schedule so that readers can see the planned vs. actual goals. The point of the schedule is for readers to assess how to pace themselves if they are doing a similar project.
| Week Number | Scheduled Items | Actual |
|---|---|---|
| 1 |
|
|
| 2 |
|
|
| 3 |
|
|
| 4 |
|
|
| 5 |
|
|
| 6 |
|
|
Parts List & Cost
Give a simple list of the cost of your project broken down by components. Do not write long stories here.
| Part | Quantity | Cost |
|---|---|---|
| Xbee Series 1 Module | $50 | |
| Xbee Breakout Board | $20 | |
| LPC2148 CPU + MP3 Development Board | $60 | |
| Mbed LPC1768 CPU | $50 | |
| Xbee USB Adapter | $25 | |
| Pulse Sensor | $28 | |
| I2C Digital Temperature Sensor | $3 |
Design & Implementation
The design section can go over your hardware and software design. Organize this section using sub-sections that go over your design and implementation.
Hardware Design
Discuss your hardware design here. Show detailed schematics, and the interface here.
Hardware Interface
In this section, you can describe how your hardware communicates, such as which BUSes used. You can discuss your driver implementation here, such that the Software Design section is isolated to talk about high level workings rather than inner working of your project.
Software Design
- MySQL Database
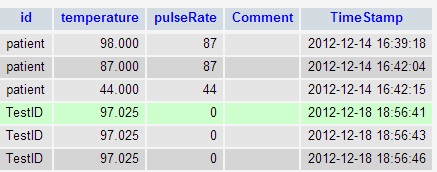
- The database will be used to collect and record data from both our temperature and pulse sensor. A database called "user" and a table called "patient" was created using phpMyAdmin. The patient table comprises of id, temperature, pulse, comments, and time stamp. Every time a string of data is received,it gets parsed and updated into their respective columns in the table. This table is shown below:
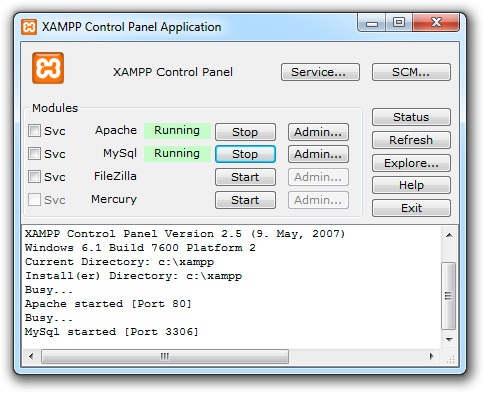
- In order to set up MySQL Database, XAMPP, an open source package which includes Appache HTTP Server, MySQL database, PHP, and Perl, will be used. With XAMPP installed, we are able to create a localhost PHP website that pulls data from our database.
- The following settings must be set to utilize XAMPP:
- Web GUI
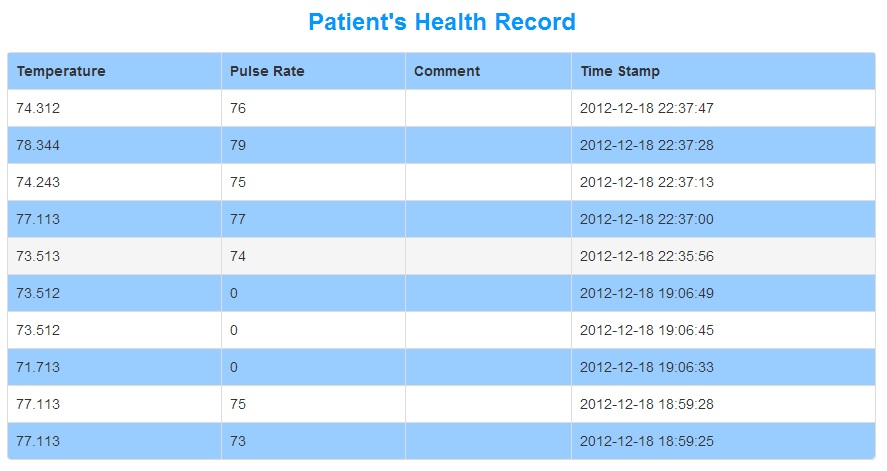
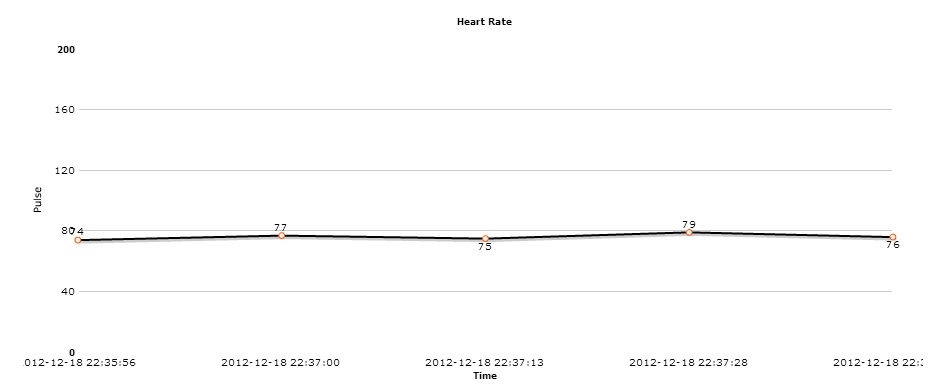
- The Web GUI is a bridge between the clients and the server. It translates the data from the database into a form where users can visually see their real time temperature and heart beat. The Web GUI is a monitoring system for the patient to see their body temperature and heart rate. Also, the monitoring system can be accessed anywhere with an internet connection so the patient doesn't have to be hooked up to machines. Other users can also view patient data such as their prescribing doctors. The doctors are able to leave feedback to their patients and monitor their health situation without physically being in the hospital to do so.
Implementation
This section includes implementation, but again, not the details, just the high level. For example, you can list the steps it takes to communicate over a sensor, or the steps needed to write a page of memory onto SPI Flash. You can include sub-sections for each of your component implementation.
- Web GUI
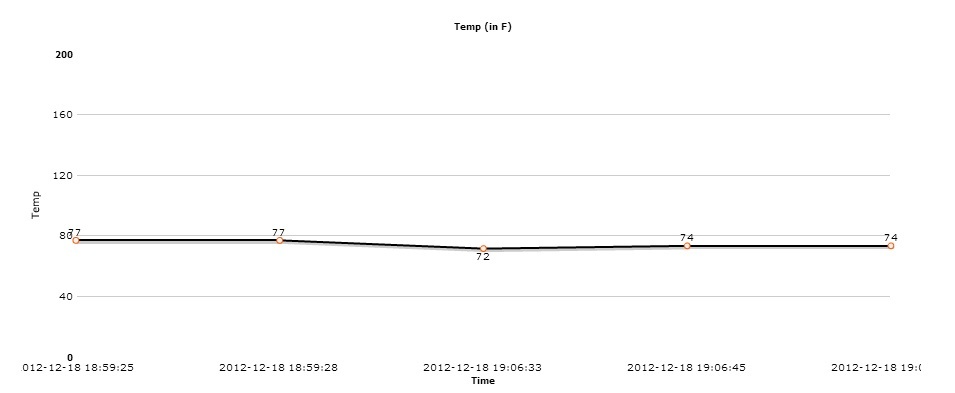
- The patients are able to access the website and check up on their temperatures and heart rates. Charts are also available to the patients along with the tables. The web GUI displays the data in real time. The values from both the table and charts are pulled from the MySQL database.
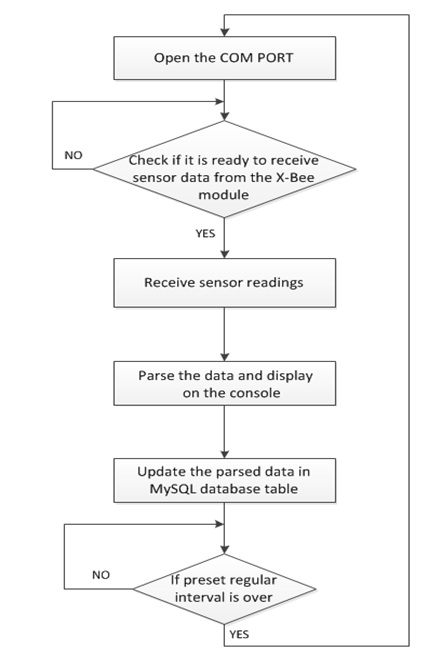
- To get the data, the comport has to be initialized to receive the incoming data from the xbee. If the comport is opened, then it is ready to receive incoming data. If it's closed, a message will display indicating that the comport it is unavailable to receive data. The data, in the form of a string, will be received and parsed using a split function and delimiters. The delimiters indicate separation between values so it can be inserted into the appropriate fields in the MySQL database. The parsed data will be displayed on the console as well as the charts on the web GUI. To be able to display the data, the charts and table are retrieving the data values from the database in real time. This is a continuous loop that will keep retrieving data until either the client or server side stops the process.
Testing & Technical Challenges
Describe the challenges of your project. What advise would you give yourself or someone else if your project can be started from scratch again? Make a smooth transition to testing section and described what it took to test your project.
Technical Challenges
- Pulse Sensor - Our first problem was that our pulse sensor wasn't able to successfully get accurate data and it was very sporadic. We had to replace the pulse sensor with a different one. Even then, the calibration was off and we had to manually change the gain of the sensor until it reached our desired range. Also, the sensor wasn't functioning properly on certain people.
- Temperature Sensor - We tested the temperature sensor through the console and it wasn't giving the right temperature. The parsed data from the temperature sensor wasn't sending the correct approximation over to the database.
- Parsing - In the beginning, we weren't able to parse decimal values because of our delimiters. We also didn't know what technique to use to split the data values being sent and how to update the database using the given strings.
- MySQL - We had trouble connecting to MySQL because of incorrectly identifying the user that held ownership to the specified database.
- Retrieving real time data using charts - The data was not retrieved correctly through the charts and table because the the web GUI was connecting to the wrong database.
If we were to restart this project from scratch, we would connect to only one database instead of many to make things simpler and easier to work around. For parsing, we might try using fewer delimiters.
Include sub-sections that list out a problem and solution, such as:
Wifi Connection Issues
Many wifi connection issues were encountered. To solve this problem, a dedicated task was created to re-connect to wifi if the connection was ever lost.
Conclusion
Conclude your project here. You can recap your testing and problems. You should address the "so what" part here to indicate what you ultimately learnt from this project. How has this project increased your knowledge?
It was very fulfilling to work in a large scale project such as this since no one in our group had encountered such a long term project before. It has taught us a tremendous amount about ourselves and how we behave in a group over the course of the year. We have learned to work with each other as well learned a great amount of life lessons when encountering such a long-term project.
For the future, we hope to increase the scalability of the health monitoring system, as well as giving it the ability to go completely wireless on a possible 4G network, as well as different types of sensors used.
Project Video
Upload a video of your project and post the link here.
Project Source Code
Send me your zipped source code and I will upload this to SourceForge and link it for you.
References
Acknowledgement
Any acknowledgement that you may wish to provide can be included here.
References Used
List any references used in project.
Appendix
You can list the references you used.
