SJ One Board
Introduction
This article provides details of the SJ-One Board used by San Jose State University.
Obtain the Board
- If you are a San Jose State University student, you can obtain the board from SCE at Engr294.
- For remote users, you can contact Preet
About the Board
- LPC1758 User Manual
- File:2012SJOneBoardSchematic.pdf
- 512K ROM, 64K RAM, 1M SPI Flash, and Micro-SD for storage.
- Built-in Nordic Wireless (Board-to-Board communication)
- 4 Switches and 4 LEDs (both hard-wired)
- Sensors :
- Temperature, 3-Axis Acceleration, IR (remote control), and Light
- 2-Digit 7-Segment Display
- RTC Crystal with Backup Battery
- Socket for Xbee or Wifi Module (Uart2 or Uart3)
- Many GPIOs with two SPI, Multiple UARTs, and I2C availability
- Power from USB or External Power
Board Block Diagrams
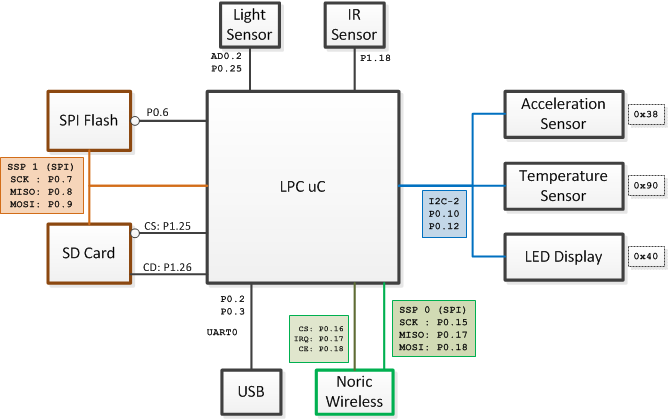
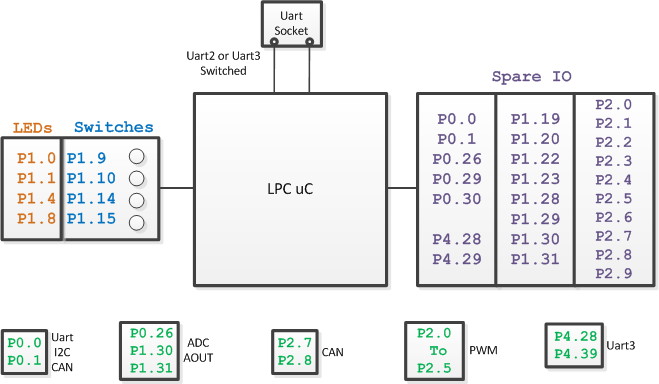
The block diagrams below show the connectivity to various different chips on the PCB, and also show which GPIOs are available to you. The first diagram shows the pins used for on-board sensors or interfaces. The second diagram shows IOs you can use.
Board Connections
Board IO
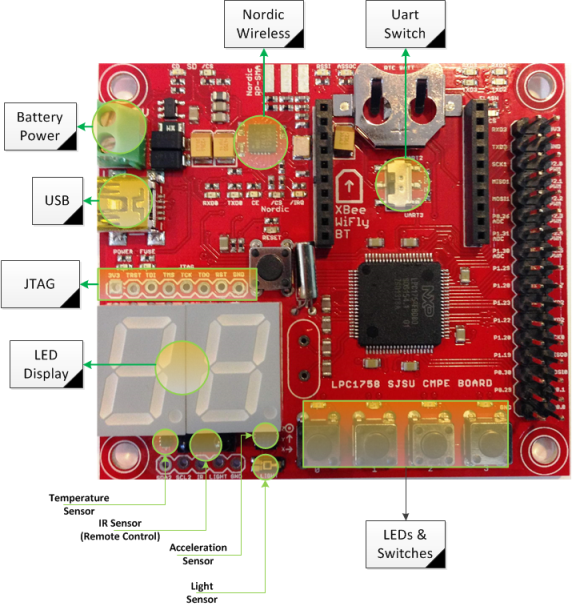
Board Overlay
This board overlay can be compared against diagrams above to get an idea of where the IOs are located.
External SPI Devices
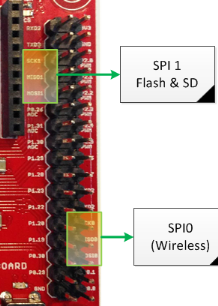
To hook up your external SPI device(s), use SPI#1 connections because there is already a driver in SJ-One sample project for this SPI. See the connections below and the sample code:
#include "spi1.h"

void access_my_spi_device()
{
   // Send 0xDEAD over to SPI device and get 2 bytes back:
   chip_select_my_device(true);
   {
       char byte_0 = spi1_exchange_byte(0xDE);
       char byte_1 = spi1_exchange_byte(0xAD);
   }
   chip_select_my_device(false);

   /**
    * You can use any GPIO for CS (chip-select) signal.
    * This example assumes CS is done through a function:
    *   chip_select_my_device(bool);
    */
} |
External I2C Devices
|
I2C#2 is tied to on-board sensors and you should utilize I2C 2's connection to hook up external I2C devices. See the connections below and the sample code: #include "I2C2.hpp"
void send_byte_to_my_i2c_device()
{
const char my_dev_addr = 0xBA; // Your device address
const char my_dev_reg = 0x01; // Write to 1st register of your device
const char my_dev_data = 0xAB; // Write 0xAB to reg 0x01
I2C2::getInstance().writeReg(my_dev_addr, my_dev_reg, my_dev_data);
} |
Board Sample Code & Experiments
LEDs & Switches
There are on-board switches and LEDs you may use. Furthermore, you can interface your board to external LEDs or switches as well.
#include "io.hpp"

void led_sw()
{
    /* Check if button 1 or button 4 are pressed */
    if (SW.getSwitch(1) || SW.getSwitch(4)) {
        LE.on(1);
        LE.off(4);
    }
    else {
        LE.setAll(0); /* Turn off all LEDs */
    }
}

#include "gpio.hpp"
void external_led()
{
    /* You can use any pin defined at gpio.hpp file
     * Use "Ctrl+Shift+R" and search for "gpio.hpp" file.
     */
    GPIO pin20(P1_20);  /* Use P1.20 as General Purpose Input/Output (GPIO) */
    pin20.setAsOutput(); /* Use this pin as OUTPUT */

    pin20.setHigh(); /* Turn on voltage to 3.3v */
    pin20.setLow();  /* Turn off voltage to 0v  */
}
Sensors
This section provides examples of how to read data values from the sensors.
#include "io.hpp"

void sensors()
{
    int light_value = LS.getRawValue();

    int tilt_x = AS.getX();
    int tilt_y = AS.getY();
    int tilt_z = AS.getZ();

    int temperature_f = TS.getFarenheit();
}
Wireless
This board can communicate to other boards using a very low-powered wireless technology. Here are various resources :
- Code samples are at Interactive Wireless Nodes Project (towards the bottom).
- You can read about Doxygen generated docs or read through wireless.h
- VIDEO : Mesh Network API
Motor & Servo Control
/* Read this include file for more info */
#include "lpc_pwm.hpp"

/**
 * You can control up to 6 servos with hardware signals (and more with sw)
 * Each signal is mapped to from P2.0 to P2.5
 */
void motor_control()
{
    /* Use 1Khz PWM */
    PWM motor1(PWM::pwm1, 1000);
    PWM motor2(PWM::pwm2, 1000);

    /* Set to 50% motor speed */
    motor1.set(50);
    motor2.set(50);
}
void servo_control()
{
    /* Use 50Hz PWM for servos */
    PWM servo1(PWM::pwm1, 50);
    PWM servo2(PWM::pwm2, 50);

    servo1.set(5.0);  ///< Set to left position
    servo2.set(10.0); ///< Set to right position
}
File I/O
You can read or write files on the SPI Flash or an SD card. You can open a limited amount of files using standard C libraries. First, at your sys_config.h file, please enable ENABLE_C_FILE_IO
#include "io.hpp"

void file_io()
{
    /* Option 1 : C library I/O (less efficient)
     * 0: is for SPI Flash
     * 1: is for SD Card
     */
    FILE *fd = fopen("0:myfile.txt", "r");
    char line[128] = { 0 };
    if (fd) {
        fgets(line, sizeof(line)-1, fd);
        fclose(fd);
    }


    /* Option 2 : Use "storage" object (more efficient)
     * This option doesn't require 'ENABLE_C_FILE_IO'
     */

    /* Write "hello" to "myfile.txt" */
    Storage::write("0:myfile.txt", "hello", 5, 0))

    /* Read the size of data array from myfile.txt
     * Not using 0: or 1: will default to 0: (SPI Flash)
     */
    char data[16] = { 0 };
    Storage::read("myfile.txt", data, sizeof(data)-1, 0));
}
Uart Socket
You can install BT, Xbee, or RN-XV (Wifi) onto the black socket on the board. The pins can either be routed to UART2 or UART3 using a tiny switch in the middle of the socket. Once the wireless module is installed, you can use the following code to interact with it.
#include "uart2.hpp"
#include "uart3.hpp"

void uart()
{
    Uart2& u2 = Uart2::getInstance();
    Uart3& u3 = Uart3::getInstance();

    u2.init(38400); /* Init baud rate */
    u3.init(19200); /* Init baud rate */

    u2.putline("Hello World\n");
    u3.putline("Hello World\n");

    /* Reference the documentation of Uart2 or Uart3 header file for more functions.
     * Most of the functionality is in a base class called uart_dev.cpp
     */
}


