S15: MP3 Player with Graphic Equalizer Display
Contents
Grading Criteria
- How well is Software & Hardware Design described?
- How well can this report be used to reproduce this project?
- Code Quality
- Overall Report Quality:
- Software Block Diagrams
- Hardware Block Diagrams
- Schematic Quality
- Quality of technical challenges and solutions adopted.
Abstract
The SJ One Board, which contains an LPC1758 microcontroller, will play MP3 audio files from an SD card and display the audio frequencies on a graphic equalizer simulated by LED's, an MP3 audio decoder integrated circuit (VS1053), and equalizer analyzing IC (MSGQE7).
Introduction
An equalizer is a set of electronic filters that can adjust the frequency response of a sound system. A common type of equalizer is the graphic equalizer, which represents filter levels usually with light-emitting diodes (LED's). Depending on the integrated circuit used, a graphic equalizer shows the direct-current representation of a varying range of audio frequency bands. For instance, the MSGEQ7 CMOS IC splits audio in seven bands: 63Hz, 160Hz, 400Hz, 1kHz, 2.5kHz, 6.25kHz, and 16kHz. Commonly seen on audio devices and media software like Windows Media Player or VLC Media Player are simulated versions of audio spectra.
Objectives
Interface the MP3/Audio Decoder IC with Our Microcontroller
The first objective was to interface the MP3/Audio decoder IC (VS1053) with SJSU One board (LPC1758) using SPI bus with some additional pins for data transmit and reset purpose.
Design Software for the MP3 Player
The second objective was to design software for the MP3 player to read files from a SD card then transmit data to the MP3/Audio decoder IC to play and output sound.
Control the MP3 Player Using a remote control
The third objective was to read IR signal from a remote control using IR receiver on SJSU One board and make change on the MP3 player accordingly. Basic commands: play, pause, fastforward, rewind.
Construct Equalizer Analyzing Circuit
The fourth objective was to design the equalizer analyzing circuit using a MSGQE7 chip. The SJSU One board gives the RESET and STROBE signal to the MSGQE7. A 3.5mm audio jack was used to input the audio into the MSGQE7.
Team Members & Responsibilities
- Thinh Lu
- Designing the MP3/Audio player
- Brian Nguyen
- Designing the equalizer analyzing circuit
- Andrew Pang
- Interfacing LED matrix with SJSU One board
- Editor-in-chief of project report
Schedule
This is our original plan and the status of each task.
| Week# | Ending date | Task | Actual |
|---|---|---|---|
| 1 | 4/18 | Order all hardware | Completed. |
| 2 | 4/25 | Interface LED matrix with LP1758.
Play a single MP3/Audio file |
Completed |
| 3 | 5/1 | Finish MP3 driver. | Completed |
| 4 | 5/15 | Finish MP3 player.
Interface with a remote control. |
Completed.
Not completed. |
| 5 | 5/22 | Interface LED's as graphic equalizer. Presenting on 5/25. | Completed. |
Parts List & Cost
Give a simple list of the cost of your project broken down by components. Do not write long stories here.
- (1) LED Matrix: $24.95
- (1) 12 V power supply: $11.59
- (1) 5/3.3 V power supply: $4.55
- (1) Mikro VS1053 breakout board: $21.90
- (20) jumper wires: $1.95
- (1) 4-pin Molex connector: $0.95
- (1) Electric tape roll: $0.95
- (2) Graphic equalizer display filter MSGEQ7: $4.95
- (1) Audio Jack 3.5mm: $0.95
- Breadboard
- Resistors
- Capacitors
Design & Implementation
In this section, we will go over our hardware and software designs including sub-sections describing our design and implementation.
Hardware Design
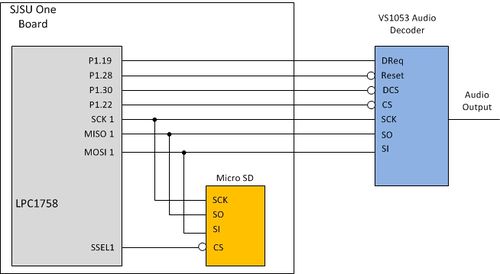
For the Mp3 Player, we use SPI interface to control and send/receive data from the decoder, VS1053. The schematic is as follows:
As the schematic points out, this design uses four GPIO pins of the LPC1758 CPU including one for input and three for output. Pin 1.22 is used as output to control CS pin of the audio decoder. Pin 1.28 is used as output to control RESET pin of the audio decoder. Pin 1.19 is used as input to check the DREQ signal from the audio decoder. And pin 1.30 is used as output to control the DCS pin of the audio decoder. The audio decode shares SPI bus, SSP1, with the Micro SD. Brief information about pins functionality of the audio decoder can be described as follows; CS is chip select pin for SCI operation (to set up and control the audio decoder), DCS is a chip select for SDI operation (to play songs), RESET is to perform a hard reset on the audio decoder, and DREQ is used to notify when the decoder can receive more data (busy = 0, ready = 1). The rest, SO, SI, and SCK, follow the SPI protocol. Please refer to the LPC 1758 and VS1053 datasheets for the detailed operations.
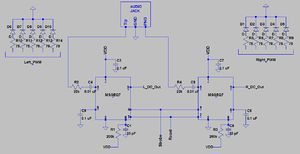
The two main components of the equalizer circuit were the audio jack MSGEQ7 chip. The audio jack divides the audio into left and right. The MSGEQ7 is an audio spectrum analyzer chip with seven band-pass filters from 63 Hz to 16,000 Hz. Two MSGEQ7 chips were used to drive 2x5 LEDs. The MSGEQ7 is controlled with two digital signals, RESET and STROBE. A positive RESET signal is needed in order to start operation. The values of each of the bands can be read whenever seven negative pulses are inputted into STROBE. The values of the seven bands are analog values that are fed into an analog-to-digital converter (ADC). The ADC provides an us with a value between 0-4096 since the ADC resolution is 12-bit. The values from the ADC were divided by 40.96 in order to produce a value between 0 and 100. This new value is used in the pulse-width modulation in order to control the brightness of the LED.
Hardware Interface
For the Mp3 player, we use SPI bus to communicate between the LPC1758, micro SD card, and VS1053. For the audio decoder, it has two operation modes, SCI and SDI. SCI is for control settings of the decoding process (volume, bass/treble value, clock speed, decoding/recording). And SDI is for receiving data; for example, when we want to play a song, we simply read the song from the SD card then send to the decoder, which is set up properly; the decoder will then just decode the data from the audio file and output sound to speaker/headphone. For driver, we break it down into small functions to set up the connection interface between the CPU and the audio decoder, to set up the audio decoder by sending the value to its control registers, to send a single byte as well as 32 bytes of data to the decoder to play songs.
Hardware Interface Driver
   LPC_GPIO1->FIODIR |= (1<<22);   //set pin P1.22 as output -- CS signal
   LPC_GPIO1->FIODIR |= (1<<28);   //set pin P1.28 as output -- RESET signal
   LPC_GPIO1->FIODIR |= (1<<30);   //set pin P1.30 as output -- DCS signal
LPC_GPIO1->FIODIR &= ~(1<<19); //set pin P1.19 as input -- DREQ signal
   LPC_GPIO1->FIOSET = (1<<28);    //set pin P1.28 high initially
   LPC_GPIO1->FIOSET = (1<<30);    //set pin P1.30 high initially
   LPC_GPIO1->FIOSET = (1<<22);    //set pin P1.30 high initially
ssp1_init(); //initialize ssp1
Software Design
Show your software design. For example, if you are designing an MP3 Player, show the tasks that you are using, and what they are doing at a high level. Do not show the details of the code. For example, do not show exact code, but you may show psuedocode and fragments of code. Keep in mind that you are showing DESIGN of your software, not the inner workings of it.
Implementation
This section includes implementation, but again, not the details, just the high level. For example, you can list the steps it takes to communicate over a sensor, or the steps needed to write a page of memory onto SPI Flash. You can include sub-sections for each of your component implementation.
Testing & Technical Challenges
Describe the challenges of your project. What advice would you give yourself or someone else if your project can be started from scratch again? Make a smooth transition to testing section and described what it took to test your project.
Include sub-sections that list out a problem and solution, such as:
Issue #1: Programming LED matrix
Our original plan was to output graphic equalizer via a 16-by-32 LED matrix. However, the matrix's library was intended for Arduino, and we could not find a way to port the library to the LPC1758. In the end, we decided to output the graphic equalizer via five LED's on a breadboard, instead. We advise future aspiring engineers to research about available libraries or ask an expert before attempting to interface hardware with a microcontroller.
Issue #2: Additional PWM signal
Our design needed seven PWM signals in order to properly display each of the seven bands. The SJ-One board provides six PWM pins for use. We tried to configure a another pin, P0.20, as a PWM pin but were unsuccessful. We had a choice of using six or five PWM signals to display the equalizer. In the end, we decided to use five PWM signals for symmetry. For the LED display, The 160 Hz and 6250 Hz bands were not used.
Conclusion
Conclude your project here. You can recap your testing and problems. You should address the "so what" part here to indicate what you ultimately learnt from this project. How has this project increased your knowledge?
Project Video
Upload a video of your project and post the link here.
Project Source Code
References
Acknowledgement
Acknowledgements to Sparkfun for providing components used, as well as lab instructor Preet Kang for his guidance in this project and throughout the semester.
References used
- R. Huisinga. (1996). Equalizer [Online]. Available: http://web.archive.org/web/20100112045434/http://www.soundinstitute.com/article_detail.cfm/ID/110
- Mixed Signal Integration. (2004). Seven Band Graphic Equalizer Data Sheet [Online]. Available: http://www.keil.com/dd/docs/datashts/philips/lpc17xx_um.pdf
- NXP. (2010). UM10360 LPC17xx User Manual [Online]. Available: https://www.sparkfun.com/datasheets/Components/General/MSGEQ7.pdf
- VLSI Solution. (2014). VS1053b Datasheet [Online]. Available: http://www.vlsi.fi/fileadmin/datasheets/vs1053.pdf

