Difference between revisions of "F13: LED Display"
Proj user7 (talk | contribs) (→Hardware Design) |
(→Conclusion) |
||
| (51 intermediate revisions by one other user not shown) | |||
| Line 1: | Line 1: | ||
| − | |||
| − | |||
| − | |||
| − | |||
| − | |||
| − | |||
| − | |||
| − | |||
| − | |||
| − | |||
| − | |||
| − | |||
== Project Title == | == Project Title == | ||
A Moderately Fancy LED Display | A Moderately Fancy LED Display | ||
| Line 18: | Line 6: | ||
== Objectives & Introduction == | == Objectives & Introduction == | ||
| − | This project will need to be able to control several relays with the microcontroller. The development board's GPIO header pins | + | This project will need to be able to control several relays with the microcontroller. The development board's GPIO header pins will be used to bias the gate of a FET, which will in turn drive the relay coil. The ADC will sync up the playback of the song to the LED display. The ADC will wait for the first beat of the song, and then begin the program. The LED timing and channel usage will be manually programmed to make a visually appealing show. |
=== Team Members & Responsibilities === | === Team Members & Responsibilities === | ||
| Line 25: | Line 13: | ||
*Project Management | *Project Management | ||
*Hardware Design and Build | *Hardware Design and Build | ||
| + | *Parts Procurement | ||
*Software Design | *Software Design | ||
*Test | *Test | ||
| Line 65: | Line 54: | ||
| Write code to sync LEDs to song playback||||11/6 - 11/9|| 11/9 - 11/16 | | Write code to sync LEDs to song playback||||11/6 - 11/9|| 11/9 - 11/16 | ||
|- | |- | ||
| − | | | + | | Adjust LED switching (for nice video)||||11/22 - 11/28|| 11/22 - 11/30 |
|- | |- | ||
| − | | Complete report||Y||11/28 - 12/3|| | + | | Complete report||Y||11/28 - 12/3|| 11/1 - 12/1 |
|- | |- | ||
| Project presentation||Y||12/3||12/3 | | Project presentation||Y||12/3||12/3 | ||
|} | |} | ||
| − | == | + | == Bill of Materials & Cost == |
{| class = "wikitable" | {| class = "wikitable" | ||
| Line 133: | Line 122: | ||
== Design & Implementation == | == Design & Implementation == | ||
| − | |||
=== Hardware Design === | === Hardware Design === | ||
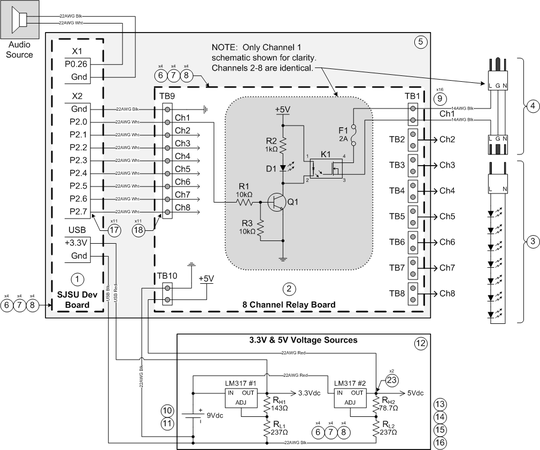
| − | The system schematic is shown below in Figure 1 (with Bill of Material references).Each GPIO pin biases the gate of a transistor on the relay board. The voltage source on the relay board then has a conductive path to power the relay coil | + | The system schematic is shown below in Figure 1 (with Bill of Material references). Each GPIO pin biases the gate of a transistor on the relay board. The voltage source on the relay board then has a conductive path to power the relay coil. |
| − | For the LM317, ''V''<sub>''REF''</sub> is a fixed voltage of 1.25Vdc, and ''R''<sub>''L''</sub> is typically chosen to be 240Ω. The output voltage ''V''<sub>''OUT''</sub> is fixed by the choice of ''R''<sub>''H''</sub>. | + | The voltage sources use linear voltage regulators which control each output voltage. Each regulator's output voltage is set by the equation ''V''<sub>''OUT''</sub> = ''V''<sub>''REF''</sub> (1 + ''R''<sub>''L''</sub> / ''R''<sub>''H''</sub>). For the LM317, ''V''<sub>''REF''</sub> is a fixed voltage of 1.25Vdc, and ''R''<sub>''L''</sub> is typically chosen to be 240Ω. The output voltage ''V''<sub>''OUT''</sub> is fixed by the choice of ''R''<sub>''H''</sub>. |
| − | [[File:LED_display-HWSchematic.png|thumb|left| | + | {| |
| + | |[[File:LED_display-HWSchematic.png|thumb|left|x450px|Figure 1: Electrical schematic]] | ||
| + | |} | ||
=== Hardware Fabrication Steps === | === Hardware Fabrication Steps === | ||
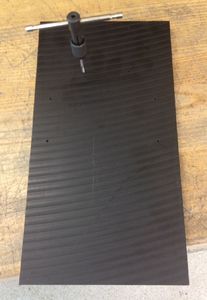
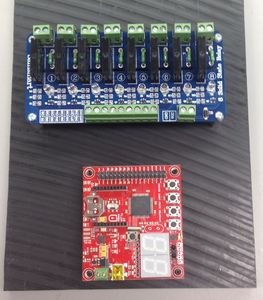
| − | A piece of 1/2" Delrin sheet was obtained to hold the two boards and to give the AC wiring some strain relief. Holes for standoffs were drilled and tapped (see Figure 2). | + | A piece of 1/2" Delrin sheet was obtained to hold the two boards and to give the AC wiring some strain relief. Holes for standoffs were drilled and tapped (see Figure 2). The boards were then mounted (see Figure 3) to the Delrin with Aluminum standoffs. The relay board was screwed down, since it would not need to be removed. The development board was held on with set screws for easy removal during the fabrication process. |
| − | |||
| − | The boards were then mounted (see Figure 3) to the Delrin with Aluminum standoffs. The relay board was screwed down, since it would not need to be removed. The development board was held on with set screws for easy removal during the fabrication process. | ||
{| | {| | ||
| Line 153: | Line 141: | ||
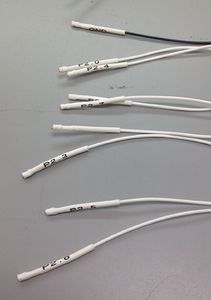
| − | To attach the signal wires to the development board's header pins, a connector block was tried (to plug in all the signals at once). However, the correct contacts could not be obtained. Instead, each wire was terminated in a Molex-type contact that fit the header pins well. Each contact was then covered in white shrink tube to prevent shorting and to label each wire (see Figure 4). Each wire end that plugs into the relay board's screw terminal block was terminated in a Wago ferrule (see Figure 5). This wiring is shown in Figure 6. It should be noted that the 3. | + | To attach the signal wires to the development board's header pins, a connector block was tried (to plug in all the signals at once). However, the correct contacts could not be obtained. Instead, each wire was terminated in a Molex-type contact that fit the header pins well. Each contact was then covered in white shrink tube to prevent shorting and to label each wire (see Figure 4). Each wire end that plugs into the relay board's screw terminal block was terminated in a Wago ferrule (see Figure 5). This wiring is shown in Figure 6. It should be noted that the 3.3Vdc and ground wires were removed later due to higher voltage requirements. |
{| | {| | ||
| Line 162: | Line 150: | ||
| − | Per the vendor's datasheet, the Omron solid state relays require a control voltage of 4-6Vdc to switch. The use of the development board's 3.3Vdc bus voltage was unsuccessfully attempted in the chance that the relays might switch at a lower voltage than specified. If it had it worked, this would have eliminated the need for a second voltage source. As a result, a dual voltage source was designed and built. Using a | + | Per the vendor's datasheet, the Omron solid state relays require a control voltage of 4-6Vdc to switch. The use of the development board's 3.3Vdc bus voltage was unsuccessfully attempted in the chance that the relays might switch at a lower voltage than specified. If it had it worked, this would have eliminated the need for a second voltage source. As a result, a dual voltage source was designed and built. Using a 9Vdc alkaline battery and two linear regulators, a 3.3Vdc and 5Vdc source was constructed (see Figure 7). The 5Vdc voltage source connected to the relay board with 2 wires. The 3.3Vdc source connected to the development board through a modified USB cable. There are four wires and foil shielding in a USB cable. The power and ground are the red and black wires, respectively. The Analog to Digital Converter (ADC) signal is provided from a set of defunct headphones. Cutting off a speaker and stripping the jacket off will reveal a twisted wire pair. The insulation must be burned off, and the wire cleaned with a solvent such as isopropyl alcohol. |
{| | {| | ||
| Line 169: | Line 157: | ||
| − | Extension cords were modified instead of the LED cords. This would allow the LEDs to be used in a more conventional fashion by | + | Extension cords were modified instead of the LED cords. This would allow the LEDs to be used in a more conventional fashion by my spouse upon the completion of this project. The AC line wire was carefully separated from the cord with an exacto blade and then cut. A piece of 14AWG wire was soldered to the exposed AC line wire to allow easier connection to the relay board's screw terminals. Each extension cord was mounted to the Delrin sheet using cable ties (see Figure 8). The voltage source box was attached to the Delrin sheet using velcro tape. The voltage wires were then hooked up to each board. The project hardware was complete, with the two boards powered by a battery only (see Figures 9 and 10). It should be noted that the 8 AC plugs are connected to 110Vac power by a power strip for convenience. |
{| | {| | ||
| Line 176: | Line 164: | ||
| [[File:LED_display-Complete2.jpg|thumb|center|x300px|Figure 10: Completed system]] | | [[File:LED_display-Complete2.jpg|thumb|center|x300px|Figure 10: Completed system]] | ||
|} | |} | ||
| + | |||
=== Hardware Interface === | === Hardware Interface === | ||
| − | + | ||
| + | The hardware is interfaced to the microcontroller via two methods. The first is through use of GPIO ports. The port's direction is set to output so that the transistors can be turned on and off. Ports 2.0 through 2.7 are used in this fashion. The ADC is also used to get an input syncing signal from an external audio source (my computer for this project). An ADC driver was used to correctly configure the ADC for use. The driver performs the following steps: | ||
| + | |||
| + | *Power up ADC | ||
| + | *Enable ADC | ||
| + | *Set ADC clock frequency (for this project, it was 1/4th the CPU clock) | ||
| + | *Set ADC channel number | ||
| + | *Start conversion | ||
| + | *Wait for conversion to finish | ||
| + | *Return result of conversion | ||
=== Software Design === | === Software Design === | ||
| − | + | The software design requires the initialization of the ADC, biasing the ADC output, and then beginning the LED display once the program has confirmation of the song starting. The software block diagram is shown below in Figure 11. | |
| + | |||
| + | {| | ||
| + | |[[File:LED_display-SWblock.png|thumb|left|x400px|Figure 14: Sample code]] | ||
| + | |} | ||
=== Implementation === | === Implementation === | ||
| − | + | The song chosen for this project is "Jingle Bell Rock" by Bobby Helms. It was chosen because it is not extremely long (~2 minutes) and has a distinct musical beat. Songs from Trans Siberian Orchestra are twice as long and have a much higher tempo. When programming a light show, higher tempo means more data points to handle. "Jingle Bell Rock" is a nice compromise, with over 350 distinct points to flash the LEDs. After choosing the song, a method for getting the timing information had to be devised. Thankfully, I have the Nero suite on my computer, which includes Nero WaveEditor. Figure 12 shows the waveform interface and song timing. | |
| + | |||
| + | {| | ||
| + | |[[File:LED_display-wave.PNG|thumb|left|x400px|Figure 12: Wave diagram]] | ||
| + | |} | ||
| + | |||
| + | |||
| + | Note that this view is showing only 5 seconds of the song, which helps to show individual beats. To make it easier to get every note correctly timed, I slowed the song down by four times. This greatly aided my ability to accurately record the critical song timing. The data was then imported into a spreadsheet, and every song feature was associated with a time and LED channel (see Figure 13). | ||
| + | |||
| + | {| | ||
| + | |[[File:LED_display-data.PNG|thumb|left|x300px|Figure 13: Song data]] | ||
| + | |} | ||
| + | |||
| + | |||
| + | To correctly sync the song playback with the LED flashing, an ADC loop was used. The song has 450ms of quiet before the first note. Once the ADC "hears" the first note, the main portion of the program starts with the LED switching. It was observed that the ADC accurately measured DC signals, such as board Vcc (4096 on this board) and ground (0 on this board). However, when the ADC input was left without a signal, the output readings seemed to float around 1000 (1/4th the full scale). The song signal was lost in this output, so a method was developed to get the ADC output to zero before taking the song measurement. I noticed that letting the ADC take samples caused the output to drop. Thus, in the first part of my program, I allow the ADC to take 2000 samples to get the output to zero. The song input can then accurately be sampled. I had to constrain this reading to a narrow range, as I also noticed spurious high readings (over 3000) which were not related to the song. By creating a "notch filter" in software, I was able to achieve 100% reliability in syncing the song to the program (see Figure 14 for code). I programmed every point in the song using the GPIO outputs and delaying the time the LED on-time. | ||
| + | |||
| + | {| | ||
| + | |[[File:LED_display-code.PNG|thumb|left|x400px|Figure 14: Sample code]] | ||
| + | |} | ||
== Testing & Technical Challenges == | == Testing & Technical Challenges == | ||
| − | |||
| − | |||
| − | + | === Testing === | |
| + | I used the relay board's LEDs for troubleshooting the code without having to use the full string of LEDs. This allowed me to ensure correct switching. I also used the Hercules program heavily to get the ADC to work as I needed it to. This program allowed me to determine what the ADC outputs were during the software development phase of the project. | ||
| + | |||
| + | === Relay Board Vendor === | ||
| + | For the kind of fast switching this project demands, a mechanical relay would be a poor choice. I initially had decided to go down this path, but reconsidered and chose to use solid state relays (SSR). There are many sources of complete relay boards. They are cheaper than building a custom board and buying all the required components. The board will almost certainly be coming form China, so it is critical to order the board as quickly as possible. My board took over one month to arrive (with the free shipping), so I would suggest paying a bit extra for the expedited shipping. Once the board arrives, thoroughly scrutinize it for defects. On my board, several solder joints required touching up, and there was a fair amount of solder splatter that needed cleaned off. I was extremely careful with this, since 110Vac house power would be used on the board. Overall, I still recommend using a ready-made board for a short project like this. It will almost certainly work straight away, with no issues to troubleshoot. | ||
| − | === | + | === Music Editing Software === |
| − | + | It is absolutely critical to be able to break the song down into small pieces for analysis. I first looked online for freeware before realizing I had a suitable program already. There are software programs available for purchase online. This is an issue that must be dealt with very early on in the project. | |
| + | |||
| + | === Analog to Digital Converter === | ||
| + | I ended up writing the full ADC driver before realizing that it is included in the course's "''L2_Drivers''" folder in Eclipse. This cost me several hours of unnecessary work. I had a very difficult time getting the ADC to function in the way I wanted it to. It worked well for steady signals (such as Vcc) but not as well for the irregular signal a song produces. As was described in the "''Implementation''" section above, the solution involved pre-sampling the ADC. By taking 2000 samples before the actual signal was sampled, the ADC output was taken down to 0. I was then able to get an accurate sample of the song. It is easy to troubleshoot this issue by using a ''printf'' command on the ADC result and viewing it on the course's Hercules serial program. This program is how I was able to test the ADC output. I tested the song syncing by taking another 1000 samples (~6 seconds), and starting the song at various points to ensure proper functionality. To achieve perfect results I constrained the acceptable ADC result, which eliminated the problem of occasional high readings. | ||
== Conclusion == | == Conclusion == | ||
| − | + | Since Clark Griswold is one of my favorite characters, this type of project is something I've wanted to do for a long time. This class has given me the knowledge and confidence to carry on. While this project is only eight strings of Christmas lights, it is an easily scalable concept. Starting indoors on a Christmas tree is the perfect way to learn some of the hang ups, such as getting the timing right and getting the ADC to function as I need it to. Possible upgrades to this project are: | |
| + | *Adding to the channel count and moving the LEDs outside. This would require significant weatherproofing. | ||
| + | *Automatically sensing the ADC gain, and picking which string of LEDs to light up in software. | ||
| + | *Adding a low power FM transmitter to allow passersby to listen to the music on their car radio. | ||
| + | *Adding motorized channels that would move and light up based on software commands. | ||
| + | It has given me the confidence to work on this type of project alone, and has taught me how to use many different types of microcontroller peripherals. In addition, this is a project my wife and kids can get excited about. | ||
| + | |||
=== Project Video === | === Project Video === | ||
| − | + | The first video is to show functionality at the expense of viewing enjoyment. | |
| + | * [http://youtu.be/abEUxgb6sJo SJSU - Fall 2013 - CmpE240 - Functional Demo] | ||
| + | * [http://youtu.be/hxwP5G9XjNg SJSU - Fall 2013 - CmpE240 - Final Demo Video] | ||
=== Project Source Code === | === Project Source Code === | ||
| − | + | * [https://sourceforge.net/projects/sjsu/files/CmpE240_LM_F2013/ Project source code is available at SourceForge] | |
== References == | == References == | ||
=== Acknowledgement === | === Acknowledgement === | ||
| − | + | Preet Kang for his encouragement and help overcoming issues along the way. | |
| + | |||
| + | Anes Topcagic for his advice during portions of the hardware build. | ||
| − | + | My wife and children for putting up with my long hours on the computer and weekends spent on this project. | |
| − | |||
=== Appendix === | === Appendix === | ||
| − | + | * [http://www.nxp.com/documents/data_sheet/LPC1769_68_67_66_65_64_63.pdf Microcontroller datasheet] | |
| + | * [http://www.nxp.com/documents/user_manual/UM10360.pdf Microcontroller user manual] | ||
| + | *[http://www.socialledge.com/sjsu/images/d/de/2012SJOneBoardSchematic.pdf SJ One board schematic] | ||
| + | *[http://www.onsemi.com/pub_link/Collateral/LM317-D.PDF Voltage regulator datasheet] | ||
| + | *[http://www.mouser.com/ds/2/307/G3MB_0609-24072.pdf Relay datasheet] | ||
Latest revision as of 03:07, 2 December 2013
Contents
Project Title
A Moderately Fancy LED Display
Abstract
This project will control several strings of household LED lights (i.e. Christmas lights) via a microcontroller. The LED display will be synced to a song playback.
Objectives & Introduction
This project will need to be able to control several relays with the microcontroller. The development board's GPIO header pins will be used to bias the gate of a FET, which will in turn drive the relay coil. The ADC will sync up the playback of the song to the LED display. The ADC will wait for the first beat of the song, and then begin the program. The LED timing and channel usage will be manually programmed to make a visually appealing show.
Team Members & Responsibilities
Mike Mellman
- Project Management
- Hardware Design and Build
- Parts Procurement
- Software Design
- Test
- Project Documentation
Schedule
| Task | Milestone? | Expected Duration | Actual Duration |
| Settle on project and approval by instructor | Y | 9/24 - 10/1 | 9/24 - 10/1 |
| Finalize channel count on dev and relay boards | 10/1 - 10/5 | 10/1 - 10/5 | |
| Identify vendors for parts | 10/1 - 10/5 | 10/1 - 10/5 | |
| Prepare proposal | 10/5 - 10/6 | 10/5 - 10/6 | |
| Final instructor approval | 10/8 | 10/8 | |
| Finalize circuit design | 10/8 - 10/15 | 10/8 - 10/12 | |
| Order online parts (long-lead from China) | Y | 10/8 - 10/15 | 10/12 |
| Buy parts from stores | Y | 10/8 - 10/15 | 10/12 - 11/16 |
| Pick song for display | 10/8-10/15 | 10/13 | |
| Work on code for timing LEDs | 10/15 - 11/22 | 10/15 - 11/22 | |
| Relay board in hand | 11/1 | 11/4 | |
| Build hardware setup | Y | 11/2 - 11/5 | 11/8 - 11/17 |
| Lecture on ADC | 11/5 | 11/5 | |
| Write code to sync LEDs to song playback | 11/6 - 11/9 | 11/9 - 11/16 | |
| Adjust LED switching (for nice video) | 11/22 - 11/28 | 11/22 - 11/30 | |
| Complete report | Y | 11/28 - 12/3 | 11/1 - 12/1 |
| Project presentation | Y | 12/3 | 12/3 |
Bill of Materials & Cost
| Ref Number | Part Number | Description | Vendor | Qty | Unit Cost | Total Cost |
| 1 | SJ One Board | SJSU development board, LPC1758 | SJSU Engineering | 1 | $75.00 | $75.00 |
| 2 | 20-018-902 | Solid state relay module, 5V, 8 channel | Sainsmart | 1 | $20.99 | $20.99 |
| 3 | 94781 | LED string, 60 count, multi-color, 110VAC | Holiday Time | 8 | $9.98 | $79.84 |
| 4 | 16082 | Extension cord, 8', indoor | Walmart | 8 | $6.37 | $50.96 |
| 5 | 8662K278 | Delrin sheet, black, 6x12x0.5" | McMaster-Carr | 1 | $28.19 | $28.19 |
| 6 | 91780A735 | Standoff, aluminum, 1/2" tall, 4-40 thread | McMaster-Carr | 12 | $0.27 | $3.24 |
| 7 | 91735A106 | Machine screw, 1/2", 4-40 thread, pan head | McMaster-Carr | 12 | $0.04 | $0.53 |
| 8 | 91771A110 | Machine screw, 1/2", 4-40 thread, flat head | McMaster-Carr | 12 | $0.05 | $0.55 |
| 9 | 7556K25 | Cable tie, 4 way | McMaster-Carr | 16 | $0.14 | $2.23 |
| 10 | ULA29V | 9V battery, alkaline | Radio Shack | 1 | $5.99 | $5.99 |
| 11 | 270-324 | 9V battery snap connector | Radio Shack | 1 | $2.99 | $2.99 |
| 12 | 270-1803 | Project enclosure, 5x2.5x2", ABS black | Radio Shack | 1 | $5.49 | $5.49 |
| 13 | LM317 | Voltage regulator | Fairchild | 2 | $0.56 | $1.12 |
| 14 | RN55D78R7FR36 | Resistor, 78.7ohm, 1%, 1/8W, axial lead | Vishay | 1 | $0.05 | $0.05 |
| 15 | RN55D1430RFR37 | Resistor, 143ohm, 1%, 1/8W, axial lead | Vishay | 1 | $0.05 | $0.05 |
| 16 | RN55D2370FR38 | Resistor, 237ohm, 1%, 1/8W, axial lead | Vishay | 2 | $0.05 | $0.10 |
| 17 | 50802-9001 | Square contact, for header post | Molex | 11 | $0.04 | $0.44 |
| 18 | 216-201 | Ferrule, 22AWG | Wago | 11 | $0.12 | $1.32 |
| 19 | 83006-009 | Hook up wire, 22AWG White, 5 feet | Belden | 1 | $2.50 | $2.50 |
| 20 | 83006-002 | Hook up wire, 22AWG Red, 2 feet | Belden | 1 | $1.00 | $1.00 |
| 21 | 83006-010 | Hook up wire, 22AWG Black, 2 feet | Belden | 1 | $1.00 | $1.00 |
| 22 | 8916-010 | Hook up wire, 14AWG Black, 10 feet | Belden | 1 | $5.00 | $5.00 |
| 23 | 320553 | Ring terminal, #4 stud size, 22-16AWG | TE Connectivity | 2 | $0.24 | $0.48 |
| Project Total | $289.07 |
Design & Implementation
Hardware Design
The system schematic is shown below in Figure 1 (with Bill of Material references). Each GPIO pin biases the gate of a transistor on the relay board. The voltage source on the relay board then has a conductive path to power the relay coil.
The voltage sources use linear voltage regulators which control each output voltage. Each regulator's output voltage is set by the equation VOUT = VREF (1 + RL / RH). For the LM317, VREF is a fixed voltage of 1.25Vdc, and RL is typically chosen to be 240Ω. The output voltage VOUT is fixed by the choice of RH.
Hardware Fabrication Steps
A piece of 1/2" Delrin sheet was obtained to hold the two boards and to give the AC wiring some strain relief. Holes for standoffs were drilled and tapped (see Figure 2). The boards were then mounted (see Figure 3) to the Delrin with Aluminum standoffs. The relay board was screwed down, since it would not need to be removed. The development board was held on with set screws for easy removal during the fabrication process.
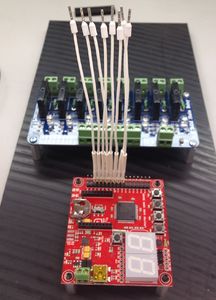
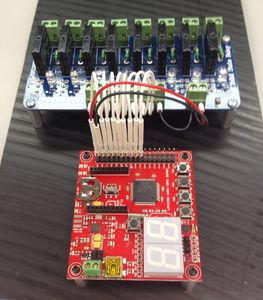
To attach the signal wires to the development board's header pins, a connector block was tried (to plug in all the signals at once). However, the correct contacts could not be obtained. Instead, each wire was terminated in a Molex-type contact that fit the header pins well. Each contact was then covered in white shrink tube to prevent shorting and to label each wire (see Figure 4). Each wire end that plugs into the relay board's screw terminal block was terminated in a Wago ferrule (see Figure 5). This wiring is shown in Figure 6. It should be noted that the 3.3Vdc and ground wires were removed later due to higher voltage requirements.
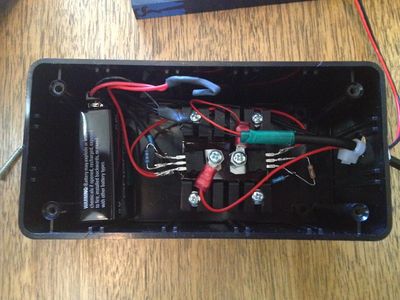
Per the vendor's datasheet, the Omron solid state relays require a control voltage of 4-6Vdc to switch. The use of the development board's 3.3Vdc bus voltage was unsuccessfully attempted in the chance that the relays might switch at a lower voltage than specified. If it had it worked, this would have eliminated the need for a second voltage source. As a result, a dual voltage source was designed and built. Using a 9Vdc alkaline battery and two linear regulators, a 3.3Vdc and 5Vdc source was constructed (see Figure 7). The 5Vdc voltage source connected to the relay board with 2 wires. The 3.3Vdc source connected to the development board through a modified USB cable. There are four wires and foil shielding in a USB cable. The power and ground are the red and black wires, respectively. The Analog to Digital Converter (ADC) signal is provided from a set of defunct headphones. Cutting off a speaker and stripping the jacket off will reveal a twisted wire pair. The insulation must be burned off, and the wire cleaned with a solvent such as isopropyl alcohol.
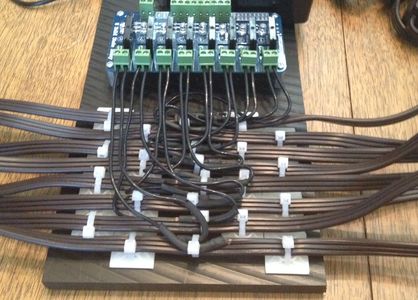
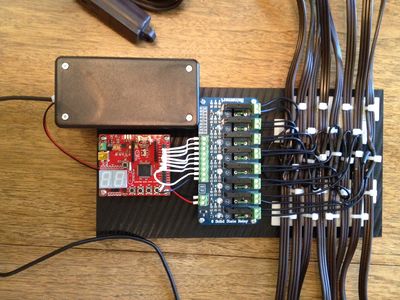
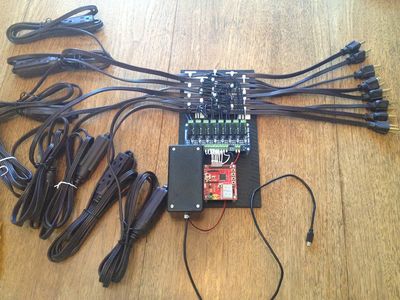
Extension cords were modified instead of the LED cords. This would allow the LEDs to be used in a more conventional fashion by my spouse upon the completion of this project. The AC line wire was carefully separated from the cord with an exacto blade and then cut. A piece of 14AWG wire was soldered to the exposed AC line wire to allow easier connection to the relay board's screw terminals. Each extension cord was mounted to the Delrin sheet using cable ties (see Figure 8). The voltage source box was attached to the Delrin sheet using velcro tape. The voltage wires were then hooked up to each board. The project hardware was complete, with the two boards powered by a battery only (see Figures 9 and 10). It should be noted that the 8 AC plugs are connected to 110Vac power by a power strip for convenience.
Hardware Interface
The hardware is interfaced to the microcontroller via two methods. The first is through use of GPIO ports. The port's direction is set to output so that the transistors can be turned on and off. Ports 2.0 through 2.7 are used in this fashion. The ADC is also used to get an input syncing signal from an external audio source (my computer for this project). An ADC driver was used to correctly configure the ADC for use. The driver performs the following steps:
- Power up ADC
- Enable ADC
- Set ADC clock frequency (for this project, it was 1/4th the CPU clock)
- Set ADC channel number
- Start conversion
- Wait for conversion to finish
- Return result of conversion
Software Design
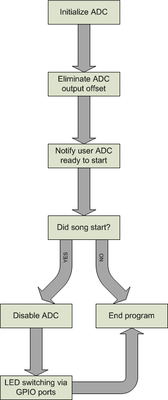
The software design requires the initialization of the ADC, biasing the ADC output, and then beginning the LED display once the program has confirmation of the song starting. The software block diagram is shown below in Figure 11.
Implementation
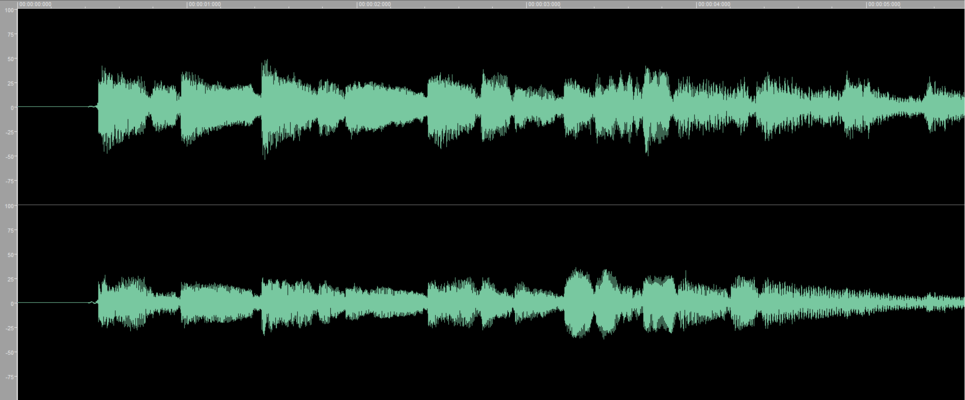
The song chosen for this project is "Jingle Bell Rock" by Bobby Helms. It was chosen because it is not extremely long (~2 minutes) and has a distinct musical beat. Songs from Trans Siberian Orchestra are twice as long and have a much higher tempo. When programming a light show, higher tempo means more data points to handle. "Jingle Bell Rock" is a nice compromise, with over 350 distinct points to flash the LEDs. After choosing the song, a method for getting the timing information had to be devised. Thankfully, I have the Nero suite on my computer, which includes Nero WaveEditor. Figure 12 shows the waveform interface and song timing.
Note that this view is showing only 5 seconds of the song, which helps to show individual beats. To make it easier to get every note correctly timed, I slowed the song down by four times. This greatly aided my ability to accurately record the critical song timing. The data was then imported into a spreadsheet, and every song feature was associated with a time and LED channel (see Figure 13).
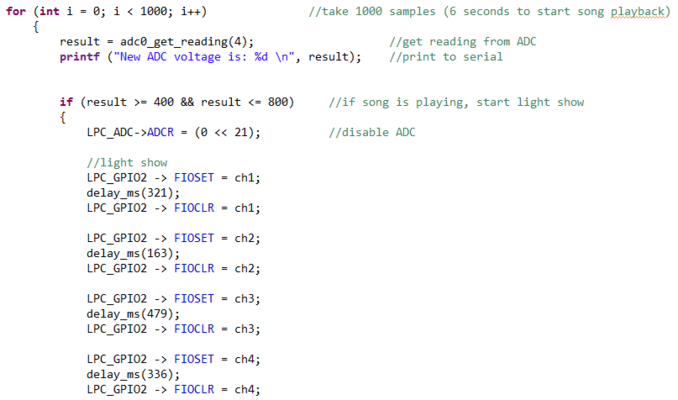
To correctly sync the song playback with the LED flashing, an ADC loop was used. The song has 450ms of quiet before the first note. Once the ADC "hears" the first note, the main portion of the program starts with the LED switching. It was observed that the ADC accurately measured DC signals, such as board Vcc (4096 on this board) and ground (0 on this board). However, when the ADC input was left without a signal, the output readings seemed to float around 1000 (1/4th the full scale). The song signal was lost in this output, so a method was developed to get the ADC output to zero before taking the song measurement. I noticed that letting the ADC take samples caused the output to drop. Thus, in the first part of my program, I allow the ADC to take 2000 samples to get the output to zero. The song input can then accurately be sampled. I had to constrain this reading to a narrow range, as I also noticed spurious high readings (over 3000) which were not related to the song. By creating a "notch filter" in software, I was able to achieve 100% reliability in syncing the song to the program (see Figure 14 for code). I programmed every point in the song using the GPIO outputs and delaying the time the LED on-time.
Testing & Technical Challenges
Testing
I used the relay board's LEDs for troubleshooting the code without having to use the full string of LEDs. This allowed me to ensure correct switching. I also used the Hercules program heavily to get the ADC to work as I needed it to. This program allowed me to determine what the ADC outputs were during the software development phase of the project.
Relay Board Vendor
For the kind of fast switching this project demands, a mechanical relay would be a poor choice. I initially had decided to go down this path, but reconsidered and chose to use solid state relays (SSR). There are many sources of complete relay boards. They are cheaper than building a custom board and buying all the required components. The board will almost certainly be coming form China, so it is critical to order the board as quickly as possible. My board took over one month to arrive (with the free shipping), so I would suggest paying a bit extra for the expedited shipping. Once the board arrives, thoroughly scrutinize it for defects. On my board, several solder joints required touching up, and there was a fair amount of solder splatter that needed cleaned off. I was extremely careful with this, since 110Vac house power would be used on the board. Overall, I still recommend using a ready-made board for a short project like this. It will almost certainly work straight away, with no issues to troubleshoot.
Music Editing Software
It is absolutely critical to be able to break the song down into small pieces for analysis. I first looked online for freeware before realizing I had a suitable program already. There are software programs available for purchase online. This is an issue that must be dealt with very early on in the project.
Analog to Digital Converter
I ended up writing the full ADC driver before realizing that it is included in the course's "L2_Drivers" folder in Eclipse. This cost me several hours of unnecessary work. I had a very difficult time getting the ADC to function in the way I wanted it to. It worked well for steady signals (such as Vcc) but not as well for the irregular signal a song produces. As was described in the "Implementation" section above, the solution involved pre-sampling the ADC. By taking 2000 samples before the actual signal was sampled, the ADC output was taken down to 0. I was then able to get an accurate sample of the song. It is easy to troubleshoot this issue by using a printf command on the ADC result and viewing it on the course's Hercules serial program. This program is how I was able to test the ADC output. I tested the song syncing by taking another 1000 samples (~6 seconds), and starting the song at various points to ensure proper functionality. To achieve perfect results I constrained the acceptable ADC result, which eliminated the problem of occasional high readings.
Conclusion
Since Clark Griswold is one of my favorite characters, this type of project is something I've wanted to do for a long time. This class has given me the knowledge and confidence to carry on. While this project is only eight strings of Christmas lights, it is an easily scalable concept. Starting indoors on a Christmas tree is the perfect way to learn some of the hang ups, such as getting the timing right and getting the ADC to function as I need it to. Possible upgrades to this project are:
- Adding to the channel count and moving the LEDs outside. This would require significant weatherproofing.
- Automatically sensing the ADC gain, and picking which string of LEDs to light up in software.
- Adding a low power FM transmitter to allow passersby to listen to the music on their car radio.
- Adding motorized channels that would move and light up based on software commands.
It has given me the confidence to work on this type of project alone, and has taught me how to use many different types of microcontroller peripherals. In addition, this is a project my wife and kids can get excited about.
Project Video
The first video is to show functionality at the expense of viewing enjoyment.
Project Source Code
References
Acknowledgement
Preet Kang for his encouragement and help overcoming issues along the way.
Anes Topcagic for his advice during portions of the hardware build.
My wife and children for putting up with my long hours on the computer and weekends spent on this project.
