S16: Pinball
Contents
Pinball
Abstract
For our project, we wanted to design a pinball machine. We wanted to incorporate bumpers, a 7 segment LED display driven by a UART interface for the total points earned, a sound system that would go off after each bumper was hit, and LED's surrounding the machine. In addition, we wanted the user to be able to interact with the machine by turning it on and off with a power button, as well as control the flippers with push buttons that are placed on the sides of the pinball machine.
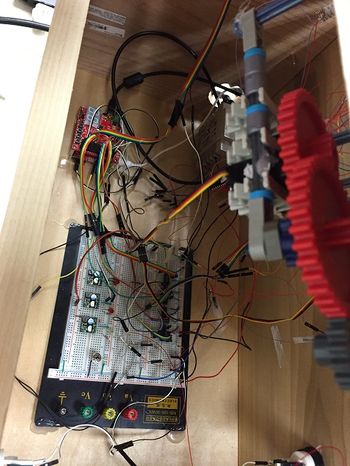
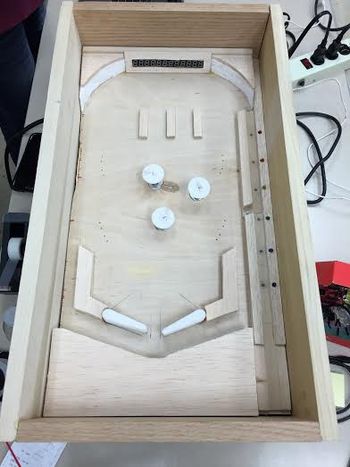
Finished Pinball Machine
Objectives & Introduction
The objective of this project is to design and build a pinball machine powered by an SJ-One Board. The pinball machine will feature an audio controller that will play sounds once triggered by the playing field, a real-time score machine, servos for powering the flippers, and different LEDs that will display different color patterns throughout the entire session of the game. Below is a high level list of the minimum functionality features our project will include.
- Launching Pin ball (mechanical)
- Play sound/music when sensors are triggered
- Flipper Controls (mechanical)
- Ball detection sensor
- Score Incrementation as sensors are hit
- Display score on 7-segment display
- Game Over announcement
Team Members & Responsibilities
- Yvonne Jacinto
- Physical Component Design: Building the Pinball Machine container and Designing the layout for the playing field
- Megumi Page
- Power Accountant: Designing power circuit for power supply and tracking watt consumption
- Jo-Anna Marie Reyes
- Programming LED's for ramp and putting components onto the playing field
- BJ Wahhab
- Flipper Control/Polling MicroSwitch, State Machine and Software Flow
Schedule
| Week# | Start Date | End Date | Task | Status | Outcome |
|---|---|---|---|---|---|
| 1 | 3/28 | 4/03 | Project Proposal | Submitted | Approved |
| 2 | 4/04 | 4/10 | 1. Component research and initial pinball design 2. Begin component purchasing |
Completed | Completed. Ordering the parts was very time consuming. We recommend putting more time into planning and purchasing the components ahead of time. There was a lot of last minute purchases as well as, unnecessary purchases made. Overall, we did well splitting up the cost and making sure we had the parts in a reasonable time frame |
| 3 | 4/11 | 4/17 | 1. Start of the architectural design 2. Program lights, sounds, and buffers 3. Start mechanical aspects |
Completed architectural design, sounds, lights | Working on buffers and mechanical aspects |
| 4 | 4/18 | 4/24 | 1. Incorporate bumpers and LED display 2. Make connections and test if certain parts are working |
Completed LED Display | Bumpers are still in progress as well as previous taks |
| 5 | 4/25 | 5/01 | 1. Incorporate all components into the designed pinball skeleton 2. Begin component/unit testing 3. Troubleshoot/Debug as needed |
Completed | The 3D printed Bumpers and flippers were the most important components needed to finalize the pinball machine. Once theses items were ready, the overall design became more defined. The gears and buttons were testes to make sure the flippers worked synchronously |
| 6 | 5/02 | 5/08 | Product testing and final adjustments | Completed | All the components were mounted and adjustments were made to the design. The ball loaded runway needed a lot of work to make sure the ball rolled over the nails easily |
| 7 | 5/09 | 5/15 | Final Product Testing | Completed | Unfortunately, the color LEDs did not turn ON during testing. Because this was an added feature to the project, we felt okay going into demo without them functioning |
Parts List & Cost
| Part | Part Name | Quantity | Cost |
|---|---|---|---|
| 1 | SJ One Board | 1 | $80.00 |
| 2 | Audio Controller | 1 | $50.00 |
| 3 | Power Supply | 1 | Free |
| 4 | Pinballs | ~9 | Free |
| 5 | Pinball Ball Shooter | 1 | $20.00 |
| 6 | Rainbow LEDs | 24 | $6.00 |
| 7 | LED Mixed Pack | ~20 | $5.00 |
| 8 | 7-Segment Serial Display (COM-09230) | 3 | Free |
| 9 | 3-D Printed Flippers | 2 | Free |
| 10 | Jumper Cables | 90+ | $15.00 |
| 11 | Speakers | 1 Set | Free |
| 12 | Servos | 2 | $75.13 |
| 12 | Push Buttons | 2 | $4.00 |
| 13 | Wood | 6 pieces | $60.00 |
| 14 | Buck Converters | 3 | $15.00 |
| 15 | 74HCT138 (3-to-8 line decoder/demultiplexer; inverting) | 2 | Free |
| 16 | SN74LS148 (8-line to 3-line priority encoder) | 4 | $2.40 |
| 17 | Micro Switches | 40 | $8.00 |
| 18 | Speakers | 1 | Free |
| 19 | Styrofoam | 3 Pieces | $10.00 |
| 20 | Balsa Wood | 4 Pieces | $30.00 |
| Total | $380.53 |
Datasheets are provided at the bottom of this page in the references section.
Design & Implementation
In this section, we will discuss the design and implementation of our pinball machine. This section will be broken up into subsections including hardware design, hardware interface, hardware constraints, software design, and implementation. Throughout these sections, we have added schematics and diagrams that will show the reader the specifics of our project.
Hardware Design
Discuss your hardware design here. Show detailed schematics, and the interface here.
In this section, we will discuss the hardware design used for our project. The hardware design included a power supply, 3 7-segment serial displays as our score board, multiple LEDs that will display patterns throughout the session of the game, and an audio controller that will display sounds throughout the game.
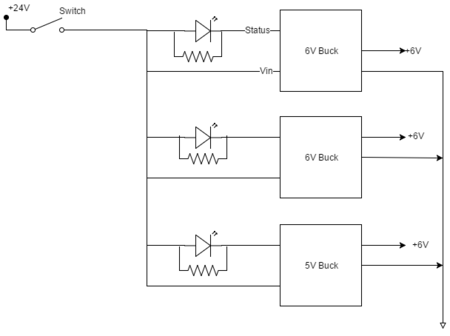
Figure 1 shows the power circuit, which has a power supply that can provide 24 volts. The power supply's voltage is divided to the SJ-One Board, the serial 7-segment LED display, the audio controller, the LEDs around the board, and the servos, which control the push buttons for the flippers. We were able to make this power supply power the SJ One Board by connecting it directly to our circuit. In addition, by hooking up the LED circuit (Figure 2) to the SJ One board, we are able to supply 5 volts to the 3-to-8 line decode, which powers the basic colored LEDs (i.e. red, orange, yellow, etc).
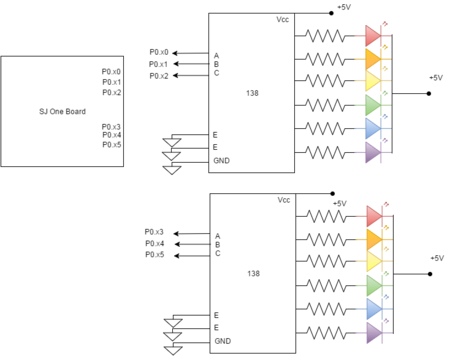
Figure 2 shows the circuit for the basic LED lights around the playing field. This circuit shows the SJ-One Board connected to two 3-to-8 line decoders, which are both connected to 6 different colored LEDs. From the SJ-One Board, each pin is connected to the inputs of the decoders. The output pins of the decoders and connected to 220 ohm resistors, which are then connected to the different LEDs.
Hardware Interface
In this section, we will discuss how the hardware is interfaced and the different types of driver implementations used to complete our project.
For the serial 7-segment LED display, Figure 3, we used a Serial Peripheral Interface (SPI). Because we chose SPI communications, the 7-segment LED display's datasheet instructed us to connect the MOSI, CSN, and SCK pins to our SJ One Board in order to successfully complete the communication. In the figure above, we have shown the display with the different pins that were connected to our SJ One Board.
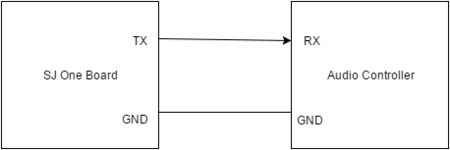
Figure 3 shows the audio controller circuit, which uses the WAV Trigger WIG-13660 ROHS. We have inputted a microSD card that holds the music that will be played throughout the game. This circuit has a UART interface, which will be discussed more in the software section of this report. Because of this type of interface, we connected the SJ One Board's ground pin to the WAV Trigger's ground. In addition, one of the TX output pins on the SJ One Board was connected to the RX pin on the WAV Trigger.
Hardware Constraints
- Power Supply: 24V / 2.1A
- Pinball size: 0.5 inch diameter / 8.4-8.5 grams each
- Pinball frame width: 1.5 feet
- Pinball frame length: 2 feet
- Pinball frame height: TBD
- Angle: ~5 degrees inclined
- Serial 7-Segment LED Display: 2.6-5.5V
Software Design
One of the tasks we have running is the music playing while our pinball machine is in session. Once the machine is started up, the player is able to hear the music, which plays different tunes using UART communication. Depending on what is happening on the playing field, the corresponding data is sent to the audio controller from the SJ-One Board as a command. By doing so, music for the bumpers, when the game starts and ends, and throughout the session of the game will be played.
To control the serial 7-segment LED display, our score board, we were able to utilize SPI to control the score. The pins that were connected were the MOSI, the SCK, and the CSN. The reason the MISO pin was not needed is because the the serial 7-segment LED display was not sending signals back to the master. The SJ-One board was the only module that needed to send signals for output. Each time the ball hit certain sensors and the flippers are switched, points will be added to the total score and displayed onto the 7-segment LED display. In addition, upon startup, words are displayed to prompt the user to start the game.
Once the ball is launched, there will be LEDs along the ramps path that will be lit once the ball has connected the circuit. This wires will be the input that the GPIO driver will need in order to power up the LEDs that are on the side of the ramp. By doing so, we are able to allocate points to the user and the scoreboard, and it will indicate where the ball is on the playing field.
To control the flippers, which are connected to the servos, we utilized PWM, which is Pulse Width Modulation.
Implementation
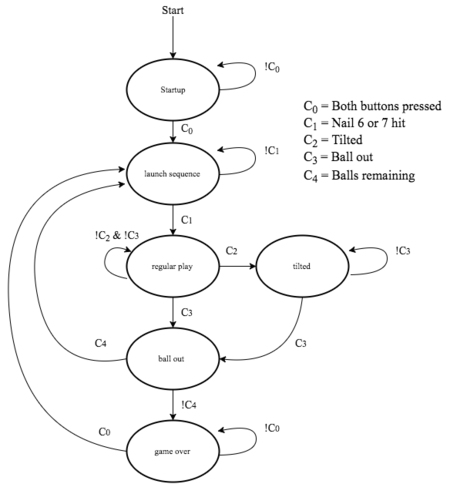
In order to implement our project, we have included a state diagram that will breakdown each aspect of our pinball machine during a session. Upon startup, the system will either go, or continue waiting for the user to press the two flipper buttons to start. After the user has started the session, the launch will commence. After the user has launched, a gaming session will start. If the ball falls out, the game will end.
Testing & Technical Challenges
When testing our pinball machine, we began by testing the different components that we had done and working off of that. Once we knew that each part was completed successfully, we started combining the different components together and repeating the testing process.
Issue #1 - Servos
We have had a few issues and a majority of these problems have been due to mechanical oversights. One of the first issues we had when starting our project was because of our servos. While trying to purchase our servos, we were researching which servo would work best for our purpose, which would be to control the flippers. Because we were limited with time, we choose the servos we thought would be the best, but they turned out to be too slow. In order to solve this issue, we had to add gears to increase the speed. One thing we would recommend in regards to key parts of a project, is that you should allocate enough time to research these parts so that fixing them does not require too much work once you have them.
Issue #2 - Serial 7-Segment LED Display
One of the smaller scale issues we had included the first set of 7-segment LED displays that we bought. Because of time constraints, we did not do our research well enough to purchase an LED display that fit our project. The first ones we purchased, we were unsure of how to display data on them because the datasheet did not have the information regarding which pin did what function. Because of this, we decided to consult with Preet about whether we should purchase new ones, or try to add different Gates to get them to work. He suggested we use 7-segment LED displays that could be driven by UART and SPI, which was the current ones we have now (COM-09230).
Issue #3 - Ball
One of the major issues we had was that the ball we initially got for the project was too light for the limit switches to be triggered once on the playing field. Because of this, we ran into other problems. The servos we had were not strong, or fast enough to withstand a ball that was heavier than the ball that we initially have, so we had to think of a different solution. The solution we found was that we should keep the ball that we currently have, and instead of using the limit switches as a detector for the ball, we should just use the 3 bumpers in the middle.
Conclusion
In conclusion, we completed everything we said we would add to our pinball machine. When adding the LEDs to the pinball machine, we did have complications because of the connections at the bottom of the board. One of the things we learned that was most valuable was to read the datasheets and really research the different components you want. In addition, planning ahead and knowing exactly what you want is a good indication that you will get the parts that you need for their specified purpose. Even though we ran into a few of these issues, we were able to make them work. In the case of the servos, we utilized gears to help them with controlling the flippers. Another valuable lesson we learned while conducting this project is the importance of communicating and teamwork. By doing this, we were able to successfully work with one another and create a project that we were all proud of. This project helped increase our knowledge of building a project that incorporated mechanical aspects.
Project Video
Project Source Code
References
Acknowledgement
We would like to thank Preet for encouraging us to pursue this type of project, and for teaching us how to incorporate the labs in a real time project. In addition, we would like to thank Dr. Haluk Ozemek for teaching us the fundamentals we needed in order to complete this project.
References Used
List any references used in project.
Serial 7-Segment LED Display (COM-09230) Datasheet https://www.sparkfun.com/datasheets/Components/LED/7-Segment/SFE-0012-DS-7segmentSerial-v41.pdf
Serial 7-Segment LED Display (COM-09230) Power Schematic https://www.sparkfun.com/datasheets/Components/LED/7-Segment/SPI_to_4x7SD-v22.pdf
Sparkfun WAV Trigger 50751 Datasheet https://solarbotics.com/download.php?file=2342
Sparkfun WAV Trigger 50751 Power Schematic https://solarbotics.com/download.php?file=2237
Servo - Hitec HS-85MG (Micro Size) ROB-11887 Datasheet http://cdn.sparkfun.com/datasheets/Robotics/hs85.pdf
Concave Button - White https://www.sparkfun.com/products/9340
8-line to 3-line Priority Encoder http://www.farnell.com/datasheets/93457.pdf
Rainbow Colored LEDs http://www.karlssonrobotics.com/datasheets/Components/LED/YSL-R596CR4G3B5W-F12.pdf
