S14: Data Acquisition using CAN bus
Contents
Project Title
Data Acquisition using CAN bus
Abstract
Our project is to implement a high speed data acquisition system using CAN and perform tasks according to the data received. Our system will collect data from sensors over multiple nodes and transmit the data over the CAN bus. The CAN packets are received by a single node which will do the required functionality as desired by the application.The LEDs at the receiver node simulate the functions which ca be done using the data acquired over the CAN bus.The purpose is to gather all the data simultaneously over the CAN bus and implement hardware filtering to manage the data packets on the CAN bus
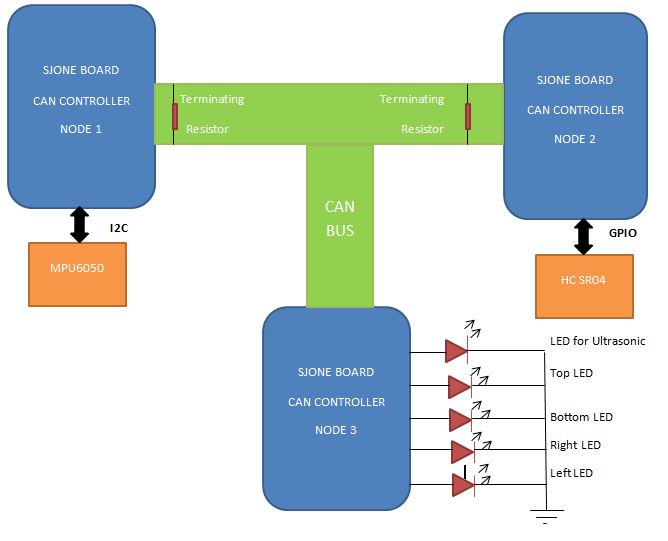
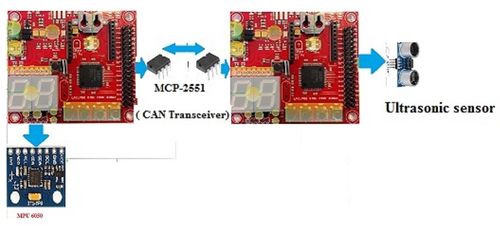
Figure 1 shows the system block diagram:
Objectives & Introduction
The objective of this project to implement CAN bus and establish communication between devices.Our idea is to use use 6 degree of freedom MPU-6050 sensor as motion/gesture, ultrasonic range finder HC-SR04 as obstacle detector for data harvesting and sending these data over the CAN bus. Specific movement/range will trigger predefined tasks and transmit the control to different LEDs. According to the direction of the accelerometer and its tilt movement, as well as ultrasonic sensor distance, specific application at the third node would be done.
Team Members & Responsibilities
- Shweta Bohare
- Can bus Interface
- Mradula Nayak
- Can bus Interface
- Heng Zhang
- 6 DOF and Ultrasonic sensors
- All Team
- FreeRTOS Software Design
- 3D on the computer
Schedule
| Week# | Start Date | End Date | Task | Actual |
|---|---|---|---|---|
| 1 | 2/25 | 3/18 |
|
Completed.Other parts are ordered. |
| 2 | 3/18 | 3/26 | Self-Loop testing of CAN Bus | Completed. |
| 4 | 3/27 | 4/13 | Write on microSD SPI microSD I/O | Initial write on SD-card is done. |
| 5 | 4/6 | 4/12 | Interfacing ultrasonic sensor with the board. | Done |
| 6 | 4/13 | 4/27 | Accelerometer data transmission between 2-Boards. | Done |
| 7 | 4/22 | 4/27 | Communication between 3 CAN Nodes | Done |
| 8 | 4/28 | 5/5 | Testing and remove bugs, further enhancements | Done |
| 9 | 5/22 | 5/22 | Demo |
Parts List & Cost
| Parts | Cost | Comment |
|---|---|---|
|
SJ One Board[1] |
$80.00 x3 |
Each board uses for different functions |
GY 521 board(MPU-6050) |
$5.90 x1 |
6 DOF motion sensor |
</tr>
|
TJA1049TK[2] |
$0.00 x4; free samples |
high-speed CAN transceiver |
|
HC-SR04[3] |
$3.00 x1; free samples |
Ultrasonic ranging module |
|
Total Cost |
$249.00 |
Keep it low |
Design & Implementation
Hardware Design and Implementation
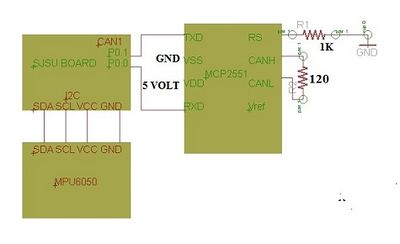
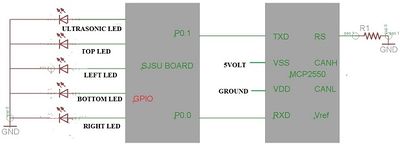
In our project we are using three nodes to communicate over a CAN bus. The CAN Controller is embedded on the SJ-ONE board which transmits the microcontroller logic signals to CAN transceiver. The CAN transceiver is a voltage converter which transmits the data on CAN bus by converting it into electrical signals required for CAN. The CAN tranceiver requires a 5V supply for its working. Hence we have designed a Power Circuit to provide 5V dc to the CAN transceiver. In the project, data is acquired from two sensors, each connected to separate nodes. We are using MPU-6050 which is interfaced with Node 1 via I2C protocol. Ultrasonic sensor HC-SR04 is connected to Node 2 which detects the distance of an object from the sensor. The receiver node gets the data from Node 1 and Node 2 and it simulates the data on the LEDs connected.
Description of parts
Power Supply: LM7805
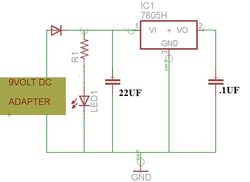
An LM7805 linear regulator IC is used for this purpose. It converts a DC input voltage of range 7-25 V to a stable +5 V. It requires just two external capacitors and is very easy to useThe input DC voltage for LM7805 could be obtained from a 9V DC wall adapter that can supply 1 Amp of load current.We need the 5 volt supply for all the external ICs have been used in this project like MCP2551 and MPU6050.The following schematic is generate the 5Volt regulated power.
CAN transceiver: MCP2551
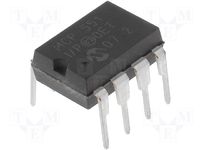
The MCP2551 is a high-speed CAN, fault-tolerant device that serves as the interface between a CAN protocol controller and the physical bus. The MCP2551 device provides differential transmit and receive capability for the CAN protocol controller, and is fully compatible with the ISO-11898 standard, including 24V requirements. It will operate at speeds of up to 1 Mb/s.
It is used for following functions:
1. As a Transmitter: It operates in two states Dominant and Recessive. When differential voltage between CANH and CANL is less than 102 V it operated in dominant mode, and when the voltage difference is less than 1.2 volt it operates in Recessive mode. These both modes are corresponds to the TXD pin.
2. Maximum nodes: allowing a maximum of 112 nodes to be connected.
3. Receiver Function: The RXD output pin reflects the differential bus voltage between CANH and CANL. The Low and High states of the RXD output pin correspond to the Dominant and Recessive states of the CAN bus, respectively.
4. Operations.High speed flow control and standby. High-Speed mode is selected by connecting the RS pin to VSS. In this mode, the transmitter output drivers have fast output rise and fall times to support high-speed CAN bus rates. The slope, or slew rate (SR), is controlled by connecting an external resistor (REXT) between RS and VOL (usually ground). The device may be placed in Standby or SLEEP mode by applying a high-level to the RS pin.
MCP2551
Motion Sensor: MPU-6050
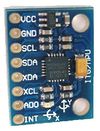
The MPU-6050 is a motion sensor that combines two chips: the MPU-6050, which contains a 3-axis gyroscope, 3-axis accelerometer and an onboard Digital Motion Processor. Although the built-in processor is integrated with 6-axis MotionFusion algorithms, such as Kalmann filter, it is not open source. As a result, we simply use MPU-6050 as a 6 DOF motion sensor and renders high resolution 6 DOF informations to the SJ-One board for further usage. When developing the MPU driver, we refer to the sparkfun github site: (1. https://github.com/sparkfun/MPU-6050_Breakout; 2. http://www.botched.co.uk/pic-tutorials/mpu6050-setup-data-aquisition/) as well as the given drivers in SJSU-Dev by Professor Preetpal Kang. It is communicate with SJ-One board via I2C ports.
Ultrasonic Sensor: HC-SR04
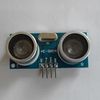
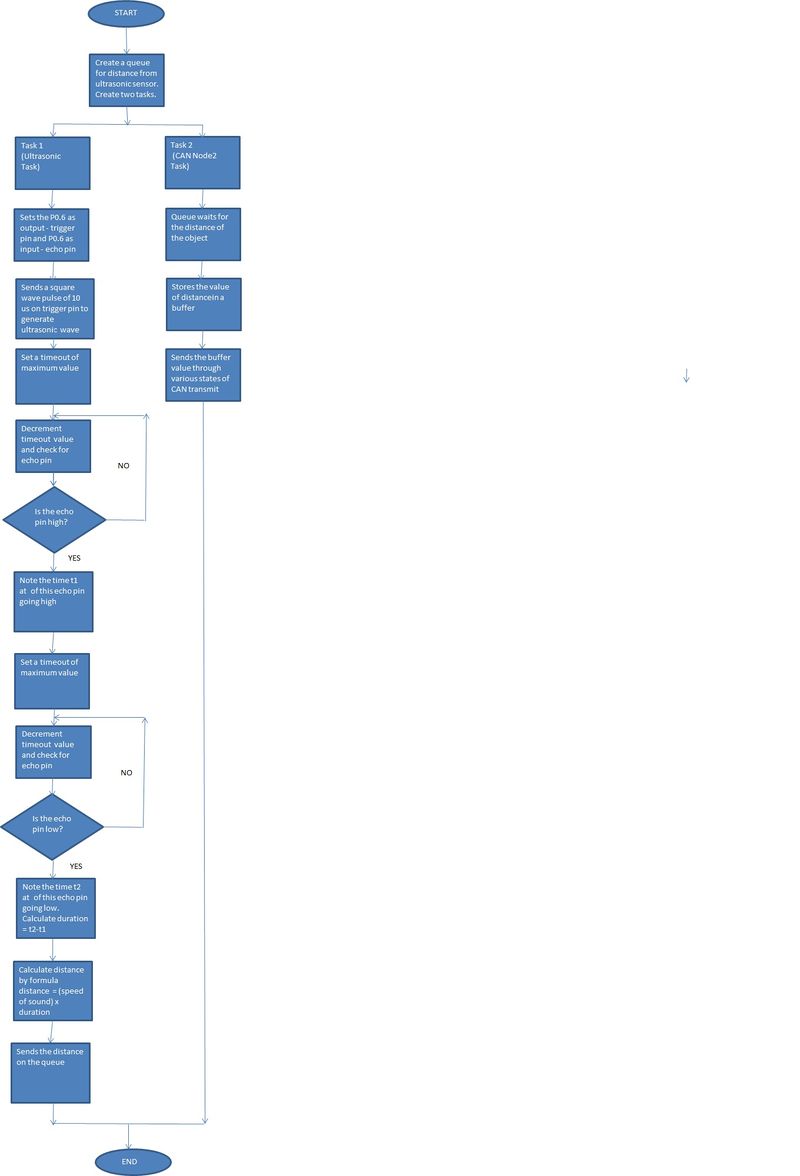
The Ultrasonic Ranging Module HC-SR04 is a low power simple module, with 4 ports: VCC(5V), GND, Trig(input), Echo(output). It is connected to the SJ-One board through GPIO pins, since it doesn't have protocols. Whenever we need to measure the range, we supply a short 10 us Pulse to the trigger input to invoke this sensor then it will send out 8 cycle burst of ultrasound at 40 kHz so as to receive its echo. The formula to calculate the distance is through the time intervals from trigger signals and the echo signals by: us/58 = centimeters.
Hardware Implementation at each NODE
Node 1
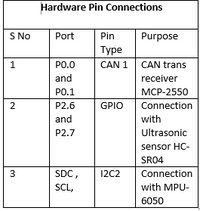
On node 1, we have connected MPU-6050 on I2C2 of SJONE-Board. CAN transceiver is connected on CAN1 of SJONE- board. A terminating resistor is also connected to the CAN transceiver of Node1.
Node 2
On node 2, we have connected HC-SR04 on GPIO pins P1.6 and P1.7. It transmits the distance of the object over the CAN bus. CAN transceiver with terminating resistor is also connected on this node.
Node 3
On node 3, we have connected the CAN transceiver on CAN1 of SJONE- board. We have connected 5 LEDs, one for distance from ultrasonic sensor on Node 2 and other 4 LEDs determine the tilt of the object on Node 1.
Software Design and Implementation
In our project, every node has to compute the data and transmit it over the CAN bus. For proper synchronization of the transmission, we have divided each function into tasks which communicate via Queues. We have utilized FreeRTOS API for managing the tasks and queues.
Software implementation is done using:
1. CAN driver
2. I2C driver for MPU-6050
3. Ultrasonic sensor trigerring
1.CAN driver
CAN is a high-speed data bus for deterministic communication.It transmits at 100k,250k, 500k and 1Mbit speeds.CAN nodes communicate by transferring CAN frames and each node has a ID associated with it. The ID for each node is developed in the program.
CAN bus works in the following modes:
1. OFF MODE: It does not accept any message from any node.
2. BYPASS MODE: It accepts all the messages that it receives.
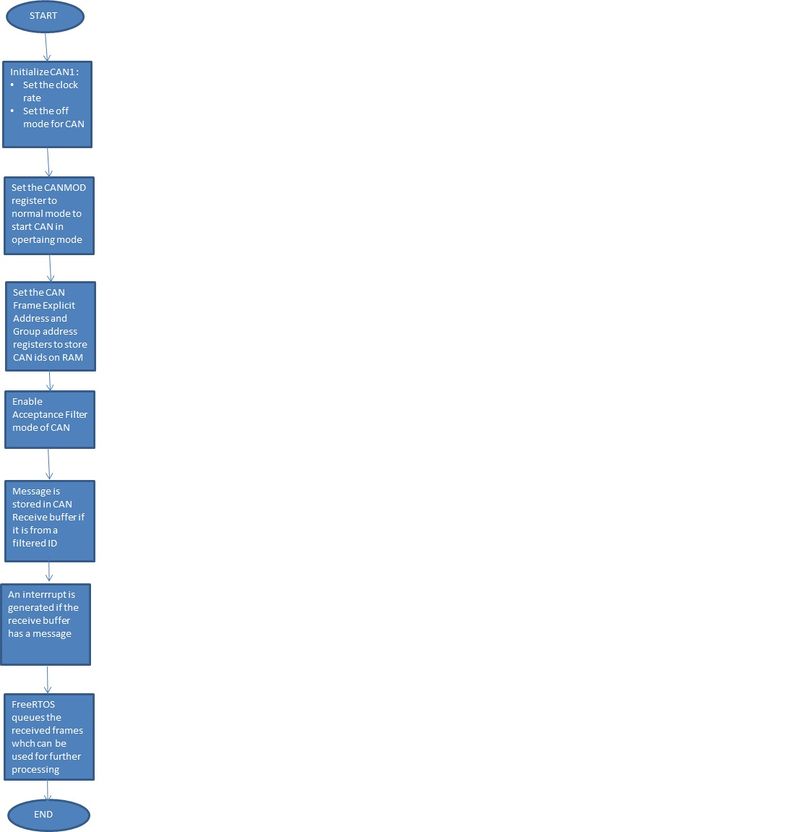
3. Acceptance Filtering: It accepts only the specific messages of the id stored in its RAM.
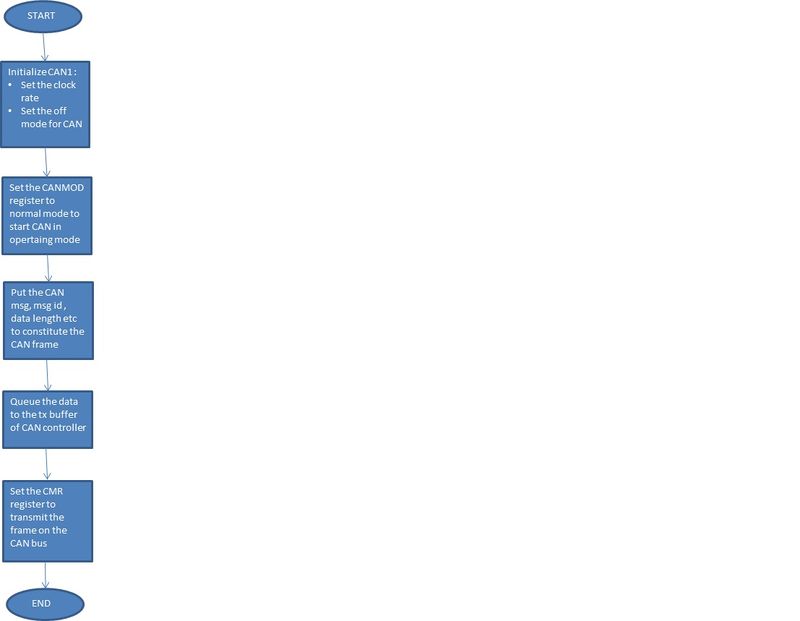
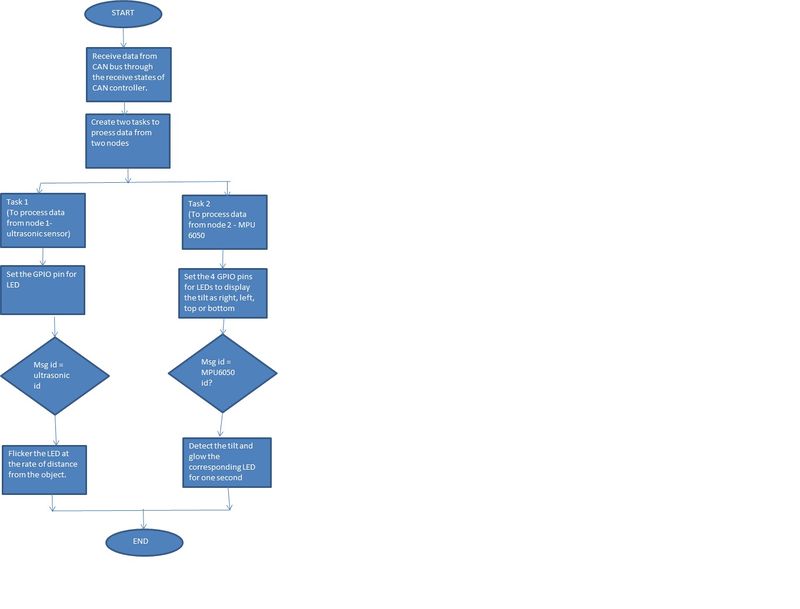
In our design, we have 2 transmitter nodes and one receiver node. Hence we have implemented Acceptance filtering at the receiver node to acknowledge the messages of the transmitter nodes. The transmitting nodes are in OFF mode,as it need not receive any messages from the other transmitter node.
FLOW DIAGRAMS EXPLAINING TRANSMITTER AND RECEIVER FLOW DIAGRAM
2. I2C driver for MPU-6050
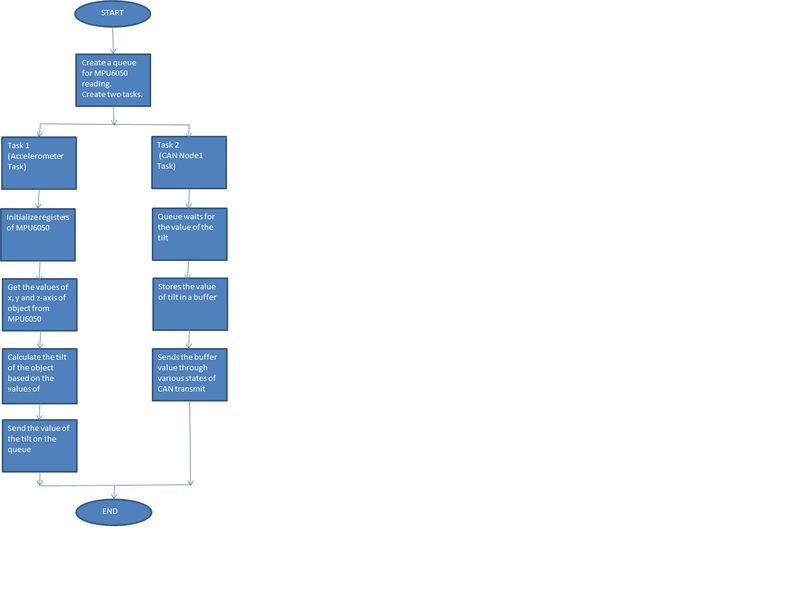
At node 1, the I2C driver is written to interface with MPU-6050. The device address of MPU-6050 is 0x69. The I2C state machine goes through different dtages to read from data from MPU-6050. The configuration resistors of MPU-6050 is first set. Since we are only reading accelerometer values, we are only reading the 16-bit registers of X,Y, Z-axis.
The Tasks at Node 1 are performing the functions in the following manner:
3. Ultrasonic sensor trigerring
At node 2, we are getting the distance of the object from the node using an ultrasonic sensor. An ultrasonic burst is triggered using a Trigger pin on the sensor module. The receiver part of the sensor then listens for the echo return pulse. An Echo pin on the sensor remains at HIGH voltage level during the time and the distance of the object can be calculated from this duration.
Distance of the object is calculated using the formula:
Distance = ((Time taken) * 340m/s) /
The tasks at Node 2 are performed as follows:
At node 3, there are LEDs which work according to the data sent over from the two nodes. The tasks are distributed as follows:
Testing & Technical Challenges
Hardware issues
1. During self loop, we recognized that there has to be a 1K resistor at the Rs pin of transceiver which has to be connected to ground.
2. Designing of power supply took a lot of time. We designed a separate power supply to provide continuous 5V supply.
3. Due to improper connections of transceiver and power supply, the CAN transceiver IC was burnt and we had to replace it many times.
Software issues
1.The mode register of CAN was not getting written because of error in clock set. We set the clock source to 2 in sys_config.h.
2.The CMR register was not set during self loop, because of which the CAN transmission had not started.
3.The data sent from the sensors had to be sent to CAN controller and at the receiver node proper timing delay had to be put to process the data from two nodes.
4.Hardware filtering didn't work for a lot of time due to a error in the CAN driver. We have written a separate piece of code to set the hardware filtering.
5.Reading serial data from SJONE- board to plot on MATLAB or processing software was not successful since the board was getting reset once the port was opened.
Conclusion
The aim of the project was implementation of CAN controller and we were able to achieve that. However, we could not do the GUI to show the data received on the receiver node. But we definitely learnt various platforms on which GUI can be done. The project has helped us learn about the driver of CAN bus.
Project Video
https://www.youtube.com/watch?v=P1lKoc-L61o
Project Source Code
References
Acknowledgement
We would like to express our heartfelt gratitude to Prof. Preetpal Kang who gave us an opportunity to do this project on the topic (Data Acquisition using CAN bus) which enhanced our understanding of CAN bus and its protocol as well as provided us knowledge about different sensors.
Secondly we would also like to thank our classmates who helped us a lot in the application of this project within the limited time frame.
References Used
1. http://users.ece.utexas.edu/~valvano/Datasheets/MCP2551.pdf
2. http://www.micropik.com/PDF/HCSR04.pdf
3. http://www.invensense.com/mems/gyro/documents/PS-MPU-6000A-00v3.4.pdf
4. http://www.socialledge.com/sjsu/index.php?title=SJ_One_Board
