S12: Web-based MP3 Player
Contents
Web-based MP3 Player
Abstract
This project allows an MP3 player to be controlled with a web interface. The concept of the project is based on the trend of an "Internet of Things" or being able to control devices on the internet. Traditionally, only computers could be remotely controlled, or robots could be controlled in a one-to-one manner. However, there was never a design for scale or variety in mind in controlling devices. The current problem in the industry is that there is no vendor that provides an adequate solution because vendors are just providing a proprietary solution for themselves. The solution for this is a platform that can connect all devices.
Objectives & Introduction
Introduction
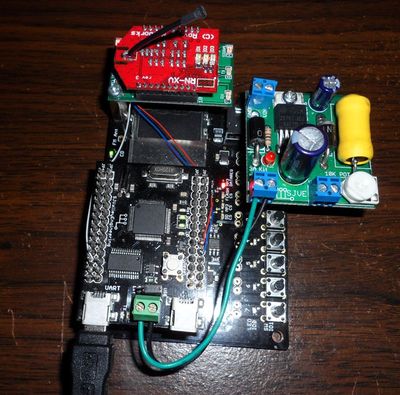
The main focus for this project was to allow users to control the MP3 player anywhere at anytime. This task can be accomplished by using the LPC2148 micro controller, MP3 development board, WiFly wireless module and a Web Server.
Objectives
- Be able to interface and configured the WiFly RN-171 Wireless Module with NXP LPC2148 via UART1
- Establish TCP connection with the Python server
- PHP website be able to parse required information from the Python server
- WiFly Wireless Module Actively listens for upcoming connections by the PHP website
- NXP LPC2148 Reacts accordingly corresponds to the string commands
Team Members
- Thomas Tsang
- Bailey Wu
- David Kwong
Roles & Responsibilities
| Member | Roles & Responsibilities |
|---|---|
| Thomas Tsang | Python Server, Parser, MySQL database |
| Bailey Wu | UART1 Driver, Interface between NXP LPC2148, Python Server and PHP Website |
| David Kwong | PHP Website, Socket Communication, MySQL database |
Parts List & Cost
| Part Name | Price | Link |
|---|---|---|
| WiFly RN-171 802.11b/g Serial Module - Roving Networks | $29.95 | [1] |
| ARM7 - NXP LPC2148 | $59.99 | [2] |
| MP3 Development Board | $59.99 | [3] |
| Ubuntu Web Server with MYSQL,PHP | NONE | NONE |
Design & Implementation
The design section can go over your hardware and software design. You can have two sub-chapters here.
Hardware Design
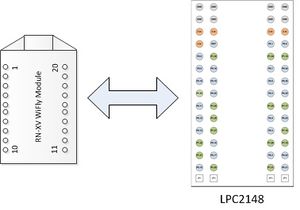
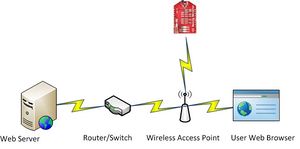
In this project, there are two major components are being used. They are the NXP LPC 2148 microcontroller, and WiFly RN-171 wireless module. Figure 1 in below shows the system block diagram of both components are being implemented.
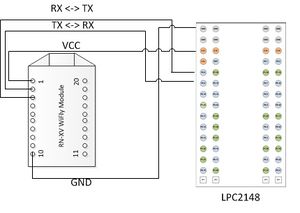
Figure 2 in below shows the complete Pin connections between the NXP LPC2148 micro controller and WiFly Module. Pin connection table is shown in Table 1 in below on how each component is connected.
| NXP LPC2148 | WiFly Module |
|---|---|
| VCC | P.1 (VDD_3.3) |
| GND | P.10 (GND) |
| P0.8 (Tx) | P.3 (RX) |
| P0.9 (Rx) | P.2 (TX) |
Hardware Interface
For this project, Interrupted-Based driven UART1 driver was used as the communication channel between the LPC2148 and WiFly module. It is highly recommended to learn the "bit-masking" techniques before moving on to write the UART driver. Bit-masking allows only certain bits of a register to be modify wihtout affecting any other bits. To have a fully functioning UART1 driver, the following steps must be taken.
First Step of creating a UART1 driver is to read the LPC2148 datasheet regarding about register descriptions. It is highly recommended to read through the descriptions carefully because it contains valuable steps on configuring the desirable configuration. Then, it is best to have great understanding of how bit-wise shifting works. So the following section contains the steps to configure a working UART1 driver.
- UART1 Driver
- Set bit values for PINSEL0 register of Pin 0.8 and 0.9
- Unset these bit values first then set these bits to select them
- Configure the PCONP register to power up UART1
- Configure the Vector Interrupt Controller (VIC) registers, make sure these values are different than UART0.
- For example, to set Bit 0.0 and Bit 0.3 then unset Bit 0.0 and Bit 0.3 can be done as the following.
- PINSEL0 |= 0x09
- PINSEL0 |= (1<<0)|(1<<3)
- PINSEL0 &= 0xF6
- PINSEL0 &= ~0x09
- PINSEL0 &= ~((1<<0)|(1<<3))
- For instance, to enable power to UART0 the following register must be set
- PCONP |= 8
- Configuration the VIC for UART1 can be done as the following.
- VICIntSelect &= ~VIC_IntSelect_UART1
- VICVectCntl3 = VIC_VectCntl_ENABLE | VIC_Channel_UART1
- VICVectAddr3 = (long) uart1ISR
- VICIntEnable |= VIC_IntEnable_UART1
- For example, to set Bit 0.0 and Bit 0.3 then unset Bit 0.0 and Bit 0.3 can be done as the following.
- It is highly recommended to look at the UART0 interrupted-base driver in the Lab MP3 lab as reference.
- WiFly Wireless Module
After configuring and having a fully functional UART1 driver, then a connection between LPC 2148 and WiFly module must be established. In order to communicate with the WiFly module, the communication channel must go through UART0. Therefore, it is required to have separate functions to retrieve information through and from UART0 to UART1. These functions are use to send and retrieve information through UART0 for debugging purposes. Then it is require to end commands through UART1 to the WiFly Module to configure desire settings.
- Steps to configure the WiFly Module
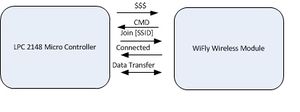
- Enter into WiFly module command mode by sending the string "$$$" (without quotes and \0 at the end)
- Establish internet access by sending opcode "join [SSID network] \0"
- Open a TCP connection with the server by sending opcode "open [I.P address or HostName] \0"
- Figure 3 below shows a detailed explanation how the LPC2148 initialize the WiFly module by using UART0 and opcode commands.
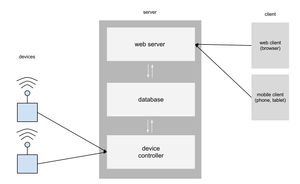
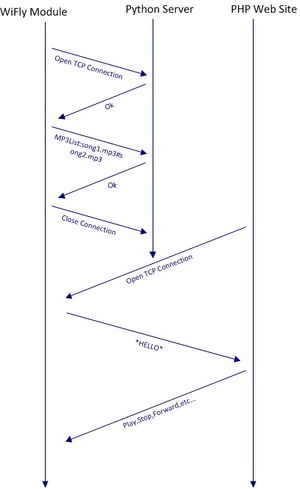
After completing the initialization process, Figure 4 and 5 below illustrated a detail process on how the WiFly Module, Python Server and PHP website communicates to each other.
Software Design
Software Design of this project was very important. Mainly the Python Server, it has to stayed on at all time and actively listens for upcoming connections then redirect the information parse from the clients to its destination. Then, the PHP website parse the needed data from the MySQL databases of the python server and then establish connection with the clients.
- Device Server
- The Device Server (or controller) is the intermediate step between the device and the Apache web server. The DS is the component that listens for device connections, and logs the relevant information in its database for clients to use. This reduces the need for a network discovery protocol since the DS is a designated location for devices to connect to.
- In order to run the python server, it requires the python packages.
- Linux Operating System - Execute the following commands in terminal
- sudo apt-get install build-essential sudo apt-get install ::libreadline5-dev ::libncursesw5-dev libssl-dev libsqlite3-dev tk-dev ::libgdbm-dev libc6-dev libbz2-dev
- Window Operting System - Download PyGTK, look at references.
- PHP Web Site
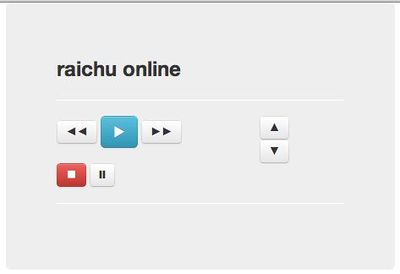
- The PHP website is a rudimentary website constructed to bridge the gap between the user's commands and the MP3 player. The command list available spans most of the functionalities available on commercial MP3 players, from play to volume control. Each of the functions listed are implemented as buttons on the resultant website.
- The PHP script that is loaded onto the server begins its operation by establishing a connection with the server's database, which contains a table of all the songs contained on the server-linked MP3 player's SD card. A simple form system is used to make multiple buttons, one for each function. This form is linked to another PHP page, which does all the background processing. This script begins with a TCP socket connection procedure, which initiates the connection from the server to the MP3 player through a predefined IP address and port. A provision is made for a returning acknowledgment message, and a string command is sent to the MP3 player. This string is dependent on the name of the button that triggered the command transfer. In this implementation, the socket is closed after each command string is sent.\
- In order to run the PHP websites, the following packages must be installed.
- Linux Operating System - Execute the following commands in terminal
- sudo apt-get install build-essential sudo apt-get install ::libreadline5-dev ::libncursesw5-dev libssl-dev libsqlite3-dev tk-dev ::libgdbm-dev libc6-dev libbz2-dev
- Window Operting System - Download WAMP , look at references.
- Linux Operating System - Execute the following commands in terminal
Implementation
When a device boots up, it sends a request to connect to the server, where the device controller is listening. Once a connection is established, the device proceeds to send relevant data pertaining to itself, such as a device name, IP address, and song listings. The device controller parses through the data and logs it into the database. If there is an error, the whole operation is stopped and an error notice is sent back to the device.
A web client can now access the website and control the MP3 player by sending commands through the GUI buttons. Each button press creates a socket and sends over a string command to the device. The device then accepts the connection, parses the string, then executes.
Testing & Technical Challenges
- WiFly Module
- One challenge for the WiFly Module was that while configuring the it through UART0, it was very hard to debug problems at first. Reading through the WiFly module datasheet, it shows a list of commands available but not the steps to initiate those commands. Many countless hours was spent on debugging whether the WiFly module received the commands from the LPC2148. First, the '$$$' command can be interpreted without a enter '\0' at the end of the string. On the other hand, the rest of the available commands must include the enter op-code at the end of the string. Otherwise, the command will not be sent.
- Timing Conflicts
- One of the most persistent problems encountered in this project was the need for the recreation of the TCP socket. When the project had progressed to the point where it was possible to test the functionality of the socket with respect to the MP3 player, it was found that despite the fact that the buttons worked, attempts to send multiple commands through a persistent socket failed. The implemented solution to this was a new method where a socket was created and closed for every command sent through. However, this resulted in a delay of a few seconds for commands from website to MP3 player.
- Testing Methods
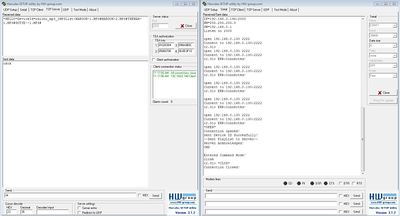
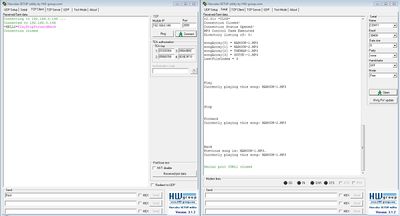
- Several testing methods were used in this project. One of the best tool that was used and most often was Hercules. This program allows user to simulate TCP/UDP client and servers. In such case, it makes the testing process much easier. Once a sub portion of the project is completed and needed to test for its functionality, Hercules was implemented. Figure 6 show a example of how the WiFly module initiation takes place and communicates to the server. Moreover, Figure 7 shows a example of how a simulate web server communicates to the WiFly modules and the list of commands can be send through and interepted by the LPC2148 module. This process ensure error free once everything integrated together.
- Recommendations
- Hercules is such a powerful tool that any project shall be included. It allows user to troubleshoot and debug their problems easily. Very easy to use and allow user to follow through each problem and simulate their necessary needs. It is highly recommended for any type of projects related to TCP/UDP communication.
- It is best to research and purchase the required components as soon as possible. This way, it allow flexibility on adding extra features on top of whats purposed. Therefore, time management is a crucial part of accomplishing the ultimate goal for any project.
Conclusion
For this CmpE146 project, the ultimate goal was to control the MP3 player anywhere at anyplace and it has been accomplished. All of the original tasks required were completed. However, due to time constraints, it was not possible to implement extra features such as custom playlist and custom directory listing to the project. While working on this project, each member of this team has learned and overcome many challenges. For example, learning a new programming language such as PHP for sockets, and Python for the device controller. Designing the web interface with Twitter Bootstrap and CSS also proved to be difficult due to lack of mastery. The biggest accomplishment for this project was that each member of the team has learned new important concepts and skill sets. From researching for what part to use to reading through many datasheet and troubleshooting and overcome obstacles, the group has grown and learned from this experience.
References
Acknowledgement
Dr. Haluk Ozemek
Preet Kang
Allen Mamaril
References Used
- LPC2148 Microcontroller Datasheet: Course Materials
- PHP Manual: http://php.net/manual/en/index.php
- PHP Web Server All-In-One: http://www.wampserver.com/en/
- Python Manual: http://docs.python.org/reference/
- Python All-In-One Windows Installer: http://www.pygtk.org/
- WiFly Wireless Module User Manual:
http://dlnmh9ip6v2uc.cloudfront.net/datasheets/Wireless/WiFi/WiFly-RN-UM.pdf
Appendix
File:CmpE146 S12 T1 WebBasedMP3Player.zip
