F21: Juvenile Jumpers
Contents
JUVENILE JUMPERS
ABSTRACT
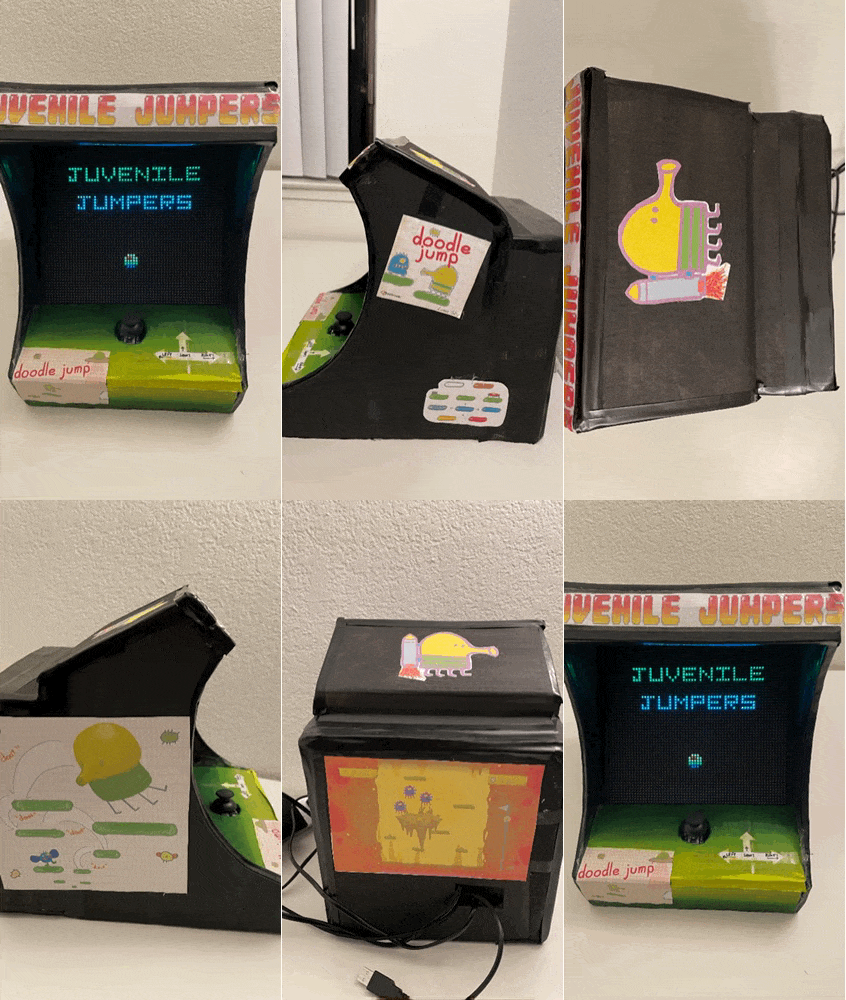
Juvenile Jumper is a single player, endless platform game in which there are enemies and obstacles on various platforms. The doodle is a four-legged creature and has a trunk that he uses to shoot at enemies. The objective of the game is to go as high as you can without falling while avoiding/killing monsters and random obstacles. After each level, the difficulty of the game increases with more enemies and obstacles.
OBJECTIVES & INTRODUCTION
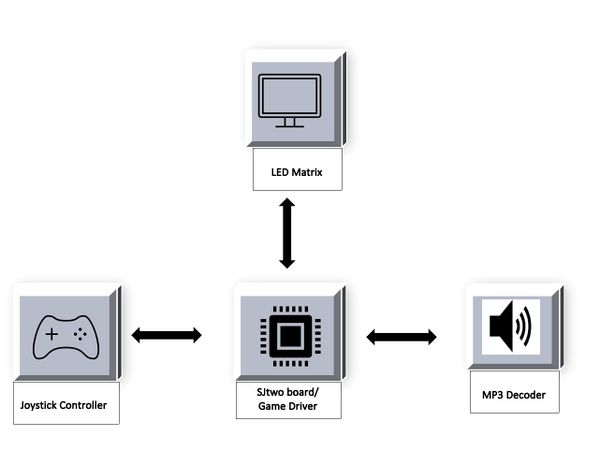
The idea is to build the doodle jump game on a 64x64 RGB LED Screen. The game is played using a joystick. The doodle keeps on jumping and its direction can be controlled using left and right control of the joystick, which can also be used in forward direction as gun to shoot the enemies. MP3 decoder is used for different sound effects in the background of game.
Team Members & Responsibilities
Ritika Beniwal
- MP3 decoder driver
- Game Logic
- PCB design verification
- WiKi page handling
Anuja Sapkal
- Joystick driver
- Game Logic
- PCB Schematic and Board Design
- WiKi page handling
Sourab Gupta
- LED driver
- Game Logic
- PCB design verification
- WiKi page handling
SCHEDULE
| Week# | Start Date | End Date | Task | Status |
|---|---|---|---|---|
| 1 |
|
|
|
|
| 2 |
|
|
|
|
| 3 |
|
|
|
|
| 4 |
|
|
|
|
| 5 |
|
|
|
|
| 6 |
|
|
|
|
| 7 |
|
|
|
|
| 8 |
|
|
|
|
| 8 |
|
|
|
|
| 9 |
|
|
|
|
PARTS LIST & COST
| Item# | Part Name | Part Supplier | Quantity | Cost |
|---|---|---|---|---|
| 1 |
64x64 RGB LED Matrix |
1 |
$ 87.4 | |
| 2 |
Sjtwo board |
1 |
$ 50 | |
| 3 |
Two-axis Joystick |
1 |
$ 4.25 | |
| 4 |
MP3 Decoder |
1 |
$ 8.05 | |
| 5 |
Power Supply |
1 |
$ 7.99 | |
| 6 |
PCB |
5 |
$14.21 |
HARDWARE DESIGN
The game has been designed using SJtwo-c board, RGB LED- for visuals, MP3 decoder- for background music, joystick and PCB. The game is controlled by using a two-axis joystick and to play the music we have used an MP3 decoder.
Printed Circuit Board
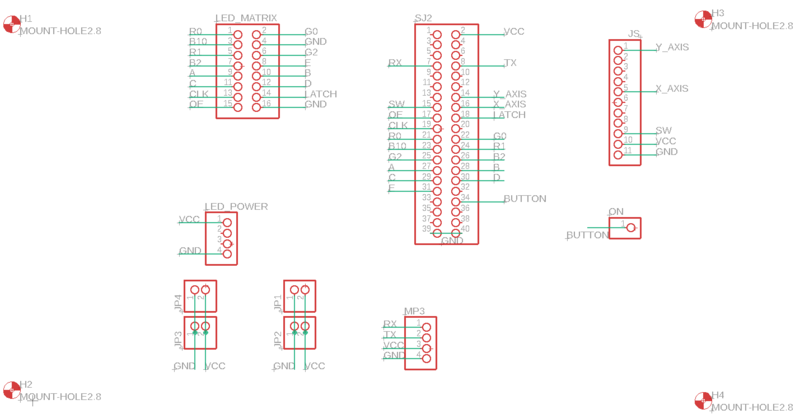
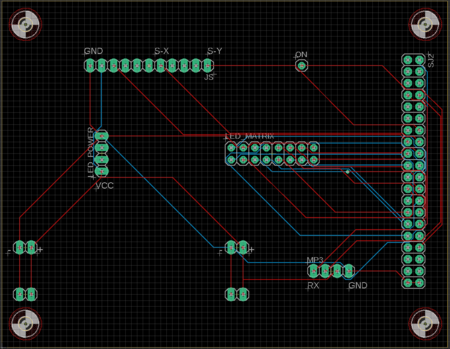
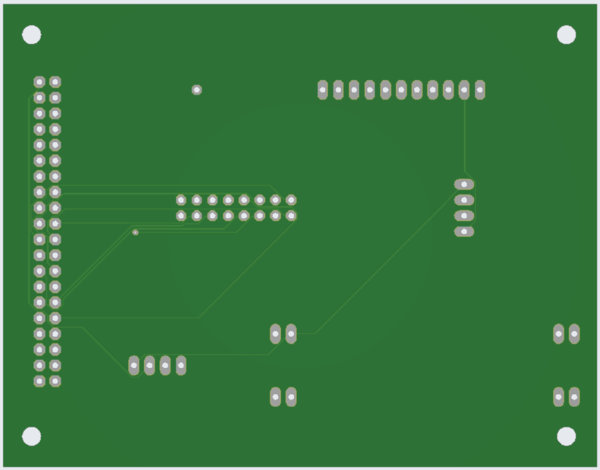
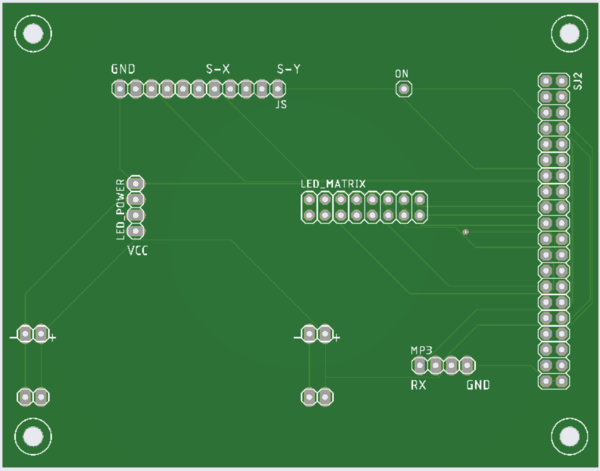
All the essential hardware is retained using a printed circuit board. For this game, we have designed a two-layer PCB and the schematic & layout is designed using Autodesk's Eagle software. The PCB fabrication vendor is JLCPCB.
PIN Configuration
| PIN number | Pin Description | SJTwo Board Pin |
|---|---|---|
| LED Matrix | ||
| R1 | Upper half (Section 1) | p2_0 |
| G1 | Upper half (Section 1) | p2_1 |
| B1 | Upper half (Section 1) | p2_2 |
| R2 | Lower half (Section 2) | p2_4 |
| G2 | Lower half (Section 2) | p2_5 |
| B2 | Lower half (Section 2) | p2_6 |
| A | Address Line | p2_7 |
| B | Address Line | p2_8 |
| C | Address Line | p2_9 |
| D | Address Line | p0_16 |
| E | Address Line | p0_15 |
| GND | Connected to ground | GND |
| Clk | For upper half and lower half | p1_28 |
| Latch | For upper half and lower half | p1_23 |
| OE | For upper half and lower half | p1_20 |
| Joystick | ||
| S-X | X axis data | p0_30 |
| S-Y | Y axis data | p1_25 |
| S-K | Switch data | p1_31 |
| MP3 Decoder | ||
| RX | Receiver | p4_29 |
| TX | Transmitter | p4_28 |
| VCC | connected to vcc | 5V |
| GND | Connected to ground | GND |
Interfacing and Layout
LED Matrix
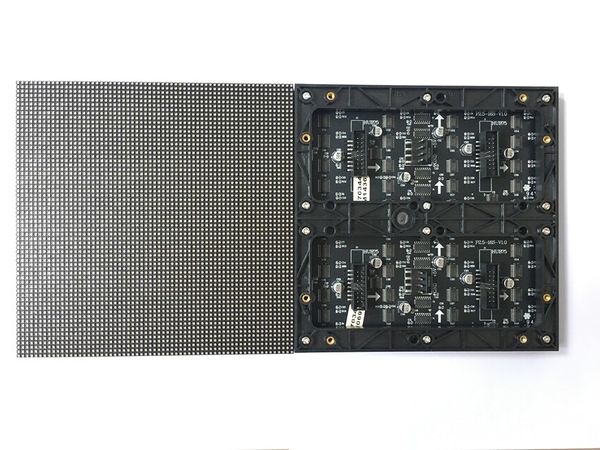
A 64x64 RGB LED Matrix, with a total of 4096 pixels is used for display. Each LED can be fully controlled independently using 13 digital GPIOs. This matrix has six 64-bit shift registers for R1, G1, B1 R2, G2, B2 where each color of the LED is controlled by one bit of the shift register. By combing RGB colors we can make different colors such as YELLOW, CYAN, RED, WHITE, MAGENTA.
Technical Specifications
| Specification | Remarks |
|---|---|
| Pitch | 3 mm |
| Resolution | 64x64 =4096 pixels |
| Volt/Amp | 5V/60A |
| Scan Rate | 1/16 |
LED Matrix Panel
Dual Axis Joystick
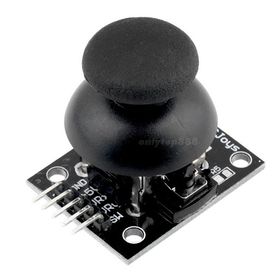
We have used a 2-axis joystick to control the movements of the jumper. The joystick operates on 5V power and provides analog output, hence it is connected to the ADC pins of the SJtwo-c board. The joystick has two potentiometers, each for X-axis and Y-axis. X-axis values are used to define the left and right directions of the jumper. The switch on the joystick controls the start and stop actions of the game.
MP3 Decoder
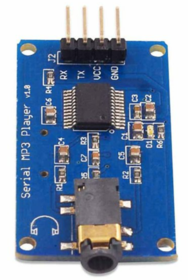
The MP3 decoder that we used is serial MP3 player model by Catalex (version v1.0.1). It's a simple MP3 player device which is based on a high-quality MP3 audio chip---YX5300. It can support 8k Hz ~ 48k Hz sampling frequency MP3 and WAV file formats. There is a TF card socket on board, so you can plug the micro SD card that stores audio files. MCU can control the MP3 playback state by sending commands to the module via UART port, such as switch songs, change the volume and play mode and so on.
SOFTWARE DESIGN
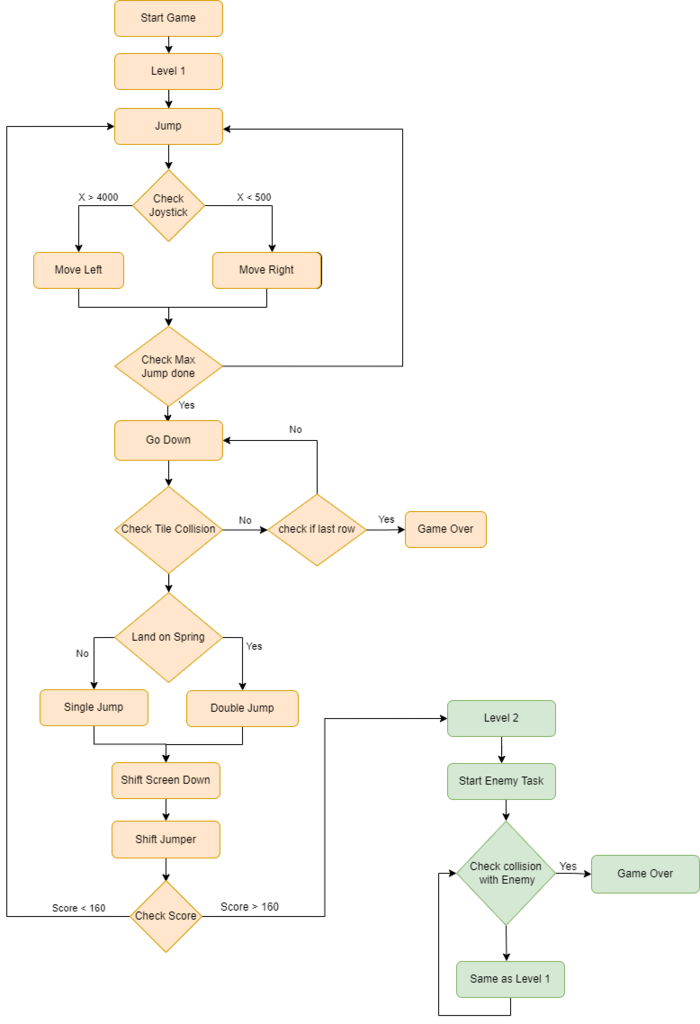
This is an open-ended game having two levels with the feasibility of integrating more levels. Below is the overview of the gameplay.
1. Level_1:
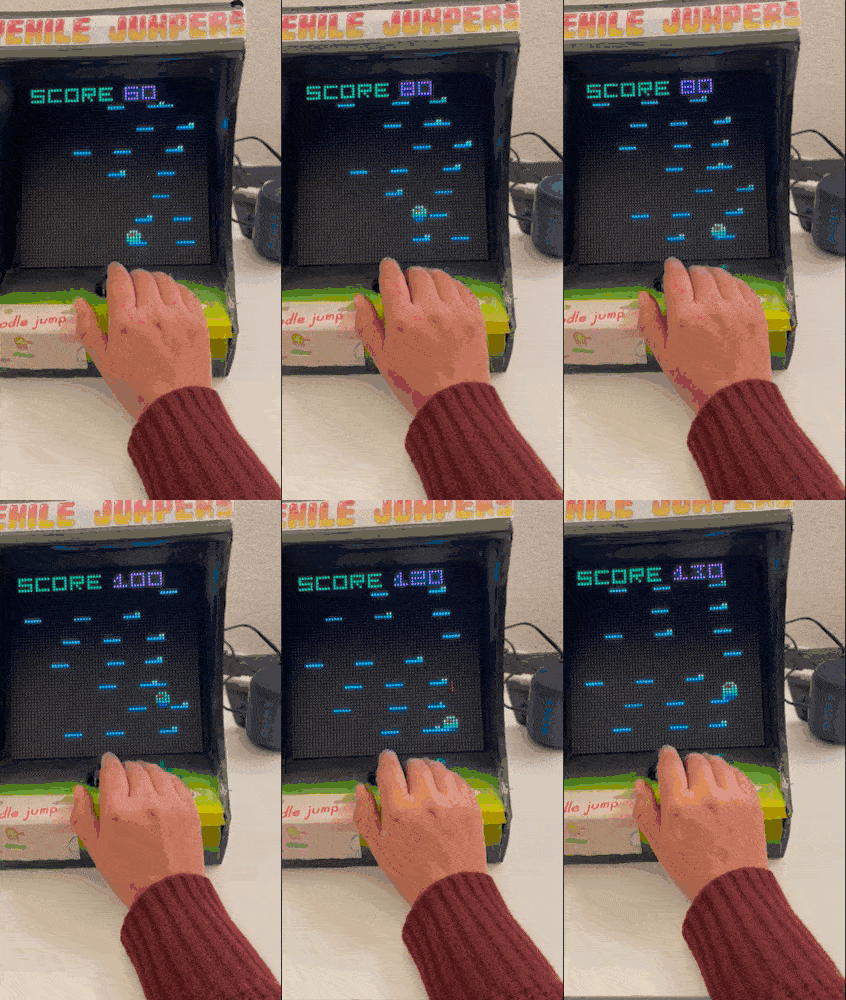
- In the first level, the jumper will keep jumping on the tiles and the player needs to control its direction. There are some special tiles with spring embedded on them and if the doodle lands on such a tile it will take longer jumps than it would have taken by landing on a regular tile.
- With each jump, the score gets incremented by 10.
- After each jump, the background screen shifts down.
- While falling, if the jumper doesn't find any tile it will be moved out of the display and the game ends.
- For reaching level two, you need to score above 150.
2. Level_2:
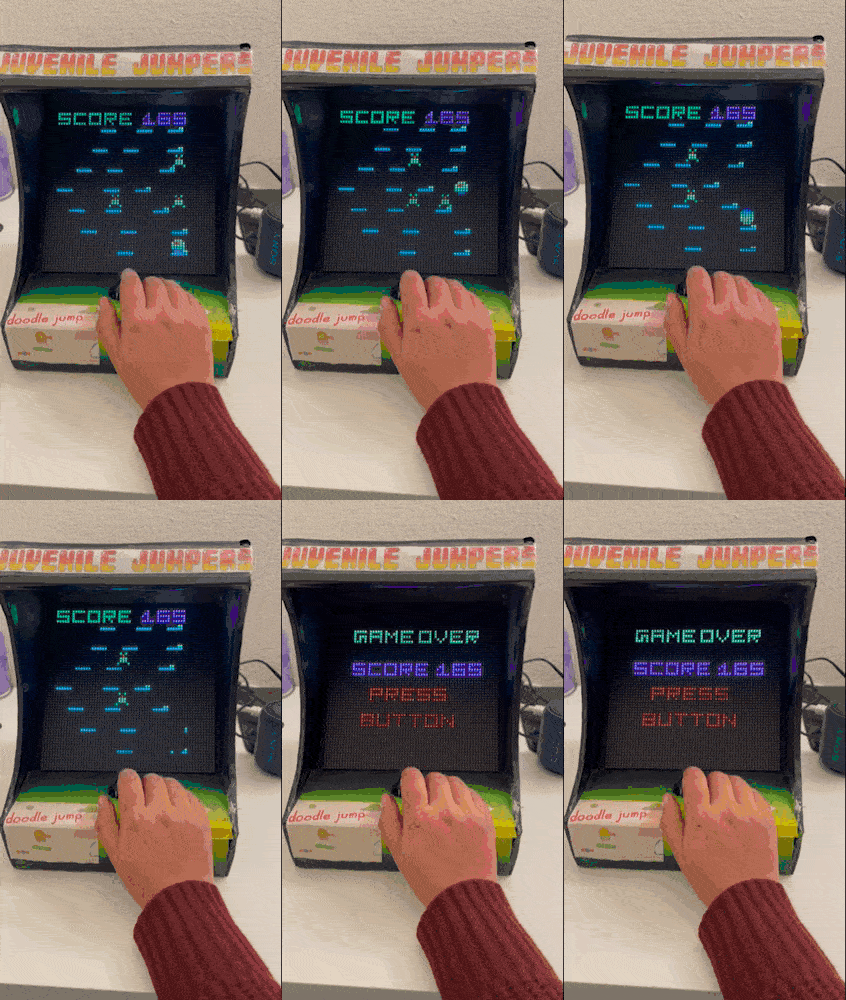
- In this level more difficulties have been added using monsters.
- But with more difficulties comes more solutions, so we have provided cannon to the doodle to shoot and kill the enemies.
- also, there are extra points on killing an enemy.
- If the doodle collides with enemies, the game ends.
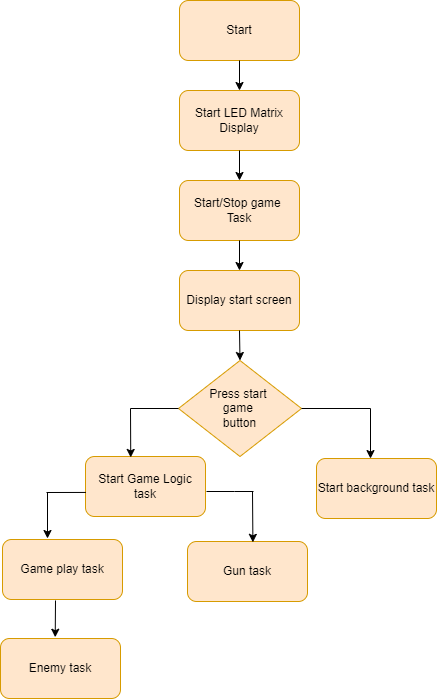
There are five tasks in total that are involved in this game in order to ensure full functionality.
1. Start and stop task:
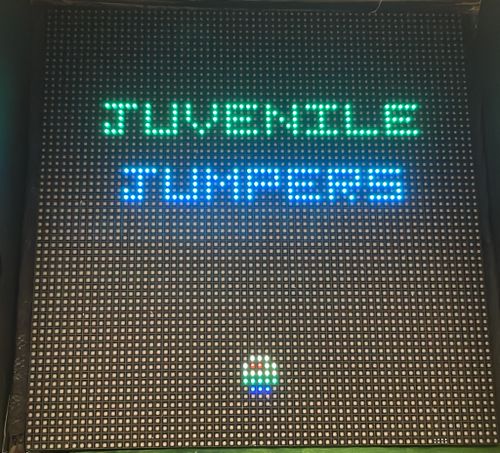
- This task displays the game's start screen.
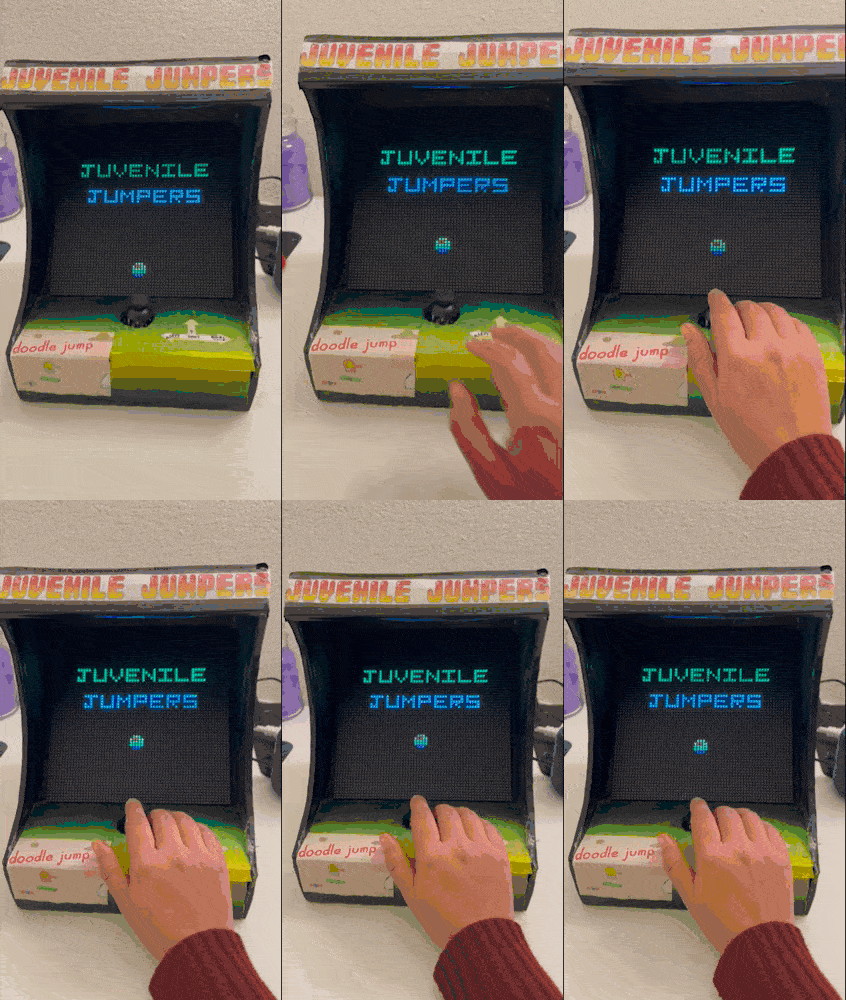
- To start the game, player need to press the onboard switch on the joystick.
- Switch is to be pressed again to restart the game.
Code snippet for Start stop task
void game_start_stop_task() {
  while (1) {
    if (!game_started) {
      led_matrtix_draw_objects_print_start_screen();
      while (1) {
        if (!start_game_button) {
          jumper_display_on_start_screen(56, 30);
        } else {
          break;
        }
      }
    }

    if (start_game_button) {
      start_game_button = 0;
      if ((play_button_count % 2) && game_started) {
#ifdef DEBUG
        fprintf(stderr, "Stopping game");
#endif
        stop_game();
        game_started = 0;
      } else if (!game_started) {
        led_matrix__clear_data_buffer();
#ifdef DEBUG
        fprintf(stderr, "Starting game");
#endif
        start_game();
        game_started = 1;
      }
      play_button_count++;
    }
    vTaskDelay(100);
  }
}
2. Background Screen task:
- This task creates background tiles for the doodle to jump on.
- It keeps on refreshing the led_matrix frame buffer with background data buffer.
Code snippet for Led matrix Task
static void background_screen_task() {
  srand(xTaskGetTickCount());
  initialize_background_screen();
  while (1) {
    if (game_started) {
      update_background_screen(0);
      vTaskDelay(100);
    }
  }
}
3. Game logic task:
- When the game starts, this task detects the doodle's initial position and collision with tiles.
- The doodle can take four jumps at a time.
- If a collision is detected then it shifts down the background screen creating the illusion of jumping of doodle to next tile.
- This task checks level and increments score.
- If the score is more than 150, the game will be switched to next level.
Code snippet for Gameplay Task
void game_play(void *params) {
  delay_time_ms = LEVEL1_DELAY_TIME_STANDARD;
  // Initialize Background Screen
  led_matrix_draw_alphabets_print_string("LEVEL", 15, 15, GREEN);
  led_matrix_print_digits_string(level + 1, 15, 50, YELLOW);
  vTaskDelay(2000);
  led_matrix__clear_data_buffer();
  initialize_background_screen();
  (void)find_initial_jumper_position(&jumper_row, &jumper_col);
  draw_jumper(jumper_row, jumper_col);
  while (1) {
    update_score();
    vTaskDelay(delay_time_ms);
    switch (level) {
    case 0:
      play_level_1();
      continue;
    case 1:
      play_level_2();
      continue;
    default:
      break;
    }
  }
  return;
}
4 LED Matrix task:
- This is a high-priority task which keeps displaying frame data every 1ms.
- There is also a draw objects that draw enemies, doodle, alphabets and digits for score.
Code snippet for Led matrix Task
static void display_task() {
  while (1) {
    led_matrix__update_display();
    vTaskDelay(1);
  }
}
5 Enemy tasks:
- Enemies are created from column 0 to 63 at random positions in this task.
Code snippet for Led matrix Task
void enemy_task(void *params) {
  find_initial_enemy_positions();
  while (1) {
    if (!game_over) {
      draw_enemies();
      vTaskDelay(70);
    } else {
      vTaskSuspend(NULL);
    }
  }
}
6 Gun Task:
- This task keeps on monitoring the joystick data for Y-axis
- If y-axis value is detected greater than 4000, a gun will be shot at the enemies.
Code snippet for Gun Task
void gun_task(void *params) {
  while (1) {
    if (!game_over) {
      shoot_gun(jumper_row, jumper_col);
      vTaskDelay(20);
    } else {
      vTaskSuspend(NULL);
    }
  }
}
IMPLEMENTATION
LED Driver
A 64*64 led matrix is used for this project. The led matrix is divided into two halves of 32*64 each. It has 3 R,G,B pins and 3 64-bits registers (shift registers) for each upper and lower halves. The address lines provided are 5. This means that at a time same row from the upper half and the lower half will be selected. So in order to display a particular row appropriate row should be selected and appropriate data needs to be fed to the RGB shift registers of both top and bottom halves. LED matrix is initialized by configuring the required pins as output. The led matrix has 3 more pins enable which are essential to display a pixel on the matrix. The clk pin that should used as a clk to the shift registers to shift the data out, the latch pin is used to latch the data from the shift registers onto the matrix's buffer, the output enable pin that is used to display the latched data on the selected row.
- Before feeding matrix data disable Output Enable (OE) GPIO
- Set bits on A, B, C, D GPIO pins to select the particular row.
- Loop through the pixels (columns) in the selected row and set the pixel color on R, G, B GPIO pins
- To mask that particular pixel set zero on R, G, B GPIO pins
- Set and Reset the clock for pushing the R, G, B bits for each column
- Issue latch to mark the row's completion
- Set OE
- Small delay
- Reset latch before going to next row
MP3 Decoder
- Integrated different music for every level that keeps on playing in background.
- To get the game state, sound flags are checked.
- Different music for jumps, firing, game over and collisions.
Code snippet for MP3:
void mp3__send_command(uint8_t command, uint8_t data_1, uint8_t data_2) {
  mp3_uart_buffer[0] = 0x7e;
  mp3_uart_buffer[1] = 0xff;
  mp3_uart_buffer[2] = 0x06;
  mp3_uart_buffer[3] = command;
  mp3_uart_buffer[4] = 0x00;
  mp3_uart_buffer[5] = data_1;
  mp3_uart_buffer[6] = data_2;
  mp3_uart_buffer[7] = 0xef;

  for (uint8_t i = 0; i < 8; i++) {
    uart__polled_put(UART__3, mp3_uart_buffer[i]);
  }
}

void mp3__init() {
  int mp3_baud_rate = 9600;
  uart__init(UART__3, clock__get_peripheral_clock_hz(), mp3_baud_rate);

  gpio__construct_with_function(GPIO__PORT_4, 28, GPIO__FUNCTION_2);
  gpio__construct_with_function(GPIO__PORT_4, 29, GPIO__FUNCTION_2);

  mp3__send_command(SELECT_DEVICE, 0x00, DEV_TF);
  mp3_play_start_song();
}

void mp3_play(int num) {
mp3__send_command(CYCLE_PLAY_FOLDER, num, 0x02);
}

void mp3_play_start_song() {
mp3_play(1);
}
Joystick
- Initialized the ADC Peripheral
- Set the appropriate pin functionality using the IOCON registers.
- Set the ADC pin functionality as input.
- Select ADC channels to read.
- Enable burst mode for a fast conversion.
Code snippet for Joystick:
void enable_joystick(gpio__port_e adc1, uint8_t x_pin, gpio__port_e adc2, uint8_t y_pin, gpio__port_e port, int pin) {
  const uint32_t set_analog_mode = (1 << 7);

  LPC_IOCON->P1_30 &= ~(set_analog_mode);
  LPC_IOCON->P0_25 &= ~(set_analog_mode);

  adc_xvalue = gpio__construct_with_function(adc1, x_pin, 1);
  adc_yvalue = gpio__construct_with_function(adc2, y_pin, 3);
  adc__initialize();
}

void initialize_joystick() {
  enable_joystick(GPIO__PORT_0, 25, GPIO__PORT_1, 30, GPIO__PORT_1, 31);
  button_press = p1;
}
TESTING & TECHNICAL CHALLENGES
PCB Design
We struggled to get the dimensions of the power supply module to design the PCB as the exact module was not available in the library. We have selected the pin dimensions for the power supply module by referencing other pin headers and using a general approximation to make it work satisfactorily. Because of this, the PCB went through a lot of internal revisions. While testing hardware on the PCB for the first time we faced a problem related to ribbon cable. To solve this problem we just replace the ribbon cable but we spent too much time realizing the problem.
LED Matrix and Game Play
- Collision detection with tiles was not working after the 32nd column. Eventually it turned out to be a very silly issue. It was because while doing `1 << 64`, 1 should have been type casted to uint64_t.
- The random number generator was not generating randomness as desired. The reason for that was that the random number generator was being seeded only once using xTaskGetTickCount() which would always give the same seed as xTaskGetTickCount() gives the time from the stat of the program and that would be same always at the start of the program. To get around this problem, the random number generator was seeded each time before generating a new random number.
- Led matrix's buffer was being overwritten every time a jumper goes over the tiles. To resolve this issue keep refreshing the background screen in a task.
MP3 Decoder
While integrating the mp3 decoder code with the rest of the code, there occurred an issue in display and game became slow. So instead of creating a separate task for mp3 decoder, we just did mp3__init() in main function and the issues got resolved.
CONCLUSION
We were able to accomplish the goals of the game that we outlined at the starting. Juvenile jumpers game successfully ran and mimicked the original doodle jump game. All the game components functioned correctly during the final demo allowing for a flawless experience. The LED matrix was capable of loading the various monsters and gun while playing the sounds for each of the game items. The demo showcased that the gun was able to shoot the enemies to gain points. Through this project, we learned a lot about designing real world project using FreeRTOS applications, drivers, PCB design, power management circuits, git source code management, and final integration testing. This project allowed us to understand the importance of writing down requirements, planning a schedule for development, and communication between all of us.
ACKNOWLEGEMENT
We would like to sincerely thank Professor Preetpal Kang for designing such a knowledgeable course and continuous guidance and support throughout the implementation of this project. Further, we would like to thank the ISA team for their advice and feedbacks.
