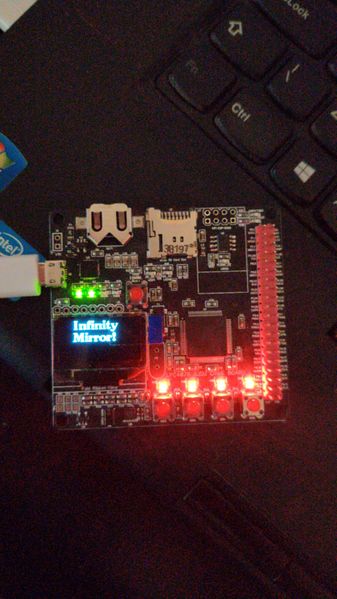
F19: Infinity Mirror
Contents
- 1 Abstract
- 2 Introduction & Objectives
- 3 Team Members & Technical Responsibilities
- 4 Administrative Responsibilities
- 5 Team Deliverables Schedule
- 6 Bill of Materials (General Parts)
- 7 Printed Circuit Board
- 8 Product Enclosure
- 9 RGB LED Matrix
- 10 Pin Configuration
- 11 MP3 Decoder
- 12 Audio Frequency Analyzer
- 13 Sensors Interface
- 14 Bluetooth Interface
- 15 Mobile Application
- 16 OLED Screen
- 17 Technical Challenges
- 18 Suggestions for Future Students
- 19 Conclusion
- 20 Project Video
- 21 Project Source Code
- 22 Project Presentation File
- 23 References
Abstract
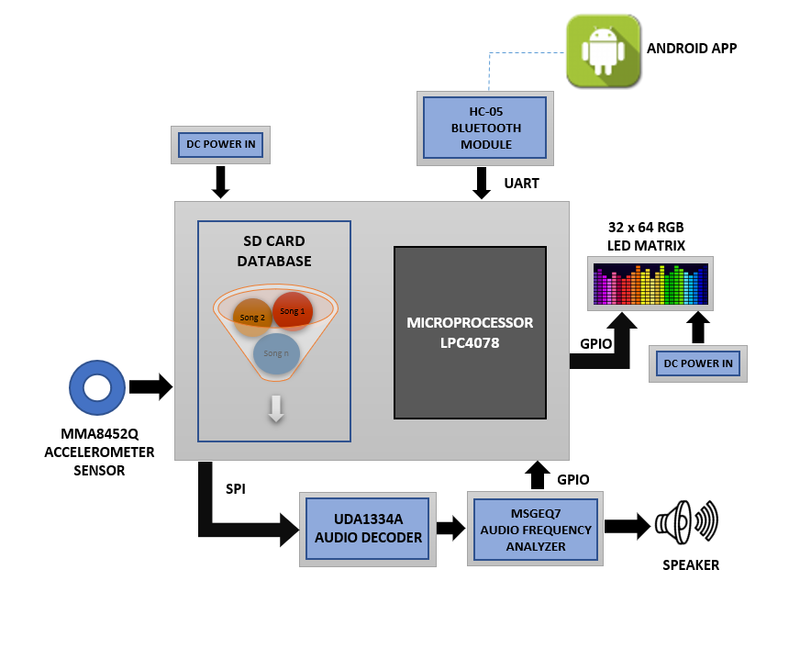
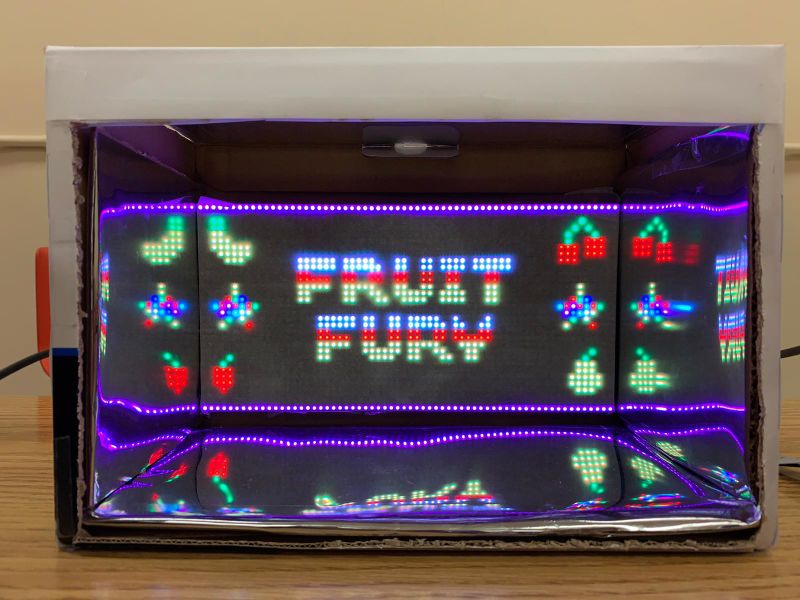
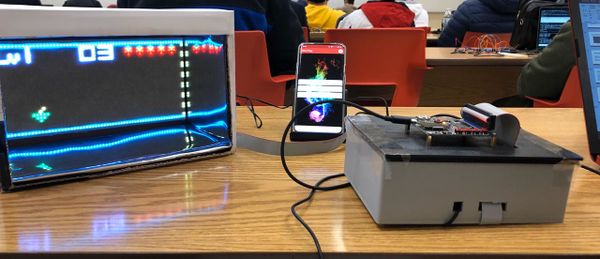
The main theme of the project is to build an interactive embedded system consisting of two entertainment modes - Music and Gaming. On the music mode, the MP3 decoder module reads songs from an SD card on the MCU board and plays the music through a speaker. It deals with the convergence of various services such as playing a game with background music, control volume, switch and pause/play songs. While the song is being played, audio frequency spectrum bands based on music tune are displayed on the LED Matrix band visualization etc. On the game mode, a fruit smashing game called “Fruit Fury” is implemented where the user needs to orient the MCU board in a direction according to where the fruit appears on the LED matrix. Alongside, the user can listen and switch songs. To achieve the above functionalities, various elements such as Audio Decoder, Audio frequency analyzer, 32x64 RGB LED Matrix and HC-05 bluetooth module and Android application are integrated.
Introduction & Objectives
The key features supported by the system is real-time orientation recognition & trigger respective actions in 2 modes - MP3 mode and Game mode.
MP3 MODE:
1. Determine the accelerometer sensor values based on the orientation of the board and perform music control such as play, pause, volume control and changing songs.
2. In response, retrieve the data from the SD Card & communicate to the audio decoder for appropriate audio streaming.
3. Also implemented interaction with HC-05 bluetooth module through a customized mobile application and provide same operations.
4. Display frequency spectrum bands in sync to the tune of the song played.
GAME MODE - Fruit Fury:
1. Determine the accelerometer sensor values based on the orientation of the board and hit the fruit in corresponding direction.
2. Incorporating provision on the board's switches to change to next or previous song.
3. Also implemented interaction with HC-05 bluetooth module through a customized mobile application and play the game through the same.
Project Objectives
     1. Audio Decoder - Fetches song data from the SD card and plays it over a speaker.
     2. RGB LED Matrix - Display frequency bands on music mode or view the game on game mode.
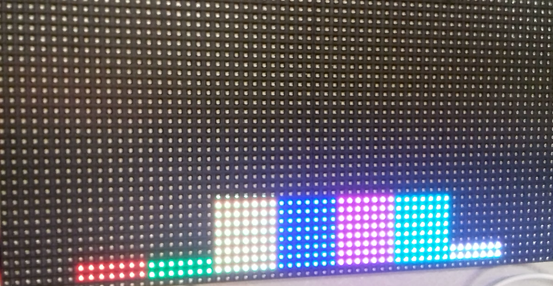
     3. Audio Frequency Analyzer - To convert the audio data into 7 spectrum bands which is then displayed as individual colored bands on the LED matrix.
     4. Bluetooth HC-05 - Interfaces the system using Bluetooth to an Android application.
Team Objectives
     1. Learn each and every module as much as possible, in order to develop an overall product.
     2. Understand the proper use of queues and semaphores in order to send/receive the data between multiple tasks.
     3. Learn to integrate all modules and ensuring smooth transition, communication and context switching at desired time intervals.
     4. Document and track all the bugs encountered during development and learn to update git repository after every fix.
Team Members & Technical Responsibilities
- Aakash Chitroda
- MP3 Audio Encoder/Decoder
- Audio frequency Analyzer logic
- Integrating MP3 player with the Game
- Monitoring and controlling the CPU utilization
- Ganesh Ram
- Interfacing of LED Matrix and driver design
- Game logic design
- Audio frequency spectrum logic on LED
- Packaging
- Niket Naidu
- Android & Bluetooth Application
- OLED Interfacing and Designing
- PCB Design improvements
- Accelerometer Sensor integration with OLED Screen
- Vidushi Jain
- Bluetooth Communication
- Interfacing of Gesture & Accelerometer Sensors
- Hardware Designing & PCB Integration
Administrative Responsibilities
| Administrative Roles | ||||
|---|---|---|---|---|
|
Aakash Chitroda | |||
|
Niket Naidu | |||
|
Vidushi Jain | |||
|
Vidushi Jain
Ganesh Ram | |||
|
Ganesh Ram | |||
Team Deliverables Schedule
| WEEK |
START DATE |
END DATE |
TASK DETAILS |
STATUS |
|---|---|---|---|---|
| 1 | 15 Oct 2019 | 22 Oct 2019 |
|
Completed Completed Completed Completed |
| 2 | 23 Oct 2019 | 29 Oct 2019 |
|
Completed Completed Completed Completed Completed |
| 3 | 30 Oct 2019 | 5 Nov 2019 |
|
Completed Completed Completed Completed Completed Completed |
| 4 | 6 Nov 2019 | 12 Nov 2019 |
|
Completed Completed Completed Completed Completed Completed |
| 5 | 13 Nov 2019 | 19 Nov 2019 |
|
Completed Completed Completed Completed Completed Completed Completed |
| 6 | 20 Nov 2019 | 26 Nov 2019 |
|
Completed Completed Completed Completed Completed Completed Completed |
| 8 | 27 Nov 2019 | 3 Dec 2019 |
|
Completed Completed Completed Completed Completed |
| 9 | 4 Dec 2019 | 10 Dec 2019 |
|
Completed Completed Completed Completed Completed |
| 10 | 11 Dec 2019 | 17 Dec 2019 |
|
Completed Completed Completed Completed Completed |
| 11 | 18 Dec 2019 |
|
Completed Completed |
Bill of Materials (General Parts)
| PART NAME |
PART MODEL & SOURCE |
QUANTITY |
COST PER UNIT (USD) |
|---|---|---|---|
|
|
|
|
|
|
| |
|
|
| |
|
|
| |
|
|
| |
|
|
|
|
|
|
|
|
|
|
| |
|
|
|
Printed Circuit Board
Design And Architecture
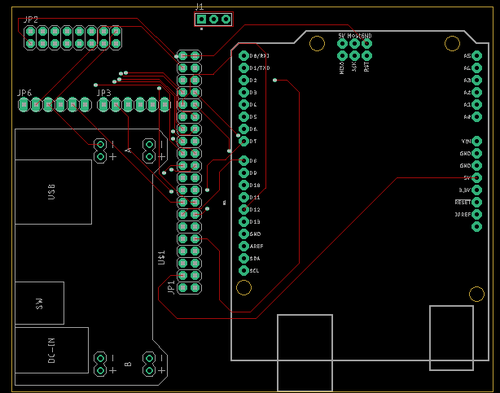
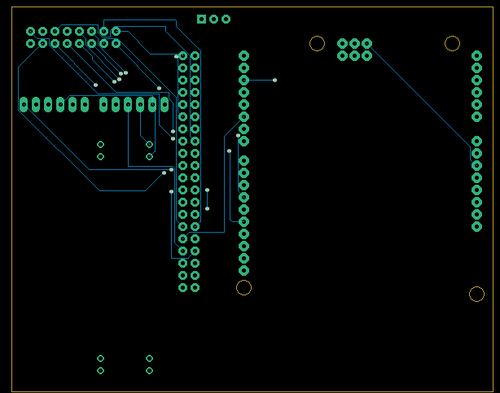
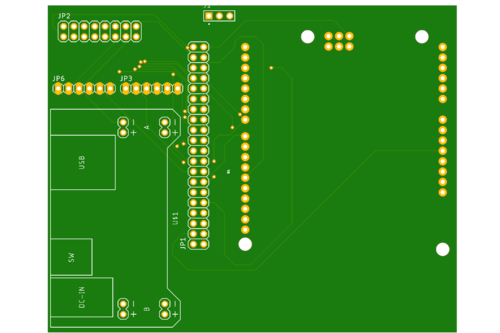
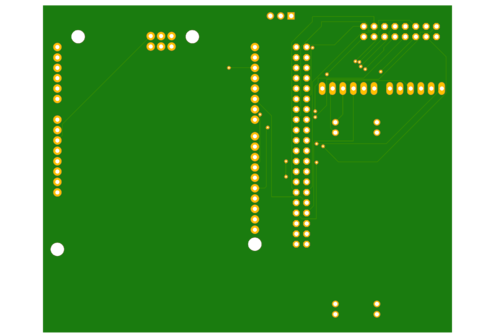
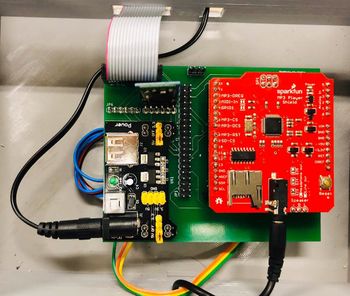
We have designed the custom PCB using Eagle Software and as well as one prototype board in which we have connected all the modules with SJ-Two board. PCB was sent to fabrication to JLCPCB China which provided PCB with lead time of 1 week. We have implemented 2 layers of PCB with all of the parts in top layer.
Components Placements on PCB and on Prototype Board
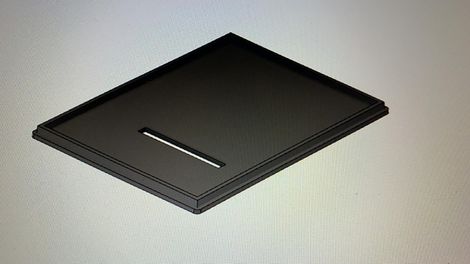
     1. One SJ-Two board is fitted onto the top of the 3D printed lid cover which with a slot opening for 2x40 IDC cable.
     2. MP3 Decoder is connected with SJ-Two board and will be place on the right side of PCB and as well as on Prototype board.
     3. Bluetooth Module needs only 4 pins to connect with SJ-Two and goes to UART3 and placed on the top left of the board.
     4. LED Matrix is connected using 2x8 IDC cable pins on the top left side of the board.
     5. Audio Frequency Analyzer is placed on the bottom side of PCB.
     6. Power supply of 5v and 3.3v provisions are made on the bottom left side of PCB.
Infinity Mirror's Internal Circuit
Product Enclosure
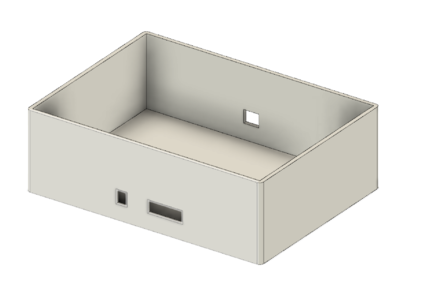
To facilitate easy and convenient gaming experience and also act as an effective audio controller, a single 3D printed enclosure was designed which is spacious enough to accommodate the MCU modules like bluetooth, audio frequency analyzer and MP3 decoder on the PCB.
Final 3D Package
RGB LED Matrix
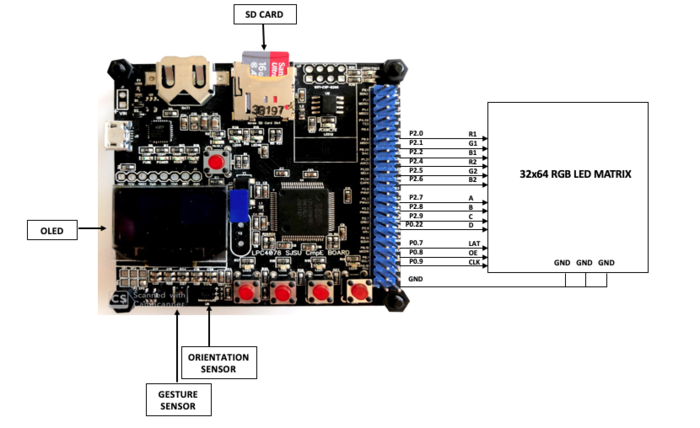
A 32 x 64 RGB LED Matrix will be powered up through a 5V/4A DC adapter and is interfaced with the board to play the game 'Fruit Fury' with desired background song in the game-mode and to display the frequency bands and other relevant messages such as "Next", "Previous" and "Pause" in the music-mode. Only the INPUT IDC connector will be used because we are not cascading multiple matrices. The matrix has 2 planes (upper and lower), both of which will be programmed separately. In order to set RGB color data for each pixel in plane 1 (top half of the display) we use R1, G1 and B1 pins and for plane 2 we use R2, G2 and B2. By setting and resetting the CLOCK pulse, color data is set for every pixel in the row. Then the LATCH is set to mark end of the row and reset to move to next row. All of these steps are repeated at very less time intervals so that the human eye perceives it as one complete frame (Persistence of Vision).
Below is the description of the pins:
Pin Configuration
| Pin | Pin Description |
|---|---|
| R1 | Sets upper panel's Red data |
| G1 | Sets upper panel's Green data |
| B1 | Sets upper panel's Blue data |
| R2 | Sets lower panel's Red data |
| G2 | Sets lower panel's Green data |
| B2 | Sets lower panel's Blue data |
| A | Sets row bit 0 |
| B | Sets row bit 1 |
| C | Sets row bit 2 |
| D | Sets row bit 3 |
| E | Sets row bit 0 |
| nOE | Set to switch the LEDs off when transitioning from one row to the next |
| LATCH | Set to mark completion of one row |
| CLK | Set to access each pixel |
| GND | Ground pins to be connected with board's GND. |
Below are the technical specifications:
| Spec | Value |
|---|---|
| Pitch | 4mm |
| Resolution | 32 x 64 = 2048 dots |
| Panel dimensions (l x b x h) in mm | 256 x 128 x 13 |
| Working voltage/current rating | 5v / 4A (max) |
| Scan Rate | 1 / 16 |
| Pixel component configuration (R,G,B) | (1,1,1) |
| Weight | 0.24 kg |
Hardware Design
The hardware involves 5V/4A DC power supply adapter, barrel jack connectors and IDC cables to power up the LED matrix and communicate with the board. Below is the pin interfacing diagram.
Software Design
1. Fruit Fury - Game mode
There are 2 tasks involved to ensure functioning of the game.
a) Task 1:
- Display the game's title screen. On pressing the onboard switch (SW1), game begins.
- Also used to display game over screen / win screen.
b) Task 2:
- Enter into game mode to play the game.
- Read accelerometer values (board orientation) and render game frame.
- Detect the player's board movement, compare it with fruit's location.
- Display score, lives and smash effects.
- Press another switch (SW0) to stop game and return to title screen or to restart the game once it is over.
Game rules:
a) Game comprises of 3 levels (level 2 on reaching score 15 and level 3 on reaching score 30) and 5 lives in total.
b) Primary objective is to tilt the board to the direction (North West, North East, South West or South East) in which the fruit appears in order to smash it.
c) Score increases by 1 point for smashing each fruit.
d) Bombs start appearing after completion of level 1, which costs a life when hit.
e) Level 3 is faster so make sure you tune your reflexes up.
f) Reach score 50 to win the game.
Bonus:
a) Streaks are rewarding. Smash 10 fruits straight up to win an extra life.
b) Look out for star fruits. Hit them to gain +2 points.
Choose your song to take all the inspiration you can and start smashing!
2. Music mode
a) Press the button to enjoy music-only mode. Graceful audio spectrum bands are displayed that dance to the tune of the chosen song.
b) A display is prompted to the user whenever music is paused or changed to next or previous song.
Implementation
LED Driver
1. Initialize the LED matrix by configuring necessary pin directions.
2. Disable Output Enable (OE) GPIO before feeding matrix data.
3. Select the required row by setting bits on A, B, C, D GPIO pins.
4. Loop through the pixels (columns) in the selected row and set the pixel color on R, G, B GPIO pins.
5. Set zero on R, G, B GPIO pins to mask that particular pixel.
6. Set and Reset the clock for pushing the R, G, B bits for each column.
7. Issue latch to mark the row's completion and reset latch before going to next row.
8. Follow the steps 2 to 7 for other rows.
    for (uint8_t row = 0; row < (MAX_ROW / 2); row++) {
      disableOE();
      set_row(row);
      for (uint8_t col = 0; col < MAX_COL; col++) {
        LPC_GPIO0->PIN |= (1 << CLK);
        set_color_bottom(game_matrix[row + (MAX_ROW / 2)][col]);
        set_color_top(game_matrix[row][col]);
        LPC_GPIO0->PIN &= ~(1 << CLK);
      }
      LPC_GPIO0->PIN |= (1 << LAT);
      LPC_GPIO0->PIN &= ~(1 << LAT);
      enableOE();
      vTaskDelay(1);
    }
Fruit Fury - Game mode
1. Generate the fruit's initial coordinate using random function (used srand() with time value as seed to get random pattern sets).
2. Construct the LED matrix array by drawing the fruit and borders.
3. Push the entire matrix data to LED driver to display the constructed matrix frame.
4. Then read the player's orientation and match with fruit's direction.
5. Modify game parameters (score, lives and level) based on player's results.
6. Stop game if all lives are over and display game over screen by switching to game init task (Task 1).
    /* Push button to exit game */
    if (LPC_GPIO0->PIN & (1 << SW0))
      is_start_game = false;

    if (is_start_game == true) {
      /* Generate fruit's initial coordinate position */
      get_fruit_begin_coord(&row_pt, &col_pt, &quadrant);
      /* Generate final frame by considering fruit object at that position */
      construct_game_matrix(row_pt, col_pt);
      /* Draw final frame matrix of the game */
      draw_final_game_frame();
      /* Get the board direction from the user and increment score count */
      compute_game_params(row_pt, col_pt, quadrant);
    } else
      vTaskResume(display_game_init_screen_t);
Spectrum display - Music mode
1. Read the audio frequency values from the graphic equalizer task and store it as an array.
2. Based on value of each frequency band, assign a height of the band (in pixels) to be drawn on the LED matrix.
3. Set a unique color for each band.
3. Push the entire matrix data to LED driver to display the constructed matrix frame.
4. Repeat steps 1 to 3 at required intervals to display repeating bands.
for (row = MAX_ROW - 1; row >= 1; row--) {
    for (col = 7; col <= 62; col++) {
      if ((row >= (MAX_ROW - band_height[0])) && col >= 7 && col <= 13 &&
          band_num <= 0) {
        band_matrix[row][col] = RED;
      }
      if ((row >= (MAX_ROW - band_height[1])) && col >= 14 && col <= 20 &&
          band_num <= 1) {
        band_matrix[row][col] = GREEN;
      }
      if ((row >= (MAX_ROW - band_height[2])) && col >= 21 && col <= 27 &&
          band_num <= 2) {
        band_matrix[row][col] = YELLOW;
      }
      if ((row >= (MAX_ROW - band_height[3])) && col >= 28 && col <= 34 &&
          band_num <= 3) {
        band_matrix[row][col] = BLUE;
      }
      if ((row >= (MAX_ROW - band_height[4])) && col >= 35 && col <= 41 &&
          band_num <= 4) {
        band_matrix[row][col] = PURPLE;
      }
      if ((row >= (MAX_ROW - band_height[5])) && col >= 42 && col <= 48 &&
          band_num <= 5) {
        band_matrix[row][col] = CYAN;
      }
      if ((row >= (MAX_ROW - band_height[6])) && col >= 49 && col <= 55 &&
          band_num <= 6) {
        band_matrix[row][col] = WHITE;
      }
    }
  }
MP3 Decoder
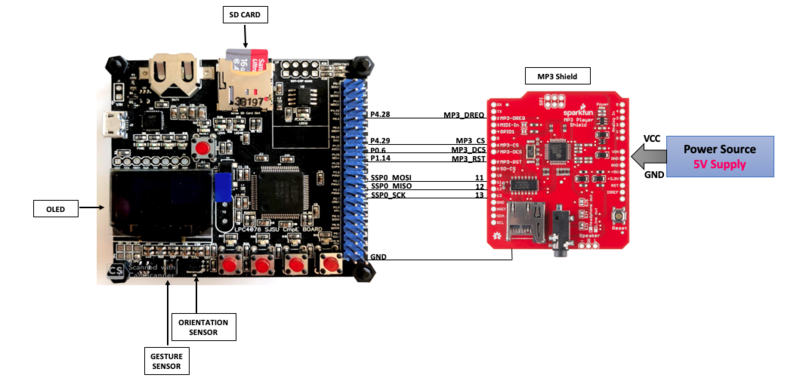
The Audio Decoder breakout board communicates with the SJ board over SPI and is interfaced with the SPI-0 pins of the SJ board as follows:
- Clock Pin (Pin 13) - SJ SPI-0 Clock Pin
- MISO Pin (Pin 12) - SJ SPI-0 MISO Pin
- MOSI Pin (Pin 11) - SJ SPI-0 MOSI Pin
- MP3 CS: Chip Select Pin for the audio decoder to be activated while sending control signals.
- MP3 DCS: Chip Select Pin for the audio decoder to be activated while sending audio data signals.
- MP3 RST: Reset pin for the audio decoder.
- MP3 DREQ: Data Request Pin. Audio decoder signals that it is ready to accept next 32 bytes of audio data.
- VCC pin - SJ 3.3V pin
- GND pin - SJ GND Pin
Hardware Design
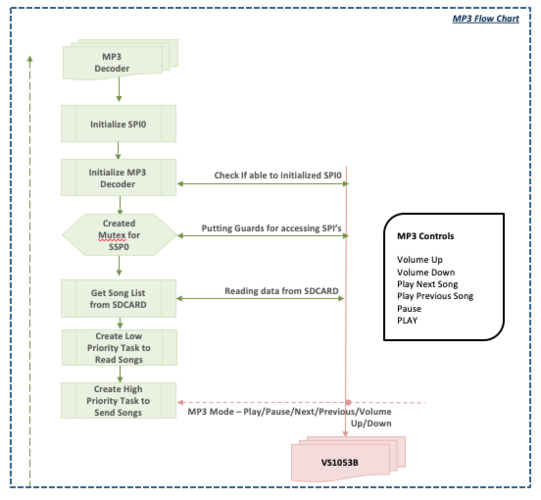
Software Design
Implementation
We are interfacing MP3 Decoder on the SPI0 for reading the Audio Mp3 file from the SDCard and send Mp3 data to the Decoder. The purpose of this task is to send mp3 data to the mp3 decoder. This is a high priority as it is acting as a consumer. The producer task in our project is the task that reads songs that fill the freeRTOS queue with 4KB of data. The consumer task i.e the task that sends a song to the mp3 decoder that waits on an empty queue for portMAX_DELAY. Once the queue has data, the task starts sending 32 bytes at a time to the MP3 decoder. Once 32 bytes are sent, the task waits for the DREQ pin to get high. DREQ pin high indicates that the MP3 decoder unit is ready to take 32 bytes of data. For sending data, the task acquires the MUTEX so that no other task can use the SPI bus at the same time. Once the 32 bytes are sent, the MUTEX is released. This is the working of the task.
// Task to send data to decoder(High priority)
static uint8_t bytes_to_be_sent_to_decoder[READ_BYTES_FROM_FILE];
 static uint8_t current_count = 0;
 uint32_t start = 0, end = 0;
 while (1) {
   if (0 == current_count) {
     xQueueReceive(mp3_queue, &bytes_to_be_sent_to_decoder[0], portMAX_DELAY);
   }
   start = (current_count * TRANSMIT_BYTES_TO_DECODER);
   end = ((current_count + 1) * TRANSMIT_BYTES_TO_DECODER);
   while (!mp3__dreq_get_status()) {
     mp3__decoder_refresh();
     vTaskDelay(2);
   }
   if (xSemaphoreTake(mp3_mutex, portMAX_DELAY)) {
     mp3__data_cs();
     send_32_bytes_to_decoder_using_ssp(start, end,
                                        &bytes_to_be_sent_to_decoder[0]);
     mp3__data_ds();
     xSemaphoreGive(mp3_mutex);
     if (current_count == COUNT - 1) {
       current_count = start = end = 0;
     } else {
       current_count += 1;
     }}}
Audio Frequency Analyzer
In the audio analyser, strobe and reset pins are used to select the DC peak output. Reset high resets the multiplexer. Reset low enables the strobe pin. At the leading edge of the first strobe, the first frequency band 63Hz is on the output. On each additional leading edge strobe the next frequency band(160Hz, 400Hz, 1kHz, 2.5kHz, 6.25kHz, 16kHz) is detected.
This analyser takes input from Audio decoder for left and right side music. SJ2 controls the RS and ST pins of the "Audio Frequency Analyzer" and reads input data from S pin which is connected to ADC pin (P0.26) of SJ2 board.
- Audio Analyzer S pin -> SJ2 ADC4 pin
- Audio Analyzer RS pin -> SJ2 P0.11 pin
- Audio Analyzer ST pin -> SJ2 P2.0 pin
- Audio Analyzer + pin -> SJ2 VCC pin
- Audio Analyzer - pin -> SJ2 GND pin
Audio Frequency Analyser
Audio frequency analyser is working is most important task in order to get correct value. Incorrect initialisation and in efficient delays may cause error. In this project Init and reading of data at each frequncy band is implemented based on timing diagram shown as bellow:
The software Implementation to Init frequency analyser is as follow:
1. Select ADC pin
2. Select GPIO pin direction for reset pin and STOBE pin
3. Reset Audio frequency analyser
Sensors Interface
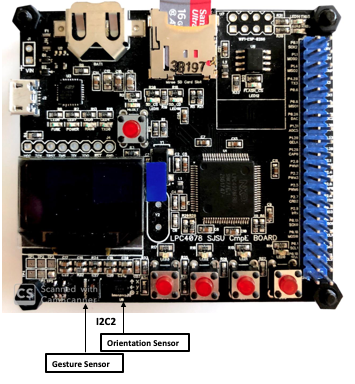
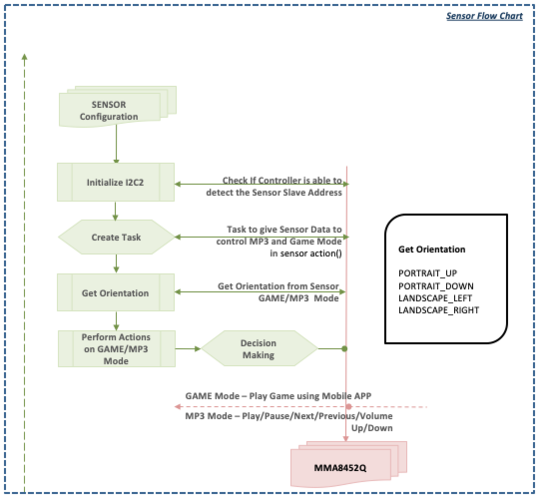
We have worked on two sensors for accessing our entertainment box i.e. Gesture Sensor and Accelerometer. The SJ-Two board has both sensors on board sensor which is interfaced on the I2C bus. Accelerometers are electromechanical devices that sense either static or dynamic forces of acceleration. Static forces include gravity, while dynamic forces can include vibrations and movement. The measurements are on 3-axis and these values can be calibrated to find the desired values.
In our project, an accelerometer is for controlling Controls in the MP3 Mode like PLAY,PAUSE,PLAY Next Song and Back to Previous Song.However in Game Mode we are playing our fruit fury game using Orientation sensor for Smashing fruits coming in Directions South East, South West ,North East and North West and We were using Gesture on SJ-Two Board for gesture recognitions Left, Right, UP and Down to change the configuration in MP3 Mode but after implementation we have realised that giving gesture is more complicated then getting signals from orientation.
Hardware Design
Software Design
Implementation
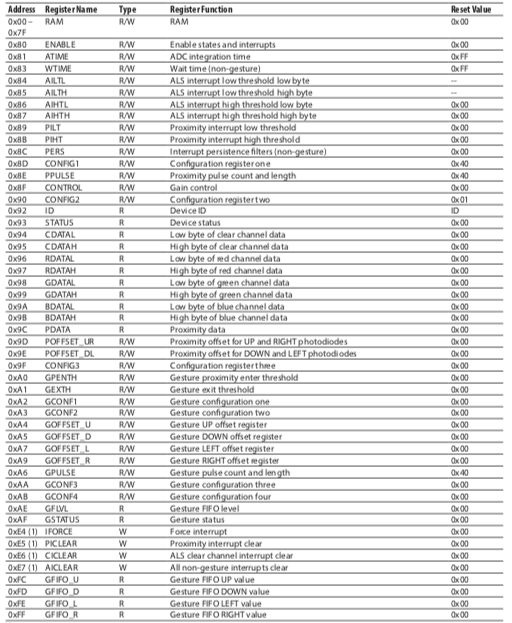
The MMA8452Q has an orientation detection algorithm with the ability to detect all six orientations but we are using only 4 orientations i.e. Portrait Up, Portrait Down,Landscape Left and Landscape Right .The transition from portrait to landscape is fixed with a 45° threshold angle and a ±14° hysteresis angle. This allows the for a smooth transition from portrait to landscape at approximately 30° and then from landscape to portrait at approximately 60°.
We have used the following register settings to configure the sensors and getting all 4 directions and Orientation.
After reading the registers we are just performing the actions as per the Orientation detected.
void perform_action_on_orientation(void *p)
{
 orientation_e value;
 while (1)
 {
   value = GetOrientation();
   switch (value)
   {
   case Portrait_UP: // Prev Song
     printf("Direction Left\n");
     xSemaphoreGive(sem__prev_song);
     break;
   case Portrait_DOWN: // Next Song
     printf("Direction Right\n");
     xSemaphoreGive(sem__next_song);
     break;
   case Landscape_LEFT: // Resume/Play/
     printf("Direction Up\n");
     vTaskSuspend(handle__play_song);
     vTaskSuspend(handle__freq_bands);
     song_status = PLAY;
     break;
   case Landscape_RIGHT: // Pause/Stop/Volume Decrease
     printf("Direction Down\n");
     vTaskResume(handle__play_song);
     vTaskResume(handle__freq_bands);
     song_status = PAUSE;
     break;
   default:
     break;
   }
   vTaskDelay(50);
 }}
Bluetooth Interface
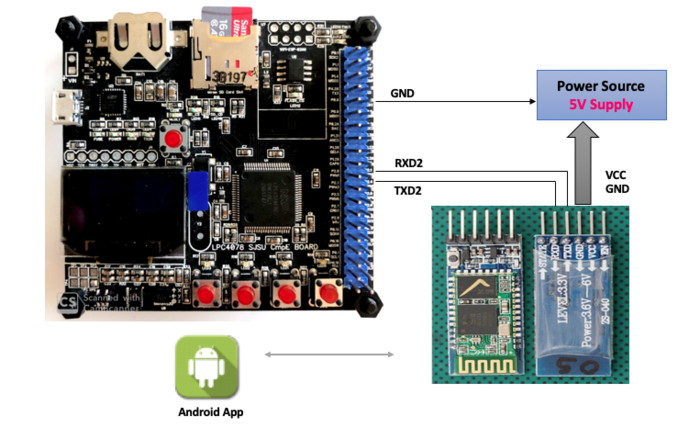
The SJ-two is connected to the Bluetooth module through the Serial interface (UART3) and we have configured it at 38400 baud rate with 8-bit data and 1 stop bit using the Communication Mode. It is used to send and receive the Game and Music data from our entertainment device to an android application.
Hardware Design
HC-05 Bluetooth module
HC-05 Bluetooth Module is used to set up wireless communication between the entertainment device and the Android phone. The right section of the Bluetooth Board has connection pins for power and signals as well as a 5V to 3.3V Regulator, LED, and level shifting.
HC-05 PinOut
* EN: N/A
* VCC: 5V Power
* GND: Ground
* TXD: Serial Transmit pin connected to RXD3 of SJ board
* RXD: Serial Receive  pin connected to TXD3 of SJ board
* STATE: States if connected or not
Software Design
Implementation
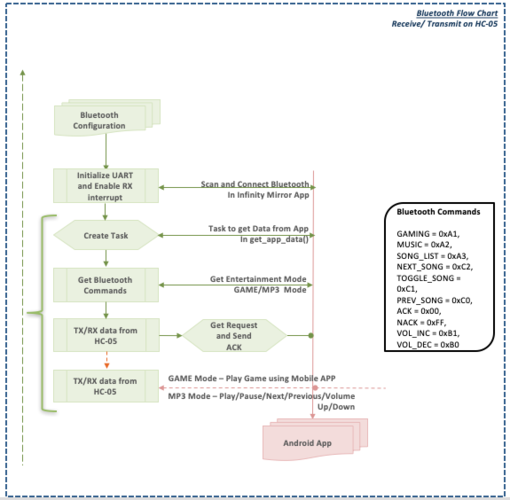
An accelerometer is used in the MP3 Mode to implement functionalities such as play, pause, switch to next and previous songs and volume control. In the game mode the “Fruit fury” game is played by smashing fruits appearing in the directions South East, South West, North East and North West. UART3 is used as communication protocol.The Bluetooth commands that we are using to interact with Mobile app and Device are as follows:
 GAMING = 0xA1,
 NORTH_EAST = 0x71,
 NORTH_WEST = 0x72,
 SOUTH_WEST = 0x73,
 SOUTH_EAST = 0x74,
 MUSIC = 0xA2,
 SONG_LIST = 0xA3,
 NEXT_SONG = 0xC2,
 TOGGLE_SONG = 0xC1,
 PREV_SONG = 0xC0,
 ACK = 0x00,
 NACK = 0xFF,
 VOL_INC = 0xB1,
 VOL_DEC = 0xB0
Mobile Application
Software Design
The Android app has been built using the cross platform framework Flutter
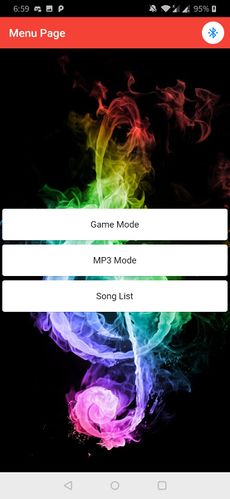
The app is composed of 3 parts, Game Mode, MP3 Mode and MP3 Song List. On the main screen we first connect to the bluetooth before establishing connection with any of the modes. The working of each mode is explained in each subsection below.
A few variables to note in advance ACK = 0x00, sent when successful NACK = 0xFF, sent incase there is any error
1. Game Mode
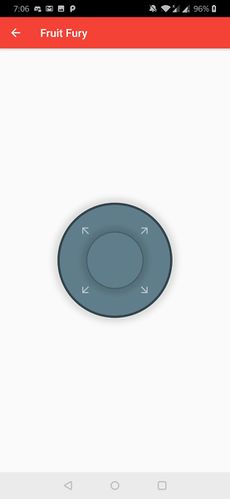
Wireless communication with the Entertainment box communication over Bluetooth protocol. Android Application is created which provides an interface to exchange data and configure the device.To enter the Game Mode screen we first check if the Bluetooth Connection is established. We send in a one byte data 0xa1 over bluetooth to the SJ2 Board and get back the response "a1$ack/nack$##" We then enter the game mode which displays a joystick that can be oriented to a direction wherever the fruit appears on the LED matrix. The corresponding orientation value is then transmitted.If the fruit had appeared in any of the quadrant then will send data from BLE APP to SJTwo Board.
1. First Quadrant (North-East): 0x71
2. Second Quadrant (North-West): 0x72
3. Third Quadrant (South-West): 0x73
4. Fourth Quadrant (South-East): 0x74
2. MP3 Mode
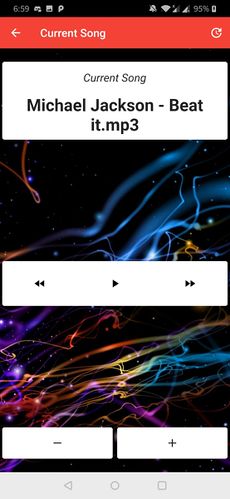
To enter the MP3 Mode screen we first check if the Bluetooth Connection is established similar to the Game Mode. We send in one byte of data 0xa2 over bluetooth to the SJ2 Board and get back the response "a2$ack/nack$volumeInfo$currentSong$isPlaying/isPaused$##" where isPlaying is 1 and isPaused is 0. These values are loaded into the MP3 Mode Screen as initial values for the current song playing. We can then see a screen where we can control the various aspects of playing songs i.e Playing and Pausing the song, Go to next song and and Go to the previous song. We can also control the volume remotely.Controlling each part of this interface is the same as sending a single byte of data over bluetooth to the SJ2 Board.
1. Playing and Pausing Song - We just toggle the state of the Song. We issue this command by sending 0xc1 which is the Toggle State command.
2. Next Song and Previous Song - Command for the previous and next song is 0xC0 and 0xC2.
3. Control Volume remotely - For volume we divide the percentage 100 percent in 16 parts. We can send the value between 0xb0 to 0xbf in increments of one step. This is parsed on the SJ2 Board and converted to an equivalent volume signal.
3. MP3 Song List
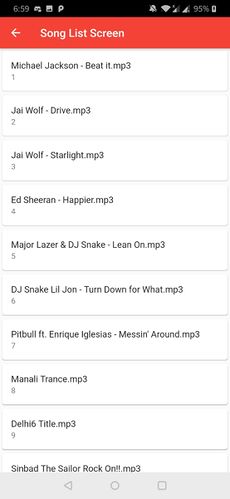
To get the list of MP3 Songs which are present in the SD card, we first check if the Bluetooth Connection is established similar to the Game Mode and MP3 Song mode. We send in one byte of data 0xa3 over bluetooth to the SJ2 Board and get back the response "a3$ack/nack$data$data$...$##". APIs that were designed to read song information and data by Audio Decoder, will be used for achieving this functionality.
OLED Screen
Software Design
The open source package u8g2 has been used. There are already ready made functions for various OLED Drivers. The indepth setup guide can be found here
Implementation
The u8g2 library is a very robust library which means that this code can be extended for any microcontroller as long as the interface is written properly.
We needed to write 2 main functions, outlined below, i.e byte_cb and gpio_and_delay_cb using the function prototype `uint8_t u8x8_lpc_gpio_and_delay(u8x8_t *u8x8, uint8_t msg, uint8_t arg_int, void *arg_ptr)`.
Since the SJ2 Board is connected to the OLED Screen on the SPI1 Bus we also need to write the SPI1 driver, mainly a method to that sends data over SPI to the Slave device i.e the OLED Screen
Initializing the u8g2 for LPC4078
// Created a file `u8g2_wrapper.h

static gpio_s dc;
static u8g2_t u8g2;

void u8g2_wrapper__init(gpio_s *dc_pin) {
  u8g2_Setup_ssd1306_128x64_vcomh0_1(&u8g2, U8G2_R0, u8x8_byte_4wire_hw_spi, u8x8_lpc_gpio_and_delay);
  u8g2_InitDisplay(&u8g2);
  u8g2_SetPowerSave(&u8g2, 0);

  dc.pin_number = dc_pin->pin_number;
  dc.port_number = dc_pin->port_number;
}

u8g2_t *u8g2_wrapper__get_instance() { return &u8g2; }

uint8_t u8x8_lpc_gpio_and_delay(u8x8_t *u8x8, uint8_t msg, uint8_t arg_int, void *arg_ptr) {
  switch (msg) {
  case U8X8_MSG_GPIO_AND_DELAY_INIT:
    delay__ms(1);
    break;
  case U8X8_MSG_DELAY_MILLI:
    delay__ms(arg_int);
    break;
  case U8X8_MSG_GPIO_DC:
    // DONE, Write to the GPIO_DC Pin
    if (arg_int == 0) {
      gpio__reset(dc);
    } else {
      gpio__set(dc);
    }
    break;
  case U8X8_MSG_GPIO_RESET:
    break;
  }
  return 1;
}

uint8_t u8x8_byte_4wire_hw_spi(u8x8_t *u8x8, uint8_t msg, uint8_t arg_int, void *arg_ptr) {
  uint8_t *data;
  switch (msg) {
  case U8X8_MSG_BYTE_SEND:
    data = (uint8_t *)arg_ptr;
    while (arg_int > 0) {
      ussp1__exchange_byte((uint8_t)*data);
      data++;
      arg_int--;
    }
    break;
  case U8X8_MSG_BYTE_INIT:
    break;
  case U8X8_MSG_BYTE_SET_DC:
    if (arg_int == 0) {
      gpio__reset(dc);
    } else {
      gpio__set(dc);
    }
    break;
  case U8X8_MSG_BYTE_START_TRANSFER:
    break;
  case U8X8_MSG_BYTE_END_TRANSFER:
    break;
  default:
    return 0;
  }
  return 1;
}
Technical Challenges
1. RGB LED Matrix
- Getting control of the matrix was challenging as it needs to follow specific sequence of pin enabling/disabling at appropriate timing.
- Setting right delays to avoid flickers and get smooth transitioning between frames by using delays or for loops.
- Fixing high CPU utilization by changing delay__us to vTaskDelay.
- Designing elements of the game (title screen and fruit objects) which required careful plotting of pixel data.
2. Audio Decoder
- The CPU utilization for sending a song task was very high (80% +).
- In order to reduce the utilization, we gave the vTaskDelay(1) while waiting for the DREQ to be high. The high DREQ indicates that the decoder is ready to receive next 32 bytes of data. So meanwhile, when the DREQ pin is low, we made task to sleep for vTaskDelay(1). After doing this, we significantly reduced the CPU utilization to 15%. We tried with vTaskDelay(2) to get CPU utilization of 10%.
- We further tried to make the CPU utilization below 10%. This was really a tough challenge, and figured out that the actual SPI clock is 1Mhz which is too slow as SPI is meant to operate at much higher speed. We changed the clock rate of SPI to 12MHz but the song speed was too slow. We checked the datasheet of the Mp3 decoder and set the internal clock multiplier to 4.5x. This make the shield operate at high clock rates at 12.XX Mhz. So keeping this in mind we made the SPI speed to 12MHz which is safe. We successfully achieved CPU utilization of 5-6% which is very much in the acceptable range.
3. PCB Designing
- We realized that using GPP for long term is not a good idea. Initially we spent time in debugging our hardware and later we have realized like we can’t take this for our final day.
- We did multiple reviews before ordering our final PCB as none of us did that earlier. We have faced issue in manual routing on Eagle Autodesk but our ISA Prashant helped us and he reviewed our PCB design twice.
4. Mobile Application
- The main challenge of the Mobile application was to make the UI interactive while getting data asynchronously over the Bluetooth module.
- There was a global listener stream implemented that got the value and concatenate the string till we received the end frame (##).
- However the challenge still existed to know which screen has called what data which prompted us to create the key and ACK/NACK pair in the start.
- The Mobile app is completely data reactive, which means that the UI components render and change according to the data provided. This caused a lot of issues mainly since we tried polling methods to make sure that the UI remains up to date with the STATE of the SJ2 Board.
- A manual approach was opted for mainly to make the system more deterministic and for better debugging capabilities.
Suggestions for Future Students
RGB LED Matrix
- To begin with, focus on writing a simple driver to get control of 1 pixel at a targeted location and then use appropriate loops to light up the entire row/column.
- Make sure all pixels are able to light up with all possible colors to eliminate hardware defects.
- Try with minimum / no delays, print tick counts and then come up with meaningful delay numbers.
- Optimize the code (minimum delays, avoiding repetitive function calls, etc.) to bring down the CPU usage level.
- Use the link in the references to draw desired elements and generate the matrix.
Tips for getting GOOD Grades and to remain in top 3 teams
- Select your teammates wisely, and make sure every one dedicates themself for this project.
- Be an active member of your team and review rubrics for the final DEMO.
- As soon as the professor mentions the project, please start working on the project otherwise, in the end, you have to struggle with finals and you will be left with less time for testing and you have to struggle in demo.
General tips
- Remember the KISS approach when you code. (Keep It Simple and Stupid).
- For this project, one should know the basics in C/ C++, FreeRTOS, and some good debugging skills. Because if you don't have one, you will eventually end up spending more time debugging your problem.
- Always give meaningful names to the variable or the function, so a third person reviewing the code gets an overall idea by just reading the name.
Conclusion
It was a really great working experience for all of us. We were really thrilled from the beginning that we will be working on something that is quite relevant in the industries. We worked as a team of four which helped us all to know the importance of team-work and co-ordination. We learned many great stuff like
- State Design using FreeRTOS
- FreeRTOS APIS when task handles are NULL vs when Initialised.
- Uses of extern and global variables as opposed to encapsulation i.e static inside private 'c' files.
- Learning Optimization through the integration of our peer's individual modules
- Improving CPU utilisation of the main LED and MP3 tasks.
- Workload sharing and cooperation amongst peers.
- Sharing ideas and debugging a common problem together i.e team building.
- We realised that using GPP for long term is not a good idea, there were some breakdown in the wires and our MP3 stopped working. Initially we spent a lot of time debugging hardware and doing soldering. So we started designing the PCB, and when our PCB was done, we spent hardly any time debugging the hardware.
- Git : We learnt all the basic of GIT and it plays an important to role for source code versioning.
There were a lot of problems while doing this project but it was a steep learning curve. In the end we were able to achieve our objective with really good results.
Project Video
Project Source Code
Project Presentation File
References
Acknowledgement
We would like to express our gratitude to Professor Preetpal Kang for generously sharing his time and knowledge with us and guiding us through the completion of this project. We would also like to thank the Prashant Gandhi(ISA) for their valuable advice and constructive feedback.
