Simple Embedded System Project
Contents
Objective
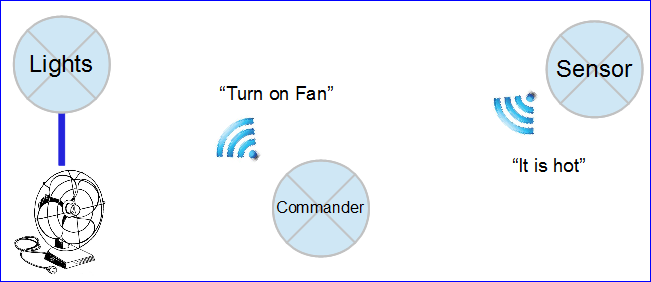
Work together as a group to create a wireless network of interactive devices. An example is a device that can read temperature of a remote device, and turn on a fan on yet another remote device. Your board contains wireless mesh network allowing you to freely connect many boards together and they can all communicate with each other. You will exploit this capability to do something creative, and ultimately learn, and have fun.
Think outside the box; you can do much more than the examples given :
- A commander can be programmed as an alarm clock. Another node can be used to make a loud noise.
- Orientation or rotation of commander node can turn on/off lights or change colors.
- You can create "Christmas Lights" which has a bunch of lights connected over wireless network.
- Each light sensor node can control an LED strip not just one LED.
Structure
There are minimum three nodes to be designed by a team of 6; you can add more nodes and more people in a team if your project is challenging enough. Each team is then split into smaller 2-person sub-team for the design of each of the nodes. Each team of 6 will compete with the other teams in your class and your grade will be assigned relative to each other with the best team earning the best grade.
Separate groups of two should work on their own project; we do not want to see a group of six working on a single Eclipse project. Each sub-team of 2 should take ownership of what they will do. You shall not share the code with each other; but instead just list out "how" you can communicate. Here are a couple of examples that show how you can list your communication protocol:
| Lights Wireless Protocol | |
|---|---|
| Wireless Channel | 2580 |
| Wireless bitrate | 2000 |
| Wireless Address | 110 |
| Command List | |
| Lights ON | Send data value of 1 |
| Lights OFF | Send data value of 2 |
| Lights Auto | Send data value of 3 |
| Sensor Node Wireless Protocol | ||
|---|---|---|
| Wireless Channel | 2580 | |
| Wireless bitrate | 2000 | |
| Wireless Address | 125 | |
| Command List | ||
| Get Light Sensor | Send data value of 1 | 2-byte data returned as uint16_t |
| Get Temperature Sensor | Send data value of 2 | 2-byte data returned as int16_t |
A good suggestion to follow is that the commander node always initiates communication and other nodes only "speak when spoken to". This can generally simplify your project. In other words, instead of unsolicited messages from nodes, the commander node shall initiate communication or "ask" for data. This way, multiple nodes will not speak at the same time causing wireless data to collide and "vanish" in mid-air.
Example Nodes
The nodes listed below are just examples. You can and should create your own node with its own purpose that goes above and beyond the examples listed in this article. Four unique features are required per node, and some hints are provided in the latter part of this document. Do not worry about the "how"; let the class instructors help you. Just think about the "what".
Lights Node
This node shall act like a wireless node that is responsible to turn on and off lights. This will involve some hardware design such that you can connect your board to some high-power LEDs. Look-up “super bright led” at sparkfun.com for examples.
Sensor Node
This node shall act like a sense point for the commander node. The objective is not just to provide the on-board sense points such as temperature and light, but also implement features such that you can report other creative sense points such as a motion sensor, and distance sensor.
Commander Node
This node shall be responsible to put it all together and serve as a single commanding node to get sensor input and control the lights. This node shall provide the interface for the user, so try to provide user options to configure features such as automatic lights, or remote controlled operation.
Requirements
Technical
Your grade will depend on how well you follow the following requirements :
- You must use a
switch / casecode section in your code. - You must use a state machine in at least one of your nodes.
- This could be as simple as a state machine for "Manual Lights" vs. "Automatic Lights"
- All functions used shall be no larger than 50 lines of code.
- Split into smaller sub-functions.
- You must utilize functions that use pass-by-value and pass-by-reference.
- Project should be self-contained
- Project should be enclosed, with no wires visible.
- Project should operate either by a battery or USB power, but NOT require a computer's USB port.
- Should not require the Hercules Terminal to operate
- All buttons should be labeled.
- An operator should be able to operate without reading an instruction manual.
Deliverables
At the end of the project, the following items need to be submitted :
- Full source-code of all the projects
- Individual evaluations about team members and their contribution
- This will be confidential, and you can submit as one per person (at Canvas).
Project Report
You must submit a full, documented report for your project. The following are minimum sections required in your PDF submitted report:
- Introduction
- What does your project do?
- Try to sell your project in this section.
- Add a sub-section called "Features & Communication Table"
- List the features of each node and the communication table.
- Schematics
- List the hardware you used.
- Use "LibreOffice Draw" to draw the schematics
- Implementation
- Show your software workings using a flow-chart
- Use bullets and pictures to show the "how" part.
- Show what Software you used to control your Hardware.
- Testing
- What kind of tests did you perform?
- What kind of problems did you solve?
- Conclusion
- What did you learn?
- What worked, and what didn't work?
- How would you improve your project?
Challenges & Hints
Challenges
Over the course of the project, you will encounter some real-world problems such as :
- How will you design your project to be user friendly?
- How will you collaborate in your large team?
- How will you balance your budget and keep parts cost to a minimum?
- How will you design your network protocol such that each team understands a command and response system well?
- How will you make your project more creative? How will it stand out?
- What if you command a light output node that is not responding?
- How will you report this to the user and what would you do?
Wireless Packet
As of the wireless mesh network's version 1 source code, the wireless packet can be 32-bytes long, out of which 8 bytes are used by the network header and 24 bytes are free to be used. Please take a look at the mesh_packet_t structure to understand the data of the wireless packet. The only relevant fields you need to know about are :
-
data_len: Size of the valid data bytes -
data[0] - data[23]: Actual data bytes.
| Wireless Packet Structure | ||||||||
|---|---|---|---|---|---|---|---|---|
| 4 Byte Header | 2 Byte Network Address | 2 Byte Physical Address | 24 Byte User Data | |||||
| B0 | B1 | B2 | B3 | B4 | B5 | B6 | B7 | B8 - B31 |
| data_len | Do not use | data[0] - data[23] | ||||||
Hints
- For the commander, implement a "ping" packet that is sent to everyone once a second.
- If an ACK is received, turn on an LED, otherwise turn it off (one LED per remote node).
- This will immediately help diagnose connection issues.
- Security : Beware of Mr. Sabotage :
- In your class, there will be an attacker, which will use "replay attack" technique to attack your project.
- Mr. Sabotage will hop from one channel to another to look for presence of the wireless data.
- If Mr. Sabotage can read a packet, it will replay it back randomly to confuse your project.
- Try to implement a simple scheme to prevent replay attacks.
Sample Code
In Eclipse, with your project open, press Ctrl+Shift+R and type "sys_config.h" and open the file. Modify the following settings, and note that after you change this file, you should also perform Project-->Clean and rebuild your software code.
- WIRELESS_CHANNEL
- All nodes must use the same channel
- Use a value different than the rest of the class.
- WIRELESS_ADDRESS
- Each node should have a different address
Commander Node
#include <stdio.h>
#include "wireless.h"
#include "utilities.h"

    /* Keep an enum of addresses in all your nodes */
    enum {
         lights_addr = 100,
         commander_addr = 200,
    };
    /* Same enum as lights controller */
    enum {
        lights_on  = 1,
        lights_off = 2,
    };

int main(void)
{
    /* ********************************************************************
     * Max hops allows our pkt to be delivered through an intermediate node
     * Node address is set automatically based on sys_config.h
     * so setting node address again is not necessarily needed.
     */
    const char max_hops = 1;
    mesh_set_node_address(commander_addr);

    char cmd = 0;
    mesh_packet_t pkt;

    /* We will send "NACK" packet.  No acknowledge or retries will be done
     * if the packet gets lost on its way.  This is okay for a simple demo.
     */
    while (1) {
        cmd = lights_on;
        wireless_send(lights_addr, mesh_pkt_nack, &cmd, 1, max_hops);
        delay_ms(3000);

        cmd = lights_off;
        wireless_send(lights_addr, mesh_pkt_nack, &cmd, 1, max_hops);
        delay_ms(3000);
    }

    return 0;
}
Light Sensor Node
You should try the Light Sensor Node and Commander Node code below in your group of 2 to get familiar with how to communicate wirelessly.
#include <stdio.h>
#include "wireless.h"

    /* Keep an enum of addresses in all your nodes */
    enum {
         lights_addr = 100,
         commander_addr = 200,
    };
    /* Enum of our commands */
    enum {
        lights_on  = 1,
        lights_off = 2,
    };

void process_command(char command);

int main(void)
{
    mesh_set_node_address(lights_addr);

    while (1) {
        mesh_packet_t pkt;
        if (wireless_get_rx_pkt(&pkt, 1000)) {  /* Check if we get a packet within 1 second : */
            char cmd = pkt.data[0];             /* Assume first byte is our command */
            process_command(cmd);
        }
    }
    return 0;
}

void process_command(char command)
{
    switch(command) {
        case lights_on:
            printf("TODO Turn ON lights\n");
        break;

        case lights_off:
            printf("TODO Turn OFF lights\n");
        break;

        default:
            printf("ERROR: INVALID COMMAND!\n");
        break;
    }
}
Ping!
This code sample not only shows how to "ping" another node, but it also shows how we can ask for an "ACK" or acknowledgement that the packet was delivered. Note that we send mesh_pkt_ack type of packet, and then we wait some time for an acknowledgement packet through wireless_get_ack_pkt()
#include "io.hpp"
#include "wireless.h"
#include "soft_timer.hpp"

void ping_and_set_led(uint8_t addr, uint8_t led_num)
{
    /* Sending NULL packet is a "PING" packet.
     * No special code is required at the other node since the
     * other node will automatically send the ACK back.
     */
    const char max_hops = 2;
    mesh_packet_t pkt;
    wireless_send(addr, mesh_pkt_ack, NULL, 0, max_hops);

    /* Turn LED on or off based on if we get ACK packet within 100ms */
    if (wireless_get_ack_pkt(&pkt, 100)) {
        LE.on(led_num);
    }
    else {
        LE.off(led_num);
    }
}

int main(void)
{
    /* Keep an enum of addresses in all your nodes */
    enum {
         lights_addr = 100,
         sensor_addr = 125,
         commander_addr = 200,
    };

    /* Use a software timer "object" with 3000ms duration. */
    SoftTimer ping_timer;
    ping_timer.reset(3000);

    while (1) {
        /* If timer expires, restart it again and ping everyone. */
        if (ping_timer.expired()) {
            ping_timer.restart();

            ping_and_set_led(lights_addr, 1);
            ping_and_set_led(sensor_addr, 2);
        }
    }

    return 0;
}
Send & Receive Data Variables
In this example, a commander demands certain data to be sent by a slave node. Also, we show you how data variables can be exchanged between two boards. Note that the wireless can only transport 24-bytes through a single packet.
#include <stdio.h>
#include <stdint.h>
#include "wireless.h"
#include "io.hpp"

    /* Common between commander and sensor node
     * This identifies "what" the commander is asking for
     */
    enum {
        req_light = 1, /* Request light sensor reading       */
        req_temp = 2,  /* Request temperature sensor reading */
    };

void commander(void)
{
    char hops = 1;
    char addr = 100;
    char cmd  = req_light; /* Request light sensor data */

    /* mesh_pkt_ack_app means the destination should ACK manually
     * with our data, and an auto-ack is not performed.
     */
    wireless_send(addr, mesh_pkt_ack_app, &cmd, 1, hops);

    mesh_packet_t pkt;
    if (wireless_get_ack_pkt(&pkt, 100)) {
         /* Light sensor MUST have sent 16-bit variable for this to work */
         uint16_t light = 0;

         /* We need to deform packet the same way it was formed */
         /* Parameters should be same after 4th parameter into wireless_form_pkt() */
         wireless_deform_pkt(&pkt, 1, &light, sizeof(light));
    }
}

void sensor(void)
{
    mesh_packet_t pkt;
    uint16_t light = 0;

    if (wireless_get_rx_pkt(&pkt, 100)) {
        /* Check if we were asked for an application ACK */
        if (wireless_is_ack_required(&pkt)) {

            /* Send the packet back based on the commanded byte */
            const char cmd = pkt.data[0];
            switch (cmd) {
                case req_light :
                    /* Send packet back to network source: pkt.nwk.src */
                    light = LS.getRawValue();
                    wireless_form_pkt(&pkt, pkt.nwk.src, mesh_pkt_ack_rsp, 1,
                                      1,
                                      &light, sizeof(light));
                break;

                case req_temp :
                    /* TODO: You figure this out
                     * NOTE: YOU CAN SEND MORE THAN 1 VARIABLE using wireless_form_pkt()
                     *       Look at the function's documentation for more examples.
                     * It is possible to form a packet with 4 data variables too, so you
                     * don't have to request/get light/temp separately.
                     */
                break;

                default:
                    printf("ERROR: Invalid data requested!\n");
                break;
            }

            wireless_send_formed_pkt(&pkt);
        }
    }
}
Troubleshooting
My boards cannot communicate.
- Double check sys_config.h to make sure wireless channels are the same.
- Did you use correct source and destination address? Double check the wireless address set at sys_config.h
- Are the wireless boards too far away from each other?
- Try doing Project --> Clean and build/compile your code again.
Sometimes wireless doesn't work
- This is normal because sometimes wireless packets do not make it through due to interference.
- Try using another wireless channel.
- The wireless mesh software will retry packets a few times, but in case packets still do not make it through your software needs to be able to cope with this behavior.