S21: exFAT
Contents
Abstract
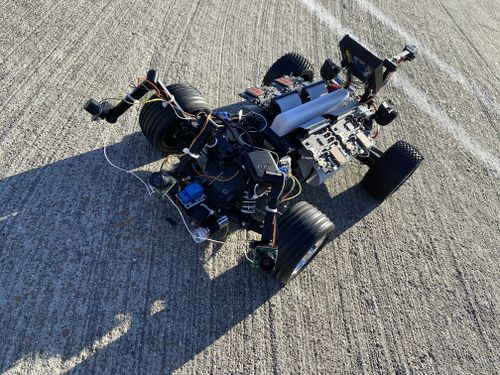
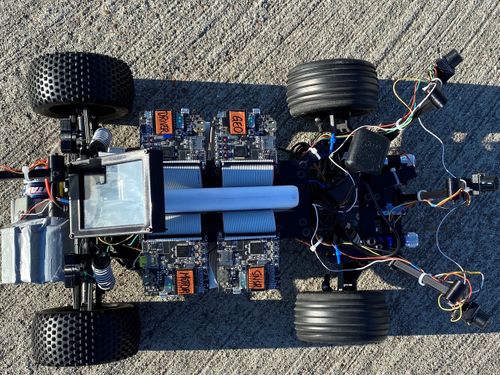
As the capstone project for this class, we designed, prototyped, implemented, and tested an autonomous RC car. Our RC car platform of choice was built by Traxxas as it has a great reputation for building durable RC chassis. On this chassis, we mounted ultrasonic sensors to detect objects surrounding the car and allow it to steer clear of them, a GPS and compass unit that can output important GPS coordinates and heading, a bluetooth module that communicated these location and orientation data to the SJ2 boards, a pair of optical encoders that can detect the car's speed and direction of acceleration, and an LCD screen that provides some important real-time metrics for our debugging purposes. In addition to this debugging method, we also used the provided PCAN dongle to observe CANBus readings and confirm that we were seeing expected values transmitted. Finally, our development of the project was test-driven, using unit tests to confirm the functionality of some code prior to its usage on the car. The rest of this report will detail more specifics about the methodology behind the development of each module.
Car Demo (Youtube)
Introduction
The project was divided into 5 modules:
- Sensor
- Motor
- Geo Controller
- Driver/LCD Controller
- Web application
Team Members & Responsibilities
Gitlab Project Link
- Sensors
- Motor
- Geographical (GPS & compass)
- Driver/Master Controller & LCD
- All of us
- Communication Bridge Controller
- Web Application
Schedule
Below is a legend of the color coding used in the table for the schedule.
| General |
| Motor Controller |
| Sensor & Bridge Controller |
| Driver Controller |
| Geo Controller |
| Web Application |
| Week | Start Date | End Date | Task | Person in Charge (PIC) | Status |
|---|---|---|---|---|---|
| 1 | Feb 27, 2021 | March 5, 2021 | First team meetup to discuss the direction of the project, reviewed past projects and report our findings/concerns | All | Complete |
| 2 | March 6, 2021 | March 13, 2021 | Divide the tasks & responsibilities among the team | All | Complete |
| 3 | March 14, 2021 | March 21, 2021 | Finalize / Buy Parts | All | Complete |
| 3 | March 14, 2021 | March 21, 2021 | Delegate Tasks | All | Complete |
| 3 | March 14, 2021 | March 21, 2021 | Get Data from Ultrasonic Sensor | Eishan, David | Complete |
| 3 | March 14, 2021 | March 21, 2021 | Get Data from Infrared Sensor | Eishan, David | Complete |
| 3 | March 14, 2021 | March 21, 2021 | Initial Draft for common DBC file for sensor readings | Eishan, David | Complete |
| 3 | March 14, 2021 | March 21, 2021 | Get Data from GPS & CMPS14 | Suryanto, Ka | Complete |
| 3 | March 14, 2021 | March 21, 2021 | Develop Bluetooth Driver (UART + customized line buffer) | Tyler | Complete |
| 4 | March 21, 2021 | March 28, 2021 | Initial UI Setup for Mobile App | Tyler | Complete |
| 4 | March 21, 2021 | March 28, 2021 | Bluetooth "Hello World" | Tyler | Complete |
| 4 | March 21, 2021 | March 28, 2021 | Build Driver Controller To Control Motor | Suryanto, Ka | Complete |
| 4 | March 21, 2021 | March 28, 2021 | Disassembly RC Car and Evaluation of Components | Manas | Complete |
| 4 | March 21, 2021 | March 28, 2021 | Complete Motor Drive Development with basic PID control. | Manas | Complete |
| 5 | March 21, 2021 | March 28, 2021 | Implement Bluetooth on Motor for wireless debugging | Manas | Complete |
| 5 | March 28, 2021 | April 04, 2021 | Driver Controller Integration | All | Complete |
| 5 | March 28, 2021 | April 04, 2021 | Send Heading / Bearing / Distance info over CANBus to the Driver Node | Suryanto, Ka | Complete |
| 5 | March 28, 2021 | April 04, 2021 | Display Compass, GPS, Steering angle, and Acceleration info on the LCD screen. | Manas, Suryanto | Complete |
| 5 | March 28, 2021 | April 04, 2021 | Research and implement power solution for powering SJ2 boards w/ peripherals | Eishan, Tyler | Complete |
| 5 | March 28, 2021 | April 04, 2021 | Design and Order PCB. | Eishan, Ka, Suryanto | Complete |
| 6 | April 04, 2021 | April 11, 2021 | Map PWM Duty Cycles to real speed (KmPH) readings. | Manas | Complete |
| 6 | April 04, 2021 | April 11, 2021 | Design, 3D print, and assemble LED ring. | Tyler | Complete |
| 6 | April 04, 2021 | April 11, 2021 | Complete required elements of web application | Tyler | Complete |
| 6 | April 04, 2021 | April 11, 2021 | Deploy webpage to web server | Tyler | Complete |
| 6 | April 04, 2021 | April 11, 2021 | MIA handling for GPS module | Suryanto, Ka | Complete |
| 6 | April 04, 2021 | April 11, 2021 | Test LED ring which shows the compass info | Suryanto, Ka | Complete |
| 7 | April 11, 2021 | April 18, 2021 | Create Collision Avoidance Algorithm Module | Suryanto, Ka | Complete |
| 7 | April 11, 2021 | April 18, 2021 | Create Pathing from Web Application | Tyler | Complete |
| 7 | April 11, 2021 | April 18, 2021 | Hardware Integration Test and First Field Test | All | Complete |
| 7 | April 11, 2021 | April 18, 2021 | Optimize Obstacle Detection Based On First Field Test Result (if needed) | Suryanto, Ka | Complete |
| 8 | April 18, 2021 | April 25, 2021 | Design and Print Mounting Components | Tyler | Complete |
| 9 | April 25, 2021 | May 02, 2021 | PCAN / BusMaster Configuration on car. | All | Complete |
| 10 | May 02, 2021 | May 09, 2021 | CANBus Integration | All | Complete |
| 11 | May 09, 2021 | May 16, 2021 | MIA Integration | All | Complete |
| 12 | May 16, 2021 | May 23, 2021 | Big Integration and Live Field Test (Split into 2) | All | Complete |
| 12 | May 16, 2021 | May 23, 2021 | System Debug & fine tuning | All | Complete |
| 13 | May 23, 2021 | May 28, 2021 | Demo Prep | All | Complete |
| 13 | May 23, 2021 | May 28, 2021 | Wiki Report | All | Complete |
Parts List & Cost
| Item # | Part Description | Vendor | Quantity | Total Cost |
|---|---|---|---|---|
| 1 | GPS Breakout board | Adafruit | 1 | $39.75 |
| 2 | GPS Antenna | Amazon | 1 | $8.43 |
| 3 | Compass module - CMPS14 | RobotShop | 1 | $35.31 |
| 4 | Bluetooth module - HC05 | Amazon | 1 | $13.59 |
| 5 | CAN Transceiver - Waveshare | RobotShop | 5 | $21.45 |
| 6 | Infrared sensor(s) | Amazon | 1 | $10.89 |
| 7 | Ultrasonic sensor(s) | Amazon | 3 | $81.78 |
| 8 | SJTwo Evaluation Board | Amazon | 4 | $200 |
| 9 | Traxxas Rustler | Traxxas | 1 | $169.99 |
| 10 | Traxxas Battery + Charger | Traxxas | 1 | $59.99 |
| 11 | High Capacity Battery | Traxxas | 1 | $69.99 |
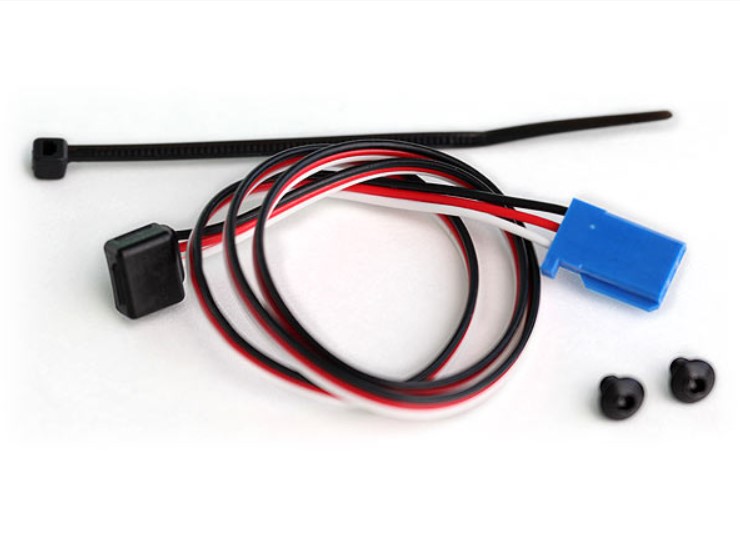
| 12 | RPM sensor | Traxxas | 1 | $12.00 |
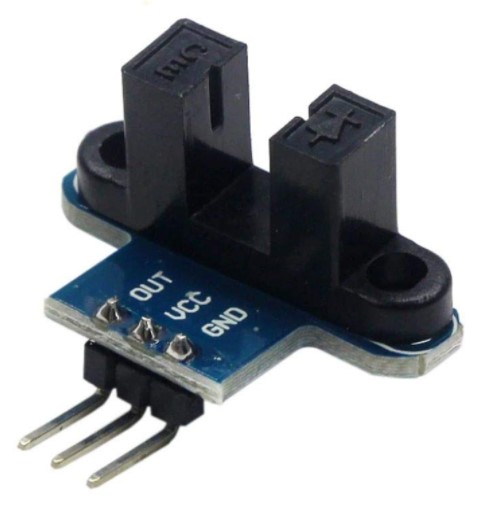
| 13 | Optical Wheel Encoder | Amazon | 1 | $6.99 |
| 14 | LED ring 8 LEDs (Cat shape) | DIY | 1 | N/A |
| 15 | PLA Filament | Amazon | 1 | $18.99 |
| 16 | Ribbon Cable set | Amazon | 1 | $10.99 |
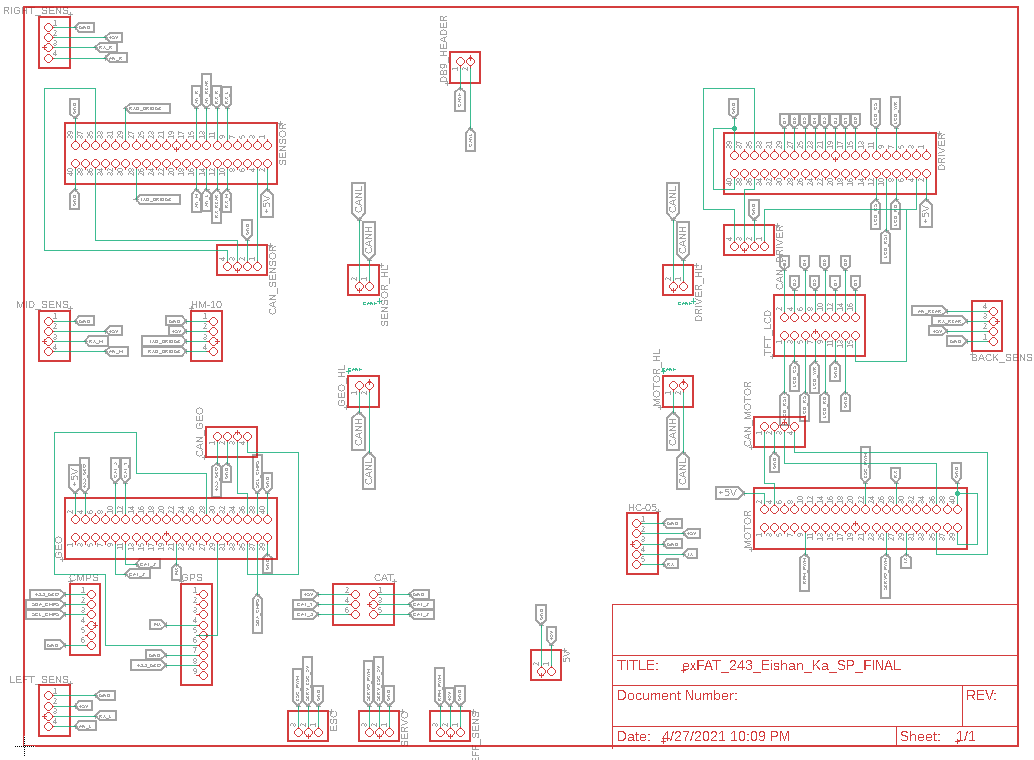
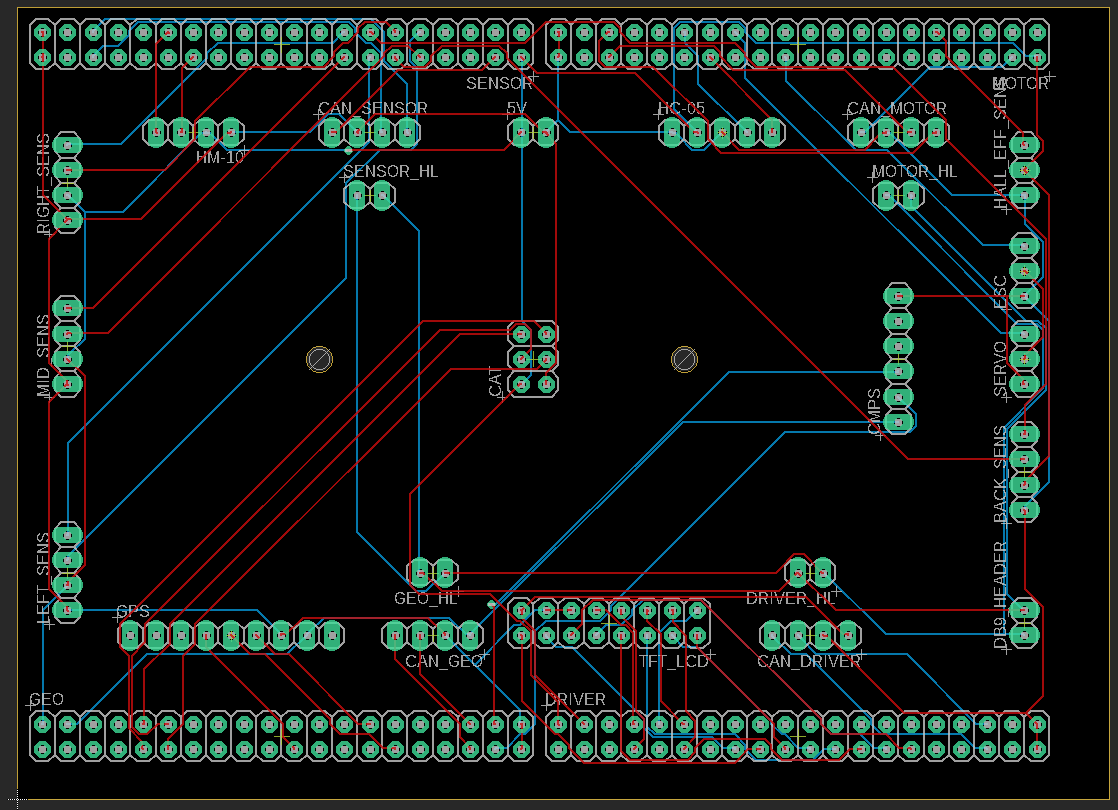
Printed Circuit Board
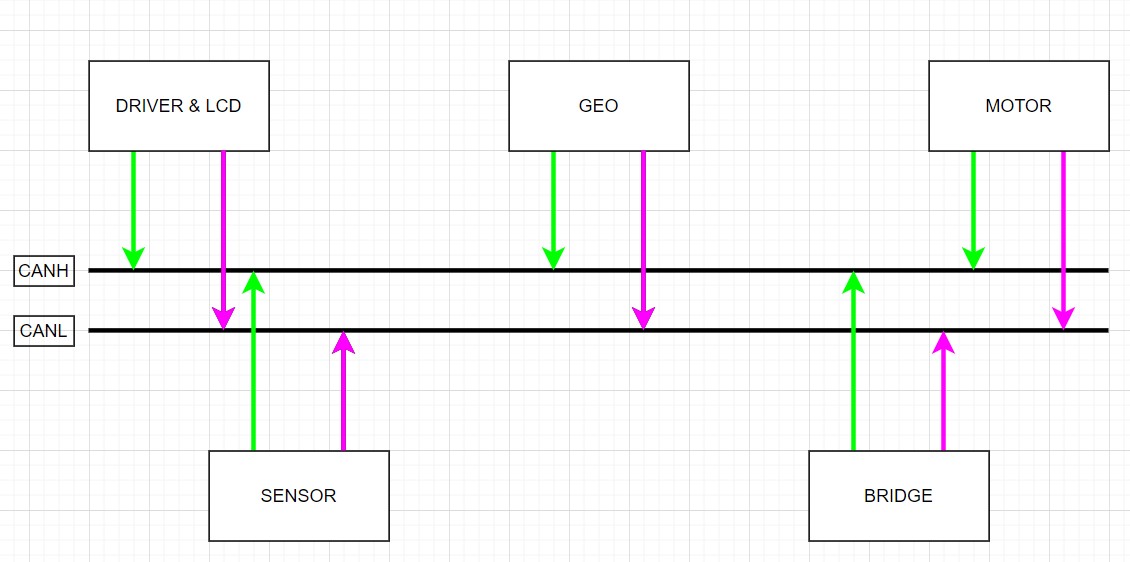
CAN Communication
Hardware Design
DBC File
In our DBC file, we have 6 nodes, DRIVER, SENSOR, BRIDGE, GEO CONTROLLER, COMPASS, and MOTOR. Each of them represents a message sends from one node to another via the CAN bus.
1. The DRIVER sends the throttle and wheel angle command to the MOTOR so it knows when to speed up, speed down and turn.
2. The SENSOR sends the information about how far away is each of the Ultrasonic sensors away from the obstacles
3. The BRIDGE sends the GPS destination to the GEO Controller
4. The GEO CONTROLLER sends the current location of the car back to the BRIDGE
5. The COMPASS CONTROLLER sends the heading, bearing, and the distance from the destination to the DRIVER
6. The MOTOR sends the PWM and current speed information to the DEBUG node.
Gitlab link to the dbc file
VERSION "1.0.0"

BU_: DRIVER SENSOR BRIDGE GEO_CONTROLLER COMPASS MOTOR

BO_ 100 DRIVER: 3 DRIVER
SG_ DRIVER_throttle : 0|16@1- (0.1,-11) [-11.1|11.1] "kph" MOTOR
SG_ DRIVER_wheel_angle: 16|8@1- (1,-4) [-4|4] "degree" MOTOR

BO_ 200 SENSOR: 5 SENSOR
 SG_ SENSOR_sonar_front_left : 0|10@1+ (1,0) [0|0] "cm" DRIVER
 SG_ SENSOR_sonar_front_mid : 10|10@1+ (1,0) [0|0] "cm" DRIVER
 SG_ SENSOR_sonar_front_right : 20|10@1+ (1,0) [0|0] "cm" DRIVER
 SG_ SENSOR_infrared_back_mid : 30|10@1+ (1,0) [0|0] "cm" DRIVER

BO_ 205 GPS_DESTINATION: 8 BRIDGE
 SG_ LATITUDE_DEGREE : 0|9@1- (1, -90) [-90|90] "degree" GEO_CONTROLLER
 SG_ LONGITUDE_DEGREE : 9|10@1- (1, -180) [-180|180] "degree" GEO_CONTROLLER
 SG_ LATITUDE_MINUTE : 19|6@1+ (1, 0) [0|60] "minute" GEO_CONTROLLER
 SG_ LONGITUDE_MINUTE : 25|6@1+ (1, 0) [0|60] "minute" GEO_CONTROLLER
 SG_ LATITUDE_SECOND : 31|13@1+ (0.01, 0) [0|60] "second" GEO_CONTROLLER
 SG_ LONGITUDE_SECOND : 44|13@1+ (0.01, 0) [0|60] "second" GEO_CONTROLLER

BO_ 206 GPS_CURRENT_LOCATION: 8 GEO_CONTROLLER
 SG_ LATITUDE_DEGREE : 0|9@1- (1, -90) [-90|90] "degree" BRIDGE
 SG_ LONGITUDE_DEGREE : 9|10@1- (1, -180) [-180|180] "degree" BRIDGE
 SG_ LATITUDE_MINUTE : 19|6@1+ (1, 0) [0|60] "minute" BRIDGE
 SG_ LONGITUDE_MINUTE : 25|6@1+ (1, 0) [0|60] "minute" BRIDGE
 SG_ LATITUDE_SECOND : 31|13@1+ (0.01, 0) [0|60] "second" BRIDGE
 SG_ LONGITUDE_SECOND : 44|13@1+ (0.01, 0) [0|60] "second" BRIDGE

BO_ 210 COMPASS_HEADING_DISTANCE: 8 COMPASS
 SG_ HEADING : 0|12@1+ (0.1, 0) [0|359.9] "degrees" DRIVER
 SG_ BEARING : 12|12@1+ (0.1, 0) [0|359.9] "degrees" DRIVER
 SG_ DISTANCE : 24|32@1+ (0.01, 0) [0|0] "meters" DRIVER

BO_ 220 MOTOR_DEBUG: 8 MOTOR
 SG_ MOTOR_PWM : 0|32@1+ (0.01, 0) [10|20] "duty cycle" DEBUG
 SG_ CURRENT_SPEED : 32|32@1- (0.1,-11) [-11.1|11.1] "kph" DEBUG
Sensor & Bridge Controller
Hardware Design
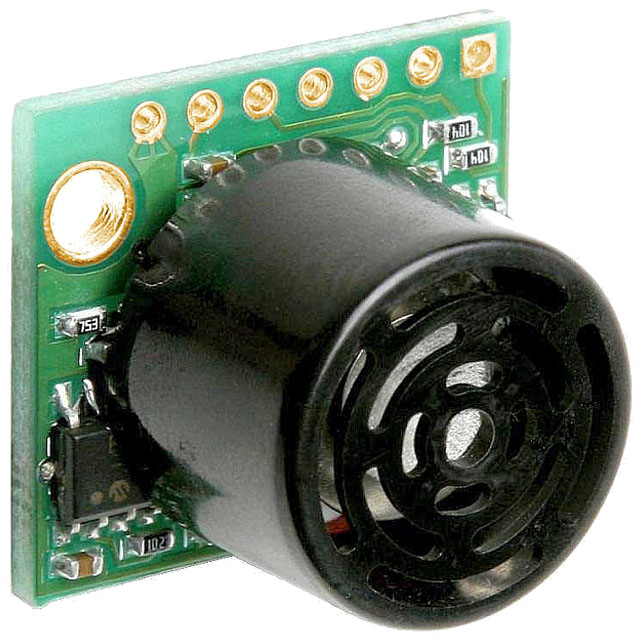
For this project, we initially planned on using combination of ultrasonic sensors and a single infrared sensor. The idea was that we could utilize different kinds of sensors and use the SJ2's ADC to sample all of them. We also discussed the prospect of using a Lidar system, but it's extremely impractical for a few reasons:
- It's cost-prohibitive due to the nature of Lidar systems.
- Lidar is unreliable, especially since bright daylight can affect its readings.
- The scale of this project doesn't warrant use of Lidar, as it's unnecessarily complicated and may overwhelm the SJ2.
After ruling out the use of Lidar, we decided to go with a 3+1 approach of 3 ultrasonic sensors in the front and a single infrared sensor in the rear of the car. While prototyping this idea, we discovered the range of the infrared sensor was quite limited. Out of sheer luck, we had a spare ultrasonic sensor that was ordered for the sake of a replacement in case the existing sensors broke during testing and debugging. We replaced the infrared sensor with the ultrasonic sensor and attached it to the rear of the car.
Software Design
Sensors
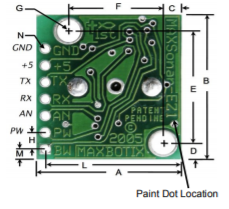
The sensors must be triggered initially by the SJ2 board, needing to set a GPIO pin to output, pulse a 1, and then switch to input mode. This process triggers the sensor triggering loop then disconnects the pin so that it doesn't interfere with the loop past then.
gpio_s trigger;
trigger = gpio__construct_with_function(GPIO__PORT_0, 6, GPIO__FUNCITON_0_IO_PIN);
gpio__set_as_output(trigger);
gpio__set(trigger);
delay__us(20);
gpio__set_as_input(trigger);
The 4 ADC pins connected to the ultrasonic sensors are simply read at 10Hz and broadcasted over the CAN bus.
Bridge
The bridge part of the controller handles the connection to the webapp/mobile app and additionally the waypoints.
Bridge and CAN Echo
The controller will collect all messages from the CAN bus with MIA handling and will report information to the webapp via Bluetooth, as well as receive information from the webapp. Further details are available in the Mobile Application section.
Waypoints
Waypoints are received from the webapp as simply comma delineated decimal numbers for latitude and longitude (ex. 37.287168, -121.866852). These coordinates are added to a list which are sent over the CAN bus in a FIFO order, switching to the next one when distance reported from Geo controller is less than a threshold. The only issue with this is because the waypoints are sent from the geo controller and not calculated on the bridge controller, the distance calculation has a 1 periodic callback cycle where the distance value is invalid and cannot be used. As such, there is a delay making it so that the waypoint cannot be changed more than once per second.
Additionally, the coordinates of 0,0 are used to reset the waypoints. This is done because of the group decision to treat 0,0 as a "stop." After receiving zero coordinate over bluetooth, the car will be ready to accept additional ones and stop where it is at the current time. Possessing a wireless emergency stop for testing was invaluable to the safety of the car.
Technical Challenges
- Using UART for the sensors
- We initially decided to use the serial UART for the sensors because according to the sensor datasheet it is the most accurate. After many attempts to decode the values we tried using the UART on the SJ2 board but would not get good data value.Then we decided to try reading the raw UART values using serial UART dongle(CP2102), and we noticed the same problem. Root cause for this integration issue was the level difference , most UART bridges can accept TTL logic levels, to get data reliably we would have to use a level shifter such as MAX232. It was decide that for some accuracy boost we would significantly increase the H/W complexity and decided to use the ADC values instead.
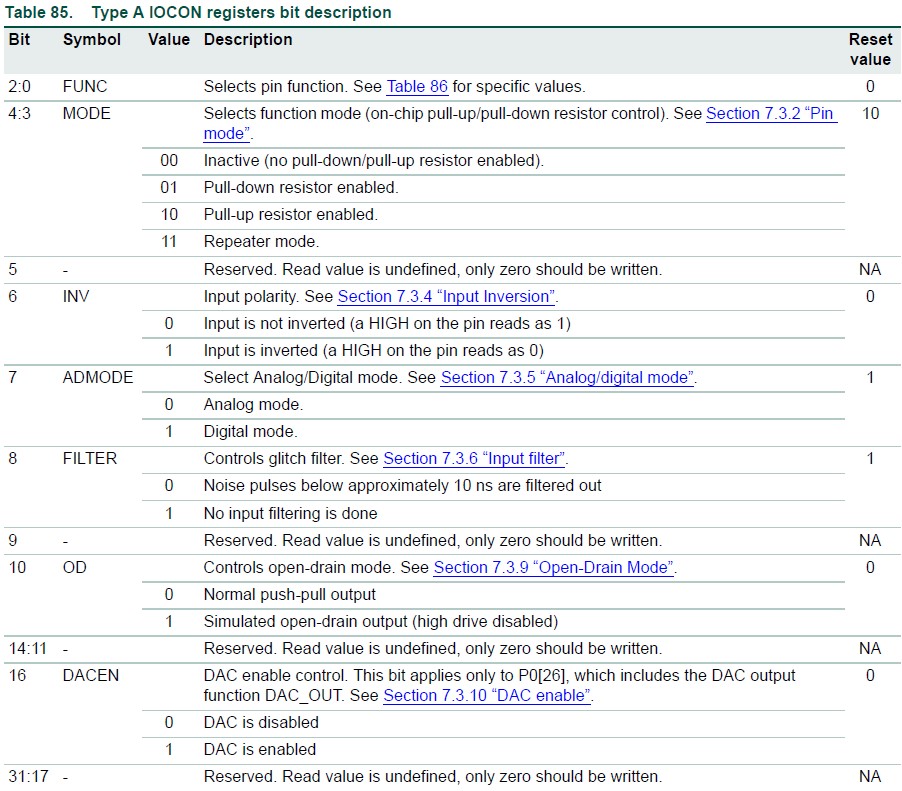
- Using the DAC as an ADC
- Using ADC had its own challenges because only 3 ADC ports are exposed in the code base. We had to configure a DAC min to work as an ADC pin.This was achieved by setting bit 16 to 0.
- We set up the pin's function mode to 00 for inactive resistors (i.e no pull-up or pull-down)
- For all other pins on the ADC we had to set up bit 7 to 0 for enabling analog mode
- Crashes using burst mode for the ADC
- We were using burst mode initially to sample the ADC values and the micro-controller kept crashing.We never finished debugging why this was the case but instead moved to single reading mode and we could sample sensors without any problems.
- Sensor interference/cross-talk
- One approach was software filtering where we would put all sensor values in a queue and we would sort the values from closest to farthest and then choose the median of all the values. This approach gave us significant stability in the values.
- sensors were angled away from each other and that helped a little bit but the main problem was that there were still reflections from other sensors that would cause cross-talk.
- Cones on the sensors to better direct and isolate the ultrasonic waves also helped but was not the ideal solution.
- Sensors were triggered individually using 1 GPIO pin each per sensors, this approach was the very promising but again the timing was hard to manage as we would not know when one sensor is completely done with the sampling.
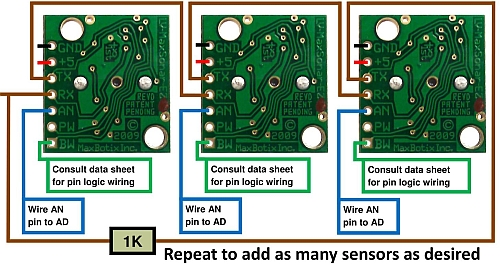
- Final solution: continuous loop, this is an in-built functionality for every sensor where we would daisy chain the sensors as shown below and also set the original GPIO trigger pin to Hi-Z state.This approach also worked because each sensor will only trigger exactly once and then trigger the next sensor reducing the cross-talk significantly, the sensor will also hold the last valid value on the ADC pin making the final values very stable.
Motor Controller
Hardware Design
The hardware portion of the motor controller required the most precision. Because we needed to detect wheel RPM to calculate the speed of the car, we resorted initially to using a Hall Effect sensor and bracket sold by Traxxas. After conducting advanced field testing with this setup, we found out that the magnet's position on the bracket that attached it to the drive gear affected the readings output by the Hall Effect sensor. Sometimes, if the magnet was in the perfect position to trigger the Hall Effect sensor, the car would detect it was moving, though it was stationary. To get the car moving, we usually had to bump it forwards to move the magnet's position; as expected however, this solution is not robust since in the sensor's normal use case, the user would be using a wirelessly transmitting remote to control the car's movement.
To rectify this minor roadblock, we decided to switch to a set of optical wheel encoders. These would allow the same RPM detection as done by the Hall Effect sensor, but without the issue of the car detecting its own movement whilst at a standstill. Additionally, we were able to use a second wheel encoder in conjunction with the first so that we could also detect reverse motion.
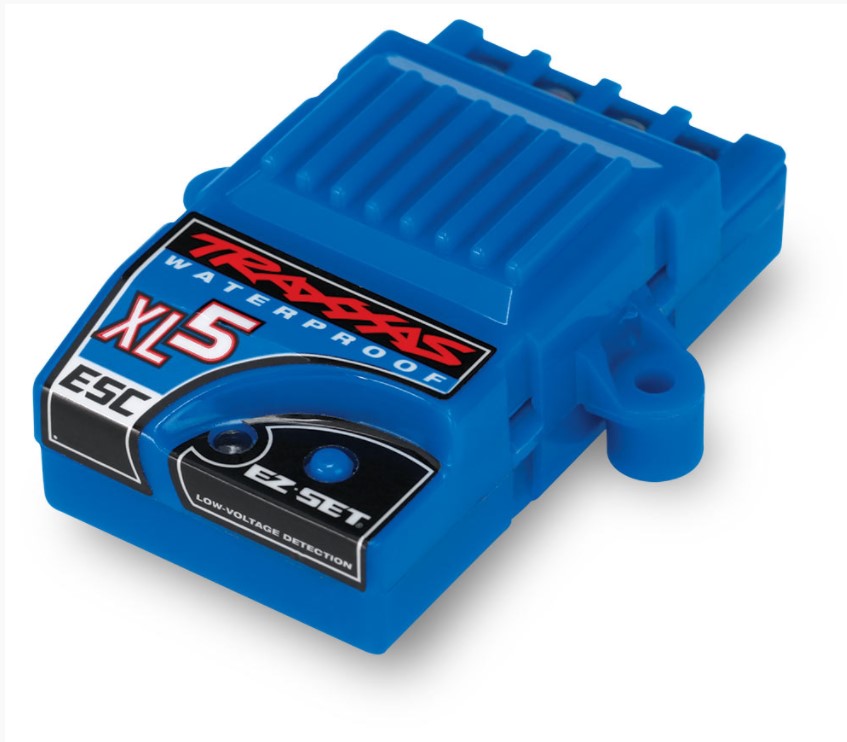
With wheel RPM detection complete, we moved onto integrating wheel speed into the PWM duty cycle applied to the ESC. Our car came equipped with the XL-5 ESC from Traxxas, and it has a very narrow range of PWM values dictating forwards, backwards, and neutral movement.
Since the XL-5 is intended to be controlled by a wireless transmitter, it doesn't have any documentation that helped us integrate with it using our SJ2 boards. So, through some experimentation, we were able to discern a few things about its behavior:
- PWM values of 15.0 - 20.0 move the car forward.
- PWM values of 10.0 - 14.9 move the car backward.
- To begin moving backward or apply "brakes" to the car, the ESC must be issued a reverse signal, then a neutral signal, and then your target PWM value.
- This is to prevent the ESC from causing any significant harm to the motor as well as the clutch that modulates left - to - right wheel speed.
After we knew how to control the ESC to control the drive motor, we applied the same methodology to the servo motor that turns the front wheels. As our car was RWD only, we didn't need to worry about front wheel speeds. Here's what we noticed about the servo motor and the car's turning behavior:
- PWM values of 15.0 - 20.0 turn the front wheels right.
- PWM values of 10.0 - 14.9 turn the front wheels left.
- The car needs some calibration to the front wheels using the TRIM knob on the wireless remote it came with so that it can run straight.
- Once the car is loaded with the weight of the boards, peripherals, and battery packs, the front wheels experience a lot of camber and toe angle changes.
- This causes an issue with the alignment previously set with TRIM knob and the car will likely pull in one direction. With some basic hand tools, this can be rectified by adjusting the car's camber and toe angle adjustments such that the car will pull straighter. Tightening the front wheels correctly is important for these adjustments to work correctly.
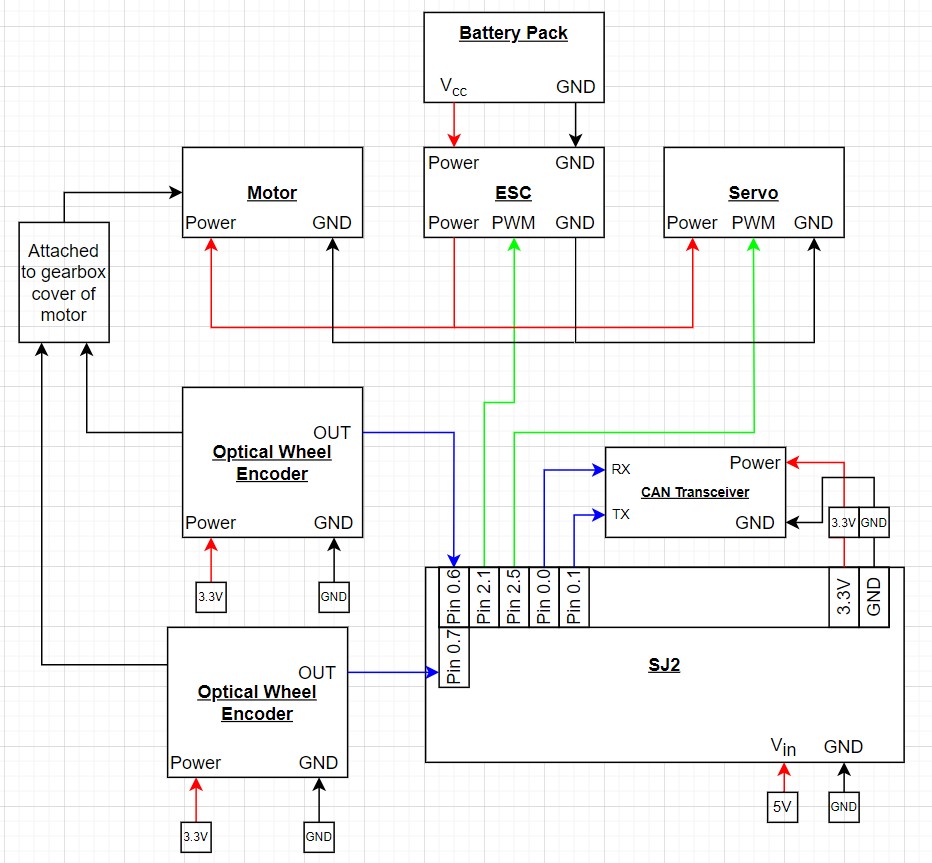
With ESC and servo control figured out, as well as the optical encoder setup to detect wheel RPM, we integrated them all together with the SJ2 Motor Controller board and made the necessary electrical connections. The schematic below shows how our hardware is connected.
Software Design
In our codebase, the motor controller logic was split into a few different files for the sake of simplicity, readability, abstracting away unnecessary code bulk, and easier unit-testing. The first module that we created was motor_controller_logic.c which takes care of a lot of functionality. It handles the PID control loop, motor controller related initializations, and serves as the receiver code module for CAN messages. That CAN utility is shown below
   void motor_receive_message(dbc_DRIVER_s *message) {
     motor_set_speed(message->DRIVER_throttle);
     motor_set_steering_angle(message->DRIVER_wheel_angle);
   }
By using some helper functions, we receive a message from the Driver node, set our speed and steering values accordingly, and proceed with reaching the target speed in the PID control loop and the target steering angle in the function shown below:
   void motor_set_steering_angle(int8_t steering_angle) {
     steering_pwm_duty_cycle = motor_map_steering_angle_from_driver_msg(steering_angle);
     pwm1__set_duty_cycle(SERVO_PWM_CONTROL_PIN, steering_pwm_duty_cycle);
   }
Much like motor_receive_message, our aim was to keep the functions light whenever possible. In this case, motor_set_steering_angle is only 2 lines. However, the enclosing motor_map_steering_angle_from_driver_msg is much longer because it maps steering values decoded from the CAN message to PWM values.
With all this mention of the PID control loop, here are some snippets that capture its functionality, along with some explanations to clarify a few details:
   float error = target_speed - current_speed;
   error_integral += error;
   if (error_integral > 25) {
     error_integral = 25;
   }
   if (error_integral < -25) {
     error_integral = -25;
   }
   float error_derivative = error - previous_error;
   previous_error = error;
   motor_pwm_duty_cycle =
       MOTOR_NEUTRAL + (gain_prop * error) + (gain_inte * error_integral) + (gain_deri * error_derivative);
The snippet of code above is the error calculation portion. It calculates an instant P (proportional) error by subtracting the current speed from the target speed. By accumulating this P error over time, we can calculate our I (integral) error. Finally, we calculate the D (derivative) error by subtracting the previous error from the current error. This effectively calculates the derivative of some equation that represents our error function.
However, what does all of this do for us? The final line, in which we set the value of motor_pwm_duty_cycle, is responsible for setting the correct PWM value so that the motor will respond smoothly. By setting and tuning some gains, we can multiply these gains by the errors of each domain and add them to our MOTOR_NEUTRAL PWM value so that the acceleration and deceleration will ramp up and down smoothly.
Next we will discuss how we are able to handle forward and backward movement. The code below represents the car's ability to detect forward motion after deciphering the CAN message.
   if (target_speed > 0) {
     direction_state = FORWARD;
     motor_pwm_duty_cycle += 0.5;
     if (motor_pwm_duty_cycle < 15) {
       motor_pwm_duty_cycle = 15;
     }
     if (motor_pwm_duty_cycle > 17) {
       motor_pwm_duty_cycle = 17;
     }
   }
If the car needs to move forward based on the CAN message's target speed, it will set a direction enumeration named direction_state to FORWARD. Additionally, we have clamped the motor PWM values in the FORWARD, BACKWARD, and NEUTRAL direction states so that the car doesn't exceed the pre-determined limits we set and run too quickly for us to be able to catch it. The mentioned enumeration is shown below:
enum direction { FORWARD, NEUTRAL, REVERSE };
However, we do have a form of safety measure in place so that the car will not attempt to raise its PWM value while stuck on an object. In our initial iteration of the PID control loop, if the car were stuck on an object, the PWM values would increase without limit and the car would spike in acceleration before the control loop lowered the speed of the car. This could have proven dangerous, as the car running into someone's body could have caused harm or damage to the car itself. To rectify this, we created the code below:
   if (current_speed == 0) {
     if (motor_pwm_duty_cycle > 16 || motor_pwm_duty_cycle < 14) {
       failure_state++;
     }
   }
   if (failure_state > 3) {
     pwm1__set_duty_cycle(MOTOR_PWM_CONTROL_PIN, MOTOR_NEUTRAL);
   }
This code detects how many times the car failed to accelerate, and will halt the car if it fails 5 times consecutively.
With the bulk of the code controlling the motor discussed, we shall quickly cover the optical encoder and its functionality. The rpm_sensor.c code module contains all of the code we used to interact with the optical encoder and its outputs. We configured a set of them to trigger GPIO interrupts. This way, we could use the number of interrupts counted in a set amount of time to calculate the RPM and speed of the car. The rpm_sensor.c code below shows the car's speed is calculated:
   float rpm_sensor_get_speed_in_kph_10Hz() {
     float rpm = rpm_sensor_get_rpm_10Hz(interrupts_per_100_ms);
     float kph = ((rpm * minutes_in_hour * wheel_circumference) / cm_in_km) / 10; // 3.74; // 3.33f;
     interrupts_per_100_ms = 0;
     return kph;
   }
Finally, we shall discuss our periodic callbacks. Everything for the motor controller is conducted in the periodic_callbacks_10Hz function as shown below:
   void periodic_callbacks__10Hz(uint32_t callback_count) {
     motor_10Hz_PID();
     motor_send_debug_message_to_can();
     can_handler__handle_all_incoming_messages();
     can_handler_mia_10Hz();
   }
Here we run our PID control loop, handle incoming CAN messages, handle MIA management, and send our motor RPM and current speed over CANBus for the LCD screen and web application to display.
Technical Challenges
- The first problem we ran into was controlling the ESC. As mentioned before, the XL-5 was intended to be controlled by a wireless transmitter, and thus doesn't have any documentation available online. When we were testing what PWM values would work, we eventually ran PWM duty cycle sweeps from 0% to 100% to determine what the minimum and maximum thresholds for movement were.
- The second problem we faced was motor acceleration tuning. Before we decided to make use of a PID loop to control the speed of the motor, we often dealt with long wind-up times before the motor began moving. Additionally, when the car needed to slow down, it would slow down too quickly and we would run into a loop of long wind-up times followed by fast deceleration. Our PID loop solved this issue by making the necessary calculations from the car's RPM and current speed and adjusting the PWM value more predictably.
- The final problem we faced was ESC calibration, though this issue was minor. Occasionally, the XL-5 ESC can fall out of calibration, and requires manual calibration to ensure correct operation. This calibration normally has to be done with the wireless transmitter and remote, but we managed to perform the same procedures using an SJ2 board, with its onboard buttons serving to issue PWM values as the ESC needed for calibration.
Geographical Controller
Hardware Design: GPS Module
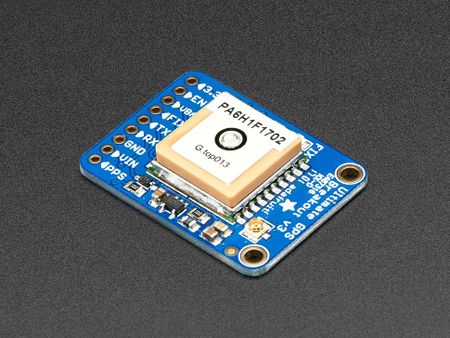
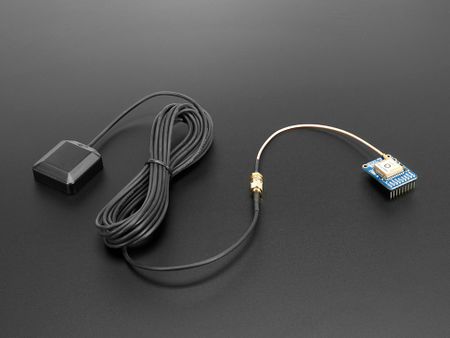
We used the Ultimate GPS Breakout v3 and an antenna to better receive the GPS signal. This GPS module has an LED that indicates a GPS fix is found so we can start the car.
The GPS module is connected to the microcontroller of our SJ2 board via UART.
It outputs several NMEA sentences by default. In our project, we only look for the $GPGGA ones. Therefore, we had to change the settings of the modules using a USB to UART bridge to send the command to the GPS module.
We used the GPS module to obtain the real time GPS coordinate of the car. The GPS coordinate of the car will be used to calculate the distance between the itself and the destination
The $GPGGA sentence we target looks like the following:
$GPGGA,hhmmss.ss,llll.ll,a,yyyyy.yy,a,x,xx,x.x,x.x,M,x.x,M,x.x,xxxx
| Format | Name | Example | Description |
|---|---|---|---|
| $GPGGA | Sentence Identifier | $GPGGA | Global Positioning System Fix Data |
| hhmmss.ss | Time | 201409 | UTC of position 20:14:09 Z |
| llll.ll | Latitude | 3721.4429 | Degrees Minutes Seconds form: 37°21'26.574" or Decimal Degree form: 37.357382 |
| a | Direction for Latitude | N or S | North or South |
| yyyyy.yy | Longitude | -12145.2451 | Degrees Minutes Seconds form: -121°45'14.706" or Decimal Degree form: -121.754085 |
| b | Direction for Longitude | E or W | East or West |
| x | GPS Quality indicator | 0 or 1 or 2 | 0 indicates no fix, 1 indicates GPS fix, 2 indicates Differential GPS |
| xx | Number of satellites | 05 | 5 satellites are in use |
| x.x | Horizontal dilution of precision | 1.5 | 1.5 Relative accuracy of horizontal position |
| x.x | Altitude above mean-sea-level | 25.3 | 25.3 meters above the mean-sea-level |
| M | Unit of altitude above mean-sea-level | M | meter |
| x.x | Height of geoid above WGS84 ellipsoid | -15.2 | -15.2 meters |
| M | Units of geoidal separation, meters | M | meter |
| x.x | Age of Differential GPS data (seconds) | blank | No last update |
| xxxx | Diff. reference station ID# | blank | No station ID |
| *hh | Checksum | *25 | Used to maintain data integraty |
Hardware Design: Compass
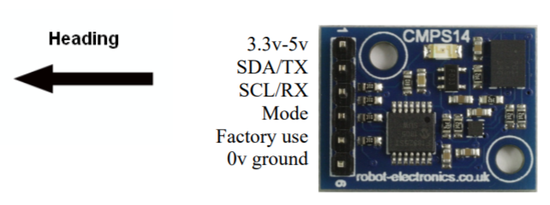
We used CMPS14 as our compass module to keep track of the heading of the car. The CMPS14 is a tilt compensated compass that has a 3-axis magnetometer. It also uses the BNO080 running algorithms to make sure the heading output degree is always accurate when the module is tilted unexpectedly. The CMPS14 module is connected to the SJ2 board via I2C.
Software Design: GPS logic
In the Geo controller node, we connected the GPS module via UART to get the GPS fix update for every 10Hz. The GPS module sends us the current coordinates the car is located. As we have covered in the previous section, the GPS module sends out the $GPGGA NMEA format. The SJ2 board receives the $GPGGA sentence in bytes. After the board receives the raw byte data, we convert and break them down to meaningful information that we need for our car.
We used 2 functions in our line_buffer.c module to parse the raw data we obtained from the GPS module.
- line_buffer__add_byte() to add the raw data to our temporary line buffer
- line_buffer__remove_line() to parse the data into coordinates that is stored in the line buffer.
bool line_buffer__add_byte(line_buffer_s *buffer, char byte) {
  if (buffer->write_index < buffer->max_size) {
    *(char *)(buffer->memory + buffer->write_index) = byte;
    buffer->write_index++;
    return true;
  } else {
    return false;
  }
}
bool line_buffer__remove_line(line_buffer_s *buffer, char *line, size_t max_line_size) {
  uint16_t index = 0;

  if (*(char *)(buffer->memory + max_line_size - 1) != '\0') {
    strncpy(line, (char *)(buffer->memory), max_line_size);
    *(line + max_line_size - 1) = '\0';
    *(char *)(buffer->memory) = '\0';
    buffer->write_index = 0;
    return true;
  }

  while ((*(char *)(buffer->memory + index) != '\n') && (*(char *)(buffer->memory + index) != '\0')) {
    *(line + index) = *(char *)(buffer->memory + index);
    index++;
  }

  if ((*(char *)(buffer->memory + index) == '\n') && (*(char *)(buffer->memory + index + 1) == '\0')) {
    *(line + index) = '\0';
    *(char *)(buffer->memory) = '\0';
    buffer->write_index = 0;
    return true;
  } else if ((*(char *)(buffer->memory + index) == '\n') && (*(char *)(buffer->memory + index + 1) != '\0')) {
    strcpy((char *)buffer->memory, (char *)(buffer->memory + index + 1));
    return true;
  }

  return false;
}
After we obtained the GPS coordinates from the car that is currently located at, we need to:
- send the current GPS coordinates of the car to the bridge controller
- calculate the distance and bearing of the car and sends information to the driver controller to handle the driving logic
They are both sent via the CAN bus.
Code shows the destination coordinates received from the bridge controller via CAN bus:
void gps__receive_message(can__num_e can_port) {
  can__msg_t gps_coordinates_from_bridge_controller = {0};

  while (can__rx(can1, &gps_coordinates_from_bridge_controller, 0)) {
    dbc_message_header_t header = {
        .message_id = gps_coordinates_from_bridge_controller.msg_id,
        .message_dlc = gps_coordinates_from_bridge_controller.frame_fields.data_len,
    };

    if (dbc_decode_GPS_DESTINATION(&gps_destination_coordinates, header,
                                   gps_coordinates_from_bridge_controller.data.bytes)) {
    }
  }

  if (dbc_service_mia_GPS_DESTINATION(&gps_destination_coordinates, 10)) {
    fprintf(stderr, "GPS MIA! I will feed a pre-defined coordinate to the struct gps_destination_coordinates\n");
  }
}
Code shows the current GPS coordinates of the car sent to the bridge controller via CAN bus:
void gps__transmit_msg_to_bridge(can__num_e can_port) {
can__msg_t msg = {0};
dbc_GPS_CURRENT_LOCATION_s current_coord = {0};
gps__convert_to_deg_min_sec(¤t_coord, parsed_coordinates);
const dbc_message_header_t header = dbc_encode_GPS_CURRENT_LOCATION(msg.data.bytes, ¤t_coord);
msg.msg_id = header.message_id;
msg.frame_fields.data_len = header.message_dlc;
if (parsed_coordinates.latitude > 3000 && parsed_coordinates.latitude < 4000 &&
parsed_coordinates.longitude > 10000 && parsed_coordinates.longitude < 15000) {
can__tx(can_port, &msg, 0);
}
}
We set up 2 functions to obtain the latitude, longitude, and the directions from the $GPGGA sentence we stored on our line buffer.
static void gps__get_longitude(gps_coordinates_t *gps__extracted_data, char *gps__original_data) {
  char *gps__original_data_addr;
  gps__original_data_addr = gps__original_data;

  char tmp_gps_data[30];
  memset(tmp_gps_data, 0, sizeof(tmp_gps_data));

  char *tmp_gps_data__ptr;
  tmp_gps_data__ptr = tmp_gps_data;

  uint8_t tmp_data_index = 0;
  uint8_t original_data_index = 0;

  if (*gps__original_data_addr == '$') {
    while (*(original_data_index + gps__original_data) != '\0') {
      if (*(gps__original_data + original_data_index) == ',') {
        if ((*(gps__original_data + original_data_index + 1) == 'W')) {
          longitude_direction = -1;
          gps__extracted_data->longitude = strtof(tmp_gps_data, NULL);
          break;
        } else if ((*(gps__original_data + original_data_index + 1) == 'E')) {
          longitude_direction = 1;
          gps__extracted_data->longitude = strtof(tmp_gps_data, NULL);
          break;
        } else {
          for (uint8_t i = 0; i < original_data_index; i++) {
            *(tmp_gps_data__ptr + tmp_data_index) = *(gps__original_data + i);
            tmp_data_index++;
          }
          gps__original_data = (gps__original_data + original_data_index + 1);
          tmp_data_index = 0;
          original_data_index = 0;
          memset(tmp_gps_data, 0, sizeof(tmp_gps_data));
          continue;
        }
      } else {
        *(tmp_gps_data__ptr + tmp_data_index) = *(gps__original_data + original_data_index);
        tmp_data_index++;
      }

      original_data_index++;
    }
  }
  gps__original_data = gps__original_data_addr;
}
static void gps__get_latitude(gps_coordinates_t *gps__extracted_data, char *gps__original_data) {
  char *gps__original_data_addr;
  gps__original_data_addr = gps__original_data;

  char tmp_gps_data[30];
  memset(tmp_gps_data, 0, sizeof(tmp_gps_data));

  char *tmp_gps_data__ptr;
  tmp_gps_data__ptr = tmp_gps_data;

  uint8_t tmp_data_index = 0;
  uint8_t original_data_index = 0;

  if (*gps__original_data_addr == '$') {
    while (*(original_data_index + gps__original_data) != '\0') {
      if (*(gps__original_data + original_data_index) == ',') {
        if ((*(gps__original_data + original_data_index + 1) == 'N')) {
          latitude_direction = 1;
          gps__extracted_data->latitude = strtof(tmp_gps_data, NULL);
          break;
        }
        if ((*(gps__original_data + original_data_index + 1) == 'S')) {
          latitude_direction = -1;
          gps__extracted_data->latitude = strtof(tmp_gps_data, NULL);
          break;
        } else {
          for (uint8_t i = 0; i < original_data_index; i++) {
            *(tmp_gps_data__ptr + tmp_data_index) = *(gps__original_data + i);
            tmp_data_index++;
          }
          gps__original_data = (gps__original_data + original_data_index + 1);
          tmp_data_index = 0;
          original_data_index = 0;
          memset(tmp_gps_data, 0, sizeof(tmp_gps_data));
          continue;
        }
      } else {
        *(tmp_gps_data__ptr + tmp_data_index) = *(gps__original_data + original_data_index);
        tmp_data_index++;
      }

      original_data_index++;
    }
  }
  gps__original_data = gps__original_data_addr;
}
Haversine Formula
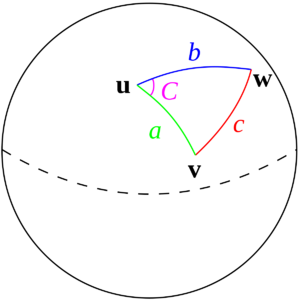
There are two approaches that we considered to implement to calculate the bearing angle and distance of our car, the Pythagoras Theorem and the haversine formula. The former one is easier to implement yet less accurate on the result it generates due to the fact that the earth is curved. We decided to use the haversine formula to retain the accuracy of the data. This allow our car to drive to a very long trip with the most accurate data calculated.
| Harversine Formula for distance: | Harversine Formula for bearing: |
|---|---|
| Haversine formula: a = sin²(Δφ/2) + cos φ1 ⋅ cos φ2 ⋅ sin²(Δλ/2) c = 2 ⋅ atan2( √a, √(1−a) ) d = R ⋅ c where φ is latitude, λ is longitude, R is earth’s radius (mean radius = 6,371km); note that angles need to be in radians to pass to trig functions |
Formula: θ = atan2( sin Δλ ⋅ cos φ2 , cos φ1 ⋅ sin φ2 − sin φ1 ⋅ cos φ2 ⋅ cos Δλ ) where |
The 2 formulas are written in calculation.c
The following function calculates the distance between the current coordinate of the car and the destination coordinate.
double distance_calculation__gps(gps_coordinates_t current_loc, dbc_GPS_DESTINATION_s dest_loc) {
  double combined_lat =
      latlong_convert_dbc_to_double(dest_loc.LATITUDE_DEGREE, dest_loc.LATITUDE_MINUTE, dest_loc.LATITUDE_SECOND);
  double combined_long =
      latlong_convert_dbc_to_double(dest_loc.LONGITUDE_DEGREE, dest_loc.LONGITUDE_MINUTE, dest_loc.LONGITUDE_SECOND);

  double theta1 = combined_lat * math_pi / 180; // in radian (current_loc or dest_loc as theta1 doesn't matter)
  double theta2 = (double)current_loc.latitude * math_pi / 180; // in radian

  double delta_theta = (combined_lat - (double)current_loc.latitude) * math_pi / 180;
  double delta_lambda = (combined_long - (double)current_loc.longitude) * math_pi / 180; // in radian
  double a = sin(delta_theta / 2) * sin(delta_theta / 2) +
             cos(theta1) * cos(theta2) * sin(delta_lambda / 2) * sin(delta_lambda / 2);
  double c = 2 * atan2(sqrt(a), sqrt(1 - a));
  double distance = earth_radius * c;

  return abs(distance);
}
The following function calculates the bearing using the current coordinate of the car and the destination coordinate.
double bearing_calculation__gps(gps_coordinates_t current_loc, dbc_GPS_DESTINATION_s dest_loc) {

  double combined_lat =
      latlong_convert_dbc_to_double(dest_loc.LATITUDE_DEGREE, dest_loc.LATITUDE_MINUTE, dest_loc.LATITUDE_SECOND);
  double combined_long =
      latlong_convert_dbc_to_double(dest_loc.LONGITUDE_DEGREE, dest_loc.LONGITUDE_MINUTE, dest_loc.LONGITUDE_SECOND);

  double current_loc_latitude_in_radian = current_loc.latitude * 180 / math_pi;
  double current_loc_longitude_in_radian = current_loc.longitude * 180 / math_pi;
  double dest_loc_latitude_in_radian = combined_lat * 180 / math_pi;
  double dest_loc_longitude_in_radian = combined_long * 180 / math_pi;

  // keeping suryanto's original code
  // float y = sin(combined_long - current_loc.longitude) * cos(combined_lat);
  // float x = cos(current_loc.latitude) * sin(combined_lat) -
  //           sin(current_loc.latitude) * cos(combined_lat) * cos(combined_long - current_loc.longitude);
  // float theta = atan2(y, x);
  // float bearing = (float)((int)((theta * 180 / math_pi) + 360) % 360) +
  //                 (float)((float)(theta * 180 / math_pi) - (int)(theta * 180 / math_pi));

  double y = sin(combined_long - current_loc.longitude) * cos(combined_lat);
  double x = cos(current_loc.latitude) * sin(combined_lat) -
             sin(current_loc.latitude) * cos(combined_lat) * cos(combined_long - current_loc.longitude);
  double theta = atan2(y, x);
  double bearing = (double)((int)((theta * 180 / math_pi) + 360) % 360) +
                   (double)((double)(theta * 180 / math_pi) - (int)(theta * 180 / math_pi));

  return bearing;
}
In order to keep the GPS coordinate in its highest accuracy, we have to parse the coordinates into degree minute second format,
static void gps__convert_to_deg_min_sec(dbc_GPS_CURRENT_LOCATION_s *coord, gps_coordinates_t data_from_gps_mod) {
  coord->LATITUDE_DEGREE = (int8_t)((data_from_gps_mod.latitude) / 100) * latitude_direction;
  coord->LONGITUDE_DEGREE = (int8_t)((data_from_gps_mod.longitude) / 100) * longitude_direction;
  coord->LATITUDE_MINUTE = (uint8_t)((int)(data_from_gps_mod.latitude) % 100);
  coord->LONGITUDE_MINUTE = (uint8_t)((int)(data_from_gps_mod.longitude) % 100);
  coord->LATITUDE_SECOND = (float)((data_from_gps_mod.latitude - (int)(data_from_gps_mod.latitude)) * 60);
  coord->LONGITUDE_SECOND = (float)((data_from_gps_mod.longitude - (int)(data_from_gps_mod.longitude)) * 60);
}
MIA handling is used when the car does not get the destination coordinates from the bridge controller. ie., the bridge controller fails to send the data via CAN bus. The default destination is at SJS engineering building if the Geo Controller has lost connection with the bridge controller.
const uint32_t dbc_mia_threshold_GPS_DESTINATION = 100;
const dbc_GPS_DESTINATION_s dbc_mia_replacement_GPS_DESTINATION = {
    // new struct value to replace when not receiving can_msg struct

    // current MIA coordinate: SJSU engineering building (37.33787573112567, -121.88162199354933)
    .LATITUDE_DEGREE = 37,    .LATITUDE_MINUTE = 20,  .LATITUDE_SECOND = 16.35,
    .LONGITUDE_DEGREE = -121, .LONGITUDE_MINUTE = 52, .LONGITUDE_SECOND = 53.83};
Software Design: Compass logic
The CMPS14 is connect via the I2C2 pins of the SJ2 board. The CMPS14 module outputs a 16 bit heading ranged from 0-3599, which represents 0 degree to 359.9 degree. SJ2 board reads the value of the heading from register 0x02 (upper byte) and 0x03 (lower byte) of CMPS14 to get the current heading of the car.
float cmps14__read_16bit_compass_data(i2c_e i2c_port) {
  uint16_t cmps14_data_from_register = 0;

  cmps14_data_from_register |= i2c__read_single(i2c_port, 0xC0, 0x03);
  cmps14_data_from_register |= (i2c__read_single(i2c_port, 0xC0, 0x02) << 8);

  return (float)(cmps14_data_from_register / (float)10);
}
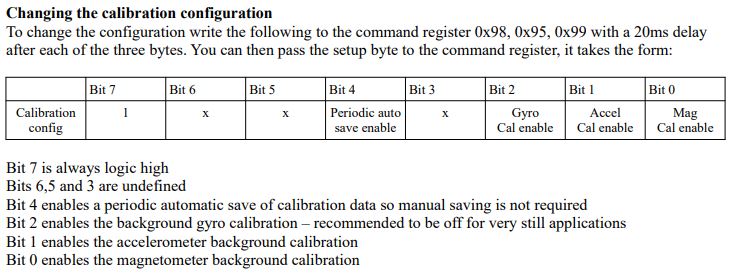
We enabled the calibration of the magnetometer background calibration by writing to the command register 0x00 of CMPS14. Besides that, we also checked the LSB 2 bits of register 0x1E to check whether the compass has been fully calibrated.
The SJ2 board then transmits the data of the heading, distance, and bearing to the driver controller via CAN bus,
void cmps14__transmit_message(can__num_e can_port) {
  cmps14_data.HEADING = cmps14__read_16bit_compass_data(I2C__2);

  cmps14_data.DISTANCE = gps__get_distance();
  cmps14_data.BEARING = gps__get_bearing();

  can__msg_t msg = {};
  const dbc_message_header_t header = dbc_encode_COMPASS_HEADING_DISTANCE(msg.data.bytes, &cmps14_data);
  msg.msg_id = header.message_id;
  msg.frame_fields.data_len = header.message_dlc;

  can__tx(can_port, &msg, 0);
}
The periodic callbacks of the FreeRTOS task looks like the following. It is called every 10 Hz.
void periodic_callbacks__10Hz(uint32_t callback_count) {

  // receive desintation coordinates from the web app (sensor/bridge controller)
  gps__receive_message(can1);

  gps__run_once();

  // transmit current gps coordinates to the web app (sensor/bridge controller)
  gps__transmit_msg_to_bridge(can1);

  // transmit compass heading, bearing, distance to the driver (driver controller)
  cmps14__transmit_message(can1);

  led_ring_turn_on_led_north();

  count = gps_fix_led_logic(gpio_input_p2_0, gpio_output_p1_18, count);
}
Technical Challenges
- We Encountered issues with getting the GPS coordinates. The solution was to connect the GPS module with an external antenna and plugging in CR1220 as a backup battery.
- We had an issue about the compass heading of the car. The degree was off in a different degree each time we started the car. We later found out the compass module needs calibration each time before we start the car. Here is a video that explains why the calibration is needed.
- The dbc format can support floating point for each signal, not double, which is not enough when it is being used to store the GPS coordinates. We fixed the issue by breaking the coordinates into 3 signals using the Degrees Minutes Seconds format.
- The factory setting for our GPS module has a default setting that outputs different NMEA sentences other than $GPGGA in 1Hz. It did not have enough time to finish outputting the $GPGGA line before the next 10Hz periodic callback function was called. We ended up configuring the GPS module by sending PMTK commands to change the GPS output speed from 1Hz to 10Hz and to only provide $GPGGA through a serialComm USB-TTL.
Driver
Software Design: Obstacle Avoidance
We have set the granularity of our steering angle to be between [-4, 4]. The following code snippet is how we define each value.
static const int16_t EXTREME_LEFT = -4;
static const int16_t FULL_LEFT = -3;
static const int16_t HARD_LEFT = -2;
static const int16_t SOFT_LEFT = -1;
static const int16_t NO_TURN = 0;
static const int16_t SOFT_RIGHT = 1;
static const int16_t HARD_RIGHT = 2;
static const int16_t FULL_RIGHT = 3;
static const int16_t EXTREME_RIGHT = 4;
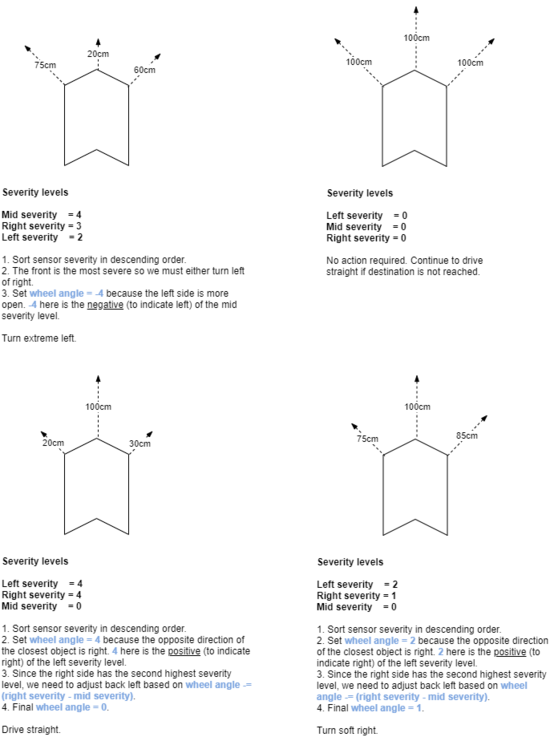
Note that there are 4 values of steering per direction. We have mapped these 4 values to something we refer to as a severity. We use an array of distance thresholds for each sensor to determine what the severity level is. A higher severity level in a particular direction means that there is a higher priority to avoid that direction.
Given a threshold array defined as: [X0, X1, X2, X3], where X0 > X1 > X2 > X3:
- If a sensor value is greater than X0, then we treat it as if there is no object in that direction. We call this severity level 0.
- If a sensor value is between X0 (inclusive) and X1 (exclusive), then we treat it as if there is an obstacle far away. We call this severity level 1.
- If a sensor value is between X1 (inclusive) and X2 (exclusive), then we treat it as if there is an obstacle somewhat close. We call this severity level 2.
- If a sensor value is between X2 (inclusive) and X3 (exclusive), then we treat it as if there is an obstacle very close. We call this severity level 3.
- If a sensor value is lower than X3, then we treat it as if there is an obstacle extremely close. We treat this as severity level 4.
The following code snippet shows what we have defined as our distance thresholds.
static const uint16_t THRESHOLDS_CM_SEVERITY[SEVERITY_LEVELS] = {95, 80, 65, 50};
The follow diagram shows several examples of how we apply the severity levels to determine which direction we should turn.
Software Design: Motor Command Delegation & Speed Adjustment
The driver will continuously send throttle=0 to the Motor controller until the driver receives a GPS coordinate from the mobile app. When a coordinate is received, there will be contention on which piece of information will be the one controlling the motor: GPS coordinates, sensor values.
If there are no objects within the far threshold of any sensor, we rely solely on the GPS coordinates of the car and the destination to adjust our throttle and wheel angle. However, we will switch to relying only on the sensor values when any of them detect an object within our far threshold. We have an array of settable throttle values we use that look like:
static const float SPEED[GEAR_COUNT] = {0, 2, 4, 6, 8, 10};
When the driver has a destination, we set throttle=10 as its initial speed. Next, we adjust the speed to be slower based on the severity level of the sensor that detects the closest object. As an example:
# The left sensor has the highest severity.
uint16_t left_severity  = 3;
uint16_t mid_severity   = 2;
uint16_t right_severity = 1;

# 10 - 6 = 4
uint8_t throttle = SPEED[GEAR_COUNT - 1] - SPEED[left_severity];
Since the maximum severity level is 4 (index 4 of our SPEED array), the worst case would mean that we will be at throttle=2.
Technical Challenges
Problem: As we got more confident with our obstacle avoidance logic, we started to increase the default speed of the car. The increase in speed caused more frequent crashes because it failed to dodge obstacles in time.
Solution: We had to adjust our sensor thresholds whenever we change the default speed.
Problem: Sometimes the car would drive in an unexpected direction. This happened because Geo was sending us bad data due to reading incomplete NMEA lines.
Solution: We stop moving if we detect bad values from the Geo controller. In our case this would usually be 0s in our latitude and longitude fields.
Liquid Crystal Display (LCD)
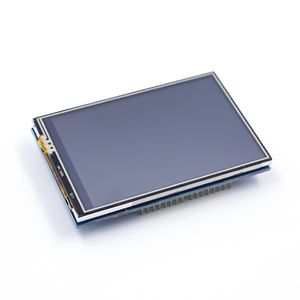
To make de-bugging easier, an LCD display was attached along with crucial information for de-bugging. There were many options of LCD available, but 3.5"-320x480 Thin Film Transistor (TFT) LCD (picture attached below) powered by ILI9486 chip by Ilitek was the best choice due to its size.
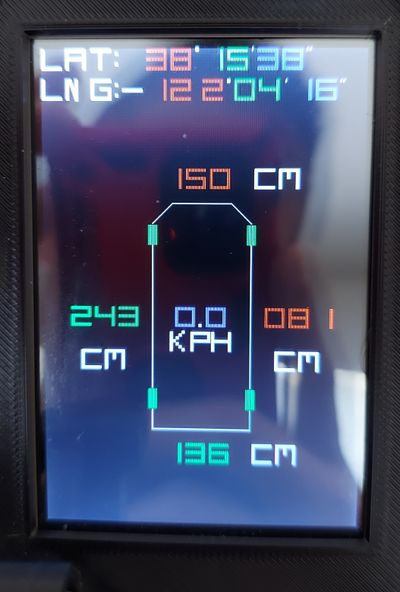
The LCD will be utilized to display information related to the car, such as:
- 1. Current coordinates of the car
- 2. Current speed of the car
- 3. Sensor values around the car
- 4. Wheel angle
- 1. Current coordinates of the car
To make it more interesting, a simple graphical presentation of the car was provided for visualization purposes.
Hardware Design
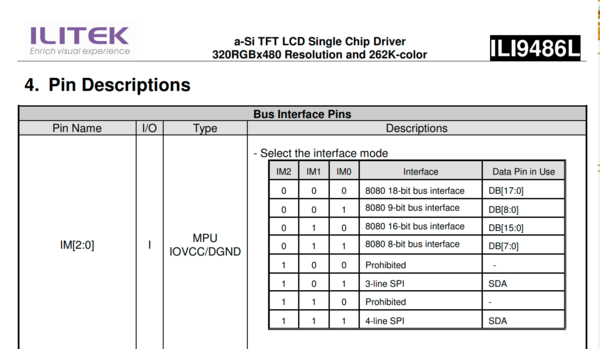
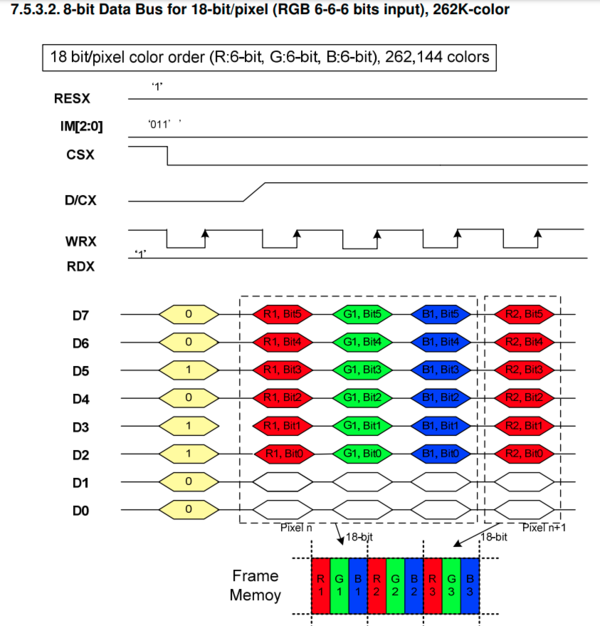
Since the TFT LCD ordered came with a shield, only some of the pins are exposed. Unfortunately, the Serial Peripheral Interface (SPI) pins of the LCD were not exposed, therefore, 8-bit parallel micro-controller unit (MCU) interface that supported 18-bit/pixel or equivalent to 262K color representation for a pixel was used.
Realistically, it was possible to change the communication to SPI by removing the shield and re-soldering the instruction mode (IM) pins to "101" or "111" to use either "3-line SPI" or "4-line SPI", respectively (as shown below). However, the 8-bit parallel MCU interface is arguably faster than SPI, therefore, the original communication protocol was kept.
The disadvantages of using 8-bit parallel MCU interface are the extra number of wires needed for the data pins and the complication in read/write protocols.
In order to write one pixel on the LCD, 3 bytes are required to be sent at each rising "write" edge clock. Each byte represents a color as shown in the figure below.
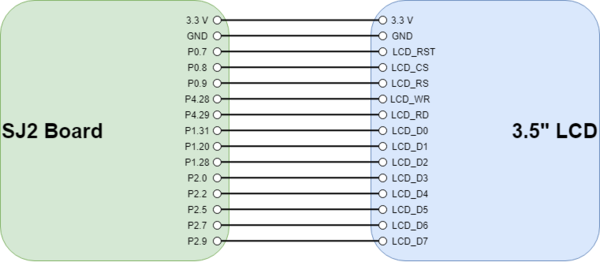
To better visualize the hardware design, a simple diagram of the connection between SJ2 board and the TFT LCD is provided below.
To make the TFT LCD work, an 8-bit parallel driver needs to be written.
First, we initialized the TFT LCD using the following code:
void tft__init(void) {

  /**
   **************************************************************
   *                    TFT-LCD PARAMETERS                      *
   **************************************************************/

  const static uint8_t TFT_BRIGHTNESS = 0xFF;
  const static uint8_t TFT_WRITE_CTRL_DISP_REGISTERS = 0x24;
  const static uint8_t CABC_REGISTERS = 0x00;
  const static uint8_t ENTRY_MODE_REGISTERS = 0x06;

  /**************************************************************/

  tft__pin_configuration();
  tft__assert_reset();
  delay__us(1);
  tft__deassert_reset();
  delay__ms(120);
  tft__sleep_out();
  delay__ms(350);
  tft__brightness(TFT_BRIGHTNESS);
  tft__write_ctrl_disp(TFT_WRITE_CTRL_DISP_REGISTERS);
  tft__write_frame_rate_ctrl();
  tft__write_disp_func_ctrl();
  tft__write_entry_mode(ENTRY_MODE_REGISTERS);
  tft__write_memory_access_control();
  tft__write_power_ctrl1();
  tft__dark_background();
  tft__display_on();
}
After the LCD has been initialized, we can start drawing.
To draw at a certain pixel, page and column addresses must be set first with the following code:
void tft__set_col_addr(uint16_t start_col_addr, uint16_t end_col_addr) {
  const uint8_t sc_15_8 = (start_col_addr >> 8) & 0xFF;
  const uint8_t sc_7_0 = (start_col_addr & 0xFF);
  const uint8_t ec_15_8 = (end_col_addr >> 8) & 0xFF;
  const uint8_t ec_7_0 = (end_col_addr & 0xFF);

  tft__assert_write();
  tft__assert_read();

  tft__assert_cs();
  {
    tft__deassert_rs_dcx();

    tft__deassert_write();
    tft__write_to_8bits_data_lines(COLUMN_ADDR_CMD);
    tft__assert_write();

    tft__assert_rs_dcx();

    tft__deassert_write();
    tft__write_to_8bits_data_lines(sc_15_8);
    tft__assert_write();

    tft__deassert_write();
    tft__write_to_8bits_data_lines(sc_7_0);
    tft__assert_write();

    tft__deassert_write();
    tft__write_to_8bits_data_lines(ec_15_8);
    tft__assert_write();

    tft__deassert_write();
    tft__write_to_8bits_data_lines(ec_7_0);
    tft__assert_write();
  }
  tft__deassert_cs();
}

void tft__set_page_addr(uint16_t start_page_addr, uint16_t end_page_addr) {
  const uint8_t sp_15_8 = (start_page_addr >> 8) & 0xFF;
  const uint8_t sp_7_0 = (start_page_addr & 0xFF);
  const uint8_t ep_15_8 = (end_page_addr >> 8) & 0xFF;
  const uint8_t ep_7_0 = (end_page_addr & 0xFF);

  tft__assert_write();
  tft__assert_read();

  tft__assert_cs();
  {
    tft__deassert_rs_dcx();

    tft__deassert_write();
    tft__write_to_8bits_data_lines(PAGE_ADDR_CMD);
    tft__assert_write();

    tft__assert_rs_dcx();

    tft__deassert_write();
    tft__write_to_8bits_data_lines(sp_15_8);
    tft__assert_write();

    tft__deassert_write();
    tft__write_to_8bits_data_lines(sp_7_0);
    tft__assert_write();

    tft__deassert_write();
    tft__write_to_8bits_data_lines(ep_15_8);
    tft__assert_write();

    tft__deassert_write();
    tft__write_to_8bits_data_lines(ep_7_0);
    tft__assert_write();
  }
  tft__deassert_cs();
}
Then, we can start writing to the memory using the following command:
void tft__mem_write(uint16_t start_col_addr, uint16_t end_col_addr, uint16_t start_page_addr, uint16_t end_page_addr,
                    color_e color) {
  uint32_t value = 0;
  const uint16_t iteration = ((end_col_addr - start_col_addr + 1) * (end_page_addr - start_page_addr + 1));

  switch (color) {
  case BLACK:
    value = 0x000000;
    break;
  case WHITE:
    value = 0xFCFCFC;
    break;
  case RED:
    value = 0xFC0000;
    break;
  case GREEN:
    value = 0x00FC00;
    break;
  case BLUE:
    value = 0x0000FC;
    break;
  }

  tft__assert_write();
  tft__assert_read();

  tft__assert_cs();
  {
    tft__deassert_rs_dcx();

    tft__deassert_write();

    tft__write_to_8bits_data_lines(MEM_WRITE_CMD);

    tft__assert_write();

    tft__assert_rs_dcx();

    for (size_t i = 0; i < iteration; i++) {
      tft__deassert_write();
      tft__write_to_8bits_data_lines(value & 0xFF);
      tft__assert_write();

      tft__deassert_write();
      tft__write_to_8bits_data_lines((value >> 8) & 0xFF);
      tft__assert_write();

      tft__deassert_write();
      tft__write_to_8bits_data_lines((value >> 16) & 0xFF);
      tft__assert_write();
    }
  }
  tft__deassert_cs();
}
Software Design
Initially when SJ2 is turned on, some of the pixels on the LCD will be drawn. These initial pixels are not expected to change throughout the program, such as:
- 1. "LAT" and "LNG" letters along with the degree, minute and second symbols.
- 2. "CM" letter for the sensor values.
- 3. "KPH" letter for the speed value.
- 4. Car body frame and the rear wheels.
To increase the visibility of numbers and letters on the LCD, the thickness of the numbers and letters on the LCD is increased to 3 pixels and the dimension of each letter or number is set to 20 x 20 pixels.
However, by doing so, it means that more pixels need to be updated every 10Hz since the pixel update is done inside a 10Hz periodic callback task.
The majority of the information on the LCD consists of numbers, therefore, to make the design easier, the design of numbers mimic the design in a 7-segment display.
To represent each number, some pixels need to be updated while others must be cleared. Clearing pixels is technically writing the pixel with the background color, so it still consumes time.
As a result, updating all of the information mentioned above at once results in SJ2 board crashing since the time it takes to update the pixels needed is more than 10Hz.
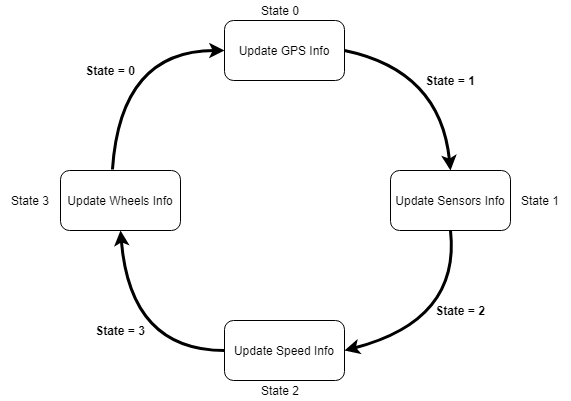
To avoid the crash from occurring, pixel updates are divided into different states where each state only updates one information at a time.
For a better explanation, a flow chart is provided below.
Practically, doing so results in less precision in the information provided on the LCD since each information is only updated every 0.4 seconds. However, this is hardly noticeable on the LCD.
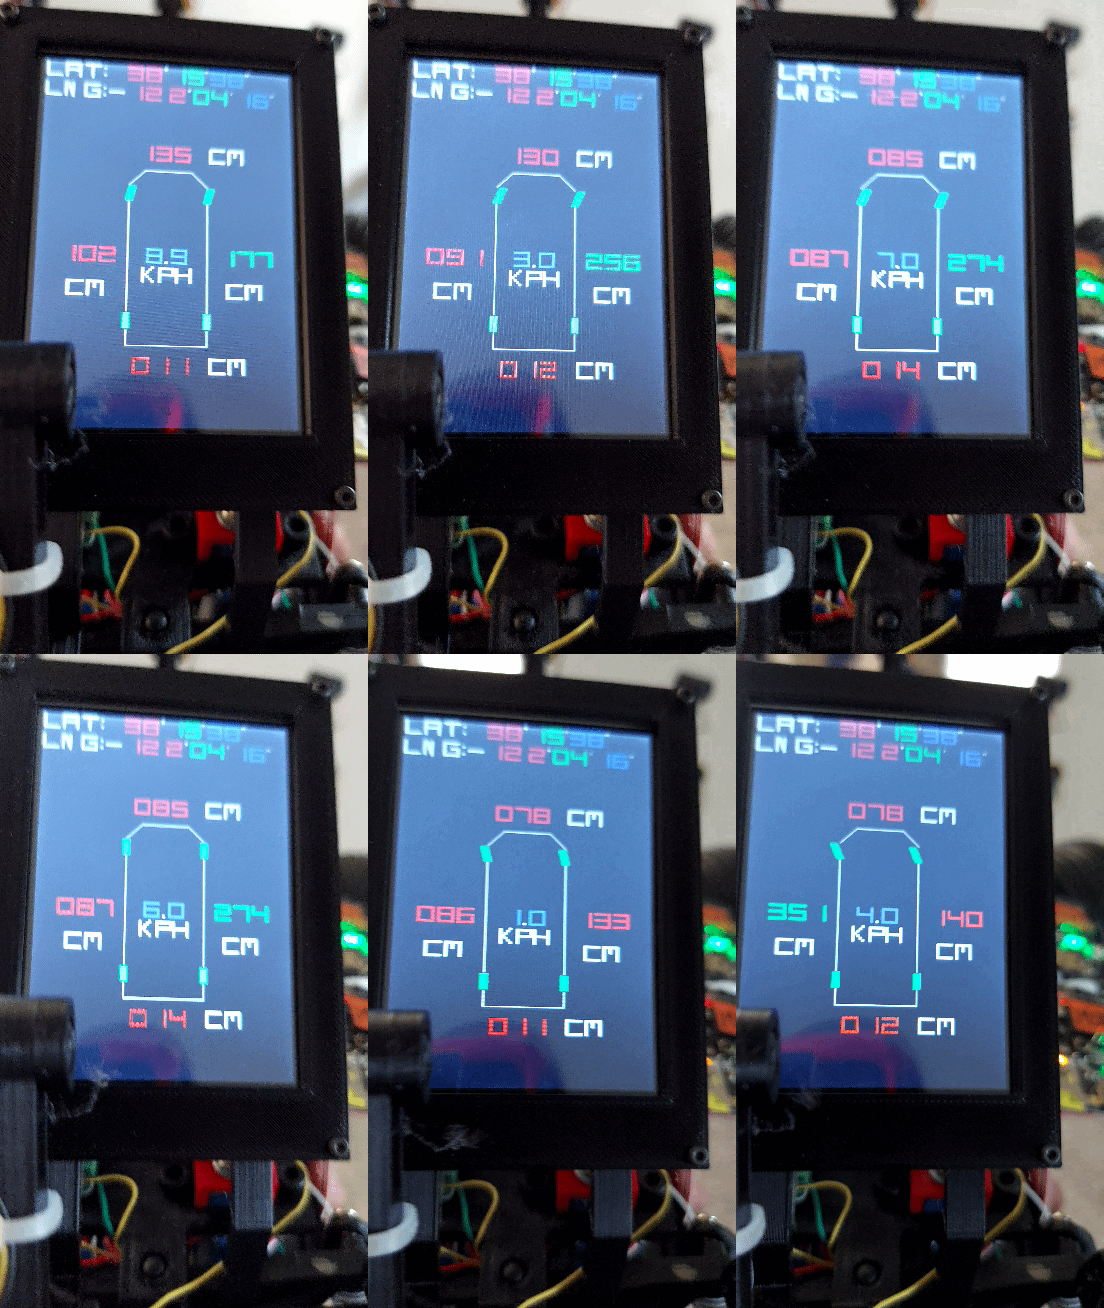
The LCD design for the car can be observed below.
Initially in periodic callback init function, we initialize the LCD first and then we draw the frame on the LCD.
In 10Hz periodic callback function, we draw the information based on the data received from the CAN bus.
void periodic_callbacks__initialize(void) {
  // This method is invoked once when the periodic tasks are created
  uint16_t rx_size = 32;
  uint16_t tx_size = 32;
  initialize__can(can1, 100, rx_size, tx_size);

  tft__init();
  draw__initialized_info();
}
void periodic_callbacks__10Hz(uint32_t callback_count) {
  // ...
  can_handler__manage_mia_10Hz();

  can_bus_handler__process_all_received_messages();

  dbc_DRIVER_s command = driver__get_motor_command();

  draw__debug_info();

  dbc_encode_and_send_DRIVER(NULL, &command);
}
Inside draw__debug_info() function, we can find different states that perform different things depending on which state it is currently in.
void draw__debug_info(void) {
  pwm_data = get_motor_data_to_periodic();
  sensor_data = get_sensor_data_to_periodic();
  gps_data = get_gps_data_to_periodic();
  driver_data = driver__get_motor_command();

  switch (state) {
  case 0:
    draw__gps_info();
    state = 1;
    break;
  case 1:
    draw__sensor_info();
    state = 2;
    break;
  case 2:
    draw__speed_info();
    state = 3;
    break;
  case 3:
    draw__wheels_info();
    state = 0;
    break;
  }
}
- [1] GPS Information
- [1] GPS Information
- The top information on the LCD is the latitude and the longitude of the current location of the car.
- This information is useful to know whether the GPS module is working properly or gets disconnected from the car.
- The coordinates are broken into three parts, degree, minute and seconds.
- However, these values do not change very often. In fact, they barely get updated and when they do, mostly the seconds get updated.
- This is displayed above in TFT LCD design picture.
- The top information on the LCD is the latitude and the longitude of the current location of the car.
- [2] Speed Information
- [2] Speed Information
- One of the most important information to display is the speed of the car. This is really important in a self-driving car.
- The driver must always know how fast the car is going, therefore this information is also displayed.
- Unlike a speedometer, the speed information on the LCD has an indication of which direction the driver is going. If the driver is going backwards, a red bar above the speed value will appear to :::indicate backwards.
- One of the most important information to display is the speed of the car. This is really important in a self-driving car.
- [3] Sensor Information
- [3] Sensor Information
- Sensors are the most important data displayed on the LCD since these values change rapidly and determine the direction of the car when obstacles are detected.
- Having the LCD mounted on the car is helpful because it can help in determining whether the car should turn a certain direction when an obstacle or more obstacles are detected.
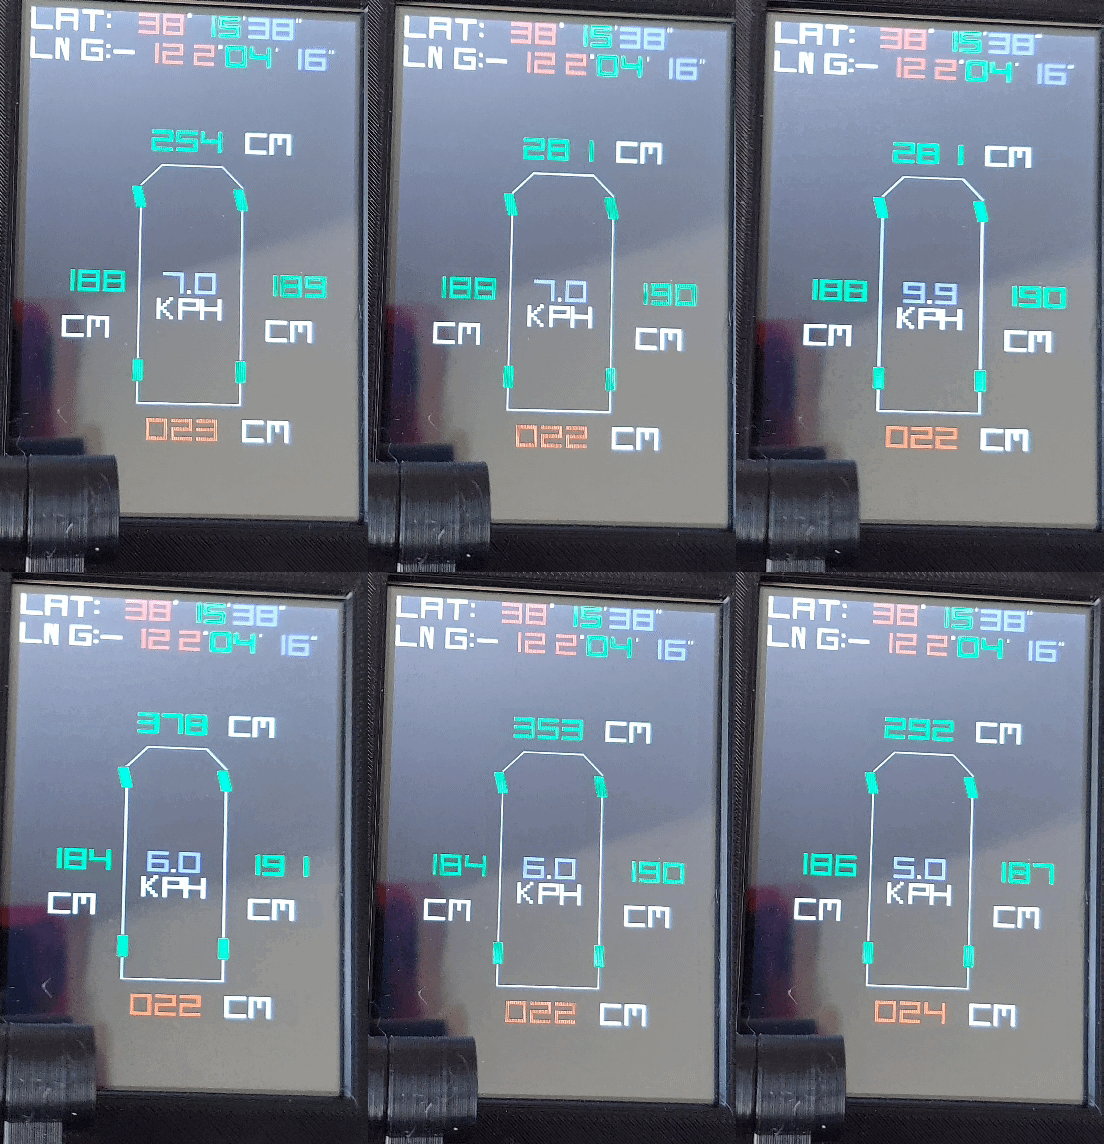
- To provide more informational data on the LCD, it is designed to change the color from green to red when the sensor values are less than the safe threshold.
- This is better illustrated in an animation below.
- Sensors are the most important data displayed on the LCD since these values change rapidly and determine the direction of the car when obstacles are detected.
- Since the threshold for the front is high, the value on the picture above is always in red. However, the right sensor values changes color from green to red as soon as the car detects an object to the right.
- Also, all the sensor values are updated at the same time to make the reading accurate.
- Since the threshold for the front is high, the value on the picture above is always in red. However, the right sensor values changes color from green to red as soon as the car detects an object to the right.
- [4] Wheel angle Information
- [4] Wheel angle Information
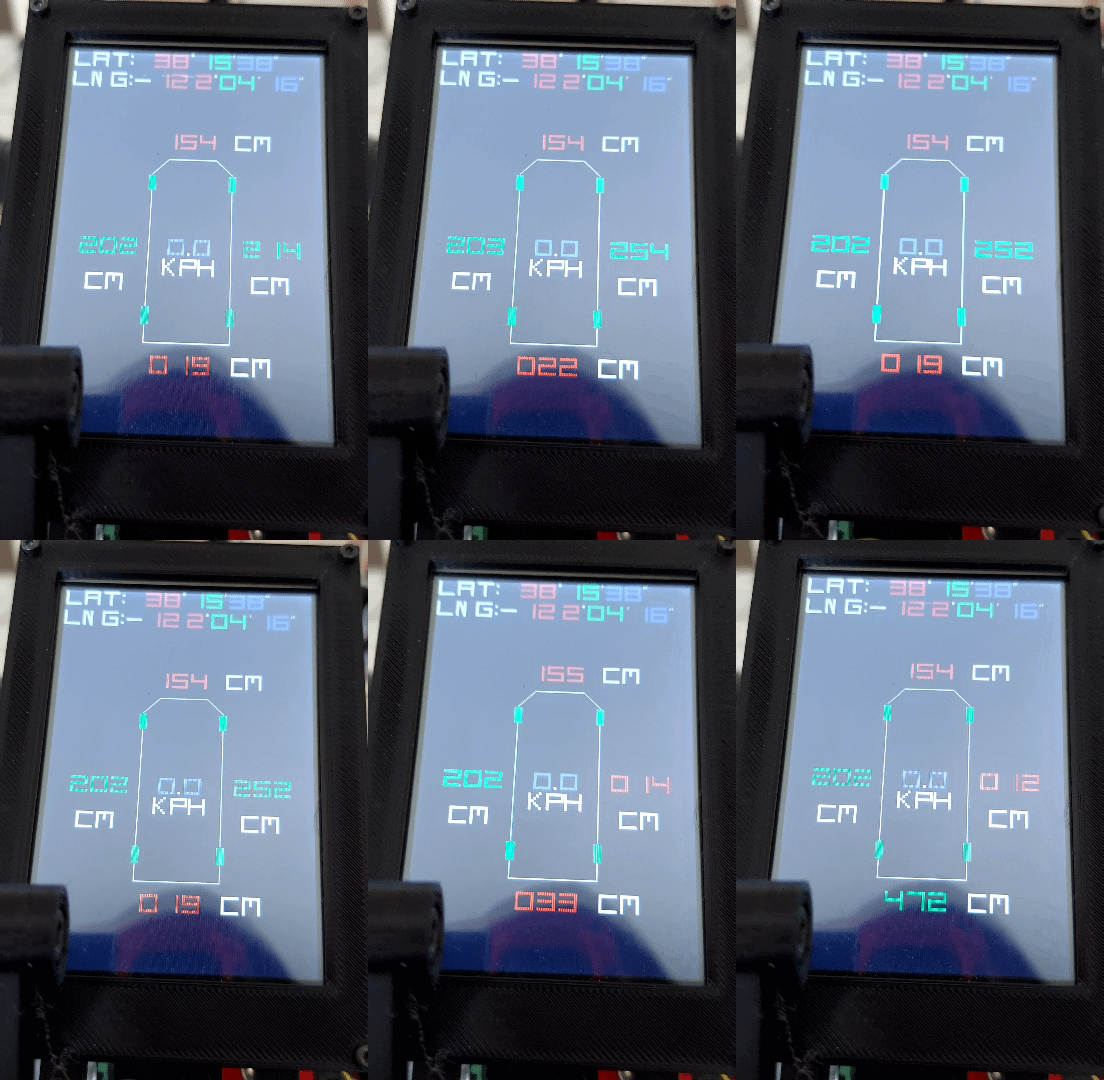
- The car diagram on the LCD also provides a useful information by changing the angle of the front wheels depending on which direction the car is going to. If the car is currently heading right, then the front wheels are also turning right on the LCD.
- This is better illustrated in the animation below.
- The car diagram on the LCD also provides a useful information by changing the angle of the front wheels depending on which direction the car is going to. If the car is currently heading right, then the front wheels are also turning right on the LCD.
- In the animation above, it can be observed how the front wheels on the LCD are changing from right to left. This information is identical to the physical front wheels of the car.
- In the animation above, it can be observed how the front wheels on the LCD are changing from right to left. This information is identical to the physical front wheels of the car.
- When designing the animations, we had two options of using a Rotate function or build our own logic.
- Eventually, we decided to ignore the Rotate function. This was because a Rotate function requires all pixels to be updated even though these pixels can be re-used to show the wheels turning right or left.
- By building our own logic, we are capable of controlling this and preserve some of the pixels that overlap with each other. As a result, we update less pixels compared to a Rotate function and the SJ2 board is less likely to crash due to pixel updates.
- When designing the animations, we had two options of using a Rotate function or build our own logic.
Technical Challenges
1. We encountered a timing issue in 10Hz where the SJ2 board cannot update every required pixels within the time frame. Initially, we tried to fit every information inside a 10Hz callback function. However, due to rapid changes in sensor values, speed and wheel angles, this would cause the SJ2 board to crash and reset.
To overcome this problem, we broke the pixel updates into different states. Each state is responsible for a specific information, such as, sensors, speed, gps and wheel angle information. The state gets updated every 10Hz. Technically, this means that the values displayed are not extremely accurate since they are delayed by 0.4 seconds. However, this is hardly noticeable.
By having different states, the SJ2 is capable to update all the pixels since the board is not required to update all pixels at once.
2. When we received the LCD, we realized that the communication protocol used is not SPI. Instead, it is using 8-bit data parallel interface. This was an issue because this communication protocol requires its own driver.
We solved this problem by basically writing the driver based on the ILI9486 datasheet.
Fortunately, this communication protocol has its advantage, which is that it is more convenient since we can control the clock to trigger each event.
Mobile Application
Hardware Design
Instead of an Android mobile application, the group decided to pursue the use of Bluetooth Web API available in Google Chrome via a website with JavaScript. This decision expands our range of platforms from only an Android device with the app installed to any device possessing Bluetooth and Google Chrome. This includes Android smartphones, Apple smartphones, Linux, Windows and Mac laptops. This created a very easy environment for deploying the app as a user only needs to know the website address and installing updates are never needed from the user's side.
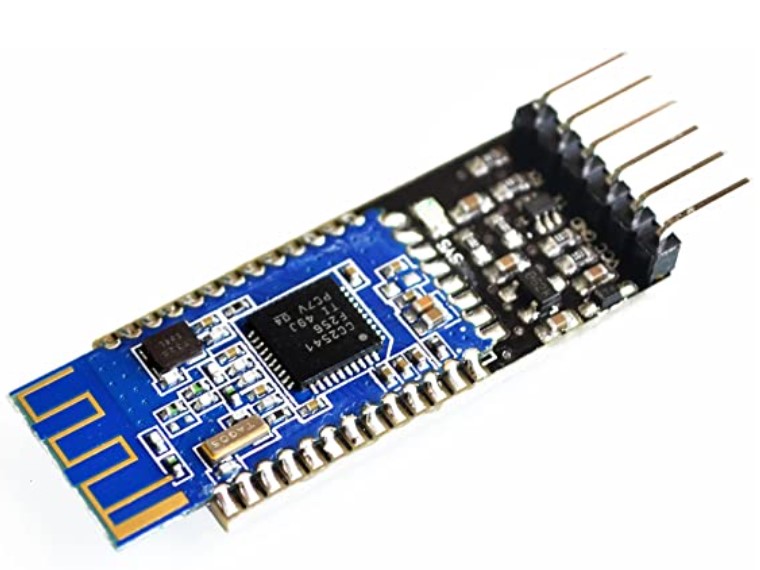
A drawback of using the Web Bluetooth API is compatibility with Bluetooth modules, namely the ubiquitous HC-05. The HC-05 works on the Bluetooth v2.0 standard, while the API only supports Bluetooth v4.0 or higher. This forced us to use a different Bluetooth module, the HM-10, which is slightly more expensive than the HC-05.
Software Design
The code for the webapp is made in HTML and JavaScript and deployed to multiple group member's servers. This allows any group member to access the webapp either of these two sites. These are highly likely to be unavailable in the future, though the git repository will have the code available.
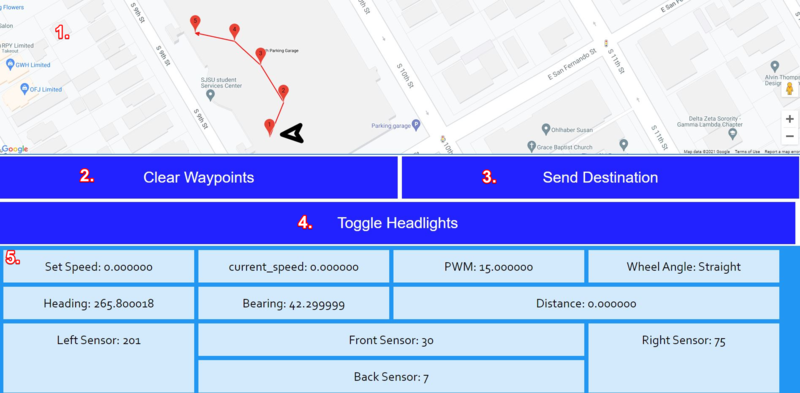
The app features:
- Google Maps display. Used to picking waypoints for the car to go to.
- Clear Waypoints button. Acts to both clear the waypoints seen on the map and as an emergency stop for the car.
- Send Destination button. Sends the currently displayed waypoints to the car.
- Toggle Headlights button. Simply toggles the headlights at the front of the car.
- Debug display area. The entire CAN bus is echoed to these boxes and displays them, including values and MIA.
The webapp and car communicate over Bluetooth UART via commands as in the following example:
DV: 0.0,1
Where DV denotes "Driver," then 0.0 and 1 denote the values of the messages being sent via the Driver node. All messages are sent to the webapp in this way.
The webapp sends information to the car in either the form of H, which denotes "Toggle Headlights" and a comma delineated latitude and longitude.
Technical Challenges
The challenge with the webapp was the limited transfer rate in Bluetooth. UART uses about 10 bits per character, and attempting to send all the CAN information over UART uses well over 1000 characters per second, easily outpacing the default 9600 baud rate configuration on the HM-10. The initial attempt to fix this issue was to raise the baud rate of the HM-10 to 115200 from 9600. This was completely unsuccessful, yielding no change from the original baud rate. The solution was to simply limit how often information is sent to the webapp.
Conclusion
The RC car project was a complete success! We were able to satisfy all of the requirements imposed upon us. The car was able to navigate itself from waypoint to waypoint, all while maintaining a constant speed and avoiding obstacles. Through this project we learned a lot of new concepts:
- CANBus usage and interaction between CAN nodes.
- How to write good software that is testable.
- TDD (test-driven development) and its value in avoiding preventable bugs.
- Minimizing the amount of code that is required to generate an MVP.
- Multiplexing multiple sensors and utilizing their values via sampling with an ADC.
- Understanding how GPS coordinates are decoded from GPGGA strings, and why multiple standards of GPS outputs exist.
- Using Git to manage multiple renditions of code, learning to merge features to target branches, and version controlling specific files to avoid constant overwriting.
- Learning how to place and route connections on a PCB using a tool like EaglePCB or EasyEDA.
This project was super fun! We all had a blast developing the code, unit-tests, and logic behind each of the modules. Seeing the car move on its own with code that we developed was a very rewarding and inspiring experience, and we hope that future groups get to experience the same success for themselves. We did run into our fair share of problems just as groups of past had: similar sensors will interfere with each other, GPS units may take some time to obtain a lock in noisy environments, and the motor controller may run haywire and cause some damage. But, the ability to understand and resolve these issues helped us grow as engineers.
Project Video
Project Source Code
Advise for Future Students
- Start extremely early!
Especially in figuring out the Motor, Sensor and Geo. The motor is the one that needs to be figured out as soon as possible. Without it, testing other parts of the car is almost impossible. We actually ran into this issue with the Hall Effect sensor and the motor barely started. We actually spent a long time figuring this out and the sensor value issues. If we had solved this earlier, we could have improved the car even further. Starting early gives your team a lot of benefits than other teams. You get to run into issues earlier, which means you have more time to fix the issue as well. Also, if your team starts early, you can always find out whether the modules your team bought are defective or not.
- Order spare parts!
Spare parts are extremely important. Anything you buy for this project, always order 2 or 3 extra parts. Sometimes you will get unlucky and receive bad parts. In that case, you will want to try using an extra part to ensure that you did not receive a bad module. Most of the time, dealing with defective parts will cost you so much time because you will most likely consider the parts to be working well. Besides that, during live testing, your car will probably go at a rate you want the car to go, which is not slow. If your obstacle avoidance algorithm does not work well and your car crash, there is always a chance of you breaking the module. In this case, you probably re-order the parts, which means you must wait a couple more days or even weeks before you can live-test your car again. (Imagine the advantage that you are giving to the other teams by doing this!).
- Write good unit tests!
Build as many good and corner cases before you write your code. Relying on TDD, believe it or not, saves you a lot of time. This is because you do not have to re-flash the controller every single time before testing it. By relying on TDD, basically you can see how the car will react in a certain situation. This is extremely useful in the driver controller because the driver controller is the one that controls how your car behaves. If every single controller passes the unit-testing, your car most likely will behave great. Maybe not perfect, but then you can start improving the code around the unit-test cases. Make sure also you unit-test every single file you have in the controller.
- Use 3D-Printed Parts if Possible
If one of your team member is good at designing 3D-parts, 3D-print parts every time. Otherwise, you can always learn how to 3D-print quickly. You do not need to have a really good looking 3D-parts, just make sure they work well
In our experience, the most handy 3D-parts are the arms for the sensors. These 3D-parts are really good because by having the arms, you can always adjust the sensors placement.
The other thing that you really need to be 3D-printed is a bumper for the car. This is actually necessary in case of the car crashing.
Also, keep your 3D-models in case you need to re-print the parts and make them thicker.
In our case, we actually ended up printing thicker 3D-parts so that it does not break after crashing.
If possible, 3D-print your car cover because most likely after attaching many 3D-parts around the car, the original cover will not fit anymore.
- Meet Up to Test Often
Testing your car is the most important thing in this project.
Your team most likely will only have one car, therefore, your team must meet up often to test it together and de-bug the issue together.
First of all, it is such a joy to see your code working in-person, but more than that, the more you meet up, the more you can try to make your car perfect.
Also, testing your car with your teammates will decrease the chance of it crashing by having every one guarding the car in case of it not avoiding obstacles.
- Good Team Chemistry
Treat your teammates nicely and actually get to know each other.
It might sound unrelated, but a good team chemistry really helps in completing the project.
When you have a good team chemistry, most likely your teammates are going to be more open to others, such as, they will not be shy in letting other teammates know if they run into issues and they need help.
- Buy Good Parts
If possible, try buying good modules even if they cost more.
This will save you trouble and time in a long run.
For instance, if you buy a cheaper compass module, you will most likely need to perform the calculation for the calibration.
In a better compass module, you can simply bit mask the calibration configuration and the compass will be calibrated.
- Don't Use Bad Parts
Buying good parts may not always be so easy, and you may find what constitutes as a "good part" may not necessarily be "expensive" or "what every other group used".
Don't be afraid to get alternatives earlier if you get the feeling that a part isn't working well enough. Amazon is good with returns.
Our example is the RPM sensor. We had purchased the first party RPM sensor from the manufacturer of the RC car, which many groups before us had used, but ultimately the sample rate was too low and the quality was too poor. We purchased an even cheaper optical sensor as a replacement. Although it was cheaper, due to the fact that we were more comfortable with it, the optical encoder was far better. However this was too late in and we lost weeks of testing and development due to a poor quality sensor.
- Take Advantage of What Preet Provides You With
If possible, make sure all your modules use a common communication protocol (SPI, UART, i2c).
In our experience, we bought an LCD with an 8-bit parallel data interface. This was a mistake that we made and we had to spend some time in order to write the driver to support an 8-bit parallel data interface.
In the SJ2 repo, Preet already provided students with i2c, uart and spi libraries, which is really helpful in saving you time in getting data from modules.
- Celebrate Your Project with Wagyu
After completing your project, celebrate with your teammates.
It would be great to sit around, have dinner together and share experiences with each other.
Make a good meal, preferably Japanese A5 Wagyu, and just have a blast!
Our team ordered the Wagyu from TheWagyuShop
Make sure you keep in touch with the rest of your teammates even after the project is done.
Acknowledgement
We would like express our gratitude to Prof. Preetpal Kang and Vidushi for their support throughout CmpE 243.
Even though the class was virtual, Preet and Vidushi did a commendable effort in translating their knowledge to the students.
Preet's lecture in CAN bus and Vidushi's support are extremely useful and helpful to complete this project since this project relies heavily on CAN bus.
Thank you, Preet and Vidushi!
We would like to thank San Jose State University for providing us with a test-field on the top of the North garage.
Without such a perfect testing field, we would not have been able to test our car more often and freely.
Also, SJSU provides police patrols around the north garage that prevents unwanted things from happening and keeping us safe during the test-field.
Lastly, we would like to thank the rest of CmpE 243 class students for the inter-communication during class time, especially regarding the project.
Thank you for providing us with suggestions in solving our issues with the sensor.
Overall, the learning experience in CmpE 243 has been extremely wonderful and extraordinary.
