Difference between revisions of "F21: Sons of Ultron"
Proj user5 (talk | contribs) (→BILL OF MATERIALS) |
Proj user5 (talk | contribs) (→BILL OF MATERIALS) |
||
| Line 364: | Line 364: | ||
| $4.00 | | $4.00 | ||
|- | |- | ||
| − | ! scope="row"| | + | ! scope="row"| |
| − | | | + | | |
| − | | | + | | Total Cost |
| − | + | | 22 | |
| − | + | | $210.89 | |
| − | |||
| − | |||
| − | |||
| − | |||
| − | |||
| − | |||
| − | |||
| − | |||
| − | |||
| − | |||
| − | |||
| − | |||
| − | |||
| − | |||
| − | |||
| − | |||
| − | |||
| − | |||
| − | |||
| − | |||
| − | |||
| − | |||
| − | |||
| − | |||
| − | |||
| − | |||
| − | |||
| − | |||
| − | |||
| − | |||
| − | |||
| − | |||
| − | |||
| − | |||
| − | | | ||
| − | | $ | ||
|- | |- | ||
|} | |} | ||
Revision as of 08:02, 4 December 2021
Contents
Bubble Trouble
Abstract
Clear all the bubbles and get yourself out of trouble !! “Bubble Trouble” is a fun game where each time you hit a big bubble, it will split up into two smaller ones. Avoid the bubbles as they bounce through the level. Race against time, collect all the traps and power-ups you can use to be the best at this game. Do you have what it takes to be the ultimate bubble shooter?. This is all displayed in the LED matrix acting as the screen. Use your spike gun to pop all the bubbles from the largest to the smallest bits. Can you clear each level?.
Objectives
The main objective of this project was to create the “BUBBLE TROUBLE” video game displayed on a 64X64 RGB LED matrix, with one SJ2 board as a graphics processor/matrix controller, and another SJ2 board as a controller. Other objectives are the following:
- Design custom PCBs for both the gamepad and matrix controller SJ2 boards.
- Use the FreeRTOS Real-Time Operating System on both SJ2 boards.
- Establish UART communications through Xbee between the two SJ-Two Microcontrollers.
- Create simple coding logic for displaying required characters and game objects.
- Add background music to the game to enhance the gameplay experience.
Introduction
- Matrix Controller Board: The matrix controller board is responsible for displaying the graphics of the game, controlling the game logic, playing MP3 tracks based on the current game/menu screen, receiving character movement and button press signals over the Xbee interface.
- GamePad Controller Board: The gamepad controller board is responsible for processing input joystick and button press signals, controlling the character controls logic, sending character movement and button press signals over an Xbee interface.
HOW TO PLAY BUBBLE TROUBLE: The main aim of the game is to burst all the balloons and advance to the next level.
- Using the joystick on the game controller, move the character left or right.
- Shoot arrows using the button on the game controller to burst the balloons into smaller ones.
- The character must avoid getting hit by the balloon.
- If the character gets hit by the balloon it loses one life and the level restarts
- Each level has a time limit to complete it. If all the balloons are not burst in that time limit the player loses one life.
- With each level the number of balloons and the size of balloons increase.
Technical Responsibilities
| Administrative Roles | ||||
|---|---|---|---|---|
|
Rishabh Gupta & Vilas Dhuri & Saharsh Shivhare | |||
|
Vilas Dhuri | |||
|
Rishabh Gupta | |||
|
Rishabh Gupta & Vilas Dhuri & Saharsh Shivhare | |||
|
Vilas Dhuri & Saharsh Shivhare | |||
|
Saharsh Shivhare | |||
|
Vilas Dhuri & Saharsh Shivhare | |||
Administrative Responsibilities
| Administrative Roles | ||||
|---|---|---|---|---|
|
Rishabh Gupta | |||
|
Rishabh Gupta | |||
|
Rishabh Gupta & Vilas Dhuri & Saharsh Shivhare | |||
|
Vilas Dhuri | |||
|
Saharsh Shivhare | |||
Schedule
| Week# | Start Date | End Date | Task | Status |
|---|---|---|---|---|
| 1 |
|
|
|
|
| 2 |
|
|
|
|
| 3 |
|
|
|
|
| 4 |
|
|
|
|
| 5 |
|
|
|
|
| 6 |
|
|
|
|
| 7 |
|
|
|
|
| 8 |
|
|
|
|
| 9 |
|
|
|
|
| 10 |
|
|
|
|
BILL OF MATERIALS
| Item# | Part Description | Part Model & Vendor | Quantity | Cost |
|---|---|---|---|---|
| 1 | Microcontroller Boards | SJ2 Boards (Purchased from Preet Kang) | 2 | $100.00 |
| 2 | LED Matrix Display | Adafruit RGB LED Matrix Panel - 64x64 | 1 | $54.95 |
| 3 | PCB | JLC PCB | 5 | $18.00 |
| 4 | Electronics Fun Kit & Power Supply Module | ELEGOO Upgraded Electronics Fun Kit | 2 | $7.56 |
| 5 | MP3 Decoder | HiLetgo YX5300 UART Control Serial MP3 Music Player Module | 1 | $6.99 |
| 6 | Power Adapter for LED Matrix | Belker 36W Adapter (Borrowed from TA) | 1 | $0.00 |
| 7 | XBee Module | XBee 2mW Wire Antenna - Series 2C (ZigBee Mesh)(Borrowed from Prof. Preet) | 2 | $0.00 |
| 8 | Joystick | HiLetgo Game Joystick Sensor Game Controller | 1 | $4.89 |
| 9 | Push Button Switch | Anchor Electronics | 1 | $1.00 |
| 10 | Jumper Cables | Anchor Electronics | 1 | $7.00 |
| 11 | Female headers for SJ2-PCB Connection | Anchor Electronics | 1 | $2.50 |
| 12 | Ribbon Cable Connector for LED Matrix-PCB Connection | Anchor Electronics | 1 | $1.00 |
| 13 | Soldering Wire & 18 Gauge Wire | Anchor Electronics | 1 | $3.00 |
| 14 | Copper Board for Game Controller Connections | Anchor Electronics | 1 | $4.00 |
| Total Cost | 22 | $210.89 |
Design & Implementation
PIN CONFIGURATION
-
PIN# SJ-2 Main Board Pin Description uC PIN 64x64 LED MATRIX R1 PIN for Red terminal of RGB LED for the upper half of LED Matrix P0_0 G1 PIN for Green terminal of RGB LED for the upper half of LED Matrix P0_1 B1 PIN for Blue terminal of RGB LED for the upper half of LED Matrix P2_2 R2 PIN for Red terminal of RGB LED for the lower half of LED Matrix P2_4 G2 PIN for Green terminal of RGB LED for the lower half of LED Matrix P2_5 B2 PIN for Blue terminal of RGB LED for the lower half of LED Matrix P2_6 A Mux pin for row selection P2_7 B Mux pin for row selection P2_8 C Mux pin for row selection P2_9 D Mux pin for row selection P0_16 E Mux pin for row selection P0_15 OE Output Enable P1_28 LATCH Data Latch P1_29 CLK Clock Signal P0_17 POWER VCC VCC Supply VCC GND Ground GND MP3 Decoder RX UART Receive From MP3 Decoder P2_1 TX UART Receive From Gamepad Controller P2_0 UART RX UART Receive From Gamepad Controller P0_11 VCC VCC Supply VCC 3.3
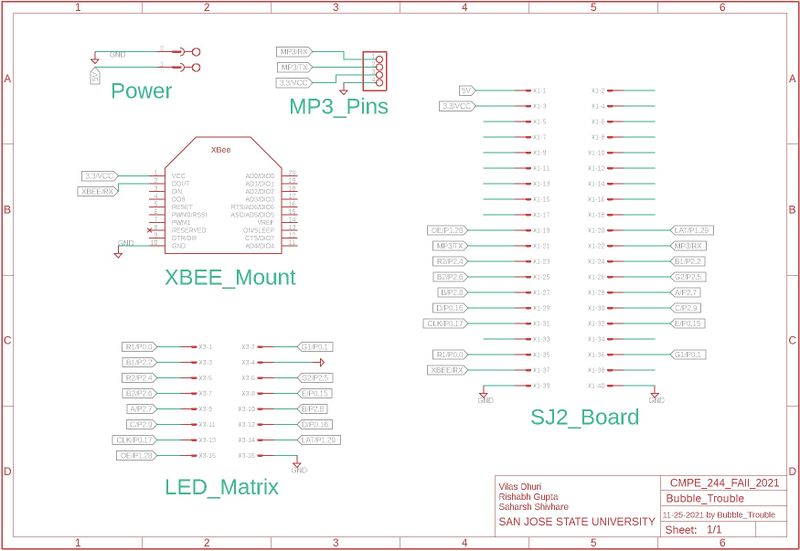
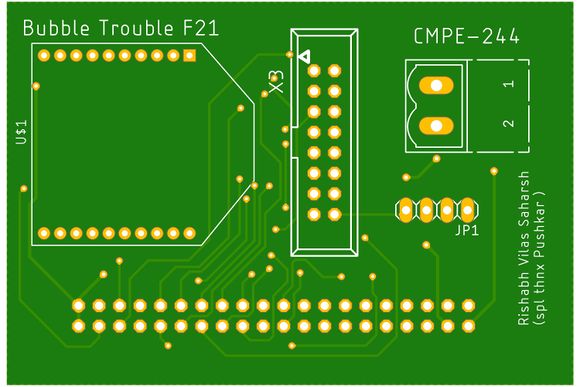
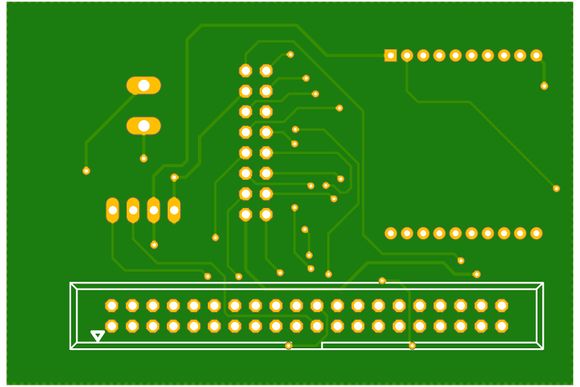
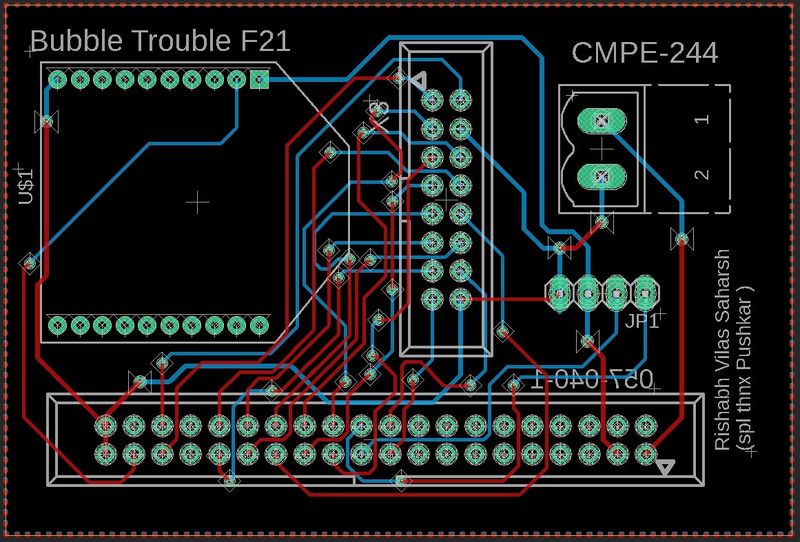
PCB DESIGN
We chose Eagle AutoDesk as our PCB designing software since we got its free license for a year after registering with university email-id. The routing was done manually to create a PCB from a schematic. We designed one PCB, one for our game for our matrix controller. First, we created separate schematics for the controller that included all connections. We included the XBee mount available in the Adafruit library that enabled us an easy connection to the module. For MP3 we directly used male headers whose connection is mapped from the underside of the PCB. Once our schematics were done and we checked it several times. We would like to give a special mention to our roommate Pushkar who is quite familiar with Eagle AutoDesk. He helped us to cross-check the connection and provided us with tips to do better routing.PCB was sent to fabrication to JLCPCB China which provided PCB with an order of 5 and 2 layers of PCB and common grounded the rest of the copper area.
Parts List & Cost
Give a simple list of the cost of your project broken down by components. Do not write long stories here.
Hardware Design
Discuss your hardware design here. Show detailed schematics, and the interface here.
Hardware Interface
In this section, you can describe how your hardware communicates, such as which BUSes used. You can discuss your driver implementation here, such that the Software Design section is isolated to talk about high level workings rather than inner working of your project.
Software Design
Show your software design. For example, if you are designing an MP3 Player, show the tasks that you are using, and what they are doing at a high level. Do not show the details of the code. For example, do not show exact code, but you may show psuedocode and fragments of code. Keep in mind that you are showing DESIGN of your software, not the inner workings of it.
Implementation
This section includes implementation, but again, not the details, just the high level. For example, you can list the steps it takes to communicate over a sensor, or the steps needed to write a page of memory onto SPI Flash. You can include sub-sections for each of your component implementation.
Testing & Technical Challenges
Describe the challenges of your project. What advise would you give yourself or someone else if your project can be started from scratch again? Make a smooth transition to testing section and described what it took to test your project.
Include sub-sections that list out a problem and solution, such as:
<Bug/issue name>
Discuss the issue and resolution.
Conclusion
Conclude your project here. You can recap your testing and problems. You should address the "so what" part here to indicate what you ultimately learnt from this project. How has this project increased your knowledge?
Project Video
Upload a video of your project and post the link here.
Project Source Code
References
Acknowledgement
Any acknowledgement that you may wish to provide can be included here.
References Used
List any references used in project.
