F15: Smart Car
Contents
Grading Criteria
- How well is Software & Hardware Design described?
- How well can this report be used to reproduce this project?
- Code Quality
- Overall Report Quality:
- Software Block Diagrams
- Hardware Block Diagrams
- Schematic Quality
- Quality of technical challenges and solutions adopted.
Project Title
Smart Car
Abstract
A smart car with three wheels will be designed to have the capability of following high contrast lines. Options for the lines include using black Sharpie, black duct tape, and white duct tape. Afterwards, it will send back a CSV file format with 0s and 1s. 1s denote that the car was traveling in the area of the map. Using a peripheral compass, the car will also be able to draw a map of the route that it took.
Objectives & Introduction
Our objectives include the following:
- Self-driving car that is able to follow a line
- LED matrix that can draw out the path the car is taking
Team Members & Responsibilities
- Steven Hwu
- B.S. Computer Engineering
- Helen Tsui
- B.S. Computer Engineering
Schedule
| Week# | Date | Task | Actual |
|---|---|---|---|
| 1 | 10/23 | Complete project abstract | Complete |
| 2 | 10/30 | Gather parts | Complete |
| 3 | 11/06 | Program compass | Complete |
| 4 | 11/13 | Program LED matrix | Complete |
| 5 | 11/20 | Program wireless functionality | Complete |
| 6 | 11/27 | Build car | Complete |
| 7 | 12/04 | Put all the pieces together | Complete |
| 8 | 12/11 | Testing | Incomplete |
Parts List & Cost
| Quantity | Description | Price |
|---|---|---|
| 2 | SJ-One development board | $80 ea |
| 1 | Cardboard | $0 ea |
| 1 | White duct tape | $4.52 ea |
| 1 | Electric tape | $1.99 ea |
| 1 | Servos | $4.47 |
| 1 | Compass | $ |
| 2 | Motors | $80~ |
| 2 | LED matrix | $24.95 ea |
| 2 | Photo transistors | $1.20 ea |
| 3 | Jumper cables | $3.99 ea |
| 1 | Super glue | $3.99 ea |
| 1 | Breadboard | $6.49 ea |
| 4 | NPN transistors | $3.29 ea |
| 1 | 5k potentiometer | $2.29 ea |
| 1 | Switch | $2.99 ea |
| _______ | ||
| Estimated total | $ |
Design & Implementation
Hardware Design
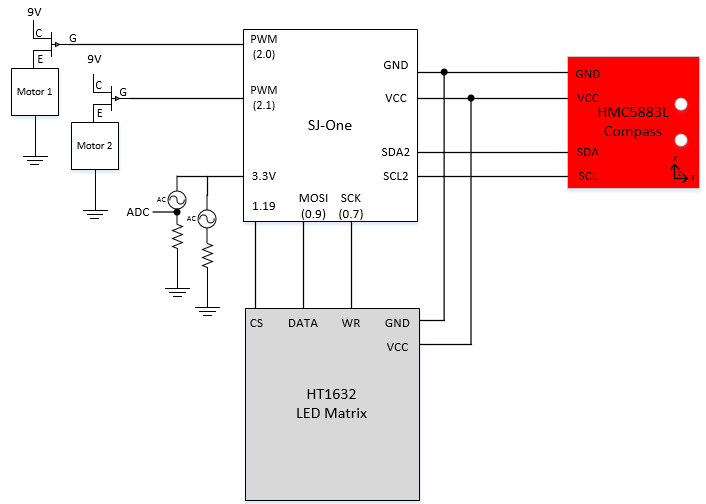
Discuss your hardware design here. Show detailed schematics, and the interface here.

Compass
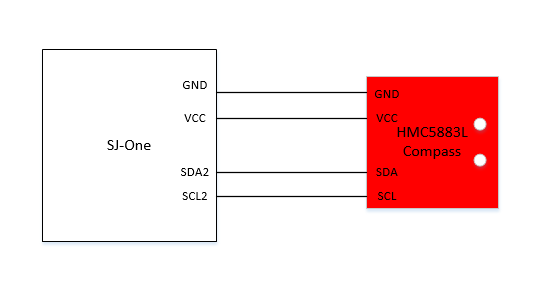
The compass uses I2C as the communication protocol. The x, y, and z coordinates were able to be read from the compass depending on its orientation. After one of the SJSUOne boards reads the x, y, and z values from the compass, it wirelessly sends the values to the other board to determine which LEDs to light up. The compass' purpose was to determine the car's location so that the path the car was taking could be drawn on the LED matrix.
LED Matrix
The purpose of the LED matrix was to display the path that the car is traveling. It uses SPI as its communication protocol. The LED matrix consists of 2 x 3 blocks of 8x8 LEDs. It has a few ports that must be utilized for LED programming. The first port is the WR port which is listed as active low. This is actually the serial clock which captures data in its DATA port on rising edges. While the datasheet recommends using an idle LOW serial clock, this is not a must. With the LPC1758, changing the active level of the serial clock is not the solution to this and will cause problems for data transmission to the LED matrix as it will be transmitting data on the falling edge instead and data corruption will occur.
Motors
NPN transistors were used to control the power source to the motors. There was very little documentation for the motors used so initial tests with varying input voltages yielded that these motors seemed to operate successfully at 5V. This method should not be used on documented motors, but instead make sure to adhere to the specifications provided. In addition, if the input voltage is negated, the motor had the ability to rotate in the opposite direction. For the application, only the positive voltage was utilized since the car did not need to go backwards. For turning purposes, one motor moved slower than the other.
Photoresistor
Photoresistors are resistors that have a special characteristic of having different resistances when exposed to differing intensities of light. If high intensity light is absorbed, the photoresistor will have a low resistance. If low intensity light is absorbed, the photoresistor will have a high resistance.
Initial tests of the photoresistors yielded a magnitude of several hundred ohms when shone by a very bright phone LED and several mega-ohms in a very dark setting. A voltage divider circuit was used to read the intensity of light with a 10kOhm resistor.
By using a resistor that had a magnitude logarithmically near the center of the two values, a decent range of voltage readings was able to be provided in many different environments in the voltage divider circuit. This would prove useful for light-sensitive applications.
ADC channels were used to record the voltage across the 10kOhm resistor. There were only two configurations to record the voltage from: across photoresistor or across 10kOhm resistor. Measuring across the constant resistance was chosen because when the photoresistor became exposed to light, the resistance would drop, and the voltage drop across the photoresistor would decrease in the voltage divider circuit. Therefore, the voltage divider circuit provided an analog voltage between the two resistors with a positive correlation to brightness instead of darkness.
SJOne
The SJOne was the microprocessor used for this project. The USB port from the PC was used to power the board. The 3.3V output was used to power the compass and the LED matrix. The compass and LED matrix were interfaced with the SJOne board. The compass used I2C while the LED matrix used SPI. The wireless functionality of the board was also utilized to in order to send information from one board to another.
Hardware Interface
Communication protocols used:
- I2C - HMC5883L Compass
- SPI - LED matrix
- PWM - Motors
Software Design
The software design utilizes drivers such as SPI and I2C. In addition to the drivers, Nordic wireless functionality was programmed.
Reading Position The X, Y, and Z coordinates were able to be read from the compass depending on its orientation. After one of the SJSUOne boards reads the X, Y, and Z values from the compass, it wirelessly sends the values to the other board to determine which LEDs to light up. The compass' purpose was to determine the car's direction. Once the direction is interpreted, it is combined with the speed of the car to calculate position.
Displaying position
The position of the car will be centered around the center point of the LED matrix which we will map to positions (1,1), (1,-1), (-1, -1) and (-1,1) where the first digit is the position we are at West vs East while the second dition is how far we went North or South. Positive corresponds to traveling East and North for the first and second digit respectively.
Handling Start/Stop and Compass readings
The wireless transceiver task for the controller (with the LED matrix) is in charge of sending start and stop commands to the vehicle. In addition, the car’s board will be sending map coordinates for its X and Y coordinates. The controller will be in charge of turning that X and Y mapping into a format such that the LED matrix can properly display the data.
The format for the wireless transmission will be:
Byte 0 Byte 1 Byte 2
0x00 Start(1)/Stop(0) Command
0x01 X position Y position
Implementation
System Startup
Transmission of x and y Coordinates
Mapping Received Coordinates to LED Matrix
Testing & Technical Challenges
Wireless LED Matrix Testing
To test the LED matrix wirelessly, a sender task was written to allow the sending of three parameters that correlated to the coordinates of each LED on the LED matrix. If the sending was successful, the corresponding LED would light up.
Issues Faced
Wireless communication and LED Matrix
The LED matrix that was used was programmed using SPI0. However, it turns out that SPI0 is shared with the wireless communication API. To fix the issue, the LED matrix was reprogrammed on SPI1.
Conclusion
Conclude your project here. You can recap your testing and problems. You should address the "so what" part here to indicate what you ultimately learnt from this project. How has this project increased your knowledge?
Project Video
Upload a video of your project and post the link here.
Project Source Code
References
Acknowledgement
References Used
LED matrix HT1632C datasheet: https://www.adafruit.com/datasheets/ht1632cv120.pdf
Appendix
You can list the references you used.
