F12: Smart Bulb
Contents
- 1 SmartBulb: The Intelligent Lighting System
- 2 Abstract
- 3 Objectives & Introduction
- 4 Team Members & Responsibilities
- 5 Schedule
- 6 Parts List & Cost
- 7 Design
- 8 Implementation
- 9 Testing & Technical Challenges
- 10 Conclusion
- 11 References
SmartBulb: The Intelligent Lighting System
Problem Statement
Conventional lighting systems do not provide flexibility or automatically adapt to users’ needs. While there has been a push for smarter light bulbs, the equipment which has been released to the market incorporates no intelligence, and the functionality is superficial at best.
Our Solution
A lighting system which adapts to occupant needs and produces optimal light output. SmartBulb automatically recognizes ambient light and the presence of occupants, incorporates the diurnal cycle into its decisions, and enables supervisory devices to request changes to the system configuration.
Abstract
Conventional lighting systems, such as those used in commercial workplaces and residences, are antiquated, primarily because these systems provide minimal flexibility and do not automatically adapt to user’s needs. While there has been a push for “smarter lightbulbs”, the equipment which has been released to the market (such as color configurable LED bulbs) incorporates no intelligence, and the functionality is superficial at best. Being able to change your living room’s color to hot pink via your smartphone only allows a user to amuse him/herself. In comparison, we are interested in having the lighting system adapt to occupant needs automatically, recognizing ambient light and occupant presence, incorporating the diurnal cycle into its decisions, and enabling supervisory devices to request changes to the system’s current configuration.
For instance, each of the bulbs (nodes) within our intelligent lighting system is able to sample the current ambient light within the room without visible interruption to its own light output. This allows us to sample the ambient light using our color sensors, without the light output from the bulb or the adjacent bulbs impacting our measurements. From our samplings, we can determine the intensity of light in the room, along with the color composition of the light. This information is shared amongst all bulbs within the same room via a shared intelligence network facilitated by the Digimesh protocol, which utilizes XBee radios. From this information, a consistent lighting color / temperature is created in the room, and light output can be limited when plenty of ambient light (such as sunlight) is available. When ambient light is limited, the system will utilize the current time-of-day and the diurnal cycle to determine optimal light output. By utilizing the diurnal cycle to make lighting decisions, we can ensure that occupant fatigue due to lighting is minimized, improving occupant comfort.
This project extends the work currently being performed within our senior projects.
Objectives & Introduction
System will be able to detect and adapt to changing ambient light conditions
- If the room is dark and occupants are detected, the system should utilize the time-of-day combined with the diurnal cycle to output the preferred light temperature and brightness
- If the room has ambient light, the system should attempt to match the color of the ambient light and should lower its light output to meet the room’s desired number of lumens.
- For instance, if a warm colored ambient light is visible to the system, it should produce a warm colored output. If a cool color light is visible to the system, it should produce a cool colored output. Extreme cases can also be demonstrated
- Lights should not need to turn on / off (from occupant perspective) during ambient light measurements
- System will be able to respond to supervisory commands via Digimesh network
- Web interface will be connected to Digimesh network via Raspberry Pi or via ConnectPort X2. User will be able to control the current output (intensity, color) of each bulb, and modify other configuration settings (amount time on when occupant detected, relative location to other bulbs, etc.)
- Supervisory commands intended to show that other systems (including home automation) can be tied into this system.
Team Members & Responsibilities
- Phil Cyr
- Hardware architect, electronics, sensors, software
- Stephanie Fung
- Electronics, sensors, software, wiki-updater
- Brandon Schlinker
- Embedded systems architect, software, network
Schedule
| Week Number | Planned Items | Actual |
|---|---|---|
| 1 |
|
|
| 2 |
|
|
| 3 |
|
|
| 4 |
|
|
| 5 |
|
|
| 6 |
|
|
| 7 |
|
|
| Week Number | Scheduled Items | Items Completed |
Parts List & Cost
| Part | Quantity | Unit Cost |
|---|---|---|
| Parallax PIR Motion Sensor | 12.99 | |
| TAOS TCS3414FN Color Sensor | 3.68 | |
| LedEngin LZC-A3MD00 40W RGBW LED Module | 37.70 | |
| LM3404MA High Power LED Driver Chip | 3.28 | |
| LPC1769 Cortex M3 Processor | 9.01 | |
| J-Link EDU | 60 | |
| Xbee-PRO DigiMesh 2.4GHz Module | 34 | |
| RN-SMA-S-RP 1" Antenna for Xbee PRO | 5.95 | |
| LS35-5 5V 7A Switching Power Supply | 19 | |
| 36V DC 9.7A 350W Regulated Switching Power Supply | 35.49 | |
| Aavid Heat Sinks 2.25 X 3.0 X 2.996 | 17.25 | |
| Arctic Silver Thermal Cooling Compound | 16.33 |
Design
Hardware Design
System Overview
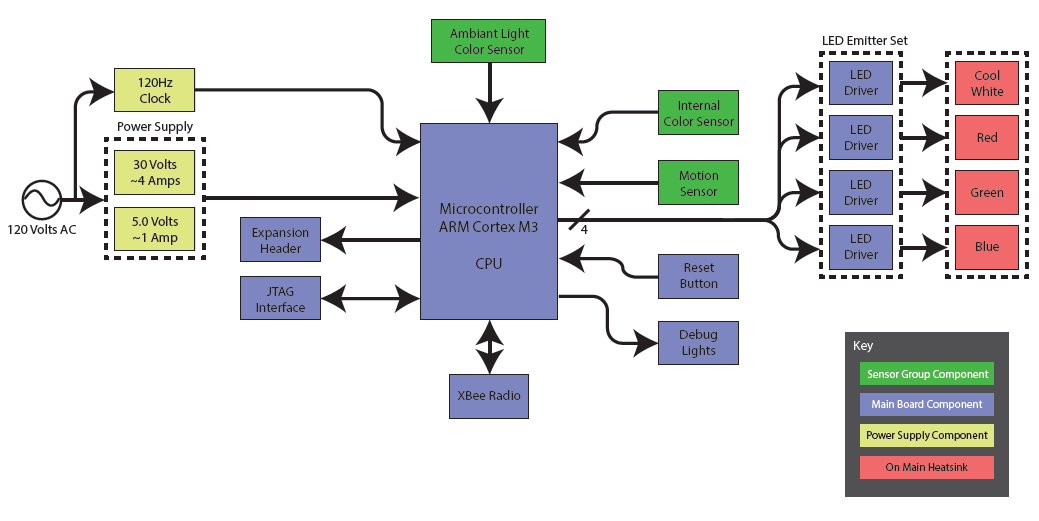
As seen in the main system diagram below, there are four key elements of our system.
Sensor Group Components
The sensors consist of two color sensors and one motion sensor. The techniques for interfacing each individual sensing component is described further into this section. The internal color sensor is soldered directly on the PCB. The other two sensors have extension headers from their respective traces.
Main Board Components
The main board components revolve around our microcontroller. The JTAG interface allows us to flash our microcontoller and debug our code. The debug lights and reset button offer us simple debug tools directly on the PCB. The XBee radio utilizes DigiMesh protocol so that the system can communicate to other light nodes. Furthermore, there are several expansion headers which connect to the microcontroller which allow for expansion and the introduction of new modules.
Power Supply Components
Switching power supply units supply the two main power types used on the board. The 30 volts PSU is utilized by the LED drivers, while the 5 volt power supply supplies the rest of the power.
The LEDs
Our LEDs are driven by the LED drivers which are controlled via pulse-width modulation (PWM). The PWM is software controlled, and the signals are generated by the microcontroller.
Motion Sensing
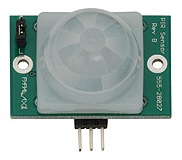
Motion sensing is the key element for the occupancy sensing of the system. This is achieved by using a Parallax PIR motion sensor. There are three pins on the motion sensor: power, ground, and output. The motion sensor is active high, so it will go HIGH (Vcc) when movement is sensed. The approximate distance range for the sensor is 30 feet. By having a motion sensor module on each of lighting fixture, we are able to sense movement to a fine resolution.
Color Sensing
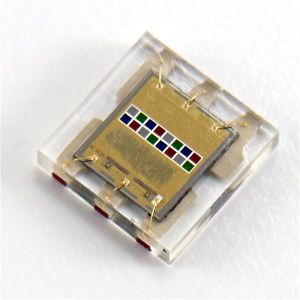
Color sensing on the system consists of two elements: sensing the hue or color, and sensing the brightness or intensity of the light. The main component used to achieve this is the TCS3414, which can sense the intensity of red, green, and blue (RGB) colored light. This color sensor is an I2C device, several photodiodes with corresponding RGB color filters result in different sensor values depending on how much light of each color is sensed on their respective color channels.
XBee Radio
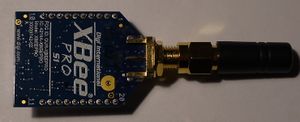
Communication between fixtures was accomplished via a shared-intelligence network, which used XBee Radios running Digimesh firmware. In comparison to the Zigbee protocol, which requires that each network have a statically defined coordinator node, the Digimesh protocol automatically elects a coordinator node and builds a distributed, fault-tolerant mesh network. As a result, no additional setup is required as fixtures are added and removed from the setup, which simplified our design considerably. In addition, the serial number of the XBee radio also serves as the fixture's unique address / identifier. The XBee radio serial number is retrieved via UART through the XBee API.
The traditional XBee radios with on-chip antennas, or whip antennas are unable to transmit reliably in facilities which have substantial wireless interference, such as the engineering building. If the distance is greater then 3 - 4 feet between nodes, the signal degrades rapidly. Since lighting fixtures are typically 6 - 8 feet apart, we chose to utilize a 1-inch RPSMA antenna and an XBee PRO module to increase the distance possible between XBee radios. We were able to transmit reliably 45 feet within the San Jose State University Library.
Custom PCB
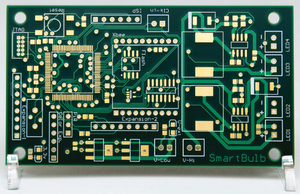
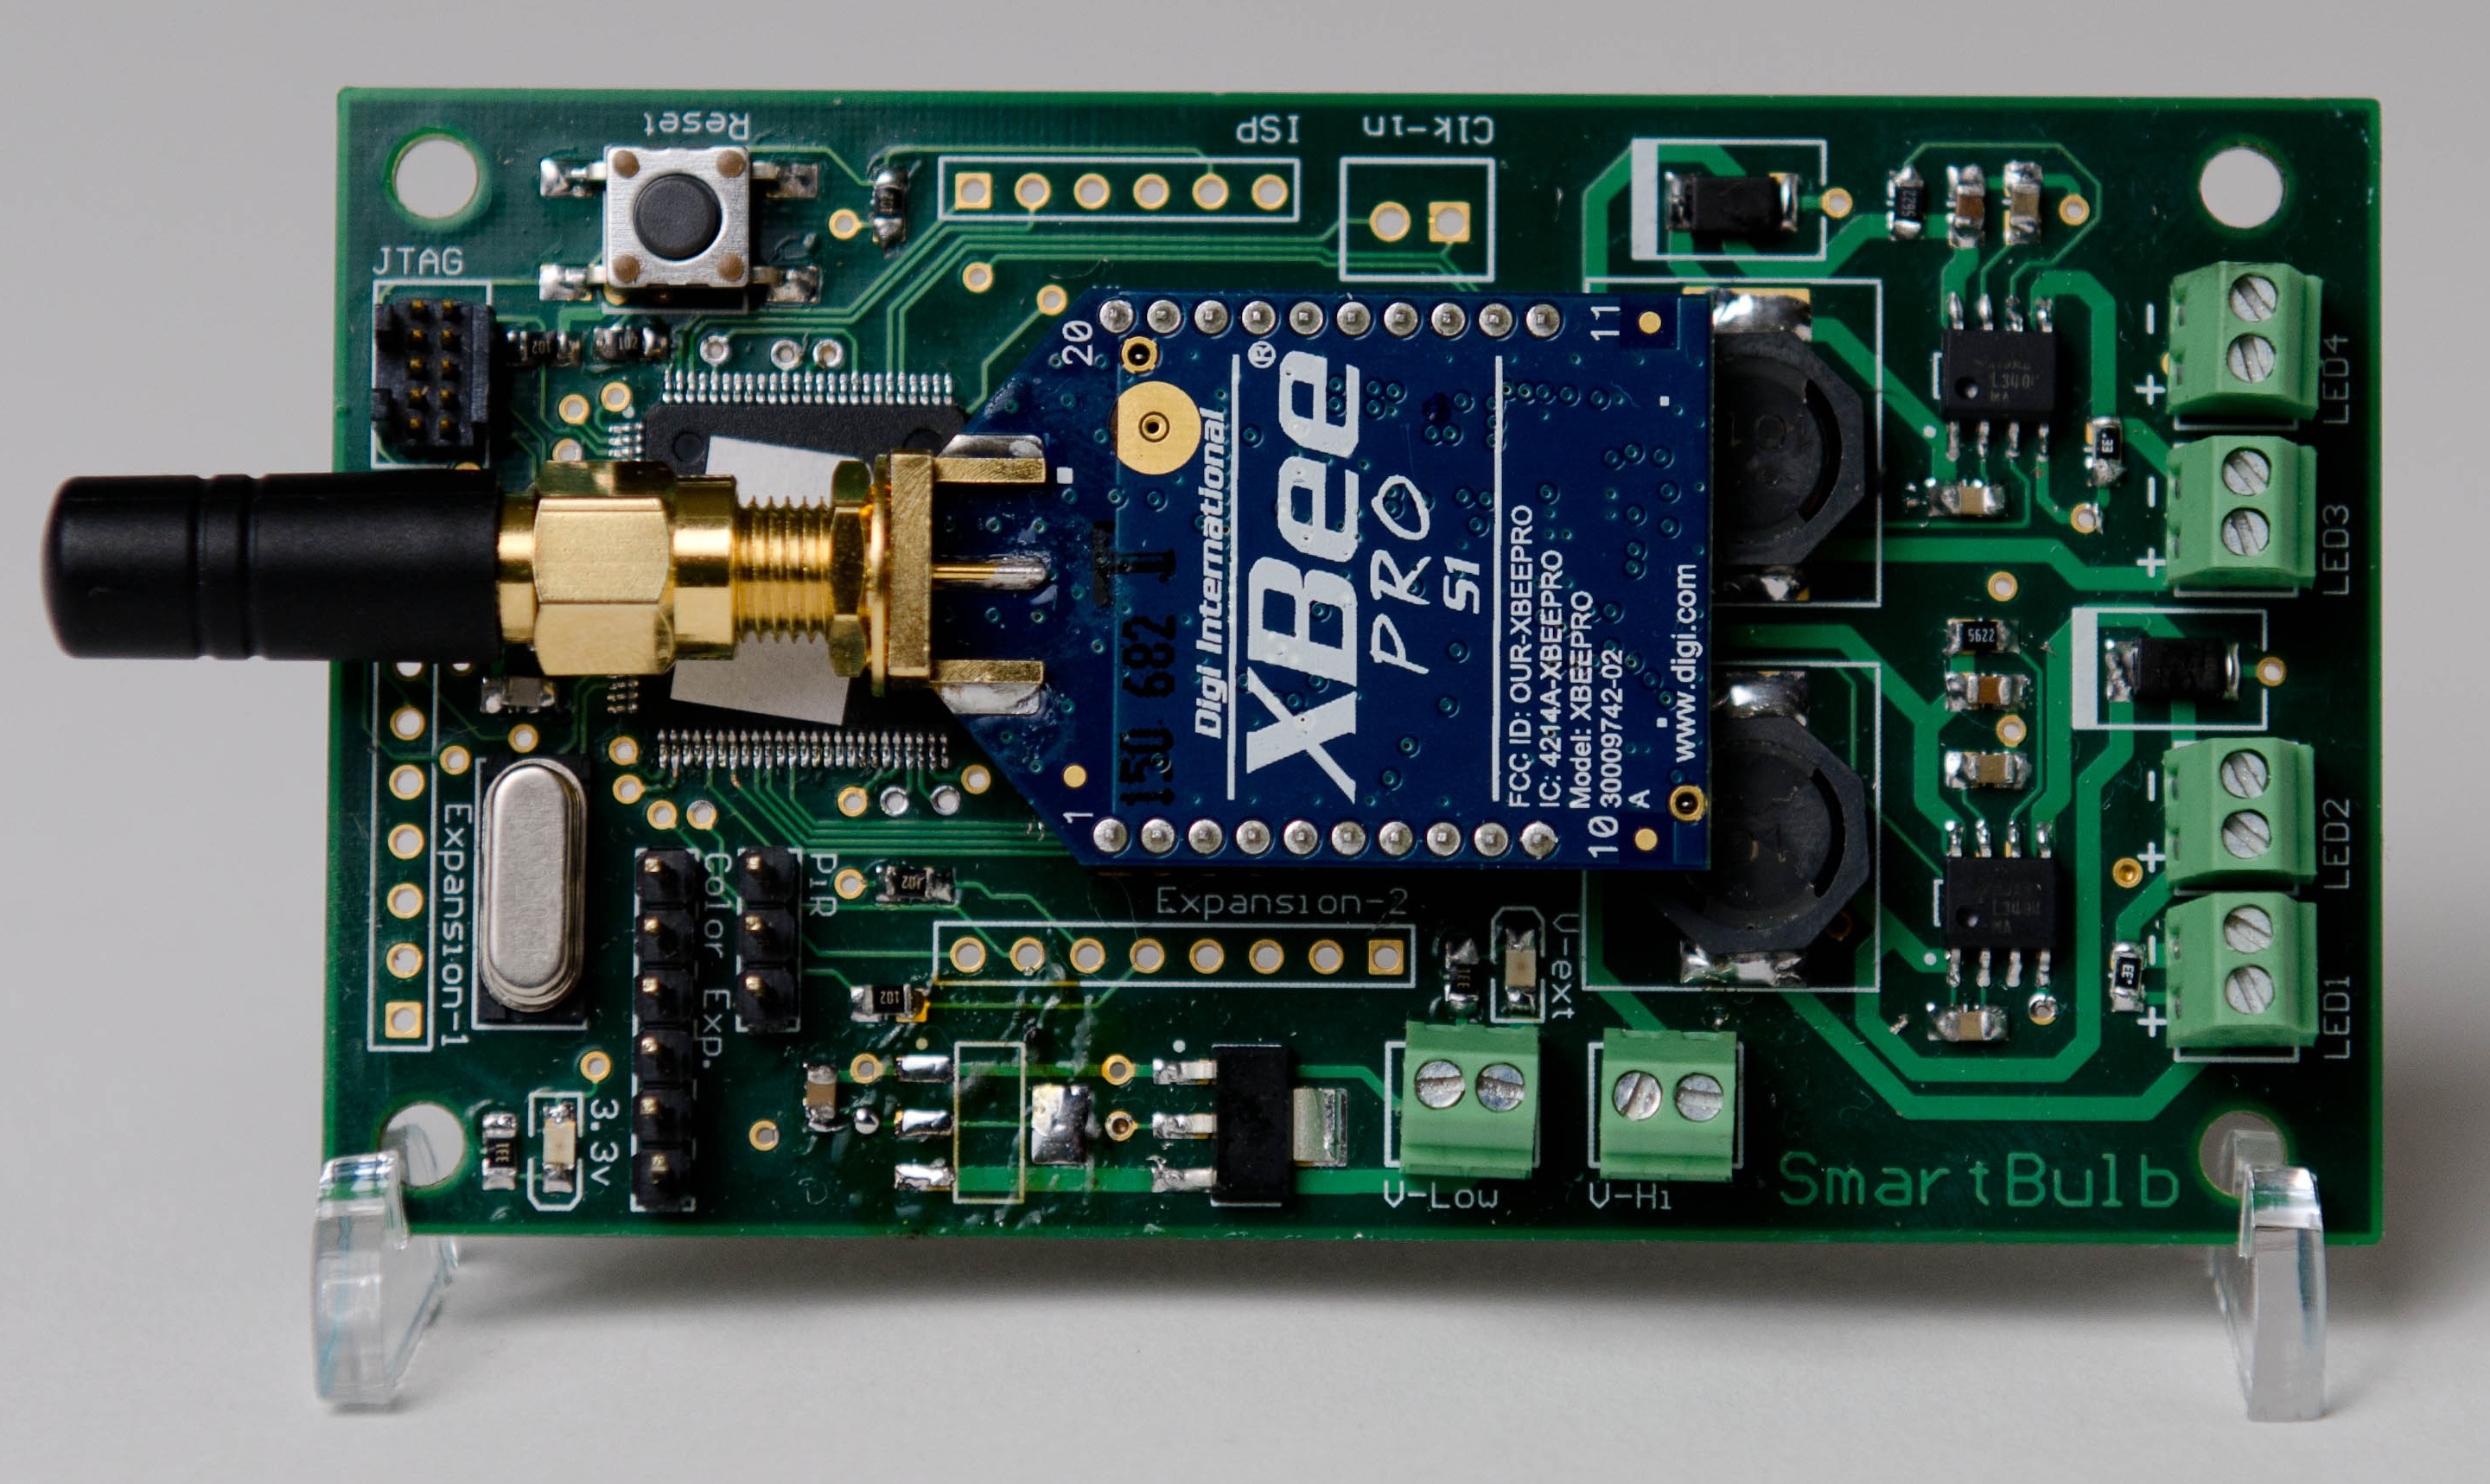
After testing all the components individually on a breadboard, we soon realized that we would need to create a custom PCB in order to achieve the desired form factor for our project. We used Altium as the PCB CAD software to design our board. We designed two iterations of the circuit board. For the first iteration, our goal was to test our design and connections. For the second iteration, we were able to optimize the size based on lessons learned from the board’s first version.
The PCB is split into two sections. The left section is roughly square and contains the embedded system components: CPU, debug interface, radio, control logic, and sensors. The right section, delineated by the large black inductors, contains the power LED driver components.
Microcontroller / Glue Logic
The embedded system portion of the custom PCB provides the computational power to tie the sensors and I/O devices together in the coherent manner that makes them all part of a single system.
The parts were chosen to meet requirements for estimated computational power required as well as manufacturability. Components that only come in a BGA (Ball Grid Array) package were not considered. Components that come in an FN package (Flat No-lead) were avoided. Unfortunately, the color sensor was only available in an FN package. To make the color sensor solderable the land pattern had to be modified. When used in a reflow oven the land pattern for an FN package would not include any copper outside of the chip package footprint, making the packages capable of being placed in close proximity. Without either a lead or a pad extending from the footprint soldering is impossible. Extending the footprint an extra couple millimeters allows the iron to heat the pad and let surface tension pull the solder under the chip.
LED Drivers
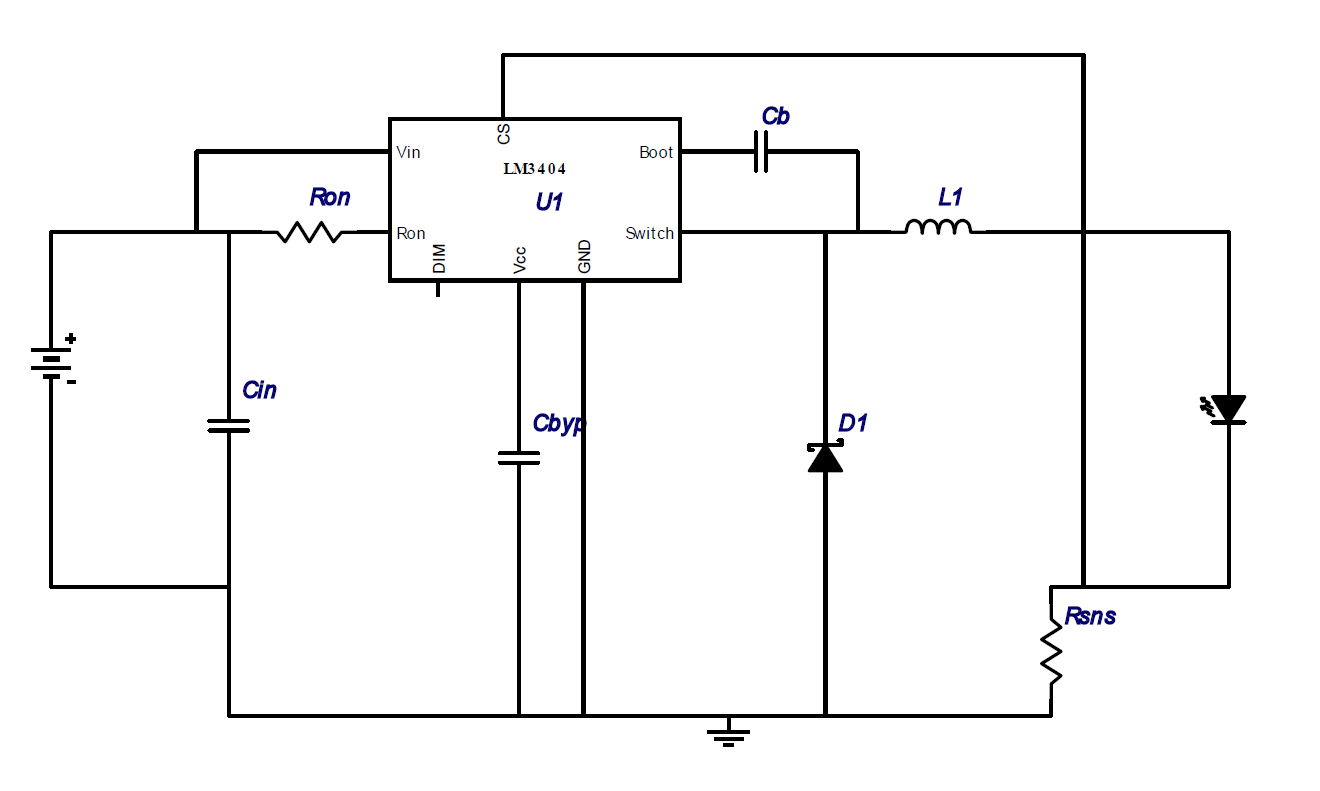
The LED drivers represent a critical component in the construction of the SmartBulb. High current LEDs require not only large amounts of power, but regulation of the power consumption. The changes within a single LED between a cold start and running temperature is enough to make efficient constant voltage drive impossible. The PCB contains four single channel drivers, each capable of a constant current drive of 0.7A through up to about 24V of LEDs. The four channels must be independent to provide accurate control of the Red, Green, Blue, and White LEDs in each bulb.
Since the combined forward voltage of the LEDs used is significantly less than the line voltage a buck topology is preferable. A buck converter takes a voltage higher than required and switches it on and off very quickly through a smoothing element to produce the desired output. The output can be either constant voltage or constant current depending on the smoothing element choose. Since the voltage across a capacitor cannot change instantaneously, capacitors are used for constant voltage drive. Similarly since the current through an inductor cannot change instantaneously, inductors are used to produce a constant current drive. The current through the driver is measured with a sense resistor, a small resistor that is used to convert current to voltage without making a significant impact to the circuit. The drivers must drive two 12 volt LEDs in series; a 24 volt load. To keep the required switching frequency within the permissible limits of the drivers, an overhead of about 30% is required in the supply voltage- 36 volts was selected based on the ability to meet the requirements as well as the availability of inexpensive power supplies.
The LED driver design was produced through the use of Texas Instrument's WEBENCH design tool. WEBENCH can suggest power supply and driver designs to meet specified requirements. The selection of the LM3404 was based on the criteria for a chip capable of up to 1A drive, up to 40V supply, and the minimum number of parts required for basic operation. The LM3404 requires only 7 external parts to configure. WEBENCH provides a complete schematic (shown below) and parts list that meets the needs of the user.
Hardware Interface
Disclaimer/Note: Always check the datasheet for the sensor module you are using for the voltage characteristics, rating specifications and pin functions. The interface descriptions shown here are specifically for the parts we used, and should be used as a starting point.
Motion Sensor Connection
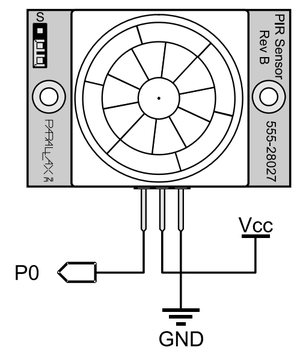
The figure below shows the pin connections for the minimum working circuit to use the PIR motion sensor module.
There are three pins on this specific module from Parallax. The Vcc pin is the supply voltage for the module, which can be 3 to 6 V. The GND pin is connected to ground. The OUT pin is an active high sensor output, it will output a HIGH signal when motion is sensed, and the sensor dome will light up red. We connected this to a pin on our microprocessor to sense motion.
There is a jumper located on the top right of the module. If the jumper is switched to the “S” mode, it will reduce the sensitivity of the sensor to a 15 feet maximum range instead of the 30 feet maximum. We used the sensor in the “L” mode since our application called for maximum sensitivity. When this sensor initially starts up, it has a warm up time of about 40 seconds where the dome will be red and the OUT pin is HIGH. This warm up time is used to allow the sensor to learn the environment, and the datasheet recommends that during this time, there should be as little motion as possible in the sensor’s field of view. Another notable characteristic is that after sensing motion, the OUT pin will remain HIGH for about 1.5 seconds until the sensor will go back to LOW.
Color Sensor Connection
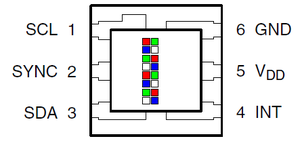
The figure below shows the pin connections for the minimum working circuit to use the color sensor module.
There are six pins on the TCS3414 color sensor module from Taos. The Vcc pin is the supply voltage for the module, which can be 3 to 6 V. The GND pin is connected to ground. SDA and SCL are utilized for I^2^C communication with the sensor, including programming configuration registers and retrieving color data from the sensor registers. The other pins are not needed for standard operation.
XBee Radio Connection
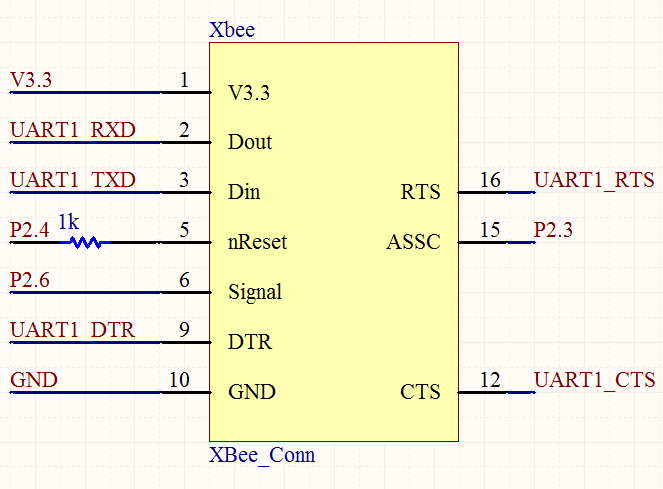
The figure below shows the pin connections made for the XBee radio. It is important to note that some of the connections made are not mandatory, as discussed below.
All standard XBee radios have 20 pin connections, regardless of their frequency (900 or 2.4 GHz), protocol (802.15.4, Zigbee, Digimesh), or series (1 or 2). However, only some of PINs on the radio are required in order to make a connection. In particular, the V3.3 and GND connections must be made to power the radio, and the UART RX and TX connections must be made to enable data to be exchanged with the radio. It is important to note that the UART TX from the microcontroller must be connected to the UART RX of the XBee radio, and vice-versa. This effectively switches the RX and TX lines, enabling the data transmitted by the microcontroller to be read by the XBee radio, and is a process commonly referred to as a null modem cable or connection.
Some of the additional pins, such as UART RTS/CTS/DTR, can be used for UART flow-control, enabling the microcontroller and the radio to inform each other of their current buffer / processing states and their ability to process new messages. If there is a chance that messages may occasionally arrive faster then the microcontroller or radio can receive them or the radio can send them, this functionality may be useful. The other additional pins enable the radio to be reset, and the current state of the radio to be determined.
PCB Software Design
High-Level System Tasks
Startup Manager (Conductor / System Engine)
The startup manager acts as the system's starting point. After the creation of all RTOS tasks and before the RTOS scheduler is brought online, all tasks except for the startup manager are suspended. As a result, the startup manager is the only task which is executed after the RTOS scheduler is brought online. The startup manager procedurally initializes components within the system engine / conductor, which acts as a central repository of all system resources. If the initialization of any critical component fails, the system will end the startup process, disable the scheduler, and enter a critical failure state.
As each component is successfully initialized, the associated RTOS task (if any) is unsuspended. This enables intercommunication between components as required for system initialization. For instance, the initialization of the Bulb Logic RTOS task is dependent on the Shared-Intelligence Network Supervisor (siNetworkMgr) task being active. As a result, the startup manager will first complete and verify the initialization of the siNetworkMgr task infrastructure, start the siNetworkMgr task, and then proceed to initialize the Bulb Logic task.
The startup manager is critical, as it ensures that inter-task dependencies are handled and verifies the operational integrity of the system prior to boot.
The shared-intelligence network manager pulls for new encoded protocol buffer messages from the XBee API, and then passes received messages to the protobuffer library for decoding / deserializaton. Messages which are successfully decoded by the protobuffer library are then passed into the Bulb Logic task via an RTOS queue. In addition, the siNetworkMgr verifies that the bulb's unique identification address exists within the shared-intelligence network message's recipient field.
This task is necessary, as Bulb Logic must be able to respond to both internal and external (network-based) events. To facilitate this requirement, the siNetworkMgr task sends external events to the Bulb Logic task processing queue, while other components, including interrupts and the ambient-light sampling task, send internal events to the processing queue.
Ambient Sampling
Ambient sampling is achieved synchronously among bulbs via a shared ground-truth. The ambient sampling task waits on a binary semaphore to begin the sampling process. An external interrupt provided the semaphore, which was then used to begin the ambient sampling process. We did not perform the sampling directly within the interrupt, as this would prevent portions of our error-handling code from operating. In addition, the I2C driver was interrupt driven and would require modification to operate from within an interrupt (specifically, the driver would need to be modified to support a polling-operation when called from an ISR). To ensure the ambient sampling task completed without interruption, it had a higher priority then the siNetworkMgr and Bulb Logic tasks.
After the ambient sampling process completed, it sent the sampled data to the Bulb Logic task's processing queue. It then waited for the next sampling period by waiting on the binary semaphore.
Bulb Logic
Bulb Logic utilized information from its processing queue to direct the bulb's operation. The processing queue was able to accept different message types by having a single structure which contained unionized, nested structures and a message type parameter. As each message was removed from the queue, the system would check the message type to determine the appropriate nested structure to review. Information from the nested structure was then used to determine the output of the bulb and any messages which needed to be sent to other network nodes.
GPIO Interrupts
Ambient Sampling Ground-Truth
Ambient sampling was triggered via a GPIO interrupt. A GPIO pin on the board was attached to an external device, which generated a ground-truth shared among all network nodes. Whenever this interrupt was triggered, a binary semaphore would be incremented, causing the ambient sampling task to begin operation.
PIR Sensor
The PIR sensor was connected to a GPIO pin, which would produce a GPIO interrupt whenever the motion sensor was activated and deactivated. When each of these events occurred, a new message was added to the Bulb Logic task's processing queue.
System Components
Conductor / System Engine
The conductor objects maintains all operational resources required for the system. From a hierarchical, object-oriented stand point, any objects created within the system are directly or indirectly the children of the conductor. Each child object contains a pointer to the conductor, enabling the resources of the conductor to be accessed by the child object. The conductor is a globally accessible object, so it can be accessed by interrupts. Objects managed by the conductor include all system management objects, driver objects, and the error-handling system. Whenever any object requires the resources of another, it will request a pointer to the object from the conductor. In addition, whenever any object has an error to report, the object will alert the conductor, who will suspend the system in the case of a critical failure.
An alternative to the conductor approach involves singletons. However, we chose to utilize the conductor design paradigm instead, due to the complications associated with testing singleton components. Having the conductor manage all system resources including driver objects simplified initialization and testing, while still providing all system management objects with access to driver objects, as needed.
Bulb Logic
The bulb logic object contains occupancy and ambient light history and uses this information along with new items in its processing queue to determine the output of the bulb. In order to process occupancy data, bulb logic is aware of the relative positions of other fixtures within the lighting system. In addition, bulb logic determines when new messages need to be sent to other fixtures, and determines the contents + recipients of those messages.
Bulb Control
The bulb control object sets the output of the fixture's elements through control of the PWM driver. If requested, the bulb control task can fade between the current output and the desired output over a specified time. In addition, the bulb control object handles the closed-loop nature of the system which ensures the output of the fixture matches the desired output through measurement.
The shared intelligence network object performs serialization and deserialization of protobuffer messages. Whenever the bulb logic object has a new message to send to other systems within the network, it is passed to the shared intelligence network object, which handles serialization and sending through the XBee API. In addition, the shared intelligence network object continuously pulls for new messages from the XBee API, which are then deserialized into messages. The recipient addresses of the messages are then checked against the bulb's unique identifier, as provided by the XBee radio via our XBee API. If the local bulb is one of the message recipients, the message is passed into the bulb logic object via an RTOS queue.
PWM Driver
With pulse-width modulation (PWM), we are able to change the brightness of our LEDs by modifying the duty cycle of the PWM. The duty cycle describes the ratio of LED "on time" as compared to the LED "off time," simply put, it is the percentage of on the period which the LED is on.
To set up our microcontroller for PWM, the proper registers must be configured. In the LPC17xx User Manual, there is a chapter which discusses the proper set up.
Since we are dealing with LEDs, which are visual elements, we also care about the resolution at which we can change the duty cycle and frequency of the PWM signal. The resolution can be changed depending on what the prescaler value is set to, the code snippet below shows an example of how the prescaler can be set to obtain your desired frequency. The "steps" parameter designates your desired resolution as how many steps you want.
// cpuFrequency / ( pclock divider * (desired frequency in Hz * MR0) - 1)
LPC_PWM1->PR = getCpuClock() / (4 * frequency * steps) - 1;
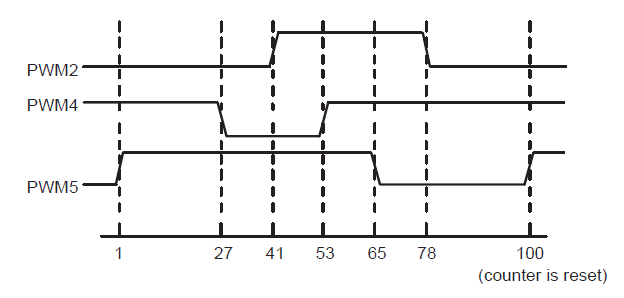
In order to obtain more PWM outputs with varying duty cycles, we need to use match registers. This is because the there is one main PWM frequency, and the others are derivatives of it using match registers. Below, you will find a code snippets which shows an example of how match registers are set. MR0 sets the period, in the example, a period of 100 is set.
	LPC_PWM1->MR0 = 100;  // set the period
	LPC_PWM1->MR1 = 41;
	LPC_PWM1->MR2 = 78;
	LPC_PWM1->MR3 = 53;
	LPC_PWM1->MR4 = 27;
        LPC_PWM1->MR4 = 65;
In the following diagram below, we see the resulting PWM outputs from the code snippet. You can see that a double edge wave is formed from each of the match register pairs (MR1 & MR2, MR3 & MR4, MR5 & MR6). You can also enable PWM signals with single-edge operation which is described in the user manual.
Protocol Buffers
We utilized Google Protocol Buffers to exchange data among devices within the shared-intelligence network. Protocol buffers enable a single .proto file to be written, which dictates the fields of the message which will be exchanged. A single message can contain multiple levels of nested messages, along with integer values (32-bit and 64-bit), floating point values, booleans, arrays, and strings. The .proto file is compiled using a protocol buffer compiler, which then generates language-specific object-oriented implementation files. The fields within the message object are modified to contain the data to be sent, and the message is then serialized into an on-the-wire format which is machine-type independent. This enables messages to transverse between machines of different endianness (such as our x86 PHP server and our ARM-based SmartBulb) without additional work. When the message arrives at the destination, it is deserialized back into a message object, which can then be reviewed by the recipient.
Web Interface Design
The web management interface is composed of a web front end and a message processing back end capable of transmitting the messages on the Digimesh wireless network.
Description of Functionality
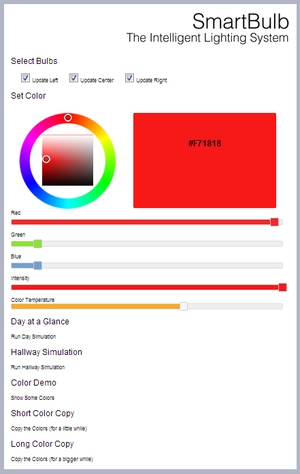
The user makes adjustments to the interface. Changes are asynchronously transmitted for processing. The color values are processed to meet the requirements of the SmartBulbs and then encapsulated in a Google Protocol buffer message for transmission across the mesh network.
Design of Web Interface
The design of the web interface centered around using proven techniques to produce a reasonable interface. Since the project focus was on the lights and their applications the management interface was kept simple for purposes of economy as well as to keep presentation focus on the core components.
Front End
The front end was created from an end-user perspective to allow system control. The layout was designed to be compatible with non-multi-touch screens; meaning that the interface must fit comfortable on a single page, all elements must be large enough to activate without zooming, and all input must be usable with nothing more than a mouse. To meet this requirement the design included the use of HTML, CSS, jQuery, and jQuery UI. The plain and simple styling of jQuery UI were largely left alone with the exception of modifications to make the elements larger and more touch friendly. AJAX was selected as the method of transmitting data from the JavaScript interface to the server for processing. AJAX allows quicker response time without breaking the illusion of a full screen desktop application.
Back End
The backend must connect the web interface to the application. In this case this means making the crucial link between the communication layer and the user's input. Input is checked before being processed. The processed data is then passed to the communication layer.
Communication Layer
The communication layer is being treated separately from the back end. The communication layer forms the bridge between data processed on the web server to the SmartBulb mesh network. The communication layer must be compatible with the Google protocol buffers in use by the SmartBulb network. The communication layer also contains the functionality to send the data via a Digimesh wireless radio attached to the computer. One reason we choose to run the web server on Linux is because of how serial connections are treated under Linux -- they are treated just as text files. To send data via the wireless radio, the communication layer simply needs write to a file.
Implementation
Implementation of PCB Board
The PCB board consisted of over 85 components, when including passive components (such as pull-up resistors for the microcontroller) and power regulation components. 6 boards were ordered from RushPCB and 1 board was ordered from Advanced Circuits. Both vendors were willing to work with students, and were either willing to offer us special student rates (Advanced Circuits) or extend promotional pricing to us (RushPCB).
In total, we assembled 6 boards and kept one unassembled board as a demonstration model. Assembly of the six boards took approximately 10 hours and involved significant solder work.
Implementation of PCB Software
Application Overview
The majority of our PCB software was written in C++, with the exclusion of our protocol buffer files and some external libraries, such as FreeRTOS. We chose to utilize C++ in order to realize the object-oriented design described previously.
The I'2'C and UART drivers were provided by Preetpal Kang and modified to match the needs of our project. In particular, we removed the use of singleton's to conform with our conductor paradigm, and also made changes to the UART driver to facilitate transmission of binary data from the protobuffers.
We chose to forbid dynamic memory allocation following RTOS initialization to eliminate potential memory fragmentation. This decision was made after reviewing DO-178B, Software Considerations in Airborne Systems and Equipment Certification, a standard in robust embedded system design. Calls to memalloc following initialization initially failed, as a custom memory allocator was used following the system's initialization. As a result, we were unable to utilize standard STL containers which incorporate dynamic memory allocation, and instead utilized EASTL, to achieve similar functionality. This is described in additional detail below.
We also chose to ensure that RTOS items, such as queue handles, were never directly shared between different objects. For instance, when one object wanted to add an item to another object's queue, it would call a public function on the second object, passing the item to be added to the queue as a parameter. This paradigm ensured that we did not need a global store of RTOS queues, mutexes, etc. and also made programming simpler, as we did not need to know the name of the queue handle, or how to process the data to be added to the queue when working on the development of the queue source objects.
FreeRTOS
We utilized FreeRTOS to enable real-time scheduling of different components. Following startup, the primary component was the Bulb Logic task, which processed items from a queue, fed by higher priority tasks and interrupts. A hierarchy of components which fed the bulb logic task directly or indirectly can be seen below. Ambient sampling had the highest priority to prevent other tasks from interrupting the synchronized sampling operation.
The following were the priorities associated with the system's tasks (number directly corresponds to priority):
- Startup Manager (Conductor / System Engine)
- Bulb Logic
- Shared-Intelligence Network Manager (siNetworkMgr)
- Ambient Sampling
Since we did not have a UART connector, we did not have any use for printf within our code. In addition, we did not use any recusive functions, and had few function call trees over three functions deep. This allowed us to limit our stack size, and has helped us recognize potential modifications which we could make in a future iteration of the system, such as using microprocessors with less RAM.
JTAG
Our PCB did not contain any UART adapter in order to minimize board size and reduce the number of components required. In addition, given the complexity of the system which we were designing, we wanted to utilize a programming interface which yould enable ius to debug the system. As a result, we chose to use JTAG (Joint Task Action Group), to program the PCB board
We purchased a J-Link EDU (educational edition) from SEGGER for approximately 60$. The educational edition is equivalent to the full product, but has a license which prohibits commercial usage. Although our IDE (Sourcery CodeBench) contained built in support for the J-Link unit, we chose to utilize the GDB server functionality of the J-Link software. This functionality can be utilized with any IDE, including the standard Eclipse IDE used in CmpE 146. In addition, the GDB server functionality allows you to use Flash Breakpoints, which allows you to use more then the 6/8 hardware breakpoints available within a Cortex M3 MCU.
Configuration of the J-Link GDB server for use with Eclipse
- Install J-Link Software / Utilities
- Visit the J-Link downloads site. Download and install the J-Link software & documentation pack for Windows
- Start the J-Link GDB server via JTAG or J-Link GDB server via SWD, depending on your configuration
- Install GDB Hardware Debugging Support in Eclipse
- In Eclipse, go to Help > Install New Software
- Enter the address of the CDT repository for your version of Eclipse in the Work With field, such as http://download.eclipse.org/tools/cdt/releases/juno for Eclipse Juno and press enter to load the contents of the repository
- Under CDT Optional Features, select C/C++ GDB Hardware Debugging. Proceed with installaton.
- Configure Eclipse to use GDB Hardware Debugging
- In Eclipse, go to Run > Debug Configurations
- Select GDB Hardware Debugging from the left panel, and create a new launch configuration.
- Under the Debugger tab, ensure that the hostname is set to localhost, and the port number is set to 2331
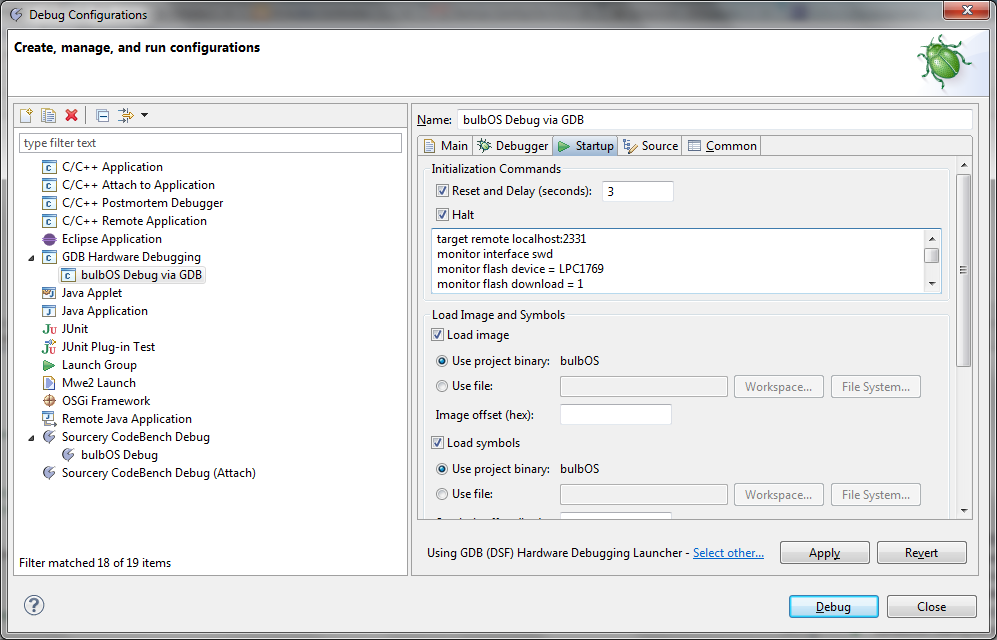
- Under the Startup tab, enter the initialization routine shown below into the Initialization Commands box. Select Load Image and Load Symbols
- Program and debug the code by selecting the Debug button within the created GDB Hardware Debug configuration.
Initialization Commands for GDB Hardware Debug Configuration
target remote localhost:2331
monitor interface swd
monitor flash device = LPC1769
monitor flash download = 1
monitor flash breakpoints = 1
monitor speed auto
load
monitor clrbp
monitor reset 0
monitor reg r13 = (0x00000000)
monitor reg pc = (0x00000004)
monitor reg r13
monitor reg pc
nanoPB
In order to utilize protocol buffers, we needed a library which could perform the encoding and decoding process. Although Google has provided an official protobuffer implementation for C/C++, we were unable to utilize the official version as the embedded system's C library is not fully POSIX compliant, preventing the official implementation from cross-compiling. We discovered nanoPb as a feasible alternative, as it is designed for embedded systems. In addition, nanoPb has an advantage over the official Google implementation, as it does not require dynamic memory allocation in order to function.
Example .proto configuration file
import "nanopb.proto";

message siMsg {
	// message types available for encapsulation
	message pwmConfig {
		// baseline config
		optional int32 frequency = 1;
		optional int32 steps = 2;

		required int32 red = 4;
		required int32 blue = 5;
		required int32 green = 6;
		required int32 white = 7;
	}

	// base message fields
	repeated int64 recipientIDs = 1 [(nanopb).max_count = 5];

	// encapsulated message
	optional pwmConfig sPwmConfigMsg = 2;
}
Example decoding on-the-wire protobuffer data
while(1) {
	// get a message from our XBee API
	xbeeRecvMsg recvMsg;
	xbeeAPI.getMsg(recvMsg);

	// decode the buffer
	pb_istream_t recvStream = pb_istream_from_buffer((uint8_t *)(recvMsg.msgData + recvMsg.msgDataStartIndex), recvMsg.msgDataLength);

	// create a siMsg for us to use
	siMsg message;

	// attempt to decode the message
	if (pb_decode(&recvStream, siMsg_fields, &message) == false) {
		continue;
	}

	// determine if we are one of the recipients
	bool foundOurID = false;
	for(unsigned int i = 0; i < message.recipientIDs_count; i++) {
		if(message.recipientIDs[i] == serialNumber32) { foundOurID = true; break; }
	}
	if(foundOurID == false) { continue; }

	// update the PWM structure as needed
	if(message.has_sPwmConfigMsg) {
		// update each parameter
		if(message.sPwmConfigMsg.has_red == true) { pwmConfig.red = message.sPwmConfigMsg.red; }
		if(message.sPwmConfigMsg.has_blue == true) { pwmConfig.blue = message.sPwmConfigMsg.blue; }
		if(message.sPwmConfigMsg.has_green == true) { pwmConfig.green = message.sPwmConfigMsg.green; }
		if(message.sPwmConfigMsg.has_white == true) { pwmConfig.white = message.sPwmConfigMsg.white; }

		if(message.sPwmConfigMsg.has_frequency == true) { pwmFreq = message.sPwmConfigMsg.frequency; }
		if(message.sPwmConfigMsg.has_steps == true) { pwmSteps = message.sPwmConfigMsg.steps; }
	}
}
Example encoding on-the-wire protobuffer data
// create a siMsg which we will use to send our message
siMsg message;

// fill-in the required values of our pwm config message
message.has_sPwmConfigMsg = true;
message.sPwmConfigMsg.red = 0;
message.sPwmConfigMsg.blue = 100;
message.sPwmConfigMsg.green = 200;
message.sPwmConfigMsg.white = 255;

// we want to set the PWM frequency also, so we'll fill in an optional parameter
message.sPwmConfigMsg.has_frequency = true;
message.sPwmConfigMsg.frequency = 10000;

// create a buffer to store the on-the-wire data (nanopb will not overflow the buffer, as it is aware of its size)
uint8_t buffer[512];
pb_ostream_t stream = pb_ostream_from_buffer(buffer, sizeof(buffer));

// encode the message, hand off to XBee API if successful
if (pb_encode(&stream, siMsg_fields, &message) == true)
{
    xbeeAPI.sendMsg(buffer); // have XBee send the on-the-wire data
}
XBee API
In order to decode a protocol buffer message with any protocol buffer API, we needed to know the length of the message. However, since multiple messages may be transmitted across the network in a sequential manner, we are unable to rely on a timeout from the UART driver to indicate the end of a message. In addition, since Google Protocol Buffers contain binary data, it is not possible to delimit the messages using conventional techniques, such as using a :, \n or similar token to mark the front or end of a message.
In order to determine the length of each protocol buffer message, we determined the length of the surrounding XBee frame's data segment through the XBee API. As long as only one serialized protocol buffer message is sent per XBee frame, the length of the surrounding XBee API frame's data segment would be equal to the length of the serialized protocol buffer message. This enabled us to accurately decode protocol buffer messages. Pseudo-code for the XBee API receive functionality is shown below.
Pseudo-code for XBee API Receive Functionality
// structure for queue
typedef struct {
	char msgData[XBEE_API_MESSAGE_BYTELENGTH_MAX];
	int msgDataLength;
	int msgDataStartIndex;
} xbeeRecvMsg;

// constant values
#define XBEE_API_MESSAGE_BYTELENGTH_MAX 81
#define XBEE_API_FRAME_HEADER_BYTELENGTH 3
#define XBEE_API_FRAME_HEADER_FRAMETYPE_BYTELENGTH 1
#define XBEE_API_FRAME_RECEIVE_PREAMBLE_BYTELENGTH 12
#define XBEE_API_FRAME_CHECKSUM_BYTELENGTH 1

// index positions
#define XBEE_API_FRAME_HEADER_LENGTH_MSB_INDEX 1
#define XBEE_API_FRAME_HEADER_LENGTH_LSB_INDEX 2

while(1) {
	// declare a structure with an array large enough to hold our maximum message size
	xbeeRecvMsg incomingMsg;
	incomingMsg.msgDataStartIndex = 0;

	// get a character from UART, wait indefinitely (portMAX_DELAY) for the character
	uart.getChar(incomingMsg.msgData[0], portMAX_DELAY);
	incomingMsg.msgDataStartIndex++;

	// verify that we received a start byte
	// if we did not receive a start byte, we had a failure -- loop back around and try again
	if(incomingMsg.msgData[0] != XBEE_API_FRAME_START_BYTE) { continue; }

	// receive 3 characters from the UART stream, including header length and frame type
	// if we do not receive 3 characters within 100 ms, we had a failure -- loop back around and try again
	if(uart.getBuff(incomingMsg.msgData+1, XBEE_API_FRAME_HEADER_BYTELENGTH, 100) != XBEE_API_FRAME_HEADER_BYTELENGTH) { continue; }
	incomingMsg.msgDataStartIndex = incomingMsg.msgDataStartIndex + XBEE_API_FRAME_HEADER_BYTELENGTH;

	// switch based on the frame type
	switch(incomingMsg.msgData+4) {
		case XBEE_API_RECEIVE_FRAME_TYPE:
		{
			// receive and discard the next 12 characters (including sender address, two required characters, etc.)
			// if we do not receive 12 characters within 100 ms, we had a failure -- loop back around and try again
			if(uart.getBuff(incomingMsg.msgData+4, XBEE_API_FRAME_RECEIVE_PREAMBLE_BYTELENGTH, 100) != XBEE_API_FRAME_RECEIVE_PREAMBLE_BYTELENGTH) { continue; }
			incomingMsg.msgDataStartIndex = incomingMsg.msgDataStartIndex + XBEE_API_FRAME_RECEIVE_PREAMBLE_BYTELENGTH;

			// determine the amount of data to receive
			incomingMsg.msgDataLength = ((incomingMsg.msgData[XBEE_API_FRAME_HEADER_LENGTH_MSB_INDEX]<<8) + incomingMsg.msgData[XBEE_API_FRAME_HEADER_LENGTH_LSB_INDEX]) - (XBEE_API_FRAME_RECEIVE_PREAMBLE_BYTELENGTH + XBEE_API_FRAME_HEADER_FRAMETYPE_BYTELENGTH));
			incomingMsg.msgDataStartIndex;

			// ensure we have a sufficiently sized buffer to hold the data from the frame
			// if not, dump the data and checksum
			if(XBEE_API_MESSAGE_BYTELENGTH_MAX < dataFrameLength) {
				// get every byte + the checksum and dump it all
				char c;
				for(int i = 0; i < (dataFrameLength + 1); i++) {
					if(uart.getChar(&c, 100) == false) { break; }
				}

				// loop back around to try again...
				continue;
			}

			// get the data from the frame
			// if we do not receive dataFrameLength characters within 100 ms, we had a failure -- loop back around and try again
			if(m_uartObj->getBuff(incomingMsg.msgData+incomingMsg.msgDataStartIndex, dataFrameLength, 100) == false) { continue; }

			// get the checksum
			uint8_t msgChecksum;
			if(uart.getChar((char*)&msgChecksum, 100) == false) { continue; }

			// if desired, verify the checksum is correct

			// put the message onto the queue
			xQueueSend(m_dataPacketQueue, &incomingMsg, portMAX_DELAY);
		}
		break;

		default:
		{
			// this is an unknown message type..
			// get every byte + the checksum and dump it all
			char c;
			for(int i = 0; i < (dataFrameLength + 1); i++) {
				if(uart.getChar(&c, 100) == false) { break; }
			}
		}
		break;
	}
}
EASTL
Unlike the STL libaray, EASTL is designed for systems with limited memory, such as embedded systems. Orginally created by Electronic Arts (EA), the library has been partically released to the open-source community over the past few years. One of the best advantages of the EASTL library is that it does not need to perform dynamic allocation of memory in order to provide STL-link functionality. Dynamic memory allocation of STL objects may lead to memory fragmentation, causing system performance issues. Each of the following EASTL containers provides at a minimum identical functionality to their STL counterparts without requiring dynamally allocated memory.
- fixed_list
- fixed_vector
- fixed_string
- fixed_set
- fixed_multiset
- fixed_map
- fixed_multimap
- fixed_hash_set
- fixed_hash_multiset
- fixed_hash_map
- fixed_hash_multimap
The EASTL library is able to provide these containers without use of dynamic memory allocation by performing allocation at compile-time on the stack. Therefore, in order to utilize the structures without dynamic memory allocation, you must be able to specify their desired size / number of elements at compile time. In addition, it possible to enable overflow on the EASTL containers, allowing dynamic memory allocation to occur if the container grows beyond it's static size limit. Overflow memory allocation can occur via a specific container for each EASTL object, potentially reducing memory fragmentation via memory pools.
Template declaration for fixed_vector:
template <typename T, size_t nodeCount, bool enableOverflow = true,
          typename Allocator overflowAllocator = EASTLAllocator>
class fixed_vector
{
   ...
};
Example use of fixed_vector without overflow allocation:
fixed_vector<int, 30, false> intVec;

for(int i = 0; i < 30; i++) {
   intVec.push_back(i)
}

// intVec is now full, so the next operation will fail
intVec.pushBack(30);
PWM
Initially, we had planned to write our own PWM driver, and had written a basic driver enabling control of one PWM output. However, we discovered that the Cortex Microcontroller Software Interface Standard (CMSIS) library produced by ARM with addons by NXP for the LPC17xx series included a robust PWM driver. As a result, we did not write the driver for this system component manually, although we did convert the CMSIS C code into C++ code and modify the parameters which it takes to match our needs.
Light Sampling via Color Sensor
Ambient light sensing was accomplished via a TAOS color sensor, which was communicated with via I'2'C. The sensor has four different channels (red, blue, green, clear) to measure light. Each of these channels is read to determine the composition of the current light sampled.
Setting up the sensor for simple operation is an easy task:
- Initialize the I'2'C bus (if not already completed)
- Write to the color sensor's control register to enable the ADC
- Write to the color sensor's gain register to enable maximum gain
- Periodically read from the 8 color registers (which have high and low bytes) to determine the composition of the current light sampled.
Pseudo-code for reading sampled color via TAOS Color Sensor:
// constant values
#define TAOS3414_ADDRESS_I2C 0x72
#define TAOS3414_ADDRESS_CONTROL_REGISTER 0x80	   // adjusted for block operation
#define TAOS3414_ADDRESS_GAIN_REGISTER 0x87		   // adjusted for block operation
#define TAOS3414_ADDRESS_COLOR_GREEN_REGISTER 0xB0 // adjusted for block operation

// get the color sensor's I2C interface, initialize it
I2C_Base * colorSensorI2C = systemEngine->getExternalColorI2C();
colorSensorI2C->init(200);

// turn on the ADC and the power to the color sensor
colorSensorI2C->writeReg(TAOS3414_ADDRESS_I2C, TAOS3414_ADDRESS_CONTROL_REGISTER, 0x03);
vTaskDelay(20); // wait for the ADC to finish initialization

// set the gain register to maximize gain
colorSensorI2C->writeReg(TAOS3414_ADDRESS_I2C, TAOS3414_ADDRESS_GAIN_REGISTER, 0x30);

// measure the ambient periodically
while(1){
	// perform the color sensor sampling
	char colorData[8];
	bool readRegisters(TAOS3414_ADDRESS_I2C, TAOS3414_ADDRESS_COLOR_GREEN_REGISTER, &colorData, 8);

	// do something with the data...

	// wait 200 ticks (200 ms if 1 tick = 1 ms) to repeat
	vTaskDelay(200);
}
Implementation of Web Interface
Front End
The user interface was constructed using HTML and JavaScript. The jQuery JavaScript framework and the jQuery UI widgets were used extensively to produce an interactive interface capable of being driven through a touchscreen. Several design choices stemmed from the decision to make the interface touch based. The interface would be a single page without scrolling for easy touch navigation. The interface would also send all the data via AJAX to avoid the need to reload the page. A full screen browsing mode when coupled with AJAX allows a seamless interface that is quickly editable. HTML and CSS were used to create the structure and style of the web page. Color choice and demonstration modes when activated would send RGB color data to the message processing back end for asynchronous processing.
The following JavaScript shows how jQuery provides easy to use AJAX functionality. This snippet allows the data provided to be POSTed to a URL. The response from the server is caught and returned to a callback. In this example the callback simply provides a log to the console. Logging to the JavaScript console is crucial to accurate debugging of asynchronous tasks. As the tasks complete the data (and any errors) are conveniently printed.
$.ajax({
  type: "POST",
  url: "some.php",
  data: { name: "John", location: "Boston" }
}).done(function( msg ) {
  console.log( "Data Saved: " + msg );
});
To avoid flooding the mesh network AJAX calls to the message processor were rate limited using Underscore.js. Underscore.js is a JavaScript library that provides many convenient functions, one of which provides rate limiting functionality. To add a rate limit to an existing function
var throttled = _.throttle(function(){
  console.log("User Scrolled");
}, 100);
$(window).scroll(throttled);
Back End
Implementing the back end was relatively straightforward. The design requirements were clear: data must be received from an AJAX call, processed, and forwarded to the communication layer. A single PHP file acted as the data receiver and was the destination of the AJAX calls. The data receiver includes a function library created to provide data processing routines. These routines process the data from user input into the format required by the bulb.
Communication Layer
The communication layer involved encoding the message with a protocol buffer library, and then passing the serialized message data via a serial interface to an XBee radio and on to the Digimesh network.
phpSerial was used to interface PHP with a USB serial port. We had an unexpected problem when initially sending out serialized protocol buffer data. The standard Linux TTY driver will automatically add in a '\r' for every '\n' which is sent on the serial line, to ensure newline cross compatibility with other systems. However, since the protocol buffer data is in a binary format, the '\n' escape character would appear occasionally, causing an additional '\r' to be fed into the output. The remote system was then unable to decode the protocol buffer message, as it had been corrupted by the addition of the '\r' character. Resolving this required disabling Linux's automatic addition of a '\r' character for each '\n'. The following command will accomplish this:
stty -F /dev/ttyUSB0 -onlcr
Protocol buffer encoding was handled by drslump's Protobuf-PHP library. The library was easy to use following initial configuration of the protoc compiler. There appeared to be an unconfirmed issue with the library's ability to encode enum fields. However, other then this issue the library worked as expected.
Pseudo-code showing encoding process using drslump's Protobuf-PHP library and sending encoded / serialized data via serial device
// Get a serial object
$serial = new phpSerial;

// First we must specify the device. This works on both linux and windows (if
// your linux serial device is /dev/ttyS0 for COM1, etc)
$serial->deviceSet("/dev/ttyUSB0");

// We can change the baud rate, parity, length, stop bits, flow control
$serial->confBaudRate(9600);
$serial->confParity("none");
$serial->confCharacterLength(8);
$serial->confStopBits(1);
$serial->confFlowControl("none");

// Then we need to open it
$serial->deviceOpen();

// Include Protobuf package
require_once 'DrSlump/Protobuf.php';
\DrSlump\Protobuf::autoload();

// Protobuf declaration
include_once 'protos/siMsg.php';

$pwmconfig = new siMsg\pwmConfig();
$pwmconfig->red   = $rgbw[0];
$pwmconfig->green = $rgbw[1];
$pwmconfig->blue  = $rgbw[2];
$pwmconfig->white = $rgbw[3];

$pwmconfig->frequency = 10000;
$pwmconfig->steps = 1024;

$siMsg = new siMsg();

// add recipients to the message
if ($updatebulbs[0] == "true"){
  $siMsg->addRecipientIDs(0x0013A20040926FD9);
}

if ($updatebulbs[1] == "true"){
  $siMsg->addRecipientIDs(0x0013A20040926FE4);
}

if ($updatebulbs[2] == "true"){
  $siMsg->addRecipientIDs(0x0013A20040926FEE);
}

$siMsg->setSPwmConfigMsg($pwmconfig);

// Serialize the data
$data = $siMsg->serialize();

// Verify we have not exceeded the maximum size of an XBee data frame
if (strlen($data) < 70){
  $serial->sendMessage($data);
}
else {
  echo "Send failed: message length exceeded.";
Testing & Technical Challenges
Describe the challenges of your project. What advise would you give yourself or someone else if your project can be started from scratch again? Make a smooth transition to testing section and described what it took to test your project.
Custom Printed Circuit Board
In order to fulfill our system requirements, we opted to design our own custom printed circuit board (PCB). We ran into several challenges on the path to accomplishing this task:
- Software: We used Altium as our PCB CAD software, it's a sophisticated tool which allowed us to accomplish our task, but we had to put in several hours to learn the intricacies of the tool
- One critical error we ran into for our first iteration of the PCB is we did not know how to run the design rule check, and we had to manually correct them when the PCB arrived
- Altium was not set up to be used with multiple users with files syncing on Dropbox, so we ran into some trouble where changes weren't being executed properly
- Assembly: Due to cost constraints, we had to assemble the boards ourselves including the 100 pin microprocessor chip
- A few of our parts were quite delicate and required extra care to solder onto the board
- We made some mistakes which required de-soldering/rework
- Testing: We had to verify that our boards worked
- During programming some errors would result from shorts on the board
Our solutions:
- Software: We put in many hours to learn Altium, each team member irrespective of their expertise learned how to use Altium to an extent in order to assist with PCB related tasks
- After we ran into the ground errors on our first board, we were vigilant about design rule checking our design to make sure that rules and specifications were followed on our final iteration of the PCB
- In order to make sure our files were not subject to unwanted changes, we made sure to properly close the files and communicated with each other about the status of the project file. We also uploaded major milestone design changes to our repository
- Assembly: We utilized our own soldering expertise, improved our techniques, and learned new techniques to accomplish our board assembly
- For the 100 pin processor chip, Phil skillfully adapted the drag-solder technique, so he was solely in charge of processor chip soldering
- After making mistakes, we would review our work to avoid making the same mistake
- Testing: We would put on the minimum parts needed to test the processor and JTAG connection before moving onto the other parts
- To find shorts, we would use a multimeter to perform a continuity test and verification on the pins. We would also look at the processor chip (it was prone to shorts from the solder drag) under a magnifying glass/microscope
- Board shorting was a particularly difficult challenge we faced, and we would suggest very carefully assembling the board and paying attention to the components which are difficult to solder -- it costed us a lot of time and frustration when a hardware problem was confused with a software issue
System Software Design
In order to fulfill our system requirements and to maximize the amount which we learned during this course, we opted to write most of the code utilized in our project from scratch. In addition, the software which we wrote was for a distributed system, forcing us to deploy code to multiple nodes simulateously to validate the system's operation. We ran into several challenges on the path to accomplishing this task:
- Testing Multiple Nodes: Since our project involved communication between nodes, we often had to have multiple nodes operating simultaneously. We needed to be able to track errors which occurred, but did not include a UART port for a console serial connection.
- Interfacing with CodeSourcery IDE: We utilized the CodeSourcery IDE to develop our project, as the IDE automatically managed our build environment, including our loader files (.ld) and other development needs. However, we struggled to understand how to setup things such as interrupt service routine (ISR) handlers within our code. Initially, this made it impossible for us to get FreeRTOS working, as we could not determine how to install the three required ISR handlers.
- Debugging Hard Faults: Occasionally, the code would attempt to access memory or perform an operation which was not allowed. As a result, the hard fault ISR would be triggered. Unfortunately, by default, there is no useful information available when a hard fault occurs to help enable discovery of the core problem.
Our solutions:
- Testing Multiple Nodes: In addition to using JTAG to monitor the execution of individual nodes step-by-step, we also built a debugging system which allows messages above a certain level of verbosity to be sent to any listeners on the network. This allowed an XBee adapter connected to our workstations to serve as a multi-system console.
- Interfacing with CodeSourcery IDE: The book The Definitive Guide to the ARM Cortex M0, available within the San Jose State University library, provides an overview of how to setup ISRs with CodeSourcery, along with other useful knowledge.
- Debugging Hard Faults: We discovered that there are techniques, as discussed on the FreeRTOS website, which can be used to help isolate the area of code which is leading to the ISR hard fault. This helped us significantly during the debugging process.
System Testing
We performed a general fixture test which enabled us to validate the communication between a total of three fixtures. Each fixture was attached to a horizontal cross-beam, which was connected to a free-standing structure. Each fixtures was connected to a shared-intelligence network, which allowed the management interface to inject commands while also enabling inter-bulb communication. Initially, the bulbs were tested via the management interface, as different conditions were injected into the network to understand how the bulbs would react. The bulbs did not send any of their own messages, but the management interface injected messages which simulated what the bulbs would typically exchange, such as an occupant detected, and the current ambient light sampled. This enabled us to verify the bulb's response to network events.
After confirming that the bulbs reacted to the messages received from the network as expected, we then took a single bulb and analyzed it's response to local stimuli, such as PIR motion and changes in the ambient light. This enabled us to validate the bulb's response to local events. Finally, we performed a complete test, where we subjected all fixtures to changes in occupancy and ambient light, to validate their response. For occupancy testing, the decay time was quick, ensuring that we could rapidly test different scenarios without having the occupancy history skewing our results.
Conclusion
When we initially started this project, we wanted to challenge ourselves by building an embedded system from the ground-up. For us, this meant starting with a barebones microcontroller, and developing the PCB and all other components, including the software systems. We encountered many problems along the way, including errors on our part exposed during the manufacturing of our first PCB, wireless radio issues, and problems with determining how to efficiently implement much of the required functionality, such as ambient light sensing. Now that the project has completed, we can say with confidence that we understand how the pieces of an embedded system fit together. This project has strengthened our knowledge of various communication protocols, including I'2'C and UART. In addition, we are more familiar with the functionality of an RTOS and the associated programming paradigms, such as limiting dynamic memory allocation, and tools, such as JTAG.
Despite the numerous hours spent working on this project, we believe that in the end it has clearly paid off given the knowledge we've gained and the personal growth we've achieved. Overall, we would encourage other students to attempt to build a system from the ground-up, similar to what we have done with SmartBulb. Building such a system truly challenges your ability to rapidly solve problems and recognize how different components must fit together to build a cohesive system.
Project Video
Project Source Code
Due to patent pending the source code is not listed for this project.
References
Acknowledgement
We would like to acknowledge our instructors: Dr. Ozemek and Preet Kang
We would also like to thank our fall 2012 classmates for an enjoyable semester in CmpE146!
References Used
- TI WEBENCH Design Center
- jQuery UI
- PHP Reference Website
- DrSlump's Protobuf-PHP library
- Nanopb - protocol buffers with small code size
- Clone of the EASTL library taken from http://gpl.ea.com/
