S19: Lightfury
Contents
LightFury
Ultrasonic and Geo Sensor Based Self-Navigating Autonomous Car using CAN communication bus.
Abstract
LightFury is an autonomous electric car project that aims to bring different embedded system paradigms together and consolidate them with industry level sophistication and robustness. This project will feature an RC car which will employ different sensors and motors to navigate the track without human assistance. Every sensor and motor combined with a dedicated functionality is managed and processed by a controller. Such different controllers will communicate with the master node using the CAN bus protocol. Real time interaction with the car for communicating destination and getting car updates is possible with bridge controller and mobile application. The autonomous car navigation is a result of all electronic module functioning harmoniously to reach the destination location.
The navigation is based on destination position and car position. The autonomous car navigates with the help of GPS and compass along the checkpoints. Also, upon detecting obstacle, the car effectively navigates away from obstacle coming into its path. The motor controller effectively controls speed at turning and on ramp. Using the communication bridge and on board LED indicators we can have interpretation of the controller decisions. Also, the CAN bus communication can be used to observe the messages and sensor output on GUI or graphs. Thus we can observe the navigation decisions taken by the autonomous car.
Introduction
The project is divided into 7 modules:
- Master Controller
- Motor Controller
- Ultrasonic Sensor Controller
- GPS Controller
- Android application and Bluetooth Connectivity
- Hardware (PCB designing and Electronic layout)
- Testing and Verification
The system has five SJOne Boards that run FreeRTOS and communicate with CAN bus. The car uses low power source for Boards and Sensory Units and high power source for Motor Driving Unit. The LEDs on each board are used to indicate status of controllers. The system is mounted and arranged on Traxis chassis. The final autonomous car is functional and compact unit.
Team Members & Responsibilities
<Team Picture>
Project Link: Gitlab Link
- Sensors
- Ultrasonic
- Compass
- PCB Design
- Testing, Integration & Repository Maintenance
Schedule
| Week# | Start Date | Task | Status | Completion Date |
|---|---|---|---|---|
| 1 | 02/12/2019 |
|
Completed | 02/12/2019 |
| 2 | 02/19/2019 |
|
Completed | 02/19/2019 |
| 3 | 02/26/2019 |
|
Completed | 02/26/2019 |
| 4 | 03/05/2019 |
|
Completed | 03/09/2019 |
| 5 | 03/12/2019 |
|
Completed | 03/19/2019 |
| 5 | 03/19/2019 |
|
Completed | 03/26/2019 |
| 6 | 03/26/2019 |
|
Completed | 04/02/2019 |
| 7 | 04/02/2019 |
|
Completed | 04/09/2019 |
| 8 | 04/09/2019 |
|
Completed | 04/16/2019 |
| 9 | 04/16/2019 |
|
Completed | 04/23/2019 |
| 10 | 04/23/2019 |
|
Completed | 04/30/2019 |
| 10 | 04/23/2019 |
|
Completed | 04/30/2019 |
| 11 | 04/30/2019 |
|
Completed | 05/07/2019 |
| 12 | 05/07/2019 |
|
Completed | 05/14/2019 |
| 12 | 05/22/2019 |
|
Completed | 05/22/2019 |
Parts List & Cost
| Item# | Part Desciption | Vendor | Qty | Cost |
|---|---|---|---|---|
| 1 | RC Car | Traxxas | 1 | From Prof. KaiKai Liu |
| 2 | CAN Transceivers MCP2551-I/P | Microchip | 15 | Free Samples |
| 3 | Semtec GPS | Microchip | 1 | Free Samples |
| 4 | Tilt Compensated Magnetic Compass | Amazon | 1 | $29 |
| 5 | LIPO Batteries + Charger | 1 | with car package | |
| 6 | 7" LCD | 1 | ||
| 7 | RPM 6520 Traxxas | Amazon | 1 | $11.67 |
| 8 | UltraSonic Sensor | Maxbotix | 4 | $150 |
| 9 | PCB | PCBWay | 1 | $40.00 (estimated) |
Printed Circuit Board
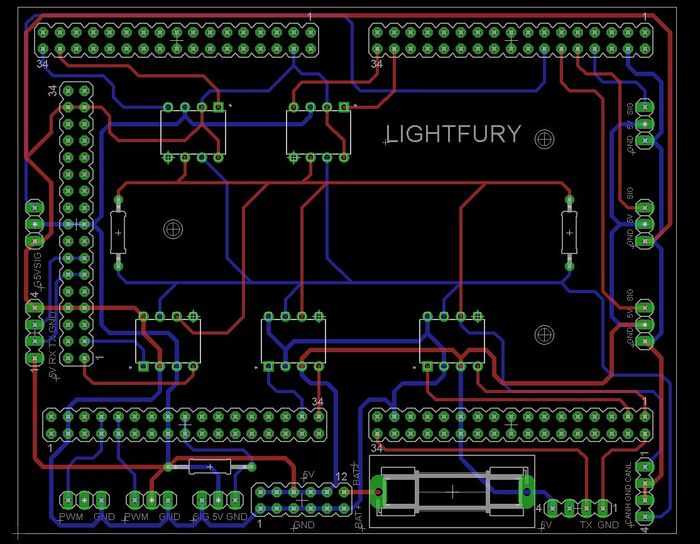
Initial prototyping was done on wire wrapping board for a common CAN bus and power input to all the controllers. Over time on finalizing the layout and components, we designed a PCB to have a compact and stable connections for our electronic and mechanical components. Planned a single PCB to place and route CAN transceivers and eliminate dangling wires. The PCB was designed with Eagle CAD software tool. Components were placed on the design after careful consideration for compactness and routing constraints. The design was modified multiple time to cater for new requirement. Finally, the designed PCB was placed on the chassis for stable and compact car design.
CAN Communication
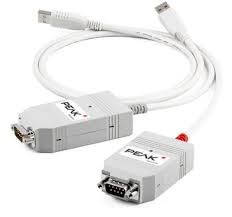
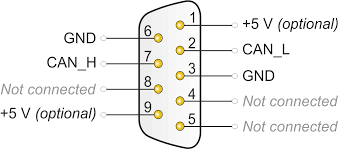
Controlled Area Network or CAN is broadcast bus used in modern autonomous car systems for reliably communicating between devices. Here we use CAN bus to communicate between different controllers and debug with CAN messages. An errorneous node goes in bus off mode and other node keep communicating over CAN bus. This is why CAN is preferred over other communication protocols. Using PCAN dongle we can debug CAN communication on the bus in real time. These messages have helped in developing the navigation algorithm after observing the system in real time and monitoring CAN communication channel.
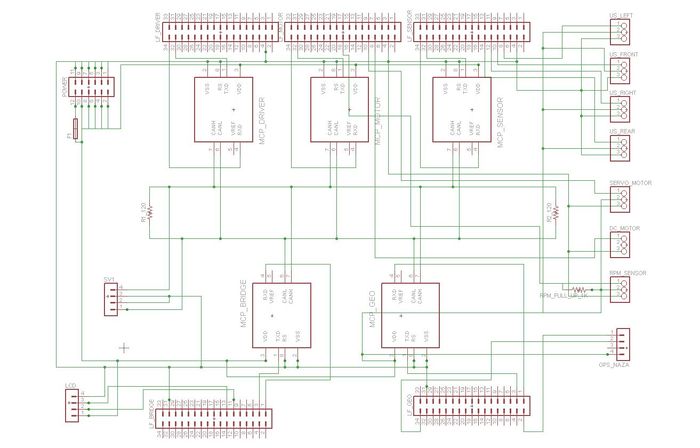
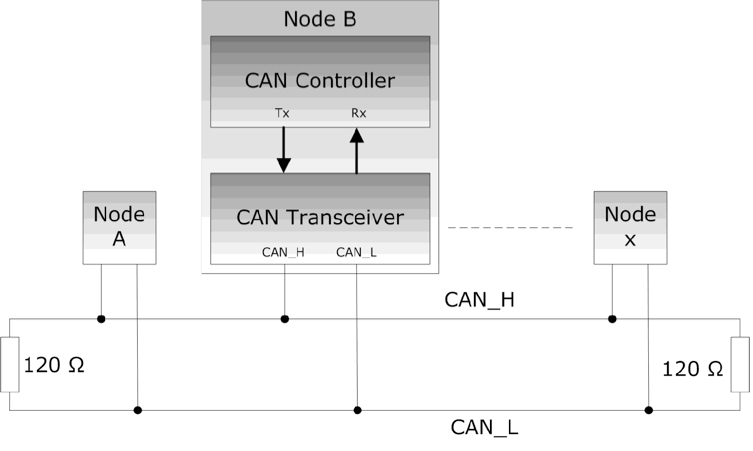
The CAN Bus physical design and communication is described in this section. The CAN controller present over SJOne board communicates to external transceiver over Rx and Tx. CAN transceiver transmit the message to CAN bus using differential signals. 0 is the dominant bit. This means that message with lower CAN message ID wins the bus arbitration and transmits its message on the bus. The other transceiver stops transmitting and waits for the next clock cycle to begin arbitration. Hence CAN message ID also acts as priority indicator. This arrangement is terminated with 2 terminal resistors of 120 Ohm. This removes signal reflection from the node end for combating echo from the signal. Due to differential means of transmitting the signal, the CAN bus is immune to noise loss and interference. All transceivers receive the CAN message. Only the intended terminal decodes the message. In case the message is not received by the terminal it goes into MIA state and consequent action can be decided by the user. This makes CAN convenient to be used in any applications.
The CAN follows certain data formatting method known as DBC. With the help of CAN transceivers, each sensor module sends data in DBC format to the controller. The data from ultrasonic sensor helps in obstacle detection. The GPS and Compass Module helps with navigation. The LCD gives live information of component status and values. Finally there is motors and control unit for navigating the car as per the commands from controller. All this controllers share information over CAN bus.
The CAN DBC file is unique format for information storage into structure and recording sender and receiver of the CAN network. It include the different message IDs along with message format and scale offset operations if any. Also there can be debugging node which keeps note of all the node data and can be used to observe the CAN communication. The DBC file comes handy while observing CAN operations in action with the help of Peak CAN. This became really helpful while observing sensor values in graph to detect false triggering.
DBC File
Sensor ECU
The sensor ECU is consist of SJOne board interfaced with four Parallax ping ultrasonic sensors. The primary objective of sensor ECU is to detect the obstacles and provide the corresponding information to the master controller in order to avoid those obstacles. According to beam angles, each sensor is mounted in such a way that the car can avoid the obstacles present in front and rear of the car. Based on the acquired information from sensors, distance is calculated and forwarded to the master controller over CAN bus. Based on the previous project reports, Parallax ping sensors were decided for this project as they provided reliable outputs with better range.
Parallax ping
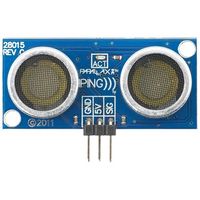
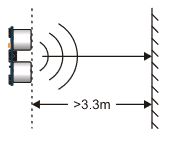
The Parallax ping sensor works on 5V supply voltage. It provides precise distance measurement ranging from about 2 cm to 3 meters. Beyond the mentioned range, the measurement provided by the sensor is not accurate. The sensor operates at 40 kHz. Blinking of LED provided on the sensor depends on triggering frequency. It has only one pin called "Signal" pin for triggering and listening to the echo pulse, which reduces hardware complexity. The distance from the obstacle is calculated by measuring the width of echo pulse and multiplying it with a constant (speed of sound in air). Also, there are some scenarios under which these sensors won't give proper readings such as:
- Object is too small to reflect enough sound back to the sensor
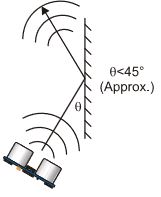
- Obstacle with the reflective surface will reflect sound at a shallow angle ( < 45 degrees), which won't be reflected back towards the sensor
- The sound pulse gets reflected off the floor when the sensor is mounted low on the device
|
|
|
|
Hardware Design
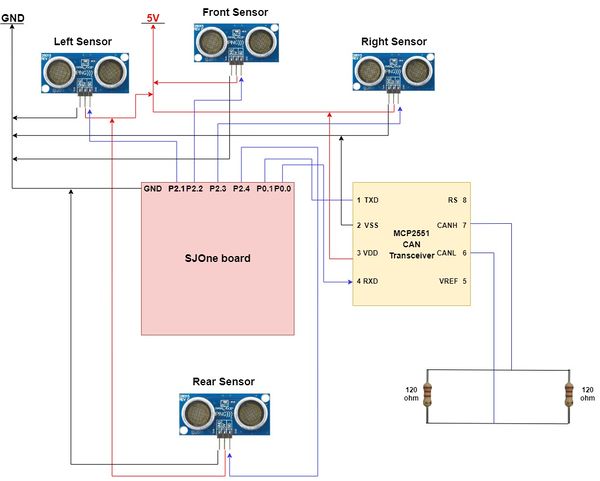
Four ultrasonic sensors are used to detect obstacle on left, front, right and rear of the car. The sensor has 124 inches (3.1m) detection range for an obstacle in line of sight. All ultrasonic sensors are mounted upright with an upward tilt to avoid ground reflection. The sensors have a minimum overlap of detection area and have a blind spot too close to the car. All the sensors are interfaced with SJOne board on port 2. Four GPIO pins are used for each sensor and external interrupts are enabled for those pins. The measured distance is transmitted over CAN bus using CAN transceiver (MCP 2551).
Hardware Interface
- Pin 2.1 of SJOne board is configured as GPIO and is connected to the signal pin (SIG) of the left sensor. External interrupt for rising and falling edge is enabled to calculate the distance from an obstacle if any.
- Pin 2.2 of SJOne board is configured as GPIO and is connected to the signal pin (SIG) of the front sensor. External interrupt for rising and falling edge is enabled to calculate the distance from an obstacle if any.
- Pin 2.3 of SJOne board is configured as GPIO and is connected to the signal pin (SIG) of the right sensor. External interrupt for rising and falling edge is enabled to calculate the distance from an obstacle if any.
- Pin 2.4 of SJOne board is configured as GPIO and is connected to the signal pin (SIG) of the rear sensor. External interrupt for rising and falling edge is enabled to calculate the distance from an obstacle if any.
- Pin 0.0 of SJOne board is configured as RD1 and is connected to RXD pin (Pin 4) of MCP 2551 (can transceiver).
- Pin 0.1 of SJOne board is configured as TD1 and is connected to TXD pin (Pin 1) of MCP 2551 (can transceiver).
|
|
Software Design
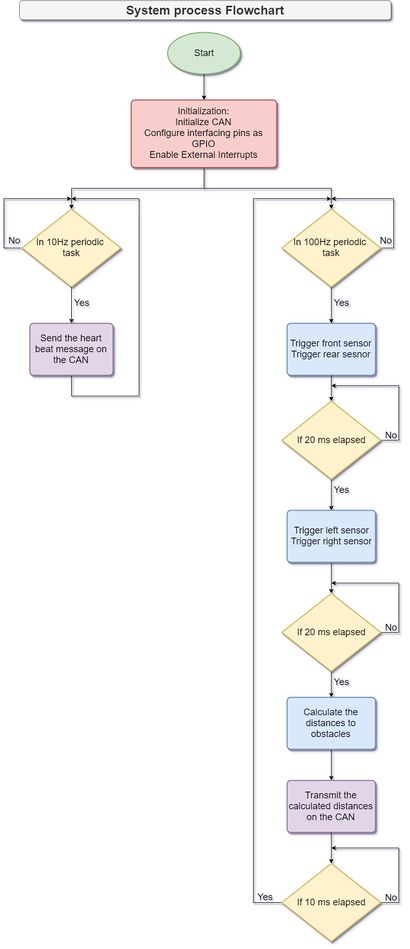
Sensor triggering is implemented in the 100Hz periodic task. Sensors are triggered in sets instead of all the sensors triggering at the same time. This technique helped in minimizing signal interference between two adjoining sensors. The front and back sensors are triggered first and then the left and right sensors. Each sensor is fed with a 5us high pulse from the host controller and it emits a short ultrasonic burst and then starts listening for the echo. After sending out the pulse, the SIG pin becomes high and it goes low when the obstacle is detected. To sense this pulse, external interrupts are enabled. The maximum duration of this pulse is 18.5ms which denotes that there is no obstacle in front of the sensor. Given this time period, left and right sensors are triggered 20ms after front and back sensors are triggered. Each sensor is triggered at 20Hz, i.e., after 50ms.
After collecting the data from sensors, distance is calculated and it is transmitted over CAN bus. CAN transmission also takes place 100Hz task only so that updated values are sent at the faster speed. A heartbeat message is sent to the master controller indicating that the sensor controller is up and running. This message is sent using 10Hz periodic task.
Implementation
- Initialize the CAN bus either on can1 or can2 with baud rate of 100 kbps and RX/TX queues of size 100
- Configure the host controller pins 2.1, 2.2, 2.3 and 2.4 as GPIO pins (These pins are connected to SIG pin of left, front, right and rear sensor respectively)
- Enable the external interrupts for corresponding pins to detect rising and falling edge of the input pulse
- Set the micro-controller pin connected to SIG pin as an output
- Triggering the sensors:
- Send low signal from the controller to SIG pin (for a clean high pulse)
- Insert delay of 2us
- Send high signal from the controller to SIG pin
- Insert delay of 5us
- Send low signal from the controller to SIG pin
- Set the corresponding pin on the controller as an input which is connected to SIG pin
- Fetch the system uptime when rising edge interrupt occurs. The noted time can be considered as the "start_time" of the echo pulse.
- Fetch the system uptime when falling edge interrupt occurs. The noted time can be considered as the "stop_time" of the echo pulse.
- Calculate the distance from the obstacle. (Distance = ((start_time - stop_time)/147) in inches or Distance = ((start_time - stop_time)/57.14) in cm).
- Send the calculated distance to the master controller over the CAN bus.
Steps 4 to 10 are executed within the 100Hz periodic task.
Technical Challenges
Unreliable sonor sensors values
Problem Summary: Observed lots of false detection for sensor over CAN bus resulting in unwanted motor turning.
Problem Resolution: Reduced noise with the help of mounts to reduce vibration from car.
Reduced range when mounted on car
Problem Summary: Max detection range reduced when mounted on car with mounts.
Problem Resolution: Increased ampere to entire circuit to support complete functionality of sensors.
False triggering due to proximity
Problem Summary: All the sensors transmitted pulse at the same time which caused interference among adjoining sensors.
Problem Resolution: Revised sensor placement and triggered non-overlapping sensors at the same time to have minimum overlapping detection range and reduced interference among sensors.
Calculation Error
Problem Summary: Calculated distance in ISR which provided random results.
Problem Resolution: ISR should be kept simple and it should take less time for execution. So for distance calculation other function was created which was called in the 100Hz task.
Motor ECU
Hardware Design
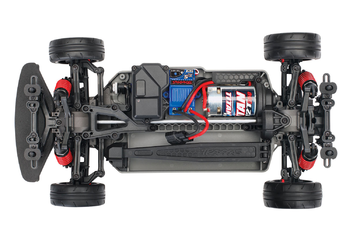
The traxxas chassis came with ECU and servo controller. It has DC motor with servo control for turning. Working on 3.4 V/ 3000mAH power specifications it has axle to rotate all the four wheels. The feedback for PWM controlled speed attained is fed back through magnetic encoder. The front wheels have servo connection for turning. The chassis is placed on suspension unit for shock absorbing. An acrylic sheet is mounted over certain height on which the PCB and controller is placed. The motor controller sends signals for PWM and servo motor angles for driving the car.
Software Design
The motor gets signal from motor controller. The motor controller sends PWM signals for speed control of DC motor. Also it implements PID for uniform performance on ramp. For direction control, the servo has 2 levels of turning: soft and moderate. Depending on Driver Controller signal, the Motor Controller sends control signals to the motor. In case of communication loss from Master Controller, the Motor Controller displays CAN MIA condition on LED.
Technical Challenges
Finding PID constants
Problem Summary: For uniform speed over ramp, we implemented PID. However, calculating the constants for PID proved to be challenging due to oscillations of set speed.
Problem Resolution: Set discrete speed levels to prevent oscillations. Determined PID constants through trials and errors.
Determining RPM accurately
Problem Summary: No support available for motor encoder reed sensor.
Problem Resolution: After checking values on DSO, we noticed irregular output. We resolved it by using pull up resistor of 1k ohms.
Motor stop functioning before demo
Problem Summary: The motor stopped functioning even with correct power and signal input.
Problem Resolution: Had previously dismantled the chassis for encoder study. Re assembled the chassis to function correctly at demo.
Geographical Controller
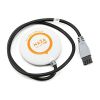
The GPS module provides the location of the car on the earth in terms of latitude and longitude in degrees. This helps us know the current position of the car to navigate to the destination. We use this information to calculate range and bearing of the car to the destination and navigate according to this information. The compass gives the heading of the car with respect to North direction. In case the car is facing north, we will get 0 degree in compass. However, that is not always true and repeatable, hence the compass module needs caliberation. The gps and compass module together called as geo sensors form important part of Geographical Controller. The geo sensors module used in the car is from NAZA. The positioning of the module on the car is such that it is away from all the electromagnetic interference. The NAZA module communicates to geographical controller over UART to send data. This data is decoded by the Geographical Controller and send to Master Controller for further action to the Motor Controller. Also the same data is sent through Bridge Controller to the Mobile Application for real time monitoring. The GPS data ie source longitude and latitude, and compass heading is also available on LCD for on car display. The Geographical Controller interprets geo data for the Master Controller.
Hardware Design
The NAZA module consisting of both gps locator and compass is mounted on a stand to avoid electromagnetic interference. The small notch on the device indicates the front direction of the compass. The module is interfaced to the SJOne board through UART at 115200 Hz and called periodically in 10Hz frequency. The module is always in transmit mode hence receiver UART signal connection is not made. It sends longitude and latitude in one cycle and compass value in the next.
Software Design
Technical Challenges
Unreliable GPS lock
Problem Resolution
Communication Bridge Controller & LCD
<Picture and link to Gitlab>
Hardware Design
The bridge controller communicates with mobile SJ one board over Xbee. This mobile SJ one board and the mobile application communicate over Bluetooth (HC05). The bridge controller then sends start/stop and monitors heartbeat of Master controller. It sends sensor controller data(distance from obstacle from all three ultrasonic sensor), geo sensor data (source latitude and longitude) and motor controller (speed and servo turning data). In addition to this , it gives checkpoint details and destination details to the geo controller. The communication used by geo controller to communicate with remaining controller is CAN communication. It uses on board LEDs to indicate functionality of Master controller and Xbee transmission.
Software Design
The bridge controller being the controller to communicate with all the controller on the car has to adhere to the data formats send by the respective controllers. Especially when it communicates with mobile SJOne board, it receives data of location in string format, which has to be converted into longitude and latitude. The data from different modules is received in different frequency.
Technical Challenges
<Bullet or Headings of a module>
Insane Bug
<Problem Summary> <Problem Resolution>
Master Module
<Picture and link to Gitlab>
Hardware Design
The master controller is connected to all the controllers through CAN bus. It uses on board LEDs to display funtioning controller. To display sent motor command it sets appropriate numeric value on LED segment.
Software Design
The master controller gets start-stop command from bridge controller which communicates the signal from the mobile application. From ultrasonic sensor it gets distance to obstacle and compares it to threshold value. Then it checks for direction and magnitude from geo sensor input to send motor controller commands for driving and steer control. Also it displays heartbeat for remaining controllers through on board LED.
Technical Challenges
Levels of turning
Problem Summary: For turning on detecting obstacle, the large servo turning value would result in oversensitive behaviour.
Problem Resolution: Set 2 discrete servo levels for turning based on how many ultrasonic sensors are triggered. A moderate turning angle command is sent if two sensors (front or any one of the side sensors) and a soft turn command is sent if only one of the side sensor detects obstacle closer than threshold.
Determining threshold
Problem Summary: The car kept crashing even after detecting obstacle.
Problem Resolution: Determined threshold values through trials and errors. For high speed, large clearance is required for stopping distance. Ideally keep higher threshold value for front sensor than side sensors.
Unresponsive to GEO sensor data
Problem Summary: The motor command responded only to ultrasonic commands and disregarded the geo information even after including it the geo data in motor command decision making.
Problem Resolution: This was a programming bug. Code restructuring and verifying the conditions helped solve this problem. The nested if structure had most frequently used command at the top of nested if, to reduce time lag. This proved unreliable as the frequently used command had ultrasonics default condition which overshadowed the geo data analysis part. Putting this condition to the end of the nested structure helped solve this default behaviour taking precedence everytime. Geo data had same conditions for stop and no data received from geo sensors. Hence the car stopped when no geo data was received. Remedying this with separate constants for each helped solve this problem.
Mobile Application
<Picture and link to Gitlab>
Hardware Design
Software Design
<List the code modules that are being called periodically.>
Technical Challenges
<Bullet or Headings of a module>
Wifi Link Reliability
<Problem Summary> <Problem Resolution>
Conclusion
<Organized summary of the project>
<What did you learn?>
Project Video
Project Source Code
Advise for Future Students
<Bullet points and discussion>
Acknowledgement
=== References ===
