S18: Hand gesture controlled multiplayer game
Contents
Project Title
Hand-gesture controlled multiplayer game
Abstract
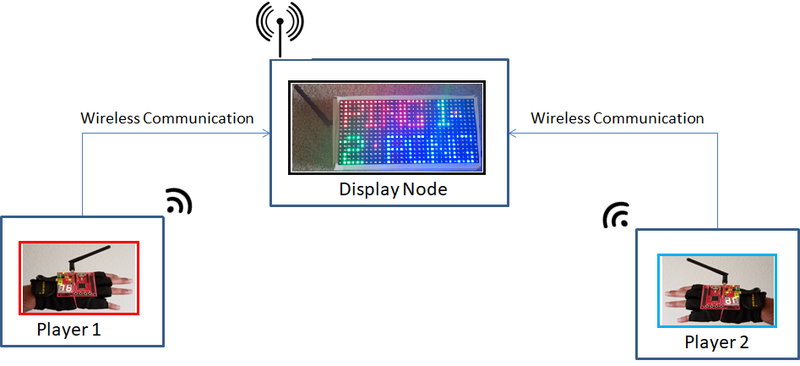
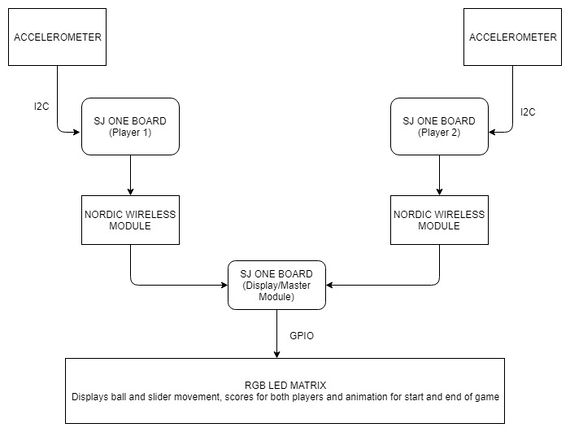
Human-machine interfaces are constantly evolving. The interfaces used in HMI, based on natural gestures of users, allow converting these movements into commands for a computer system. In this project, we developed a multiplayer Ping-Pong game using a 16x32 RGB LED Matrix, accelerometer, wireless connectivity, FreeRTOS APIs and SJOne boards. The game works as a classic ping pong game in which there are two sliders which are controlled wirelessly by two hand-gesture controllers. If the ball hits any of the vertical boundaries of the matrix then the player loses the game. Each hand-gesture controller has an accelerometer sensor interfaced to SJOne board and it transmits data wirelessly to display node. The display node has the LED matrix interfaced to SJOne board and it receives the commands wirelessly from the hand-gesture controllers. A wireless mesh network is created between the display node and the hand-gesture boards to send accelerometer values. We have designed three screens for the game: Start screen, Game screen, and Result screen. This project helps us understand the communication and synchronization of FreeRTOS tasks in an interesting way.
Objectives & Introduction
Objective
This project involves learning what goes behind developing a 2D Multiplayer game. Translating the onboard acceleration sensor in a way to be meaningful and measurable for the display node to display the slider movement from the two players over the onboard wireless Nordic transceiver.
Introduction
The overall architecture of the design includes a display node, two hand-gesture control modules, and wireless communication module.
Display Node: It has a 16x32 LED Matrix interfaced to SJOne board. It is responsible for driving the LED matrix
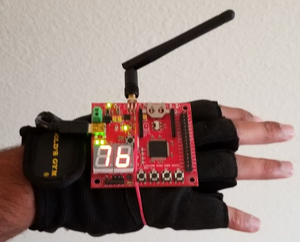
Hand-gesture control module: The two hand-gesture control boards are used to control the game. They have SJOne board with an onboard accelerometer. The microcontroller in the SJOne board continuously reads the data from the accelerometer and sends signals wirelessly to the display node
Wireless module: It is used as a communication medium between the display node and the hand-gesture controlled boards`
Team Members & Responsibilities
- Akil Khan
- Design and development of the RGB Led Matrix driver
- Game logic development, implementation, QA, and testing.
- Abhilash Tuse
- Game logic development
- Logic Development for communication between hand gesture control board and controller board
- Disha Patil
- Design of PCB using Eagle for Power Supply
- Hand gesture control logic development using an accelerometer
- Omkar Kale
- Hand gesture control logic development using an accelerometer
- Logic Development for communication between hand gesture control board and controller board
- Vishal Shrivastava
- Design and development of the RGB Led Matrix driver
- Design of PCB using Eagle for Power Supply
Schedule
| Week# | Date | Task | Status | Actual Completion Date |
|---|---|---|---|---|
| 1 | 04/10/2018 |
|
|
|
| 2 | 04/17/2018 |
|
|
|
| 3 | 04/24/2018 |
|
|
|
| 4 | 05/01/2018 |
|
|
|
| 5 | 05/08/2018 |
|
|
|
| 6 | 04/15/2018 |
|
|
|
Parts List & Cost
| Item# | Part | Manufacturer | Quantity | Cost($) |
|---|---|---|---|---|
| 1 | SJ One Board | Preet | 3 | 80.00 |
| 2 | Adafruit RGB LED Matrix | LED Matrix | 1 | 35.00 |
| 3 | Power Adapter | Power Supply | 1 | 7.95 |
| 4 | Power Bank 800mah | Aibocn | 2 | 11.95 |
| 5 | PCB Board | PCBway | 1 | 23.00 |
| 6 | Miscellaneous (Barrel Jack, Jumper wires, Connectors) | Excess Solution | 5.00 |
- Total Cost:334.85$
Design & Implementation
Hardware Design
Display Node
RGB LED Matrix
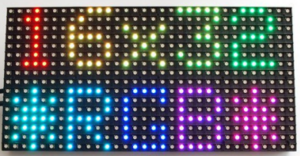
The RGB LED matrix panels are normally used to make video walls to display animations or short video clips. It has 512 bright RGB LEDs arranged in a 16x32 grid. These panels require 12 digital pins (6-bit data, 6-bit control) and a good 5V power supply, at least 2 amps per panel. A single 32x16 RGB matrix, running full tilt (all pixels set white), can require nearly 4 Amps of current.
All 512 LEDs can’t be driven at once. One reason is that would require a lot of current, another reason is that it would be expensive to have so many pins. Instead, the matrix is divided into 8 interleaved sections/strips. The first section is the 1st 'line' and the 9th 'line' (32 x 2 RGB LEDs = 64 RGB LEDs), the second is the 2nd and 10th line, etc until the last section which is the 7th and 16th line. The reason it is done in this way is so that the lines are interleaved and look better when refreshed, otherwise, we'd see the stripes more clearly. So, on the PCB is 12 LED driver chips. These are like 74HC595s but they have 16 outputs and they require constant current. 16 outputs * 12 chips = 192 LEDs that can be controlled at once, and 64 * 3 (R G and B) = 192. There are 192 outputs that can control one line at a time, with each of 192 R, G and B LEDs either on or off. The controller selects which section to draw (using A, B, and C address pins - 3 bits can have 8 values). Once the address is set, the controller clocks out 192 bits of data (24 bytes) and latches it. Then it increments the address and clocks out another 192 bits, etc until it gets to address #7, then it sets the address back to #0.
We are driving the matrix using 12 GPIO pins of SJOne board.
Hardware Interface Diagram
Pin mapping of RGB LED matrix with SJ One board:
| RGB LED matrix Pins | SJ One Board Pins | Function |
|---|---|---|
| R1 | P1.19 | Red Data top half |
| G1 | P1.20 | Green Data top half |
| B1 | P1.22 | Blue Data top half |
| R2 | P1.23 | Red Data bottom half |
| G2 | P1.28 | Green Data bottom half |
| B2 | P1.29 | Blue Data bottom half |
| A | P2.0 | Row select A |
| B | P2.1 | Row select B |
| C | P2.2 | Row select C |
| CLK | P0.1 | The CLK (clock) signal marks
the arrival of each bit of data. |
| OE | P0.0 | OE (output enable) switches the LEDs off
when transitioning from one row to the next. |
| LAT | P0.26 | The LAT (latch) signal marks the end
of a row of data. |
Hand-gesture control module
Accelerometer
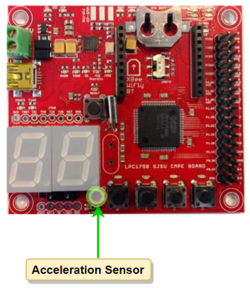
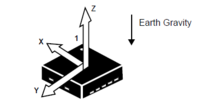
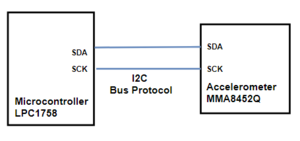
The SJ-One board has an accelerometer which is interfaced on the I2C bus. Accelerometers are electromechanical devices that sense either static or dynamic forces of acceleration. Static forces include gravity, while dynamic forces can include vibrations and movement. The measurements are on 3-axis and these values can be calibrated to find the desired values.
In our project, an accelerometer is used for detecting the up-down movement of the wrist. We are using accelerometers on two SJ-One Boards for gesture recognition. The movement from accelerometer sensor will be used to control the slider movement on the RGB LED Matrix.
Hardware Interface Diagram
Wireless Module
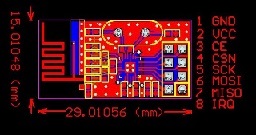
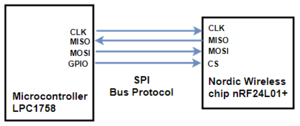
Nordic wireless chip nRF24L01+ is interfaced with SJone board using SPI bus protocol.
The nRF24L01+ is a single chip 2.4GHz transceiver with an embedded baseband protocol engine, suitable for ultra low power wireless applications. The nRF24L01+ is designed for operation in the frequency band of 2.400 - 2.483GHz. The high air data rate combined with two power saving modes make the nRF24L01+ very suitable for ultra-low power designs. The nRF24L01 integrates a complete 2.4GHz RF transceiver, RF synthesizer, and baseband logic including the Enhanced ShockBurst™ hardware protocol accelerator supporting a high-speed SPI interface for the application controller. No external loop filter, resonators, or VCO varactor diodes are required, only a low-cost ±60ppm crystal, matching circuitry, and antenna.
Hardware Interface Diagram
Printed Circuit Board(PCB) Design
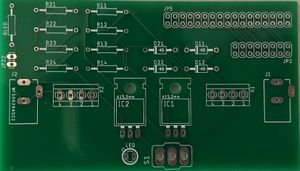
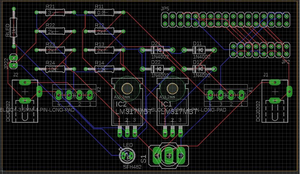
The PCB Layout is designed using the Eagle Software v8.7.1. Board consists of 2 power supplies which are powering:
- SJone board (5V, 500mA)
- RGB LED Matrix (5V,2A)
The Power Supply circuit has an LM317 voltage regulator IC and a voltage divider to fulfill the specific power requirements. LM317 is a TI (Texas Instruments) based IC which has an Output Voltage Range Adjustable from 1.25 V to 37 V and is suitable for our application. We have used a 12V adapter in order to power our board. This serves for both the current requirements. The circuit was simulated using MultiSim v14.1 software by NI (National Instruments). The simulation helped us understand the working of our circuit before we built and tested it.
Printed Circuit Board also has provisions for the connection of the SJone pin headers and RGB LED Matrix's connector. The connections are as shown in the hardware description diagram. The PCB also has a power switch and LED for indication.
Software Design
Display Node
RGB LED Matrix
This 16x32 5V,2A supply RGB LED Matrix panels from Adafruit require 12 digital pins (6-bit data, 6-bit control). They have 512 bright RGB LEDs arranged in a 16x32 grid on the front. These displays are 'chainable' - connect the output to the next input. This display requires about 800 bytes of RAM to buffer the 12-bit color image. As the matrix panel has a 6-bit parallel interface, SPI hardware won't help and hence simple GPIO interface has been used to communicate with the RGB LED Matrix. As these displays don't have built-in PWM control of any kind, the driver is supposed to redraw the screen over and over to 'manually' PWM the whole thing.
Pins R1, G1, and B1 deliver data to the top half of the display whereas R2, G2, and B2 deliver data to the bottom half of the display. Pins A, B, C, and D select which two rows of the display are currently lit. The LAT signal acts as the strobe and marks the end of a row of data. The CLK signal marks the arrival of each bit of data. OE (output enable) is an active low signal that switches the LEDs off when transitioning from one row to the next.
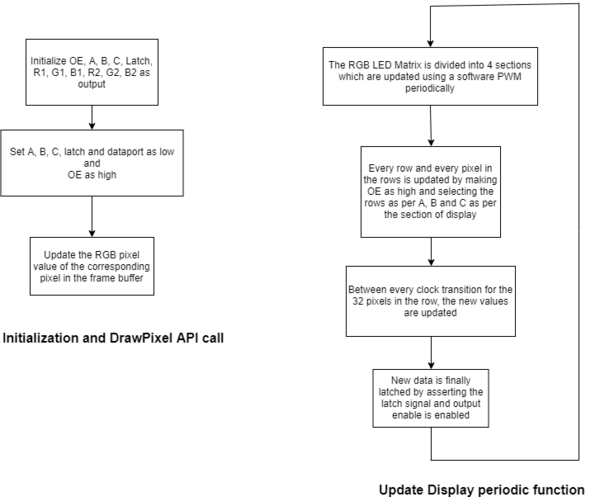
The implementation consists of 768-byte buffer for storing the pixel values for all LEDs on the display. Every line is scanned and the values for the pixels are updated every 1 ms. Between every transition of the clock from low to high, the values for the pixels are updated. As the screen is refreshed and updated very frequently, it gives the impression of a moving image.
The basic process used to refresh the display when using three bits-per-pixel color (one bit for red; one bit for green; and one bit for blue) is the following:
- Shift the pixel data for row 0 into the top column drivers and the pixel data for row 16 into the bottom column drivers using the R0, G0, B0, R1, G1, and B1 data inputs and the SCLK shift clock signal.
- Assert the blanking signal to blank the display.
- Set the address input to 0.
- Latch the contents of the column drivers‘ shift registers into the column drivers‘ output registers using the LATCH signal.
- Deassert the blanking signal to display rows 0 and 16.
- Wait some fixed amount of time.
- Repeat the process for each of the pairs of rows in the display.
- Repeat the entire process at least 100 to 200 times per second to prevent flicker.
Supported APIs:
- DrawPixel(uint8_t x, uint8_t y, uint16_t c);
- DrawLine(int8_t x0, int8_t y0, int8_t x1, int8_t y1, uint16_t c);
- DrawRectangle(uint8_t x, uint8_t y, uint8_t w, uint8_t h, uint16_t color);
- FillRectangle(uint8_t x, uint8_t y, uint8_t w, uint8_t h, uint16_t color);
- DrawChar(uint8_t x, uint8_t y, char c, uint16_t color, uint8_t size);
- UpdateDisplay();
- DrawCircle(uint8_t x0, uint8_t y0, uint8_t r, uint16_t color);
- Fill(uint16_t c);
- Fill_slider(uint16_t c);
- Fill_ball(uint16_t c);
- SetCursor(uint8_t x, uint8_t y);
Hand-gesture Control Logic
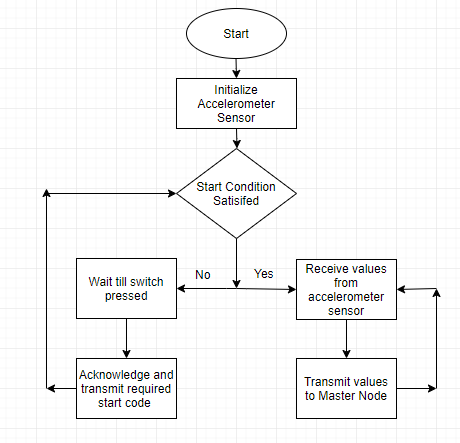
Flowchart
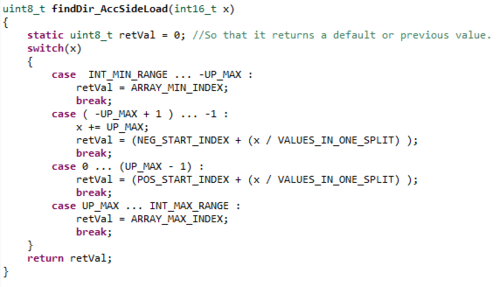
Accelerometer Value Calculation
After carefully looking at the board design and how the board will be placed on a person's hand, we found out that the values received along one axis(X-axis) will be enough to capture the wrist movement. The range of accelerometer values shows how sensitive the accelerometer sensor is. We wanted the code to be flexible in terms of the range of the values. So that we did not have to hard code the sensor values and instead used a code based on maximum and minimum range values which could be easily configurable. The piece of code mentioned below shows how the values are calculated.
Wireless Module
Wireless Receiver
The SJ-One board connected to LED display uses onboard Nordic wireless to communicate with player boards. Initially, it waits for players to press the start button on their controllers which then sends commands to the receiver board. Once it receives the commands to start, it displays green signal on the display and changes the screen to game screen. While the game is running, receiver continuously receives the acceleration values from player boards which it then sends further to the slider task. We referred Low Powered Mesh Network stack for building wireless mesh network between the display board and player boards.
Wireless Transmission
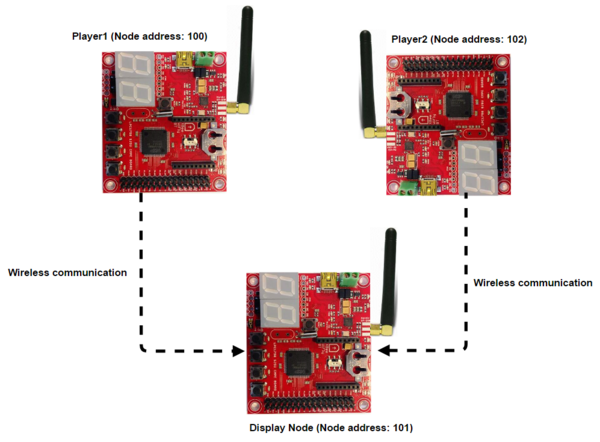
We used Nordic Wireless for transmitting the accelerometer data. Each node has a unique node address and a node name. For the mesh network, we had to use the same channel number and data transmission rate. The below figure shows the node addresses allocated to the two player nodes and the control node.
Game logic and Implementation
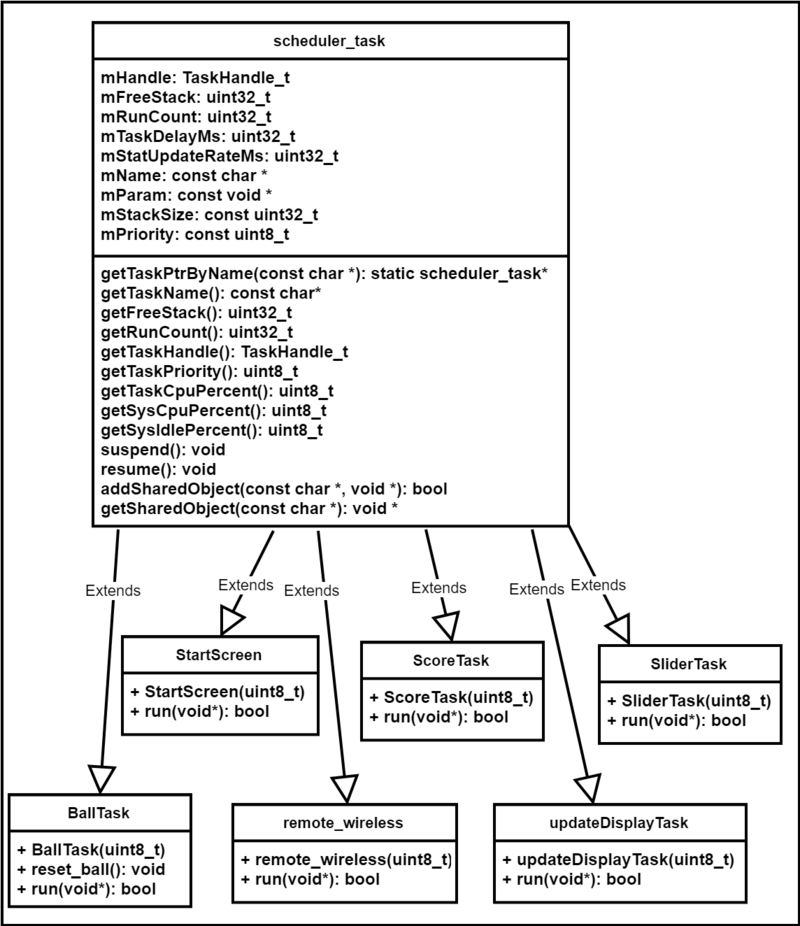
The game implementation involves creating multiple tasks for control of independent entities and also making those entities work together.
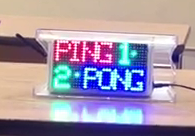
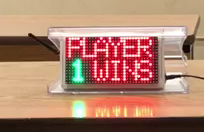
The game starts off with the start screen task, which displays the game title and status for both players. As soon as both the players have pressed the button1 (to indicate that the player is ready), after a 3 second counter, the ball and slider tasks are resumed. Initially, all the tasks are suspended except the start screen task. Slider task takes the input acceleration sensor values from both the players and translates the values into appropriate movement on the display whereas the ball tasks move the ball on the display. If any of the player miss to hit the ball, the player loses and the score display task will be displayed and all other tasks would be suspended. After displaying the score for 3 seconds, we reset the ball position to randomly start from the center of the screen (4 possible directions) and start the round again. A player wins if he wins 9 rounds, and the score display screen then displays the winner along with the scores. As the game is over, the game will be restarted by suspending all tasks and resuming the start screen task again.
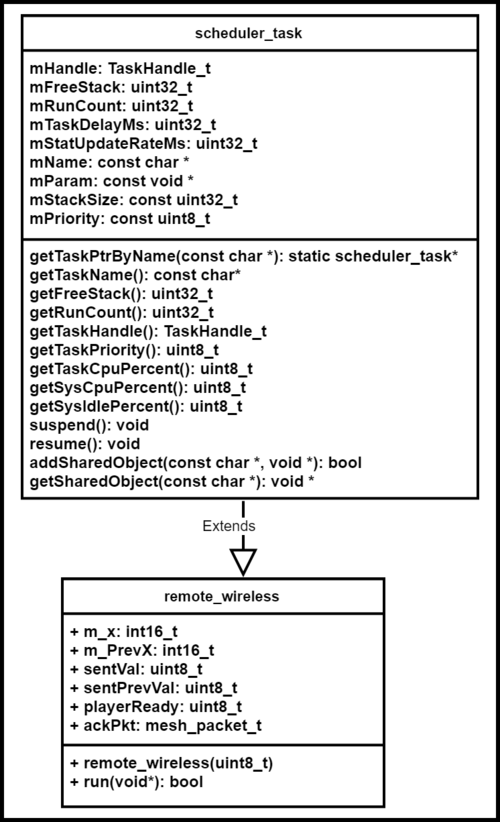
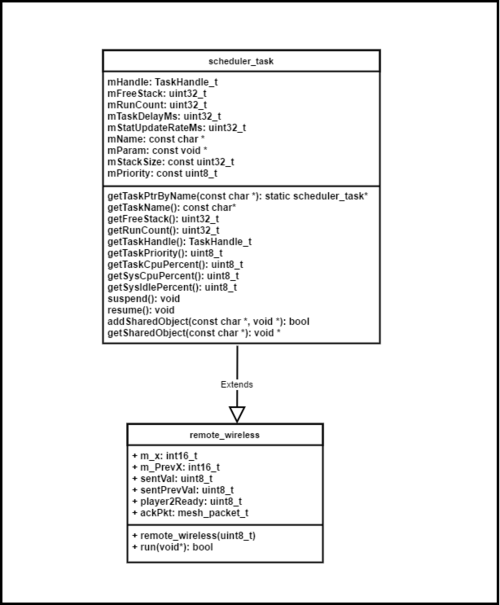
Remote wireless task retrieves the slider values from both the players over Nordic wireless transceiver and passes it to the slider task for producing the hand gesture movement on to the display. To support the wireless communication, background Nordic wireless task participates in the mesh network and handles retry logic such that packets are resent if an ACK has not been received.
Testing
Module testing
Display Node
At first, we implemented the slider movement logic and tested the slider movement on the display. This testing helped us decide the size of the slider and make sure that when the slider is moved using the accelerometer, the change in the position is perfectly reflected on the LED Matrix
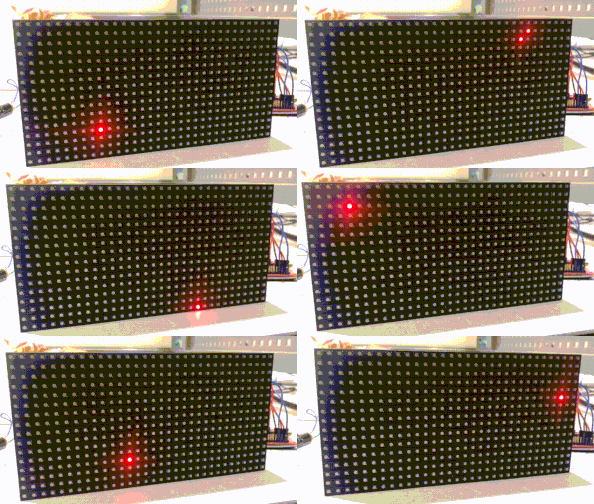
We wanted to make sure, whenever the ball touches the horizontal boundaries of the LED matrix it bounces back with the proper angle. And if the ball touches the vertical boundaries of the matrix, the matrix should display the score and start the game again. To ensure the correctness of the ball movement, we implemented the ball movement logic and tested it independently on the LED Matrix.
Also, we designed the Start screen and Game End screen and tested them on the LED display. While testing the screens we focused on having proper text font and placement of the text on the display.
Hand-gesture Control Module
Hand gesture recognition was rigorously tested. The values received from accelerometer sensor were within a range. So, we had to test the range of values received at which the slider on screen looked responsive and smooth. We tested values ranging from -1000 to +1000 to find the right range of values. The hand gesture module transmits uint8_t. So, we checked whether the output at the minimum and maximum input values were within valid range. We also checked the uint8_t value(index) transmitted depending upon the inputs received from the accelerometer sensor.
PCB Testing
The PCB was tested by checking the connectivity of the path on the copper clad tracks using a Digital Multimeter. The circuit on the PCB was simulated using MultiSim v14.1 Software and results were verified on the actual board. All the connector-related bugs were fixed by inspection and drilling the PCB wherever necessary. The board was tested for any short circuit by checking the connectivity between the Supply tracks and common ground tracks.
Integration testing
After testing the individual modules, we decided to integrate display node and left-hand control board first and test it. Once we got the desired result, we integrated the right-hand board with the display node. This methodology helped us identify the wireless communication challenges. After testing the display nodes with the hand control boards, we decided to integrate the ball movement logic with. This approach helped us in deciding the suitable speed of the ball and displaying the score if any player loses. Also, the integration testing helped us identify some major issues such as flickering of the LED matrix.
Technical Challenges
Display Driver Implementation
We initially started to mimic the Adafruit library, but the library was originally designed to work with Arduino (AVR), and it consisted of some assembly language instructions to save CPU cycle. Hence, we were unsuccessful in porting the library entirely. We read more about the RGB LED matrix and decided to get control over a single row first and then over a single pixel. We first implemented a function to first select the row according to A, B, and C signals and write the corresponding pixel values of all LEDs in those rows with the updated values from the frame buffer. The values of the pixels were set only within the clock trigger. In the end, the pixel values were latched before the output enable signal was asserted again. This function was called from a periodic task with the 1 millisecond delay in order to get the refresh rate of the display as 1 millisecond. This helped us to get the control over individual pixels of the matrix.
RGB LED Matrix Flickering Issue
We need to refresh the LED matrix to display the new data. Earlier we were refreshing the matrix after every 100 milliseconds. Because the refresh rate was low we saw there was some flickering in the matrix. So, we decided to increase the refresh rate and kept it at 1 milliseconds. This refresh rate is very small for the human eyes to detect, the flickering in the matrix stopped appearing.
Time lag between reading the accelerometer data and displaying it on the LED matrix
There was a noticeable lag between the detection of wrist movement and the time at which it was displayed on the RGB LED Matrix. In the first code, we had used strings for transmitting data from player nodes to control node. We were transmitting actual values. These two things were the reason for the lag. So, we made the following changes:
1] We transmitted uint8_t values from player nodes to control nodes which reduced the int to string conversion at both the ends.
2] We had to draw lines for the slider movement for both the players on the RGB LED matrix. Drawing a line depends on two points, so we needed the start index and the end index. The calculation of these indexes was done on the control node side. Instead of performing operations on raw data at the control node side, we performed operations on the player node side and transmitted an uint8_t value to the control node. The control node has a two-dimensional lookup table which contains the start and the end index for drawing a line. This two changes reduced the lag considerably.
PCB Designing
The toughest challenge in designing the PCB Layout and Schematic was to select the exact Pin Header Libraries of the accurate measurement of a 3.5mm spacing. This problem especially occurred for the power connectors the project needed for powering up the RGB LED matrix as the connector is slightly unconventional compared to the normal 2mm spacing. To suffice this need, a new library was created in Eagle v8.2.1 Software by taking a reference to an existing library which has the same spacing between the pins on the header.
Conclusion
The project was a success both in terms of output and learnings. We were able to play a multiplayer ping-pong game by wirelessly controlling the display on the LED Matrix by using hand gesture. This project helped us learn the working of the following modules in particular: RGB LED matrix, Nordic wireless unit, accelerometer on the SJ-One board. We could identify synchronization issues and tried to fix them by unit testing. The hardware which included a PCB and LED matrix had to be designed and packaged to give an overall compact look to the project so that it looks more like a gaming console product. We enjoyed doing this project and getting better at using FreeRTOS APIs, debugging and hardware designing.
Project Video
Game Video - Hand Gesture Controlled Ping Pong Game
Project Source Code
References
Acknowledgement
We would like to thank our Professor Preetpal Kang for all his teachings and inspirational lectures. Not only did we enjoy working though out this project but also gave us an overall learning experience and precious life lessons. We would also like to thank the ISA members for always being ready to help with whatever issues we faced.
References Used
[3] CMPE 244 Lecture notes from Preetpal Kang, Computer Engineering, San Jose State University. Feb - May 2018.
