F16: Micro Watch Monitoring System
Contents
Micro Watch Monitoring System
Abstract
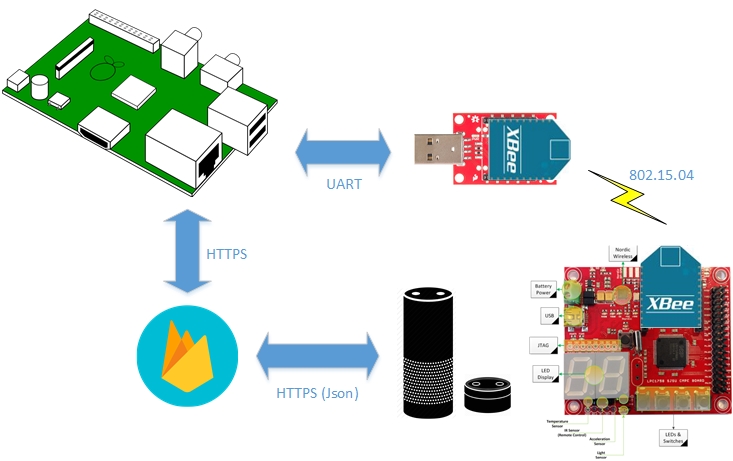
The Micro Watch Monitoring System uses Amazon's Alexa Voice Service to relay monitored data from a network of SJ-One Boards with the assistance of the Raspberry Pi 3. The monitored data from a SJ-One Board is transmitted and received via a Xbee Wire Antenna module. The monitored data is then uploaded to our backend system, Google Firebase, by the Raspberry Pi 3, and is accessible through any device integrated with the Alexa Voice Service.
Objectives & Introduction
The objective of this project is to be able to monitor a network of SJ-One Boards for statistical data that is accessible via voice commands acknowledged by the Alexa Voice Service.
Tasks
- Create FreeRTOS tasks to monitor sensor data, pin dat, and OS statistics on the SJ-One Board
- Create a task that parses sensor data into Javascript Object Notation (json) and utilizes the Xbee Wire Antenna to wirelessly transmit it via the UART protocol
- Create a python script for the Raspberry Pi 3 that parses data received by the Xbee Wire Antenna and relays it to Firebase
- Create an Alexa Skill that can answer user queries by accessing data in the Firebase Real-time Database.
Team Members & Responsibilities
- SJ-One Board Software Design
- Hardware Connectivity Design
- Software and Hardware System Testing
- Raspberry Pi 3 Software Design
- Amazon Alexa Voice Service Skill Design
- Software and Voice Service System Testing
Schedule
| Week | Begin Task | Task Description | Result | Planned Completion | Actual Completion |
|---|---|---|---|---|---|
| 1 | |
|
|
|
|
| 2 | |
|
|
|
|
| 3 | |
|
|
|
|
| 4 | |
|
|
|
|
| 5 | |
|
|
|
|
| 6 | |
|
|
|
|
| 7 | |
|
|
|
|
| 8 | |
|
|
|
|
| 9 | |
|
|
|
|
| 10 | |
|
|
|
|
Parts List & Cost
| Part | Quantity | Price | Merchant |
|---|---|---|---|
| |
|
|
|
| |
|
|
|
| |
|
|
|
| |
|
|
|
| |
|
|
|
Design & Implementation
Hardware Interface
Micro Watch System Configuration
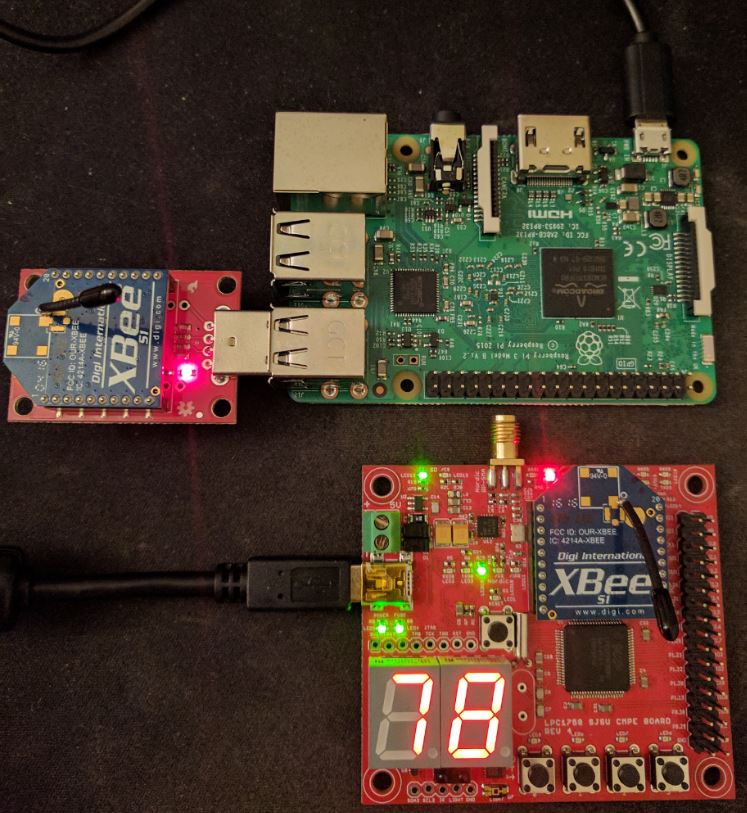
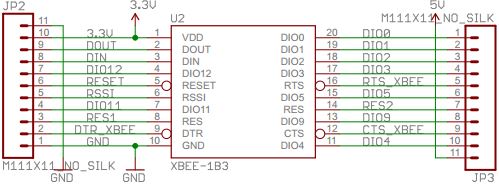
The Micro Watch system consists of the SJ-One Board, Raspberry Pi 3, Xbee Series 1 modules, and the Xbee Explorer Dongle.
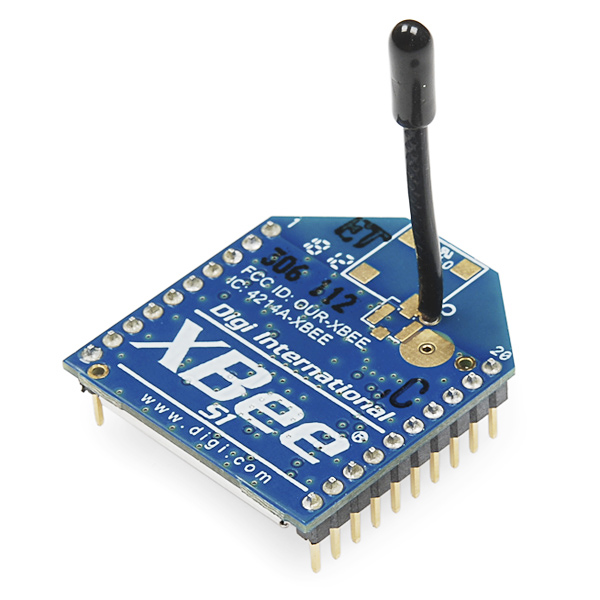
Xbee 1mW Wire Antenna - Series 1
The Digi XCTU software is used to configure the Xbee Wire Antenna modules for wireless connection. A shared channel and Personal Area Network (PAN) are set for both of the modules as well as a destination and source address. Setting these variables is all that is needed to enable communication. The module that is placed on the SJ-One Board is setup as the coordinator while the module connected to the Raspberry Pi 3 via the Xbee Explorer Dongle is setup as an endpoint. Setting either modules would have the same effect in a Xbee network with two modules, but as this project is aimed at providing multiple SJ-One Boards with sensor reporting ability, this will be important later. The SJ-One Board sends data to the Raspberry Pi 3 via UART3 protocol, and the Raspberry Pi 3 parses this data upon receiving it.
Xbee Explorer Dongle
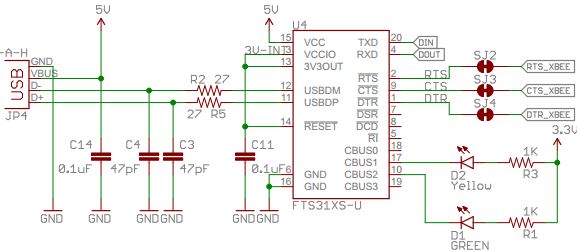
The Xbee Explorer Dongle is used to connect the Xbees to the Digi XCTU software as well as connect the Xbee to the Raspberry Pi 3. The Explorer dongle provides an interface between the Xbee pins and USB, allowing UART communication and configuration.
Software Design
SJ-One Board Monitoring Task
For this task, three tasks were implemented to gather data from the operating system, sensors, and pins of the SJ-One Board. The operating system task calculates the CPU usage of each running task in the system along with the amount of global memory used, allocated memory used, allocated memory available, and memory available on the system. The sensor task reads data from the temperature sensor, light sensor, and accelerometer on the board. The pin task checks if any of the on-board switches are being used or not. These three tasks run at low priority and sends all the data collected to a fourth task which is the consumer. The consumer receives the data, stores it in three separate queues, initializes the UART3 protocol on the board to prepare transmitting data to the Raspberry Pi 3 via the Xbee Wire Antenna module, and runs at a high priority. A fifth task called fresh clears each queue every 50 milliseconds to allow data to be sent to the consumer in real time. The fresh task runs at a medium priority and should always run at a lower priority level than the consumer.
Raspberry Pi JSON Parsing and Firebase Upload
The python script utilizes several modules to read serial data from the Explorer dongle, parse the json string into an object, add a timestamp, and upload to firebase. The Python serial module is used to read from the Explorer dongle with a baud rate of 9600 and an infinite timeout. A loop to read the serial data is implemented using a try statement as occasionally incomplete data can be sent over the Xbee resulting in serial read errors, or failed json parsing. A secondary loop is used to ensure that the Python script halts until a complete line is received. This ensures that the json object can be parsed from the string and prevents data from piling up on the serial queue, delaying the latest information from being pushed to Firebase. Once the json string is parsed into a Python object, another Python module is used to add additional fields to the data for date and time. Once the data object is ready to be sent, it is serialized back into a string and attached to the body of an HTTP PUT request sent to Firebase's real-time database. Finally, the result of the HTTP PUT request is checked for the expected error code (200), and the uploaded json data is printed to the console.
while 1:
    # Wait indefinitely for new serial data
    while uartString is not json
      uartString = readline(None)

    # add timestamp
    uartJson['timestamp'] = time_hhmmss

    # update json in fireBase
    result = requests.put(firebase_url, uartJson)
    if result.status_code is 200:
      print 'Data update Successful'
    else:
      print 'fireBase Data update failed'
Amazon Alexa Skill
The Amazon Alexa skill development can be split up into two parts: the Alexa skill code hosted on Amazon Web Services (AWS) Lambda, and the Amazon Voice Services (AVS) Interaction model defined by text and json files. The Alexa skill was developed using the Alexa Skill Kit SDK for NodeJS and uses a series of intent handlers to process the incoming json files that hold user requests. For this application, several intents for user query, app launch, help, and exit are supported, each with their own function code. Upon receiving a user request for a query intent, the Alexa Skill code will look for the intended request, pull the desired data from Firebase, format it into a response, then send that response to AVS. The AVS interaction model is defined by the types of applicable intents found in the intent schema, the custom intent items found in the items list, and the sample utterances of the defined intents found in the utterances text. For example, if the user said, "What is the board's temperature," the utterance would be "QueryIntent What is the board's {item}." The list of items would have "temperature" in it, and the intent schema would link the items list to the QueryIntent.
Intent Schema
{
  "intents": [
    {
      "intent": "QueryIntent",
      "slots": [
      {
        "name" : "Item",
        "type": "LIST_OF_ITEMS"
      }
     ]
    },
    {
      "intent": "AMAZON.RepeatIntent"
    },
    {
      "intent": "AMAZON.HelpIntent"
    },
    {
      "intent": "AMAZON.StopIntent"
    },
    {
      "intent": "AMAZON.CancelIntent"
    }
  ]
}
List of Items
temp
temperature
light
memory
button
accelerometer
accel
task
tasks
top tasks
top three tasks
cpu
cpu usage
task usage
last update
last update time
Utterances
QueryIntent what is the current {Item}
QueryIntent what is the boards {Item}
QueryIntent what is the board {Item}
QueryIntent what is the {Item}
QueryIntent tell me the current {Item}
Implementation
Transfer Data Object from the SJ-One Board to Raspberry Pi
- Collect specified data
- Format data as json in a character array
- Initialize UART driver with a baud rate of 9600
- Send null terminated character array over UART3
Transfer Data Object from the Raspberry Pi to Firebase's Real-time Database
- Initialize the serial object at "/dev/ttyUSB0" and continuously loop to read line
- Receive string in python from serial connection to Explorer dongle
- Parse json string to object and insert timestamp (date & time)
- Serialize json object back to string
- Send json string inside the body of an HTTP request to firebase
Testing & Technical Challenges
SJ-One Board Monitoring Task Issues
While implementing the monitoring driver for the SJ-One Board, the queues that transmitted data to the consumer task were not functioning properly. Every compile run would net an issue with the queue.h header file that caused some confusion. To fix this issue, each section of the code was checked to see what section was creating the compile issues. It was discovered that our queues were sending the wrong data types to the consumer. Once the data types were modified to the proper characteristic of each queue, the issue was resolved.
While implementing the Xbee driver within the consumer task, establishing the connection between the Xbee Wire Antenna on the SJ-One Board with the Xbee Wire Antenna on the Raspberry Pi 3 was troublesome. The first test was to see if data could be sent to the SJ-One Board from the Xbee Wire Antenna connected to the Digi XCTU software. The gets() function from the char_dev.hpp header file was implemented to see if data could be received and shown in Hercules. This function could not parse and display the test data sent as needed, so the next function implemented was the getChar() function from the char_dev.hpp header file. This function allowed data transmission to instantly be seen in Hercules as it was being typed in the XCTU console, which solved our receiving issue. Once this was complete, the second test ran was to send data out from the SJ-One Board. Using the putline() function from the char_dev.hpp header file, test data was sent to the XCTU console, the software successfully received it on the first try, and our sending and receiving issues were resolved.
Python Serial Read and JSON Parse Issues
When initially designing the python script that would read serial data and parse it into the desired HTTP PUT request for Firebase, we had a single loop that ran on a timeout and sent whenever serial data it had when it woke from sleep. To improve data latency and reduce timing conflicts, we decided to abandon that system and instead have the python script parse and send monitoring data as soon as it was read from the Xbee. To do this, we created an additional loop to read a line of data from the serial connection. Several issues came into play when implementing this as there was no way to know if the data received was not mangled during transfer. We found out that two issues could occur: the serial connection between the Explorer USB dongle and the Raspberry Pi 3 could temporarily freeze for a few millisecond, and the data that passes between the Xbees could sometimes be corrupt. Both of these cases caused a crash in the python script and needed to be carefully recovered from using 'try-except' statements. This process took some trial and error, but ultimately lead to huge improvements in running stability.
Alexa Skill Development Issues
There are countless developer pitfalls and best practices when developing an Alexa skill, so here are some tips that might be most helpful to new developers.
- Become familiar with some basic Alexa Skill formats. There are really only a handful of Alexa Skill interaction models for useful skills. Take a look at the sample apps in the Official Amazon Alexa Github for most of the basic types and try to adapt one to your needs.
- Read and thoroughly understand how AVS interacts with the Lambda skill code. Some simple reading could have saved time from many hours of debugging
- Setup a test environment with your skill code running locally. Some of the best tutorials for this is here: Debugging AWS Lambda Code Locally
- Test, test, and test again! You never know what the user is going to say, or how they will perceive (or misperceive) your skill, so be prepared for anything.
Conclusion
Designing this project is a great way to learn about the functionality of the SJ-One Board, Raspberry Pi 3, Xbee Wire Antenna, Google Firebase, and Amazon Alexa. Throughout testing, it was deduced that more time should be spent on debugging the project since the amount of time that was allocated for it was insufficient. If we were to recreate this project, we would expand the project's functionality to include the detection of the communication buses actively being used on the SJ-One Board. The Micro Watch Monitoring System is now fully functional and ready to be deployed to the future CMPE 146 classes!
Project Video
Project Source Code
References
Acknowledgement
We would like to thank Preetpal Kang for the advice he has given us on this project and the curriculum of CMPE 146. This class is beneficial to our Computer Engineering profession as we have learned much about embedded system programming.
