S16: Camera Gimbal
Contents
Grading Criteria
- How well is Software & Hardware Design described?
- How well can this report be used to reproduce this project?
- Code Quality
- Overall Report Quality:
- Software Block Diagrams
- Hardware Block Diagrams
- Schematic Quality
- Quality of technical challenges and solutions adopted.
Abstract
The ‘Camera Gimbal’ is an active stabilization system for camera phones. Smartphones and handheld devices encounter issues when slight movements are encountered when a user attempts to take an image or record a video. Such issues include blurring of images and/or video. This gadget will be able to stabilize a phone by using three low RPM brushless motors that are actively controlled using PID with an accelerometer and magnetometer as feedback to the system. Using this gadget, users will achieve crisp clean photos/videos without any additional hassle.
Objectives & Introduction
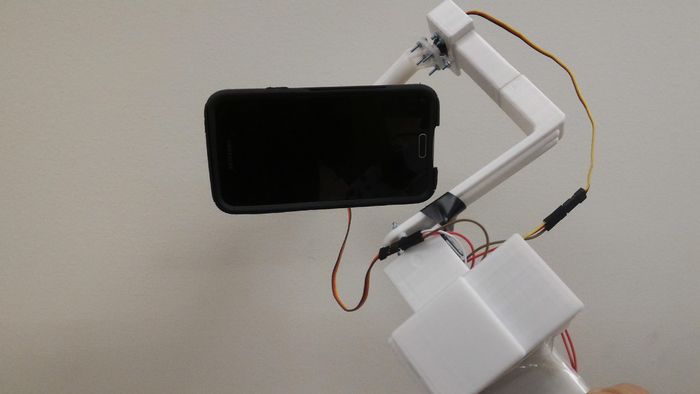
The objective of this project was to create a 3-axis self-stabilizing phone holder, or gimbal. Entirely 3D printed, the system can stabilize any standard sized smartphone that is mounted using several neodymium magnets. The system utilizes 3 DC servo motors, one per each XYZ-axis of rotation to account for all degrees of motion; each motor is controlled through PWM from the SJ One Board running FreeRTOS. Using the MPU-9250 IMU, sensor data is used to compute gimbal orientation, which is mapped to PWM values as shown below. By applying filter algorithms to account for drift and/or noise, near accurate stabilization was made possible. Reproduction involves the following steps.
1. Find high precision digital servos and make sure they have the proper degrees of freedom needed.
2. Write or fine-tune software that will precisely control the servo’s movement to the nearest micro-second.
3. Interface with an accelerometer and magnetometer to get the feedback needed to create a closed loop-control system.
4. Creating a structure in Solid-works that holds all the individual parts together and 3D print the design.
5. Create a basic control system that controls Pitch and Roll to keep the phone in a single orientation.
6. Fine-tune that control system, implementing filters and methods of dampening to quickly go to a position while not overshooting and causing oscillation.
7. Implement Yaw control using the magnetometer’s feedback.
8. Fine tune the Yaw control system using filters and dampeners.
9. Integrate all degrees of freedom together and make proper changes to the control systems if any are needed.
Team Members & Responsibilities
- Matthew Boyd
- Solidworks & controls systems
- Ronald Cheng
- 9DoF solution
Schedule
| Week # | Start Date | End Date | Task | Status | Notes |
|---|---|---|---|---|---|
| 1 | 3/28 | 4/03 | Project Proposal and outline | Completed | - Parts ordered 3/25 |
| 2 | 4/04 | 4/10 | Component testing/setup and PCB design | Completed | - Servomotors chosen over brushless motors due to ease of control circuitry |
| 3 | 4/11 | 4/17 | 1. Start of SolidWorks design 2. Being motor control driver development 3. PCB final review & order |
Completed | - Frame 3D printed and commercial phone holder used
- Initial prototype done on Arduino Mega |
| 4 | 4/18 | 4/24 | 1. Create PID system 2. Verify PCB 3. Review CAD design & start print |
Completed | - Wiring housed in a 3D printed encasing
- 3D printing started at SJSU SCE |
| 5 | 4/25 | 5/01 | Product integration & testing | Completed | - 3rd axis of integration often most complex
- Complimentary/Kalman filters recommended to overcome error as result of drift and noise - Final z-axis rotation was delayed to 5/02 as result of noise in yaw |
| 6 | 5/02 | 5/08 | 1. Design improvements 2. Update Wiki guidelines & create demo video |
Completed | - Wire housing was enlarged to account for voltage regulators
- Yaw was computed using gyroscope and Riemann summation (relative to power-on position) |
| 7 | 5/09 | 5/15 | Final product testing | Completed | - Due to damage, one of the servos needed to be swapped |
Parts List & Cost
| Part | Cost($/per) | Retailer | Details |
|---|---|---|---|
| SJ One Board | 80 | Preet | |
| MPU-9250 9DoF IMU | 12.50 | Amazon | - Includes AK8963 3-Axis magnetometer |
| HS-5065MG Servo Motors | 35 | Amazon (Serocity) | |
| 5V Voltage Regulator | 15 | Pololu | - SJ One Board 5V power |
| 6V Voltage Regulator | 15 | Pololu | - Servo motor power |
| Kit of M2 Screws | 10 | Amazon | - Used to mount servo motors |
| 3D printing | SCE Membership | - Included in SJSU SCE membership fee | |
| WizGear Phone Mount | 6.50 | Amazon | - Neodymium magnets |
| Jumper Wires | 7.29 | Amazon |
Design & Implementation
Hardware Design
This section includes the detailed hardware schematics and interface. The parts required for this system are listed above. It includes 3 servo motors control by the SJ One board, a MPU-9250 9DoF sensor to measure system orientation, and two voltage regulars to both power the SJ One board and servo motors.
Gimbal Frame
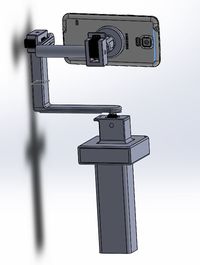
The design was made of 10 individual solid works parts that were then 3D printed and assembled with M2 bolts. The Solidworks assembly of the individual parts can be seen in (Figure 2). The method used to attach a phone to the gimbaled section of the design is through a magnetic phone holder that was purchased.
Power Regulators
Two power regulators were used; a 5v power regulator to power the SJSU-One-Board and a 6v regulator to power all the servos. The regulator type used can be seen in (Figure 3).
Servo Motors
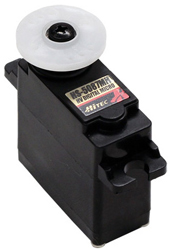
For this project, precision is key, so high precision digital servos were used over analog servos to have high resolution in their degrees of freedom with a more finely tuned PID system. The servo used can be seen in in (Figure 4).
9DoF IMU
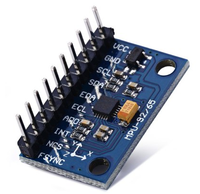
The MPU-9250 is a 9DoF (degrees of freedom) IMU housing two dies integrated into a single QFN package. One die houses the 3-axis gyroscope and 3-axis accelerometer (Figure 5). The other die houses the AK8963 3-axis magnetometer. With 3 16-bit ADCs for digitization, the MPU-9250 offers several precision tracking rates. This can be set by setting configuration registers in the MPU-9250 (0x68 or 0x69 if AD0 = 1). Using this, pitch and row can be computed from reading the accelerometer registers; this value is then scaled depending on sensitivity setting as shown below.
Because the SJ One board only includes a 6DoF, this sensor provides an example of a solution to measuring yaw in respect to magnetic north. However, magnetometers often include error as a result of noise; this is solved by applying filtering algorithms (complimentary or kalman filter). Though measuring yaw is possible with only a gyroscope by applying a Riemann summation, this measurement is in reference to when sensor is powered on. In order to get this data, the MPU-9250 must be configured in 'pass-through' mode or as 'I2C Master Controller', where the AK8963 being mounted as one of the several slaves (ref. Datasheets).
Hardware Interface
This section describes how the different hardware components communicate.
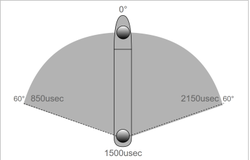
Communication among the different parts are through I2C and PWM for servo control. The servos use a special form of PWM that does not rely on how much of a duty cycle is high but rather for how long of a duration the pulse in the duty cycle remains high. For most applications, this time amount is measured in micro-seconds. The specific time intervals that are required for the servos used can be seen on the right (Figure 6).
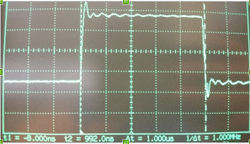
While tuning the GPIO driver created by Preetpal Kang supplied in the libraries included, it was found that setting a based frequency of 21Hz generated an output of 250Hz. From there, it was deduced that 0.025% gave an output of 1us when setting PWM duty cycle to control servo motors (Figure 7). Proportionally we could multiply that percentage by how many microseconds were needed to precisely control the servo position.
| Hz | Cycle Time (ms) | Percent for 1us |
|---|---|---|
| 250 | 4000 | 0.025 |
Software Design
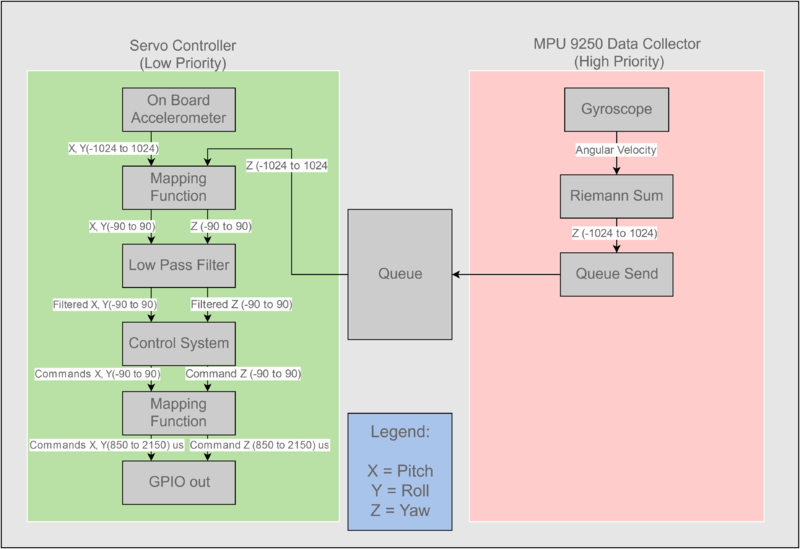
The program created used two tasks, a servo control task, and a high precision data collection task. The servo control task was low priority and did the majority of the work as it collected the Pitch and Roll orientation from the on board accelerometer, took Yaw from the data collection task, and processed the data into the servo commands. The data collection task is used to talk with the MPU-9250, collect its gyroscope angular velocity, and using Riemann's sum, create an angular position.
The servo control task is low priority as it just needs to run at least once every millisecond. The data collection task, however, needs to be high priority as it is heavily time sensitive in order to have accurate calculations of riemann's sum.
Implementation
The Euler angles passed from the MPU-9250 to the SJ One board are mapped to PWM values. For servo control methods and for putting the MPU's feedback on the handle and not introducing it on the gimbaled section, a simple and direct method of positioning the servos in relation to the MPU feedback is used. Every time the servo control method is called, center positioning is saved and where the MPU is in in terms of how far from the center is saved. The result then tells the servo to move to this position that is the center summed with the offset. This first method works but introduces oscillation around the target position. To remove this oscillation, instead of commanding the servo to go to the offset, small increments are taken toward the target position. Using this method with different levels of incrementation according to how far the offset is and using a low pass filter on all feedback axis removes the oscillation while also providing quick response. A closed-loop system like this is used on all three rotational axes.
Using the MPU-9250 to compute Euler angles can be thought of simply as the following. However, this solution is not free of error; use of a complimentary or Kalman filter is highly recommended. Alternatively, quaternion angles can be used although the math is extremely complex.
// Pitch, row, yaw using the MPU-9250

     Pitch = 180deg * atan2(accel_x, sqrt(pow(accel_z, 2) + pow(accel_y, 2))) / M_PI;
     Row = 180deg * atan2(-accel_y, accel_z) / M_PI;
     Yaw = Yaw_previous + ( gyro_z / TIME_INTERVAL ) ;
Testing & Technical Challenges
Issue #1 Motor types
The first issue is that servos dont have the necessary resolution to be accurate enough to cancel out video instability.
Possible Solution:
Use an alternative type of motor such as brush-less motor or DC brushed motor. By controlling the motor directly through their voltage allows for much greater precision.
Using a brush-less motor is the most optimal solution in terms of physical design as screws can be connected to either side of their casings. Brush-less motors can also have hollow shafts to allow for wires to be fed through. The negative of brush-less motors is that for low speed applications, they require a custom controller that would have to be self-made as their are nearly no low speed controllers on the market. The type of controller that brush-less motors require is a triple-half-H-bridge that creates 3 AC sin waves with a phase offset of 120 degrees.
A geared DC brushed motor can also be used and in terms of control is much easier to use then a brush-less motor, however the physical design around the motors and creating the full gimbal would require a much more complicated system.
Issue #2 Placement of Sensors
Another issue would be the sensor feedback that was used. For this project, all sensors were stationary in the handle of the gimbal. This solution only works with servos because servos have their own method of feedback internally. For the level of precision that we were aiming for, using the stationary sensors sufficed. With greater precision applications, this method would not necessarily be enough. The most precise set-up would be to have stationary sensors and another set of sensors in the gimbaled section of the device that work together with a complementary filter.
Issue #3 Type of feedback for Yaw
The next issue we came across, that directly effected our design was the method of feedback that was used for our Yaw. The design was initially planned to use a magnetometer(compass) to figure what orientation the Yaw is in. Through testing, it was found that the magnetometer was to jumpy due to magnetic noise in the surrounding environment. The magnetometer did work in some sense but not with an accuracy fit for the use of this project.
The solution that we used for this problem, was to use a gyroscope and find relative orientation to the starting position. by collecting the angular velocity over time and using riemann's sum to find the change in orientation, proper gimbaling of Yaw can be accomplished.
Only relative orientation can be found through a gyroscope. To get an accurate absolute orientation, a gyroscope and magnetometer can work together by a complimentary filter. The gyroscope will figure out changes in high precision, while the magnetometer will correct for absolute location and correct for the drifting over time.
Conclusion
The project was completed successfully. It began with the focus of using brush-less motors and creating a custom controller to drive them. However, due to the amount of time that was in possession for the project, that idea was removed and simplified by using servos instead. In this project we were able to interface with an accelerometer, gyroscope, and magnetometer and learn their applicable uses, while also understanding their negative features and how to get around them. We also created a basic control system with accelerometer and gyroscope feedback to control servos with the purpose of gimbaling a phone in three rotational axes.
Project Video
Project Source Code
References
Acknowledgement
Any acknowledgement that you may wish to provide can be included here.
References Used
A Guide to using IMU in Embedded Applications
MPU-9250 Product Spec
MPU-9250 & AK8963 Register Mapping & Description
