F15: Fury
Contents
- 1 Grading Criteria
- 2 Project Title
- 3 Abstract
- 4 Schedule
- 5 Parts List & Cost
- 6 Introduction
- 7 Design & Implementation
- 8 Master Controller
- 9 Motor and I/O controller
- 10 Sensor Controller
- 11 Geographical Controller and Compass
- 12 Android & Communication Bridge Controller
- 13 Integration
- 14 Conclusion
- 15 References
Grading Criteria
- How well is Software & Hardware Design described?
- How well can this report be used to reproduce this project?
- Code Quality
- Overall Report Quality:
- Software Block Diagrams
- Hardware Block Diagrams
- Schematic Quality
- Quality of technical challenges and solutions adopted.
Project Title
Abstract
This section should be a couple lines to describe what your project does.
Schedule
Show a simple table or figures that show your scheduled as planned before you started working on the project. Then in another table column, write down the actual schedule so that readers can see the planned vs. actual goals. The point of the schedule is for readers to assess how to pace themselves if they are doing a similar project.
| Sl. No | Start Date | End Date | Task | Actual End date | Problems Encountered |
|---|---|---|---|---|---|
| 1 | 09/20/2015 | 09/27/2015 | Buy RC Car | 09/26/2015 | None |
| 2 | 09/27/2015 | 10/3/2015 | Divide the modules among team members | 10/2/2015 | None |
| 3 | 10/3/2015 | 10/10/2015 | Decide the pins used by each module | ||
| 4 | 10/10/2015 | 10/25/2015 | Get the main board ready which connects all SJOne boards | ||
| 5 | 10/3/2015 | 10/30/2015 | Work on individual modules | ||
| 6 | 10/31/2015 | 11/13/2015 | Sensors, motors and master controller are integrated and tested.
GPS, android and master are integrated and tested |
||
| 7 | 11/14/2015 | 12/10/2015 | Integration, testing and tweaking | ||
| 8 | 12/16/2015 | 12/16/2015 | Final testing |
Parts List & Cost
Give a simple list of the cost of your project broken down by components. Do not write long stories here.
Introduction
The Controllers
- Master Controller
- Motor and I/O controller
- Sensor Controller
- Geographical Controller and Compass
- Android & Communication Bridge Controller
Design & Implementation
The design section can go over your hardware and software design. Organize this section using sub-sections that go over your design and implementation.
CAN 11-bit ID Format
| DST | SRC | MSG |
|---|---|---|
| 3 bits (11-9) | 3 bits (8-6) | 5 bits (5-0) |
Controller ID Table
| Controller ID | Controller Type |
|---|---|
| 000 | Motor and LCD Controller |
| 001 | Master Controller |
| 010 | Sensor Controller |
| 011 | GPS and compass Controller |
| 100 | Communication Bridge + Android Controller |
Master Controller
Group Members
- Bhargava Sreekantappa Gayathri
- Thiruparan Balachandran
Schedule
| Sl.No | Start Date | End Date | Task | Status | Actual Completion date | Problems Encountered |
|---|---|---|---|---|---|---|
| 1 | 9/27/2015 | 10/4/2015 | Decide on Node address and message ID's for CAN controller. | Completed | 10/1/2015 | |
| 2 | 10/4/2015 | 10/11/2015 | Research and decide on the tasks, priorities and scheduling. | Completed | 10/12/2015 | |
| 3 | 10/11/2015 | 10/18/2015 | Come up with a kill switch mechanism with the existing remote control and complete building the car. | In Progress | ||
| 6 | 10/18/2015 | 10/30/2015 | Set up inter board communication with CAN and test specific messages sent to a module and broadcast messages. | |||
| 5 | 10/25/2015 | 10/30/2015 | Get the car running by integrating with the motor controller and Implement logging. | |||
| 6 | 10/31/2015 | 11/13/2015 | Integrate GPS module and implement the algorithm for the car to travel to the destination with a hard coded Destination co-ordinates. | |||
| 7 | 11/13/2015 | 11/21/2015 | Integrate sensor module and implement obstruction avoidance mechanism. | |||
| 8 | 11/21/2015 | 11/25/2015 | Integrate the Bluetooth bridge and get co ordinates from hone as well as send vehicle parameters to the phone for displaying in the app. | |||
| 9 | 11/26/2015 | 12/15/2015 | Testing and fine tuning as required. |
Hardware Design
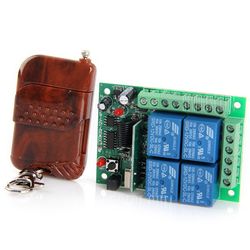
To stop the car during an emergency we need a wireless kill switch which would kill the power to the motors. For the kill switch we will be using a 4 channel remote control from gearbest.com. The module has the following properties:
- Working voltage: DC 12V, relay excitation voltage of 5V
- Static current: Less than 7mA
- Relay output: Controllable AC / DC select-able
- Working frequency: 315MHz, 433.92MHz, can customize special frequency
- Control modes: Latch (L4), Unlatch (M4), Self-latching (T4)
- Channel: 4 channels
- Working range: 200 meters
- High-security, stable performance, low power consumption, and easy to use
The main battery which will power the motors will be having the kill switch in its path, when ever the kill switch is armed main battery will not be fed to the motors.
Hardware Interface
In this section, you can describe how your hardware communicates, such as which BUSes used. You can discuss your driver implementation here, such that the Software Design section is isolated to talk about high level workings rather than inner working of your project.
Software Design
Controller Communication Table
| S.R. | Message Number | Destination | Message Name (MSG_FUNCTION) | Data Layout of Data Sent over CAN (byte[0] = total number of data bytes) |
|---|---|---|---|---|
| 1 | 0x020 | Motor Controller | RESET |
- |
| 2 | 0x220 | Sensor Controller | RESET |
- |
| 3 | 0x221 | Sensor Controller | HEART BEAT |
- |
| 4 | 0x320 | Geo-controller | RESET |
- |
| 5 | 0x420 | Communication Bridge | RESET |
- |
| 6 | 0x021 | Motor Controller | STEERING |
8 bytes steering data |
| 7 | 0x321 | Geo controller | DESTINATION |
8 bytes destination latitude and longitude data |
| 8 | 0x421 | Communication Bridge | DISPLAY DATA |
8 bytes data to be displayed on the LCD |
Show your software design. For example, if you are designing an MP3 Player, show the tasks that you are using, and what they are doing at a high level. Do not show the details of the code. For example, do not show exact code, but you may show psuedocode and fragments of code. Keep in mind that you are showing DESIGN of your software, not the inner workings of it.
Implementation
This section includes implementation, but again, not the details, just the high level. For example, you can list the steps it takes to communicate over a sensor, or the steps needed to write a page of memory onto SPI Flash. You can include sub-sections for each of your component implementation.
Testing & Technical Challenges
Describe the challenges of your project. What advise would you give yourself or someone else if your project can be started from scratch again? Make a smooth transition to testing section and described what it took to test your project.
Motor and I/O controller
Group Members
- Sin Yu Ho
- Nimmi Bhatt
Schedule
| Sl.No | Start Date | End Date | Task | Status | Actual Completion date | Problems Encountered |
|---|---|---|---|---|---|---|
| 1 | 9/27/2015 | 10/3/2015 | Decide and purchase rpm sensor and LCD screen module | Completed | 10/1/2015 | |
| 2 | 10/4/2015 | 10/11/2015 | Research and understand servo/throttle motor and issue command from terminal to control it. | In Progress | ||
| 3 | 10/11/2015 | 10/18/2015 | Understand LCD module programming and RPM sensor, and create a graphic speed monitoring | |||
| 4 | 10/18/2015 | 10/25/2015 | Design CAN message and implement CAN infrastructure. | |||
| 5 | 10/25/2015 | 10/30/2015 | Design and create graphic interface for monitoring sensor, gps, connection bridge, and master on LCD module | |||
| 6 | 10/31/2015 | 11/13/2015 | Integrate with master, testing and debug | |||
| 7 | 11/14/2015 | 12/10/2015 | Integrate with the whole system, testing and debug |
Hardware Design
Discuss your hardware design here. Show detailed schematics, and the interface here.
- LCD: : 4D Systems- uLCD-35DT-AR
Hardware Interface
In this section, you can describe how your hardware communicates, such as which BUSes used. You can discuss your driver implementation here, such that the Software Design section is isolated to talk about high level workings rather than inner working of your project.
Software Design
Show your software design. For example, if you are designing an MP3 Player, show the tasks that you are using, and what they are doing at a high level. Do not show the details of the code. For example, do not show exact code, but you may show psuedocode and fragments of code. Keep in mind that you are showing DESIGN of your software, not the inner workings of it.
| S.R. | Message Number | Destination | Message Name (MSG_FUNCTION) | Data Layout of Data Sent over CAN (byte[0] = total number of data bytes) |
|---|---|---|---|---|
| 1 | 0x100 | Master | HeartBeat |
No Data |
| 2 | 0x102 | Master | MotorStatus |
Byte [0-3]: speed in meter per hour Byte [4-7]: rpm |
Implementation
This section includes implementation, but again, not the details, just the high level. For example, you can list the steps it takes to communicate over a sensor, or the steps needed to write a page of memory onto SPI Flash. You can include sub-sections for each of your component implementation.
Testing & Technical Challenges
Describe the challenges of your project. What advise would you give yourself or someone else if your project can be started from scratch again? Make a smooth transition to testing section and described what it took to test your project.
Sensor Controller
Group Members
- Christopher Laurence
- Julio Fuentes
Schedule
| Sl.No | Start Date | End Date | Task | Status | Actual Completion date | Problems Encountered |
|---|---|---|---|---|---|---|
| 1 | 9/27/2015 | 10/3/2015 | Order ultra sonic sensors and read data sheets | Completed | 10/2/2015 | N/A |
| 2 | 10/4/2015 | 10/10/2015 | Connect ultra sonic sensor to LPC board & see if LDAR is an option | Completed | 10/10/2015 | N/A |
| 3 | 10/11/2015 | 10/17/2015 | Read data value from sensor and send in CAN bus | Completed | 10/17/2015 | N/A |
| 4 | 10/18/2015 | 10/24/2015 | Integrate and test proximity sensors | Completed | 10/30/2015 | Delayed while implementing FullCan |
| 5 | 10/25/2015 | 10/31/2015 | Develop battery sensor code | Completed | 10/31/2015 | N/A |
| 6 | 11/01/2015 | 11/07/2015 | Integrate and test battery sensor | Completed | 11/07/2015 | N/A |
| 7 | 11/08/2015 | 11/21/2015 | Complete hardware testing | Completed | 12/12/2015 | N/A |
Hardware Design
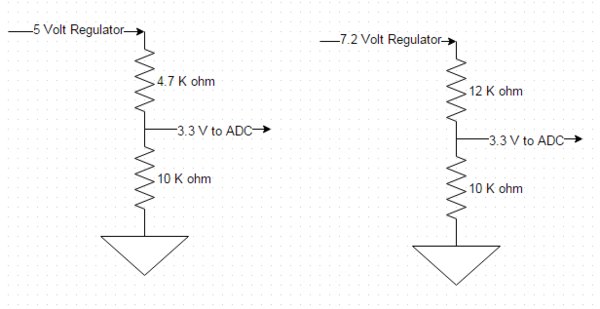
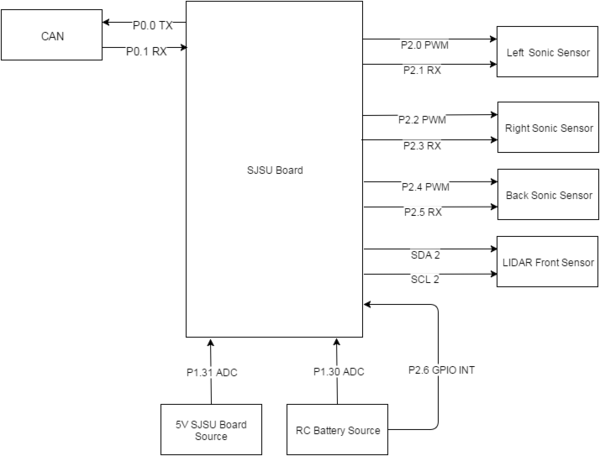
For the Sensor team, we decided to use three ultrasonic sensor and a LIDAR sensor for the front. We also use a voltage dividing circuit to bring down the voltage of the batteries, so we can monitor the voltage using two ADC pins. Lastly, our voltage regulator comes with a flag bit that indicates that the voltage has dropped below 5% of 5 volts. Below are the schematics and pin layout for our design.
Hardware Interface
In this section, you can describe how your hardware communicates, such as which BUSes used. You can discuss your driver implementation here, such that the Software Design section is isolated to talk about high level workings rather than inner working of your project.
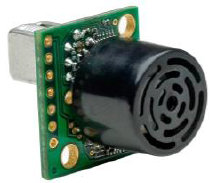
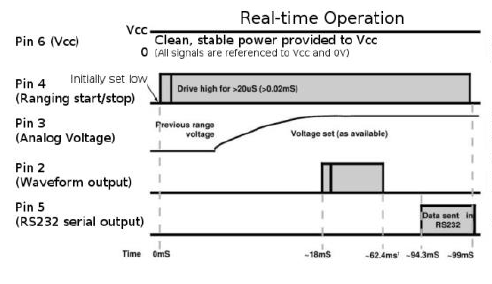
The ultrasonic sensor that we used for this project came with three interface methods. The XL-MaxSonar EZ are a highly senstive sensor that is capable of detecting object up to 725 cm away. However, this ultrasonic sensor will not be able to give you the actual distance of an object less than 20 cm away but it will detect it. The sensors allowed reading from ADC, UART, and PWM. The sensor group decided to use PWM because there would not be enough ADC available to do the battery sensor. The UART interface would take approximately 100 ms per a reading but the PWM could read a value between 18ms and 52 ms. Another reason we used PWM was because there are several pins that support PWM available on the SJSU board.The method to use the PWM is to trigger a 10 us high signal to the RX pin and read the value back from the PWM. The PWM will have an rising edge and falling edge and the time held high indicate the distance to the object.
The Battery sensor interface was an ADC pin to read the value then apply some calculations to get the approximate value.
| Pin Name | Function |
|---|---|
| P2_0 | PWM for left Sonic Sensor |
| P2_1 | RX trigger for left Sonic Sensor |
| P2_2 | PWM for right Sonic Sensor |
| P2_3 | RX trigger for right Sonic Sensor |
| P2_4 | PWM for back Sonic Sensor |
| P2_5 | RX trigger for back Sonic Sensor |
| P2_6 | 5V Regulator Flag bit |
| P1_30 | ADC from RC Battery |
| P1_31 | ADC from 5V source for all Boards |
| SDA 2 | LIDAR I2C data |
| SCL 2 | LIDAR I2C clock |
Software Design
Show your software design. For example, if you are designing an MP3 Player, show the tasks that you are using, and what they are doing at a high level. Do not show the details of the code. For example, do not show exact code, but you may show psuedocode and fragments of code. Keep in mind that you are showing DESIGN of your software, not the inner workings of it.
| Sr. No. | Message Number | Destination | Message Name (MSG_FUNCTION) | Data Layout of Data Sent over CAN (byte[0] = total number of data bytes) |
|---|---|---|---|---|
| 1 | 0x140 | Master | HEARTBEAT |
- |
| 2 | 0x142 | Master | SONIC SENSOR DATA |
Msg : byte[0:1] : (uint16_t) middle (LIDAR) Msg : byte[0:1] : (uint16_t) left Msg : byte[2:3] : (uint16_t) right Msg : byte[4:5] : (uint16_t) back |
| 3 | 0x144 | Master & I/O Controller | BATTERY DATA |
Msg : byte[0] : (uint8_t) Motor battery * 10 Msg : byte[1] : (uint8_t) Board battery * 10 Msg : byte[2] : (uint8_t) Board battery Flag |
Implementation
This section includes implementation, but again, not the details, just the high level. For example, you can list the steps it takes to communicate over a sensor, or the steps needed to write a page of memory onto SPI Flash. You can include sub-sections for each of your component implementation.
Testing & Technical Challenges
Describe the challenges of your project. What advise would you give yourself or someone else if your project can be started from scratch again? Make a smooth transition to testing section and described what it took to test your project.
Geographical Controller and Compass
Group Members
Schedule
| Sl.No | Start Date | End Date | Task | Status | Actual Completion date | Problems Encountered |
|---|---|---|---|---|---|---|
| 1 | 9/23/2015 | 10/2/2015 | Researched and decided upon the GPS module and Compass module. | Completed | 10/1/2015 | None |
| 2 | 10/3/2015 | 10/3/2015 | Ordered GPS module and compass module. | Completed | 10/2/2015 | None |
| 3 | 10/5/2015 | 10/14/2015 | Interface GPS module and
compass module to SJOne board. |
Completed | 10/20/2015 | The delivery of GPS and compass module was delayed. |
| 4 | 10/15/2015 | 10/25/2015 | Parse GPS data and format the data to be transmitted
Test code to get compass reading information |
Completed | 10/25/2015 | None |
| 5 | 10/26/2015 | 10/30/2015 | Calibrating the compass module.
Integration of GPS and compass module. Interfacing of GPS and compass module to Android. |
Completed | 11/25/2015 | Testing of the module is taking time.
Burnt GPS module, had to order another one. |
| 7 | 11/1/2015 | 11/13/2015 | Integration with Master through CAN bus. | Inprogress | - | - |
| 8 | 11/15/2015 | 12/10/2015 | Testing and calibrating with other modules. | - | - | - |
Hardware Design
Discuss your hardware design here. Show detailed schematics, and the interface here.
GPS Module
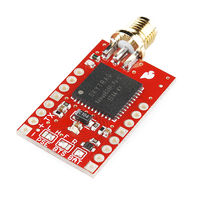
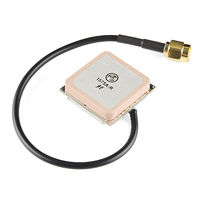
GPS module used in our project is Sparkfun Venus GPS - (Model: GPS-11058) and embedded antenna from Sparkfun - (Model: GPS-00177). We were able to configure this module at 10Hz and communicate at 38400bps through UART. Sparkfun has developed a Graphical User Interface to check Latitude, Longitude and every possible information this GPS module provides. GPS can also be configured to operate and communicate at various speed though the provided Graphical User Interface. This module has got an on-board flash to store these configuration. There are three modes in which this module can operate,
1. Cold start: Cold Start is performed every time when the GPS module is turned off without backup power supply connected. It is the longest starting time out of the three. It usually took around 15 to 20 minutes to get a GPS fix indoors.
2. Hot start: GPS module will perform Hot Start if the GPS module is provided with backup power and is powered on any time within the 2-hour time frame after GPS was previously turned off, the required fix is still stored inside the its flash memory and will not be changed. The Hot start time is typically around 10 to 15 seconds.
3. Warm start: Warm Start is performed if the module is switched on after the 2-hours of time, since satellite data has to be refreshed. Warm start time is typically around 2 to 3 minutes.
Compass Module
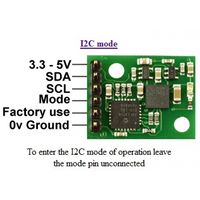
Compass module used for our project is CMPS 11 by Devantech Ltd(Robot Electronics). It is tilt compensated module which made life easier for us. There are two ways to establish communication between CMPS 11 and SJ-ONE board. UART and I2C are the two ways and we choose to do use I2C for communication. Since, it is faster.
1. First thing to do before calibrating the compass module is to make sure that there is proper I2C communication established between the compass module and SJ-ONE board. Once we have communication setup we can got ahead and find out the bearing degree of the compass and verify it with an actual analog compass.
2. Once the communication is setup and working as desired, then we can calibrate the compass. Calibration is done by sending 3 commands for every 20ms. The purpose of calibration is to remove sensor gain and offset of both magnetometer and accelerometer and achieves this by looking for maximum sensor outputs.
Hardware Interface
In this section, you can describe how your hardware communicates, such as which BUSes used. You can discuss your driver implementation here, such that the Software Design section is isolated to talk about high level workings rather than inner working of your project.
GPS module
Communication between GPS and SJOne board is through UART2. GPS was configured to communicate at 38400bps and operate at 10Hz. A coin battery of 3.3V was connected between Vbat and Gnd of GPS. The coin battery helped in hot start of GPS module.
Compass module
CMPS 11 module provides two ways of communication. First option is I2C and second option is UART. We chose I2C communication since it is faster when compared to UART. Since GPS uses UART2 and Seven segment display uses UART3 we decided to use I2C. The operating voltage range is from 3.3v to 5v.
Just a word of caution
1. Don't use 5v supply because for us it somehow created more than expected offset and our initial testing failed because of it. Later we switched back to 3.3v and offset was in expected range and testing went well too.
2. When working with CMPS 11 don't get laptops, smartphones or any ferrous object close to it because the calibration of the compass will be dislodged.
Software Design
Show your software design. For example, if you are designing an MP3 Player, show the tasks that you are using, and what they are doing at a high level. Do not show the details of the code. For example, do not show exact code, but you may show psuedocode and fragments of code. Keep in mind that you are showing DESIGN of your software, not the inner workings of it.
GPS module
A task is created to read the GPS values from the module. This task starts reading the input when there is some data on the received queue which is basically every 100ms, since the GPS module is configured to work at 10Hz. Data from communication module is received at the start of code which contains checkpoint details. The GPS data and the checkpoint data is used to calculate the distance to next checkpoint, distance to final destination and angle in which the car has to head by using Haversine formula. Once a checkpoint is reached, the checkpoint is updated and continues till final destination is reached. Once the final destination is reached, master is informed about the same. Present GPS data is transmitted back to communication bridge.
Compass module
All of compass calculation is done in 10Hz periodic task. Initial bearing is calculated and compared with the desired heading. The desired heading is calculated using the longitude and latitude values provided by the GPS module. Based on this value a turn decision is made and sent to the master to handle it.
1. For entering into the calibration mode, switch 1 on SJ- One board has to be pressed. 2. Switch 2 to come out of calibration mode back to heading mode. 3. Switch 3 to do the factory reset setting.
Algorithm to calculate distance using longitude and latitude values.
Algorithm to calculate desired heading using longitude and latitude values.
Controller Communication Table
| Sr. No. | Message Number | Destination | Message Name (MSG_FUNCTION) | Data Layout of Data Sent over CAN (byte[0] = total number of data bytes) |
|---|---|---|---|---|
| 1 | 0x160 | Master | HEARTBEAT |
- |
| 2 | 0x162 | Master and I/O | COMPASS HEADING DATA |
Msg : 8 bits : turn angle Msg : 7 bits : checkpoint Msg : 1 bit : isFinal Msg : 16 bits : distance to final destination Msg : 16 bits : distance to next checkpoint |
| 3 | 0x461 | Communication Bridge | GPS DATA |
Msg : 8 bits : latitude_decimal_part Msg : 20 bits : latitude_float_part Msg : 8 bits : longitude_decimal_part Msg : 20 bits : longitude_decimal_part Msg : 7 bits : checkpoint Msg : 1 bit : isFinal |
| 4 | 0x47F | Communication Bridge | CHECKPOINT RECEIVED |
- |
Implementation
This section includes implementation, but again, not the details, just the high level. For example, you can list the steps it takes to communicate over a sensor, or the steps needed to write a page of memory onto SPI Flash. You can include sub-sections for each of your component implementation.
Testing & Technical Challenges
Describe the challenges of your project. What advise would you give yourself or someone else if your project can be started from scratch again? Make a smooth transition to testing section and described what it took to test your project.
On board LED 3 is toggled every time there is an error to push the data onto queue.
On board LED 4 is toggled every time the data is not read from gps.
The sparkfun has developed a software to read the GPS value. The GPS module has to be connected to the laptop through a USB to Serial converter and then GPS value can be read without any difficulty. Vbat of around 3V has to be connected. The software has all the options to configure the module. Once done, it can be connected to SJOne board to read and parse the data. Initial fix, for the new module takes a while, once the initial fix is achieved, every time the GPS module is turned on, it takes very little time to get the correct GPS data.
Android & Communication Bridge Controller
Group Members
- Chinmayi Divakara
- Praveen Prabhakaran
Schedule
| Sl.No | Start Date | End Date | Task | Status | Actual Completion date | Problems Encountered |
|---|---|---|---|---|---|---|
| 1 | 9/30/2015 | 9/30/2015 | Decide and purchase Bluetooth Module | Completed | 9/30/2015 | None |
| 2 | 9/30/2015 | 10/14/2015 | Develop Basic Android App with Bluetooth Sensor Communication | Completed | 10/14/2015 | |
| 3 | 10/15/2015 | 10/20/2015 | Interface Bluetooth Module with SJSU Dev Board | Completed | ||
| 4 | 10/12/2015 | 10/26/2015 | Be able to send bi-directional arbitrary messages between Android App and Dev Board via Bluetooth | Completed | ||
| 5 | 10/14/2015 | 11/21/2015 | Interface Bluetooth Module with CAN | |||
| 6 | 10/26/2015 | 11/30/2015 | Integration with GPS module testing and fine tuning. | |||
| 7 | 11/01/2015 | 11/13/2015 | Integration with Master through CAN bus | |||
| 8 | 11/15/2015 | 12/10/2015 | Android App GUI enhancements (Google Maps, Google Drive) |
Hardware Design
Discuss your hardware design here. Show detailed schematics, and the interface here.
Hardware Interface
In this section, you can describe how your hardware communicates, such as which BUSes used. You can discuss your driver implementation here, such that the Software Design section is isolated to talk about high level workings rather than inner working of your project.
Software Design
Show your software design. For example, if you are designing an MP3 Player, show the tasks that you are using, and what they are doing at a high level. Do not show the details of the code. For example, do not show exact code, but you may show psuedocode and fragments of code. Keep in mind that you are showing DESIGN of your software, not the inner workings of it.
| S.R. | Message Number | Destination | Message Name (MSG_FUNCTION) | Data Layout of Data Sent over CAN (byte[0] = total number of data bytes) |
|---|---|---|---|---|
| 1 | 0X180 | Master | HEARTBEAT |
No DATA |
| 2 | 0X180 | Master | DRIVE MODE |
Msg : byte[0] 0 to start, 1 to stop |
| 3 | 0x181 | Master | LOCATION POINTS |
Msg : 8 bits : latitude_decimal_part Msg : 20 bits : latitude_float_part Msg : 8 bits : longitude_decimal_part Msg : 20 bits : longitude_float_part Msg : 8 bits : checkpoint |
Implementation
This section includes implementation, but again, not the details, just the high level. For example, you can list the steps it takes to communicate over a sensor, or the steps needed to write a page of memory onto SPI Flash. You can include sub-sections for each of your component implementation.
Testing & Technical Challenges
Describe the challenges of your project. What advise would you give yourself or someone else if your project can be started from scratch again? Make a smooth transition to testing section and described what it took to test your project.
Integration
Testing & Technical Challenges
Describe the challenges of your project. What advise would you give yourself or someone else if your project can be started from scratch again? Make a smooth transition to testing section and described what it took to test your project.
Include sub-sections that list out a problem and solution, such as:
My Issue #1
Discuss the issue and resolution.
Issue 1:
Full CAN was implemented to receive the required data. During CAN communication, when a particular message intended to receive for one particular module was received, the SJOne board of that module used to get stuck, there was no watchdog timer reset as well.
Solution - The Full CAN messages had to be added in ascending order. Once this was implemented, the working was smooth.
Conclusion
Conclude your project here. You can recap your testing and problems. You should address the "so what" part here to indicate what you ultimately learnt from this project. How has this project increased your knowledge?
Project Video
Upload a video of your project and post the link here.
Project Source Code
References
Acknowledgement
Any acknowledgement that you may wish to provide can be included here.
References Used
List any references used in project.
Appendix
You can list the references you used.
