S15: Multi-media Car
Contents
Multi-media Car
Abstract
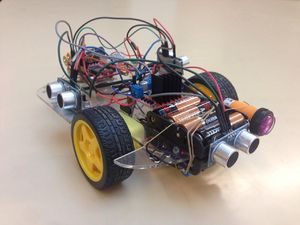
The aim of this project is to build a self-driving car which can automatically avoid big barriers and obstacles in its path.
Objectives & Introduction
Our main objective of our project is designing an autonomous car that can avoid obstacles and can also find its own path after the detour.
We can list our objectives as following:
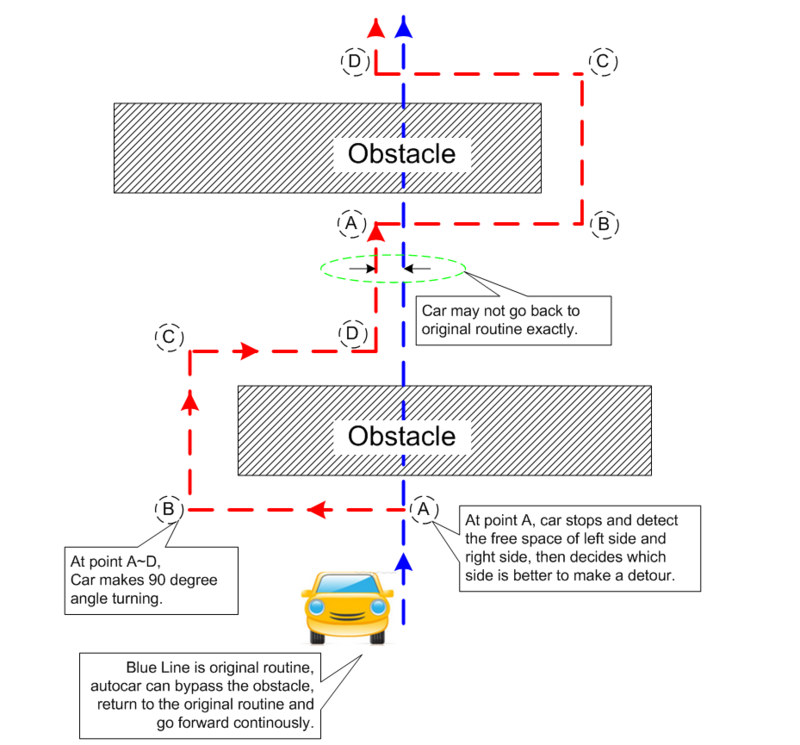
1. Avoiding approaching obstacles in front of the car.
2. The car should be able to decide whether to turn left or right by measuring the obstacles on left and right side.
3. After making a successful turning, the car should find its original direction then get back to its previous path.
The car should work as the following picture.
Team Members & Responsibilities
- Zan Zhan
- <HW design, HW connection, SW design, debugging, verification>
- Rohit Teja Maddula
- <updating wiki, provides solutions for SW design, debugging, verification>
- Mengchi Cheng
- <SW design, provides suggestions for HW design, debugging>
- Taowu Wen
- <updating wiki, HW connetion, fundamental coding, verification>
Schedule
| Week No. | Start Date | Planned End Date | Task | Status | Actual Completion Date |
|---|---|---|---|---|---|
| 1 | 04/06/2015 | 04/12/2015 | Interfacing motors with SJone board, building the power circuit design | Completed | 04/12/2015 |
| 2 | 04/13/2015 | 04/19/2015 | Interfacing infrared sensor and ultrasonic sensor, using the feedbacks to control the motors. | Completed | 04/19/2015 |
| 3 | 04/20/2015 | 04/26/2015 | Writing functions of motors(including turn left&right&forward&revesre), verify the accuracies of those functions. | Completed | 04/28/2015 |
| 4 | 04/27/2015 | 05/03/2015 | Implementing three ultrasonic sensors, and using the feedbacks to achieve the car can automatically find its own path when counter obstacles. | completed | 05/03/2015 |
| 5 | 05/04/2015 | 05/10/2015 | Depending on the previous function, adjusting the motors control functions. | completed | 05/09/2015 |
| 6 | 05/11/2015 | 05/17/2015 | Assemble all the features together, use multi-tasking to connect all equipment as a unity. | completed | 05/18/2015 |
| 7 | 05/18/2015 | 05/23/2015 | Check all the details, updating Wiki. | completed | 05/24/2015 |
Parts List & Cost
Give a simple list of the cost of your project broken down by components. Do not write long stories here.
| Part No. | Part Type | Part Description | Quantity | Cost for each | Total |
|---|---|---|---|---|---|
| 1 | 28015-ND | Ultrasonic Distance Sensor | 3 | $ 2.20 | $ 6.60 |
| 2 | L298N | Motor drive controller board | 1 | $ 8.50 | $ 8.50 |
| 3 | LTYKC-01 | DIY Toy Car (Including 2 DC motors) | 1 | $ 7.00 | $ 7.00 |
| 4 | MN1500 | Batteries(1.5V/each) | 10 | $ 1.00 | $ 10.00 |
| 5 | FC-51 | Infrared Sensor | 1 | $ 3.00 | $ 3.00 |
| 6 | SJOne Board | Board including LPC1758 from SJSU CmpE | 1 | $ 80.00 | $ 80.00 |
| Total Cost | $ 115.10 |
Design & Implementation
The design section can go over your hardware and software design. Organize this section using sub-sections that go over your design and implementation.
Hardware Design
Infrared Sensor
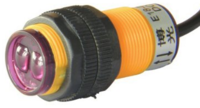
The infrared sensor has three wires: Power, GND and Feedback. Power is supplied by the SJone board, and it has a common GND with SJone Board. Feedback remains high if there are no obstacles, whenever the car encounters some obstacles, it will drop to logic low. Thus, by detecting the falling edge of the Feedback PIN, we can use the infrared sensor to stop our car immediately.
Ultrasonic Sensor
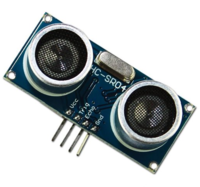
The Ultrasonic sensor is powered by the H-bridge which has a +5V power supply. In the detecting task, three ultrasonic are triggered by the pulses that are sent by SJone Board. After receiving the pulses, the ultrasonic sensor will produce a period of logic high on its echo PIN. By detecting the length of this feedback signals, we can calculate the distance between the obstacles and our car.
H-bridge
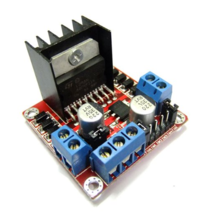
H-bridge is used to control the motor and communicates with SJone Board. When the power supply of H-bridge is between 7-12V, one of its pin can be use as a 5V power supply. H-bridge has two sets of GPIOs to control different motors. Each set has two GIPOs, one for moving forward, another one is reversing.
Schematic
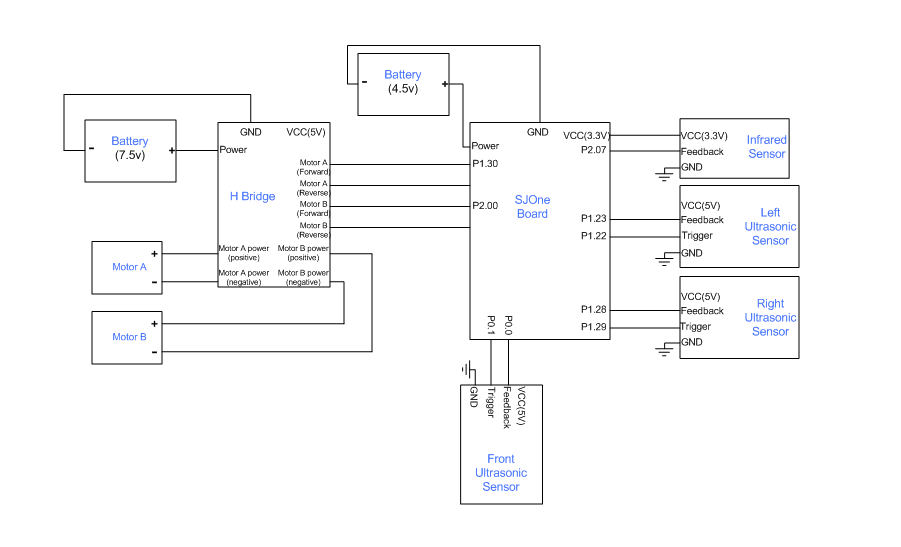
This is the overall schematic for our design.
Hardware Interface
- Power circuit is a series of batteries, which provides 7.5V power supply.
- SJone Board is communicating with different sensors. Including sending trigger signals to ultrasonic sensors and getting feedbacks of those sensors.
- Infrared sensor is used to detect any obstacles in front of the car.
- Ultrasonic sensors are triggered by the high pulse sent by SJone Board and gives the feedback. We can get the distance between obstacles and the car by calculating the length of those feedbacks.
| PIN No. | PIN type | Usage |
|---|---|---|
| P0.00 | GPIO | Sending trigger signals to front ultrasonic sensor |
| P0.10 | GPIO | Getting the feedback from front ultrasonic sensor |
| P1.22 | GPIO | Sending trigger signals to left ultrasonic sensor |
| P1.23 | GPIO | Getting the feedback from left ultrasonic sensor |
| P1.28 | GPIO | Sending trigger signals to right ultrasonic sensor |
| P1.29 | GPIO | Getting the feedback from right ultrasonic sensor |
| P1.30 | GPIO | Motor B moves forward |
| P2.00 | GPIO | Motor A moves forward |
| P2.07 | GPIO | Getting the feedback from infrared sensor |
Software Design
- Creating interrupt functions for the infrared sensor.
- Creating different tasks for controlling the motor movement(such as stop, forward and turn left).
- Using semaphores to switch between different tasks.
- Creating those tasks and semaphores in main() and initiating several sensors.
Infrared Interrupt
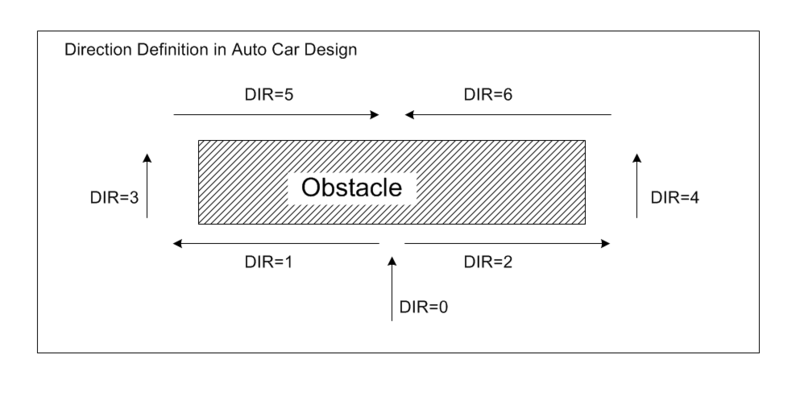
The infrared interrupt is only enabled in the Run_forward task. Whenever the car meets any obstruction while moving forward, the interrupt will hang on the current task and change to different emergency task depending on the DIR flag.
If the DIR flag is 0, which means the car haven't made any turn, the interrupt task will send an item to the turning queue.
If the DIR flag is not 0, which means the car already made the turnings but the path is blocked by an unpredicted obstacle, the car will stop immediately until the obstacle disappear.
.
   if(xSemaphoreTake(frontInfraredRay, 1))
        {
            MotorStop();//stop motor when ISR
            vTaskDelay(100);
            BMW.FrontSonic = GetSonicData_F();
            if (BMW.DIR == 0)
            {
                LPC_GPIOINT->IO2IntEnF &= ~InfraredRay ; // Disable Interrupt of P2_7
                LPC_GPIOINT->IO2IntClr |=  InfraredRay ; // Clear Interrupt of P2_7
                MotorForwardADJ(4);
                  if (BMW.FrontSonic < 20)
                    xQueueSend(H_CarDetect_Notify, &flag_block, 500);
                 else
                    xQueueSend(H_CarRunFW_Notify, &flag_block, 500);
            }
            else
            {
                BMW.Block = 1;
            }
        }
Ultrasonic detection
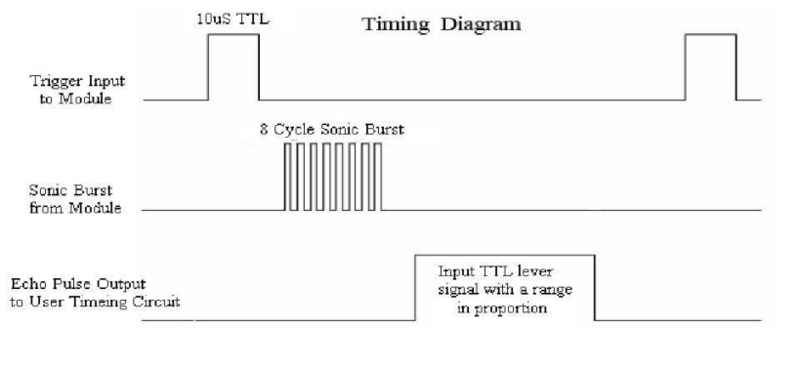
As the left timing diagram shows, when receiving a trigger signal the ultrasonic sensor gives us a feedback.
We can using the formula in the user manual to calculate the distance.
uS / 58 = centimeters
uS / 148 =inch;
range = high level time * velocity (340M/S) / 2;
Heare are the code segment.
   FSonic_Trig.setLow();
        vTaskDelay(1);
        FSonic_Trig.setHigh();
        vTaskDelay(1);
        FSonic_Trig.setLow();   // sending trigger
        while(!FSonic_Echo.read());
        uptime_us = sys_get_uptime_us();
        while(FSonic_Echo.read());
        endtime_us = sys_get_uptime_us();
    time_count= endtime_us- uptime_us;  // calculate echo length
    Distance = time_count/58;
Detect&Turning task
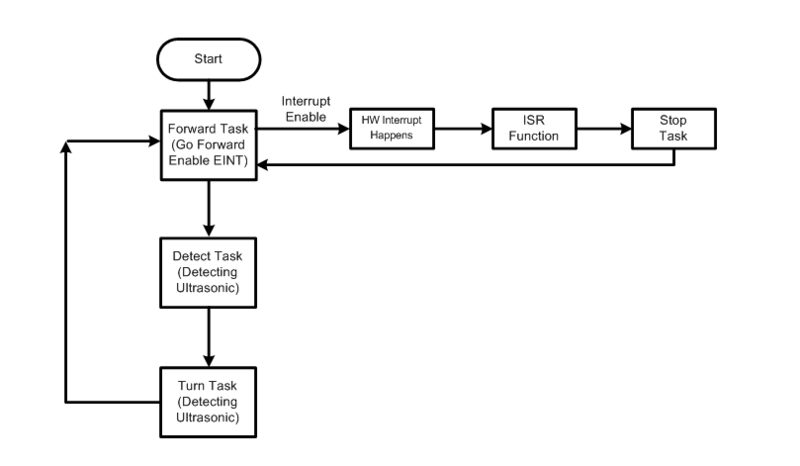
The initial state of the car is forward.
Whenever the first interrupt happens, the car stops immediately and detects the surrounding environment.
Based on the feedback from those ultrasonic sensors, the car decides to turn left or right. During the turning process, the DIR flag which indicates the direction of the car is also set as corresponding values.
After the car successfully made its first turn, it switches between the forward task and the detecting task.
Depending on the DIR and the ultrasonic sensors' feedbacks, the car keeps moving until detour the obstacles.
Implementation
This section includes implementation, but again, not the details, just the high level. For example, you can list the steps it takes to communicate over a sensor, or the steps needed to write a page of memory onto SPI Flash. You can include sub-sections for each of your component implementation.
Testing & Technical Challenges
Describe the challenges of your project. What advise would you give yourself or someone else if your project can be started from scratch again? Make a smooth transition to testing section and described what it took to test your project.
Include sub-sections that list out a problem and solution, such as:
Our Issue #1
- Controlling the car to move straight forward
In order the find the original path, our design is required to follow the expected path. However, due to the deficiency of our motor and the unevenness of the ground, the car cannot go straight forward.
Solution
We tried to use MPU6050 Accelerometer and the acceleration sensor in SJone Board, but none of them works.
Our Issue #2
- The infrared sensor gives false feedback during the movement.
When the car moves on a uneven surface, the shaking causes the disturbance.
Solution
We use the front ultrasonic sensor to double check the feedback from IR sensor to determine the accuracy of an obstacle.
Our Issue #3
- The car can not exactly turn at 90°
Depending on different surfaces, the wheel has different frictional force. The same turning function can not ensure the wheel will turn the same amount in different surfaces. Moreover, although two motors use the same turning function, the turning of different motors are slightly different from each other.
Solution
Adjusting the turning function based on testing results.
Conclusion
The designing process is very helpful and profound. We faced a lot of problems during the design process, everything is not so simple as we expected. As EE students, we practiced C/C++ in this class and improved our knowledge of hardware design. Doing this project made us familiar with FreeRTOS and master the multi-tasking. We learned how to interface the ultrasonic sensors and infrared sensors(interrupt). We also learned how to work as a team, like communicating with teammates, which is very useful for our future career. In brief, this project gives us a chance to implement our knowledge to real design that will be a great experiences for all of us.
Project Video
Project Source Code
References
Acknowledgement
We would like to thank Preet to provides useful instructions and solutions for our design.
References Used
Appendix
You can list the references you used.
