S15: Triclops: Smart RC Car
Contents
Grading Criteria
- How well is Software & Hardware Design described?
- How well can this report be used to reproduce this project?
- Code Quality
- Overall Report Quality:
- Software Block Diagrams
- Hardware Block Diagrams
- Schematic Quality
- Quality of technical challenges and solutions adopted.
Triclops: Smart RC Car
Abstract
The Smart RC car is an autonomous car that given a destination coordinate, drives to that location without any user interaction. It also has the ability to avoid obstacles in its path with the help of Sonar sensors.
Objectives & Introduction
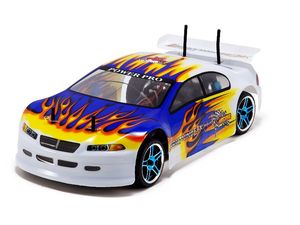
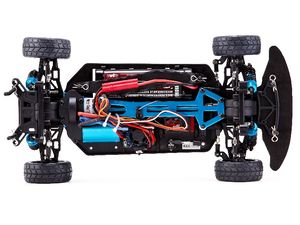
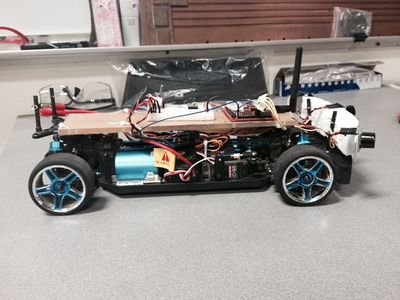
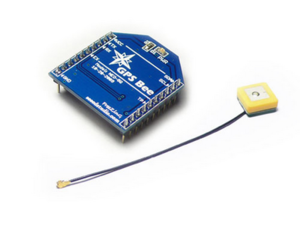
In a world of autonomous systems, it is only a matter of time until we see all cars on the roads that drive themselves. Our concept for the RC car is based on that idea that cars will be able to drive themselves. The car will drive itself from a starting point to an ending point provided by the driver, which in our case is the host computer. The car will also have the capability to avoid obstacles in its path using three LV-MaxSonar-EZ0 Ultrasonic Range Sensors in the front. A GPSBee module with a SIM28 GPS receiver is being used to track the position of the car. This allows the car to navigate to the provided location autonomously. Shown below are the images of car before we worked on it.
.
Team Members & Responsibilities
- Hector Prado-Guerrero
- GPS / Navigation Development
- Calvin Lai
- Sonar Sensors / Compass / Driving Logic
- Britto Thomas
- Motor Control / Wireless Communication
.
Schedule
| Week# | Date | Task | Status | Actual |
|---|---|---|---|---|
| 1 | 04/17 | PWM tasks Completed
Mounting equipment Completed Some code for object tracking Some code on GPS |
PWM Complete
Mounting Complete Object is being tracked but we need to train it to follow a specific color of tape. Code for GPS is still being worked. |
4/19 4/19 4/21 4/21 |
| 2 | 04/24 | GPS and Compass completed
Wireless completed Sensors completed |
Compass - completed
Wireless - completed Sensors - completed GPS - completed |
4/27
4/27 4/27 5/24 |
| 3 | 05/01 | Obstacle avoidance Completed
GPS Navigation completed |
Obstacle avoidance - mostly complete |
5/24 |
| 4 | 05/08 | Object Tracking / Lane Guidance Completed | Decided to avoid lane guidance due to its complexity
and overhead along with lack of time |
|
| 5 | 05/15 | Testing and Verification | In progress | 5/20 |
| 6 | 05/22 | More Testing and Verification | Complete | 5/24 |
| 7 | 05/25 | Demo Date | Pending |
Parts List & Cost
| Line Item# | Part Description | Vendor | Part Number | Qty | Cost ($) |
|---|---|---|---|---|---|
| 1 | Lightning EPX Pro 1/10 4WD scale RC car | Redcat Racing | 1 | 200.00 | |
| 2 | SJSU One Board | Preet Industries | 3 | 240.00 | |
| 3 | GPS Bee kit (with Mini Embedded Antenna) | Seeed Studio | SEN133D1P | 1 | 39.95 |
| 4 | Smart Vision Sensor - Object Tracking Camera | Pixy | CMUcam5 | 1 | 69.00 |
| 5 | Triple Axis Compass Magnetometer Sensor Module | 365buying | HMC5883L | 1 | 8.99 |
| 6 | 2.4GHz, 3 dBi at 5Ghz Rubber Duck WiFi Antenna | Embedded Works | EW2458-02 | 2 | 8.00 |
| 7 | Jumper Wires | Pack of 100 | 10.00 | ||
| 8 | XBEE Explorer USB | SparkFun | 5030 | 1 | 24.95 |
| Additional Shipping | $0.00 | ||||
| Total Cost | $600.89 |
.
Design & Implementation
The design section can go over your hardware and software design. Organize this section using sub-sections that go over your design and implementation.
Hardware Design
Discuss your hardware design here. Show detailed schematics, and the interface here.
Overall design
GPS
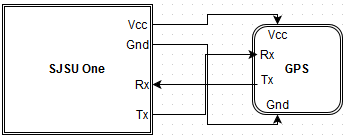
- Figure GPS_WIRING
- As seen in figure GPS_WIRING, one can see the needed wires to connect to the GPS module in order to communicate with it via UART.
Hardware Interface
In this section, you can describe how your hardware communicates, such as which BUSes used. You can discuss your driver implementation here, such that the Software Design section is isolated to talk about high level workings rather than inner working of your project.
- Motor and Servo
- PWM was used by the SJSU One Board to send signals to the motor and servo.
- GPS
- For GPS, the only interface that was used, and basically the easiest one, was UART. Refer to Hardware design Figure GPS_WIRING to see the specifics on what exactly was wired.
- Sensors
- For the UltraSonic Sensors, ADC was used to communicate with the SJSU one board. Along with that GPIO pins were used on the sensors to trigger a reading.
- Compass
- The compass was able to communicate with the microprocessor over I2C protocol.
Software Design
Show your software design. For example, if you are designing an MP3 Player, show the tasks that you are using, and what they are doing at a high level. Do not show the details of the code. For example, do not show exact code, but you may show psuedocode and fragments of code. Keep in mind that you are showing DESIGN of your software, not the inner workings of it.
Tasks
-
- GPS task - which handles all retrieval of GPS coordinates, and parses data, and converts into radian coordinates to be used by compass task.
- Compass task - handles calculation of heading and bearing and uses GPS information to determine which way to go
- PWM Task - handles the signals sent to both the Servo and Car motor. Sets speed for motors, and turns left or right for servo.
- Magnetometer Task-handles the compass functionalities so that it can accurately computer a bearing for the car.
- DistanceSensor Task-Handles the data coming in from the distance sensors and push them into a queue.
PWM Motor and Servo
PWM (Pulse Width Modulation) is a way that digital systems deal with the analog signals. In order to send or receive analog signals, the PWM sends out pulses of signals switching between high and low so emulate an average voltage. For example if a 4 volt signal is desired as an output, the PWM holds the signal high for 80% of a frequency cycle and then lowers the signal for the rest 20% of the cycle. This change in voltage over a specific time is called a duty cycle. So in this case, we have an 80% duty cycle. When the device that requires the pwm look at that signal, it realizes that the average voltage from that signal is 4 V. This allows the PWM motor and servo to work with digital devices that send digital signals.
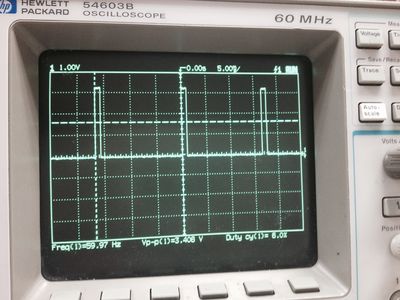
In our RC car both the Motor that powers the wheels and servo that turns the wheels, require pwm signals to function. Our car had a Brushless motor, which worked in a three phase current system. But fortunately, the motor was accompanied with a ESC(Electronic Speed Controller) which took care of the the motor power control. But in order to send signals to the motor, we had to send signals to the ESC which forwarded the signal to the motor in a way that the motor required. The Servo was a standard servo, which also worked on the concept of pwm. If the signal for the servo or motor was held high for a certain time period, then it would perform the following actions; 1.5 ms was the mid point or stop, 1 ms was left or back, and 2 ms was right or full speed. Since our car was built to go pretty fast (30-40 mph at max), we barely used the car to its full potential to avoid chasing after the car at those speeds. The image to the right shows the the waveform of the pwm from the SJSU One board sending a 6%duty cycle, which is what we need at a 50 hz frequency to emulate a stop signal.
Implementation
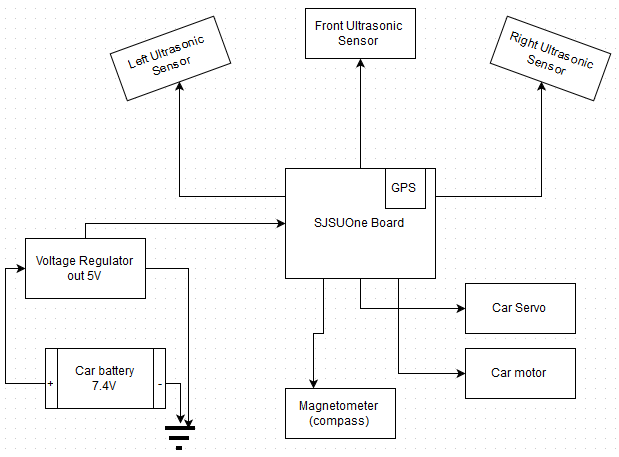
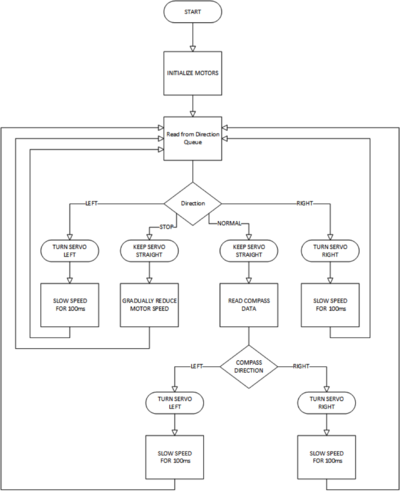
The image shown to the left is the basic logic used for the car's brain. The sensors, compass and GPS all send directions to the PWM. This feature was achieved using shared queues. This allowed the PWM to get the required information to navigate efficiently. So if it received a left signal from the direction queue, it turned left. If it received a signal from the front sensor it would stop. etc. The LIPO battery pack of the RC car provided power to the motors and this same battery was used to power the whole car and it devices. A 3.3V supply from the SJSU One board was used to power the Servo. The picture on the right below is an image of the motor and servo on the car.
.
.
GPS
For GPS, communication can be done over a few methods: I2C, UART, SPI, etc. For this project, UART will be used to collect data from the GPS module. Here are a few steps that should be done when interfacing with GPS module.
- 1. Plug into XBee socket.
- a. If not using XBee socket type GPS module, then make sure to plug in the GPS VCC an appropriate power source. Make sure ground from GPS is tied in with ground from SJSU one board.
- Then, make sure to wire the Tx pin of the GPS to the Rx pin of the SJSUOne board. If you would like to configure the GPS to, for example, only output a certain type of sentence, then wire GPS Rx to SJSUOne Tx pin.
- 2. If you see that you aren't getting any data using a basic program to getChar from uart, then refer to Issue #2.
Implementation
The GPS outputs data in a format known as the NMEA sentence. There are a few different forms this sentence can take, we used a form called GPGLL. This form contains much less information than other sentences; however, it was quite sufficient for our needs. This form contains the longitude, latitude, UTC time, status of the GPS, and a checksum. In order to use this information, we parsed the sentence for only the longitude and latitude information. We then turned this information into radians to use for finding the heading.
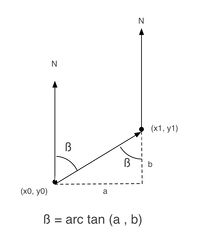
Finding the correct heading to travel to the destination requires two GPS coordinates. Calculating the heading is a relatively straightforward process which involves a little bit of trigonometry.
The following code helps to find this value.
    dlon = gpsDest.longitude - gps.longitude;
    float y = sin(dlon) * cos(gpsDest.longitude);
    float x = cos(gps.latitude) * sin(gpsDest.latitude) - sin(gps.latitude)
                    * cos(gpsDest.latitude) * cos(dlon);
    float tempHeading = atan2(y, x);
    if(tempHeading < 0){
        tempHeading += 2 * pi;
    }
    if(tempHeading > (2 * pi)){
        tempHeading -= 2 * pi;
    }
    float correctHeadingDeg = (tempHeading * 180 / pi);
.
Magnetometer
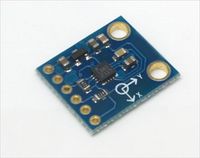
The magnetometer is used to find the current heading of the car. Without this heading, it would be impossible to face the vehicle in the correct direction without first driving in an arbitrary direction to orient according to GPS location. The magnetometer is an HMC5883L which is a Triple Axis Compass Magnetometer Sensor Module. The module uses I2C for communication and outputs data in an XYZ, pitch, yaw, roll format. In order to use this data, it first needed to be converted to a heading in degrees. The HMC5883L was implemented through the existing I2C bus and can be called using a similar method as the existing peripheral sensors. It is used as an IO device and can be called using the funtion MS.getHeading(), which returns a float value of the current heading.
In order to use the magnetometer, it first needed to be initialized and configured. The existing I2C base driver was used to send messages to the device who's manufacturer's supplied address was 0x3C. Configuration for this device is stored on two 8-bit registers, Configuration Register A and Configuration Register B. Configuration Register A holds the settings for number of samples averaged per measurement output, data output rate, and the measurement configuration bias. For out purposes, we used the default settings which were eight samples averaged, 15Hz data output rate, and no measurement bias. Configuration Register B holds the gain for the magnetometer. This gain setting ensures that the raw measurements of the Earth's magnetic field are within measurable values. If the values were too large, they would not be able to fit in the 16-bit data registers.
Data is read into six separate registers. There are two registers for each X, Y, and Z readings. For our purposes the Z reading could be omitted because the magnetometer was positioned in a way where the XY plane is parallel to the Earth. The data for each reading is 16-bits wide; however, it is split into two separate 8-bit registers and is stored as a 2's compliment signed integer. In order to read the entire measurement, both registers must be read. The data obtained from these registers are raw magnetic readings and must be converted to a usable heading in degree format.
Implementation
Converting the raw magnetic data from the magnetometer was handled using a simple arctan function found in the <cmath> library. However, in order to use the arctan function, the data must first be converted into float values. The code for the conversion can be found below.
 xH = (float)buff[0]; // convert to float
 yH = (float)buff[2]; //convert to float
 tempheading = atan2(heading.y,heading.x);
 tempheading += declinationAngle; //compensate for declination
 if(tempheading < 0){
   tempheading += 2 * pi;
 }
 if(tempheading > (2 * pi)){
 tempheading -= 2 * pi;
 }
 headingDegrees = (tempheading * 180 / pi);
In order to compensate for our location on Earth and the way the Earth tilts, a declination angle must be used to compensate the final reading. This declination angle can be found at http://www.ngdc.noaa.gov/geomag-web/. The final value must also be adjust to ensure that it falls within the 0-2π range. In order to make the result more readable to us, the value was converted back into degrees.
Proximity Sensors
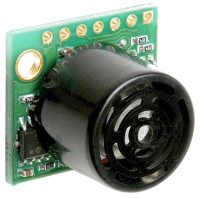
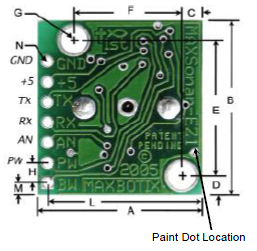
The proximity sensors used were MB1010 LV-MaxSonar®-EZ1, which were provided to us. These sensors use sound waves in order to range find and detect objects within a certain distance. The minimum distance for detection is 6 inches, while the maximum is 254 inches with a 1 inch resolution. The sensor can only range every 50ms. The sensor has three different methods to interface with.
- RS232 Serial
- PWM
- Analog voltage output
During power up, the sensor requires 250ms to initialize. After which it uses one ranging cycle to calibrate itself and one additional ranging cycle for the first reading. These two readings take 100ms. Every reading after this initial power up cycle takes 50ms.
.
Implementation
The first method we used to try to interface with the sensor was through a UART port on our SJSUOne board. However, this proved to be troublesome as the sensor does not follow the RS232 standard and inverts all of its signals. In order to decode the signal we would have had to use a voltage inverter. To get around this, we decided to use the analog voltage output. The sensor will hold a base voltage while it sends out a pulse. As time goes on, the voltage will slowly begin to increase in 512 equal levels. The time it takes for the pulse to return to the sensor determines the final voltage it outputs over the AN pin. This results in a signal of (Vcc/512) per inch. There was a lot of issued with cross talk between the three sensors, we made sure to bend the front bumper so we would not deal with one sensor messing up the other. Along with this we also implemented an trigger to the Sonar sensor so that we could control when to send the sound wave. These two methods allowed the sensors to get reading one at a time and eliminate crosstalk. Since we had an issue inconsistent supply voltage we implemented an Resistor-Capacitor circuit to the voltage supply of each sensor to compensate for voltage spikes.
Testing & Technical Challenges
Issue #1
Motor controls were not working as per the documentation of previous groups.
- It is important that there is a COMMON GROUND for the motor and the servo. So we connected all the required grounds to the SJSU boards ground and it all functioned as needed.
Issue #2
GPS XBee module from Seeedstudio v1.4
- Connecting the GPS directly into the XBee socket of the SJSU One board would not work. Reason being was that the breakout board for the GPS module created a Tx pin that was too weak to drive the Rx pin on the SJSU one board.
- Solution: Solder a jumper wire directly to the Tx pin of the GPS chip on the breakout board, and connect that to the external Rx pin of the SJSU one board. The Rx pin of the GPS module works fine for sending commands to configure the GPS.
Issue #3
Magnetometer reading issues.
- Reading the output from the magnetometer could be done in two ways, continuous and single reading. If we want to read continuously from the magnetometer, all six data registers must be read and then we must send a command to point back to the first data register. This proved tricky to implement with the existing I2C base driver, so we resorted to using the single reading method. This method does not require us to point back to the beginning of the data registers to take the next reading.
Issue #4
GPS XBee module from Seeedstudio v1.4
- Trying to capture the NMEA sentences and properly parse it. The GPS outputs data constantly, and you must be able to capture that properly. Make sure to properly setup your variables in order to capture the data.
- Solution: Captured only the exact amount of characters coming in from the GPS. Created a char array, with a certain number of elements, and used that to capture the data, the catch is, however, that you've gotta clear the array prior to capturing the data. Essentially, each time you're trying to capture the data, make sure to clear out the char array, or char* so that it doesn't somehow get messed up like it did for us.
- For parsing through the NMEA sentence after it's been captured, the same concept must apply, you should create an array with only the number of elements you want, and make sure to clear before trying to parse. We had issues trying to set the data directly, like array[i] = nmeaSentence[i], it started overwriting stuff somehow.
- Just use a pointer and dereference it to store it.
Issue #5
UltraSonic Sensor reading issues.
- The ultra sonic sensor reading would always be inaccurate, where the analog output values would dip down for a quick second causing the car to think that there is an obstacle in front of it. To help alleviate this issue we include a RC circuit with a 100 Ohm resistors and 100 mF capacitors for provide a smooth input voltage. The following link helped us understand the issue. http://maxbotix.com/articles/035.htm
Issue #6
Motor control issues
- The motors were very inconsistent. When starting the vehicle, the motors would only turn on some of the time. However, when they did turn on they could be controlled perfectly by the SJSUOne board. When the motors were turned off, it became a struggle for them to be controlled by the board again. The issue was caused by an incorrectly programmed ESC. When we interfaced with the ESC, we imitated the wireless remote which came with the car. The ESC needs to be programmed with the full range of possible PWM values that are output by the remote. At some point this programming was erased. We followed the ESC's programming instructions and reprogrammed it to the specifications of the remote and the SJSUOne board was able to control the motors reliably.
Conclusion
Conclude your project here. You can recap your testing and problems. You should address the "so what" part here to indicate what you ultimately learnt from this project. How has this project increased your knowledge?
Project Video
Coming Soon
Project Source Code
References
Acknowledgement
Any acknowledgement that you may wish to provide can be included here.
References Used
List any references used in project.
Appendix
You can list the references you used.
