Embedded System Tutorial UART
Contents
Introduction
The objective of this lesson is to understand UART, and use two boards and setup UART communication between them.
UART stands for Universal Asynchronous Receiver Transmitter. There is one wire for transmitting data, and one wire to receive data. A common parameter is the baud rate known as "bps" which stands for bits per second. If a transmitter is configured with 9600bps, then the receiver must be listening on the other end at the same speed.
UART is a serial communication, so bits must travel on a single wire. If you wish to send a char over UART, the char is enclosed within a start and a stop bit, so to send 8-bits of char data, it would require 2-bit overhead; this 10-bit of information is called a UART frame. Let's take a look at how the character 'A' is sent over UART. In ASCII table, the character 'A' has the value of 65, which in binary is: 0100-0001. If you inform your UART hardware that you wish to send this data at 9600bps, here is how the frame would appear on an oscilloscope :
A micrcontroller can have multiple UARTs in its hardware, and usually UART0 is interfaced to a "USB to serial" converter chip which is then connected to your computer. In this exercise, you will write a driver for UART-2 and attempt to communicate between two boards.
I encourage you to fully read this article first, and here is a video about the UART0 tutorial. This is a FAST PACED video, so learn to pause the video and look over your LPC user manual frequently :) Note that I forgot to configure the PINSEL registers, which are covered by this tutorial below.
UART Pins
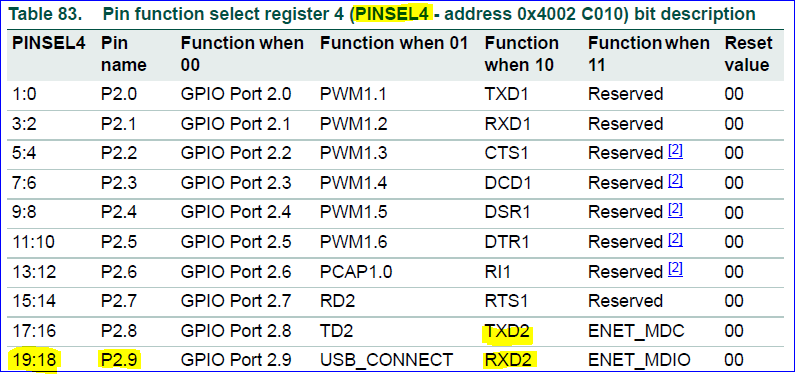
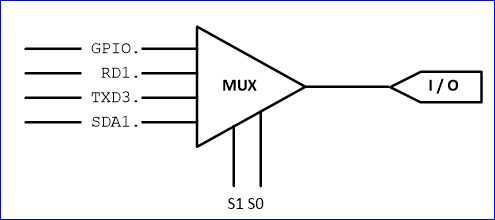
Before you write a UART software driver, you need to understand the physical constraints and identify the UART pins on your processor. A GPIO (general purpose input output) is a multi-purpose pin, and certain pins are used for certain functions. For example, P0.0 and P0.1 on your LPC17xx processor can be used for an LED (output), a switch (input), or as UART transmitter and receive signals. We will configure the microcontroller's internal MUX (multiplexor) to connect internal UART to external pins.
Clock System & Timing
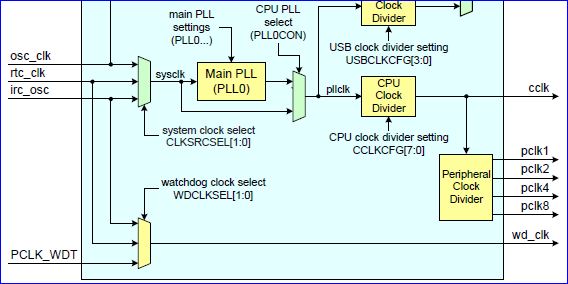
A crystal drives a processor clock, and it is usually less than 20Mhz. A processor usually uses a "PLL" or "phased-lock-loop" to generate a faster clock than the crystal. So, you could have a 4Mhz clock, and the PLL can be used to internally multiply the clock to provide 48Mhz to the processor. The same 48Mhz is then fed to processor peripherals, and sometimes you have a register that can divide this higher clock to slower peripherals that may not require a high clock rate. Remember that lower clock speed means lower power consumption.
9600bps means that one bit takes 1/9600 = 104uS (micro-seconds) per bit. The idea is that we want to divide the peripheral clock to UART hardware by a number that yields roughly 104uS per bit. The Software Driver section goes over how to configure your UART driver to divide the clock to yield the desired baud rate.
Hardware Design
There is not much hardware design other than to locate UART-2 pins on your processor board and connecting these wires to the second board. Each pin on a microcontroller may be designed to provide specific feature. So the first thing to do is identify which physical pins can provide UART-2 signals.
After you identify the physical pins, you would connect these pins to the second board. Remember that your TX pin should be connected to second board's RX pin and vice versa. Connecting two TX pins together will damage your processor. After you connect the Rx/Tx pairs together, you also need to connect the ground wire of two boards together. Not connecting the ground reference together is essentially like asking the other board "How far is my hand from the ground" when the ground reference is missing.
Software Driver
|
The UART chapter on LPC17xx has a really good summary page on how to write a UART driver. Read the register description of each UART register to understand how to write a driver. This tutorial gives away answers but unless you spend 1-2 hours reading the UART chapter, you will forget this knowledge. The datasheet shows many registers but remember that for a simple driver, we will not need interrupts so you can skip the sections that talk about the UART interrupts.
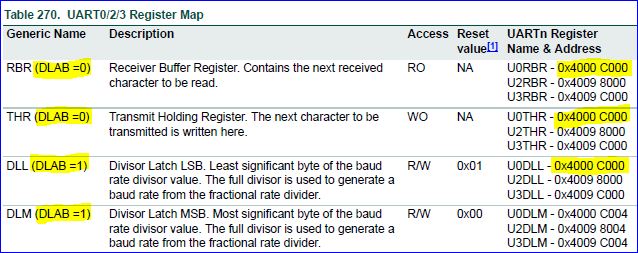
Notice that four registers have the same address. The UART divider registers are only accessible if DLAB bit is 1; this was done to protect accidental change of baud rate. Furthermore, notice that the CPU is intelligent enough to know if you are accessing the RX or the TX register based on if the register is being read or written. void uart0_init(void)
{
LPC_SC->PCONP |= (1 << 3); // Enable power to UART0
LPC_SC->PCLKSEL0 &= ~(3 << 6);
LPC_SC->PCLKSEL0 |= (1 << 6); // Uart clock = CPU / 1
LPC_PINCON->PINSEL0 &= ~(0xF << 4); // Clear values
LPC_PINCON->PINSEL0 |= (0x5 << 4); // Set values for UART0 Rx/Tx
LPC_UART0->LCR = (1 << 7); // Enable DLAB
/* See the formula picture to get more info.
* Default values of fractional dividers simplifies the equation
* Warning: You need to set DLM/DLL correctly, but if divider is small enough, it will fit inside DLL
*/
LPC_UART0->DLM = 0;
LPC_UART0->DLL = CPU_CLOCK / (16 * 9600) + 0.5);
LPC_UART0->LCR = 3; // 8-bit data
} |
char uart0_putchar(char out)
{
    LPC_UART0->THR = out;
    while(! (LPC_UART0->LSR & (1 << 6)));
    return 1;
}
To send a char over UART, the code looks incredibly easy; just two lines! It is supposed to be very easy because the UART hardware is supposed to handle the UART frame, and send start bit, followed by 8-data bits, and a stop bit by simply writing the THR register. The moment you write this register, the hardware will start shifting bits out of the wire. The while loop is present because after you write the THR register, we want to wait until hardware is done sending the bits out of the wire otherwise writing the same register again will corrupt the on-going transfer.
Advanced Design
What you've done so far is wrote a polling UART driver. If you used 9600bps, and sent 1000 characters, your processor would basically enter a "busy-wait" loop and spend 1040ms to send 1000 bytes of data. You can enhance this behavior by allowing your uart_putchar() function to enter data to a queue, and return immediately, and you can use the "THRE" or "Transmitter Holding Register Empty" interrupt indicator to remove your busy-wait loop while you wait for a character to be sent.
Assignment
- Locate the physical pins for a UART that is not already used by your board
- Configure the PINSEL to use the pins for UART Rx/Tx
- Initialize your UART at any baud rate
- Write uart_putchar(char) and uart_getchar() functions
- Interface your UART with someone else's board, and test the communication.


