F14: Team3-Self Driving Car - Optimus Prime
Contents
- 1 Optimus Prime: The Self-driving Car
- 2 Abstract
- 3 Introduction
- 4 Design & Implementation
- 5 Master Controller
- 6 Motor Controller
- 7 Sensor Controller
- 8 Geographical Controller
- 9 Android & Communication Bridge Controller
- 10 I/O Unit Controller
- 11 Conclusion
- 12 References
Optimus Prime: The Self-driving Car
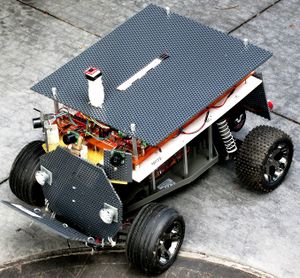
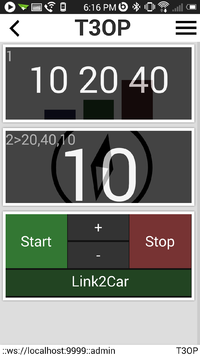
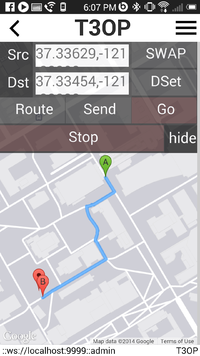
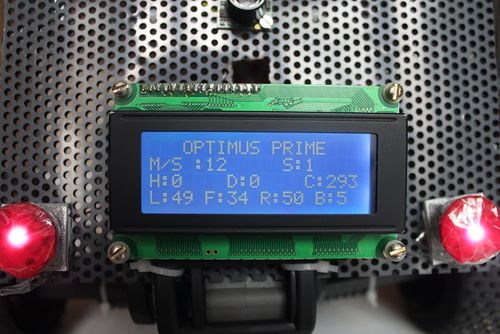
Optimus Prime, the self-driving car is an autonomous driving vehicle which is capable of driving itself to its destination using GPS. While it does so, it also avoids obstacles using multiple sensors attached to it. It has an LCD screen to display the useful information about the car in real time e.g. distance to the destination, speed, vehicle battery status, etc. The car can be controlled using an android app. This app was designed and developed specifically for this project. Using this app one can start and stop the car, increase or decrease the speed and set a destination to drive up to. This report is about designing and building this self governing car. This documentation is done keeping in mind the students who want to build their own self-driving car and for the curious ones who just want to know what goes inside an autonomous driving vehicle.
Abstract
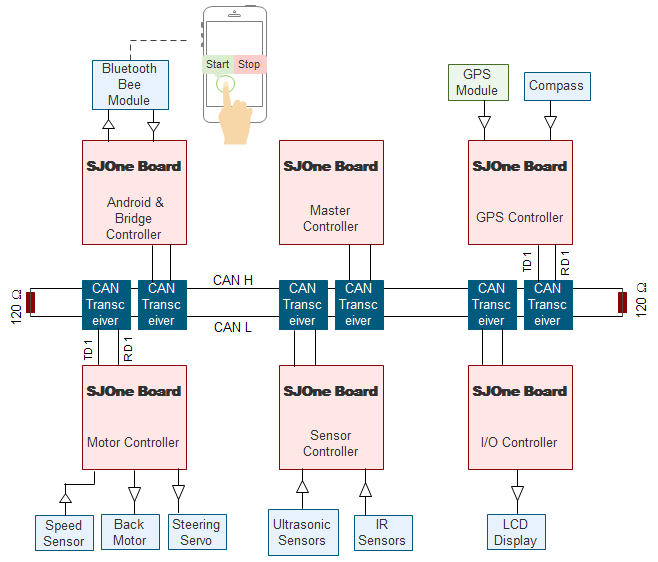
A self-driving car comprises of several controllers, each with a specific task dedicated to it. Our car consists of 6 such controllers. We have named them as Master, Motor, Sensor, GPS, Communication Bridge and I/O controllers. They communicate with each other over the CAN bus as shown in the diagram below. Each controller sends out the information over the CAN bus in the form of messages. Every controller receives only the required messages and performs the necessary task. The path navigation is achieved by the GPS. Thus the controllers do the task of a driver and navigate the path by avoiding the obstacles.The overall block diagram of the project is shown below. It includes all six controllers with their sensors and actuators, communicating through a CAN bus.
Parts List & Cost
| Item# | Part Desciption | Vendor | Part Number | Qty | Cost |
|---|---|---|---|---|---|
| 1 | RC Car | Amazon.com | Traxxas 37076 Rustler VXL | 1 | $380.57 |
| 2 | RC Car Battery | Amazon.com | Traxxas 2926 NiMH 8.4V Hump 3000mAh TRA Connector | 2 | $67.38 |
| 3 | CAN Transceiver | Texas Instrument | SN65HVD232D | 15 | $75.00 |
| 4 | Assembly Components | Amazon.com, Anchor & HSC | PCBs, Mechnical & Electical Components | NA | $110.80 |
| 5 | Power Supply | Pololu.com | 6V Battery, 5V Regulator | 1 | $34.85 |
| 6 | Sonar sensor | Maxbotix | LV-MaxSonar-EZ1 MB1010 | 3 | $99.55 |
| 7 | Sonar sensor | Given by Preet | LV-MaxSonar-EZ1 MB1010 | 1 | Free |
| 8 | Compass Module | Given by Preet | HoneyWell: HMC 6352 | 1 | Free |
| 9 | LCD Display | New Haven | NHD-0216B3Z-FL-GBW-V3-ND | 1 | $27.00 |
| 10 | Battery Status | Amazon.com | Dc 4.0-30v LED Digital Display Voltage Meter | 1 | $6.91 |
| 11 | Bluetooth Bee | Amazon.com | B005GI4HFA | 1 | $23.00 |
| 12 | Sensor RPM Long | Sheldon's Hobbies | Traxxas #6520 | 1 | $11.99 |
| 13 | Wire retainers/Gear Cover | Sheldon's Hobbies | Traxxas #6537 | 1 | $2.99 |
| 14 | Telemetry Trigger Magnet & Hold | Sheldon's Hobbies | Traxxas #6538 | 1 | $2.99 |
| 15 | Front Bumper & Screws | Sheldon's Hobbies | TRA2542 | 1 | $9.94 |
| Total Cost | 849.13 |
Team Schedule
| Sl.No | Start Date | End Date | Task | Status | Actual Completion Date |
|---|---|---|---|---|---|
| 1 | 09/15/2014 | 09/16/2014 | Order RC Car | Completed on time | 09/20/2014 |
| 2 | 09/15/2014 | 09/16/2014 | Order Other parts(Sensor/LCD/Motor Controller...) | Completed | 09/20/2014 |
| 3 | 9/30/2014 | 11/25/2014 | Master Controller Team task | Completed | 12/18/2014 |
| 4 | 10/06/2014 | 11/15/2014 | Sensor Team task | Completed | 11/15/2014 |
| 5 | 9/30/2014 | 10/20/2014 | Motor Controller Team task | Completed | 11/25/2014 |
| 6 | 10/4/2014 | 10/30/2014 | Geographical Controller Team task | Completed | 12/18/2014 |
| 7 | 10/7/2014 | 10/30/2014 | I/O Team task | Completed | 11/25/2014 |
| 8 | 9/30/2014 | 11/30/2014 | Communication Bridge + Android Team task | Completed | 11/30/2014 |
| 9 | 10/30/2014 | 11/01/2014 | Complete project integration | Completed | 11/30/2014 |
| 10 | 11/30/2014 | 12/10/2014 | Testing Phase-1 | Completed | 12/10/2014 |
| 11 | 12/11/2014 | 12/14/2014 | Testing Phase-2 | Completed | 12/14/2014 |
Introduction
CAN Bus: A brief introduction
Controller Area Network is a serial communication bus which allows microcontrollers to communicate with each other within a vehicle without a host computer. It uses differential transmission on a twisted pair wire which results in high immunity to electrical interference. Each microcontroller works as a node. There are several nodes that are connected to each other through a CAN bus. Each node is able to send and receive messages, but not simultaneously. There is an arbitration scheme which works on message priority. Each microcontroller has its own message ID. Lower message ID represents higher message priority. To learn more about CAN bus communication, visit the following wikipage article.
The Six Controllers
- Master Controller
- Motor Controller
- Sensor Controller
- Geographical Controller
- Android & Communication Bridge Controller
- I/O Unit Controller
Design & Implementation
Controller Communication Table
| Controller ID | Controller Type |
| 0x01 | Master Controller |
| 0x02 | Motor Controller |
| 0x03 | Sensor Controller |
| 0x04 | Geographical Controller |
| 0x05 | IO Controller |
| 0x06 | Bridge Controller |
| Message Number | Purpose / Data layout |
| 0x101 | Get version and boot info |
| 0x102 | Get general info |
| 0x103 | Synchronize (set) time:
byte [0-3] : System time |
| 0x201 |
byte [0-3] : Version Info byte [4-7] : boot timestamp |
| 0x202 |
byte [0-3] : Current time byte [4] : CPU usage % |
| Byte 0 | Effect |
| 0 | Off |
| 1 | 1Hz |
| 5 | 5Hz |
| 10 | 10Hz |
| 20 | 20Hz |
| 50 | 50Hz |
| Any other value | Invalid date rate |
Master Controller
Group Members
Bhargava Leepeng Chandra
Preeti Benake
Description
Master controller acts as the 'Brain' of the car. It communicates with all the other Controllers on board to implement different Functions. Being the Brain it intelligently processes the data it receives from Sensor, GPS and Bridge controllers to make the car run autonomously. It has several features embedded in it, and controls the car by sending commands to the Motor Controller. In short the master controller actively Receives, Processes and Transmits real-time data.
Master Controller Team Schedule
| Week No. | Start Date | Planned End Date | Task | Status | Actual End Date |
|---|---|---|---|---|---|
| 1 | 9/30/2014 | 10/7/2014 |
* Implement Basic CAN Hardware to communicate between 2 Controllers |
|
10/7/2014 |
| 2 | 10/7/2014 | 10/14/2014 |
* Design CAN Acceptance Filter among different Controllers * Define and Implement CAN Frame structure for proper communication establishment |
|
10/11/2014 |
| 3 | 10/14/2014 | 10/21/2014 |
* Develop Inter-Controller Communication over CAN * Test point-to-point and Broadcast message transmission * Implement a Counter to count and display number of messages |
|
10/19/2014 |
| 4 | 10/21/2014 | 10/28/2014 |
* Layout blueprint for Controller and Module positioning * Assemble the RC Car with all the controllers and Modules * Define the Message List by working with other teams * Start working on CAN Periodic message structure |
|
10/28/2014 |
| 5 | 10/28/2014 | 11/04/2014 |
* Complete CAN Periodic message structure to transmit Broadcast messages over CAN and establish controlled communication among different controllers * Implement Start condition detection and Fetch boot status from all controllers and display the status of each controller |
|
11/03/2014 |
| 6 | 11/04/2014 | 11/11/2014 |
* Design 'Kill Switch' in co-ordination with Motor Controller team and Bridge Controller team * Develop a 'CAN Bus Crash' detection and reset CAN Bus methodology * Design Automatic Head Light turn ON/OFF functionality by working with Sensors Controller team |
|
11/11/2014 |
| 7 | 11/11/2014 | 11/18/2014 |
* Implement File Log saving to SD Card at periodic intervals * Work on Restoring to last known Status if the system crashes while running * Develop Detection technique if controllers are reaching 'Error State' |
|
11/18/2014 |
| 8 | 11/18/2014 | 11/25/2014 |
* Project Integration and testing Basic Self_Drive Capability of the Car * Check the Functionality and behavior of all controllers in all the known contexts * Perform modifications (if any) to eliminate any bugs to make the car work seamlessly * Final Integration of car and testing there after |
|
11/26/2014 |
| 9 | 11/25/2014 | 12/02/2014 |
* Final Integration and testing Self_Drive Capability of the Car |
|
12/8/2014 |
| 10 | 12/02/2014 | 12/18/2014 |
* Final Testing with all Features |
|
12/15/2014 |
Hardware Design
- An RC car was used as a base to demonstrate the Self-Driven Capability of a car with all the Controlling done by SJOne boards.
- The hardware for this Project is custom designed according to the requirements of the project.
- This includes building the Chassis to place all the SJOne boards.
- Sufficient Power and Ground slots for all the Sensors, GPS, Compass, LCD breakout boards.
- Designing a CAN bus structure for establishing communication among different SJOne boards.
- Designing a Spike protection for the Input power supply.
- Finally Sufficient number of pins(if necessary) to connect external Breakout boards to the SJOne controllers.
Hardware Implementation
- First we have started by designing the chassis using a PCB as base to place all the SJOne boards that represents the 6 sub-teams,this includes a separate base for placing LCD module, Head-lights and Tail-lamps.
- As a second step we moved forward by designing the circuitry for Power Supply and Spike protection by designing a 5V voltage regulator, that serves as a power supply to all the SJOne controllers and LCD module.
- Then sufficient VCC and GND slots were added to the PCB that could accommodate Sonar sensors, GPS and Compass modules, Head-lights and Tail-lamps.
- Later a common CAN bus structure was designed to support the CAN transceivers for each individual SJOne board. The entire system is built around this CAN structure.
- Then the Hardware was made robust enough to take all the hits during the testing process.
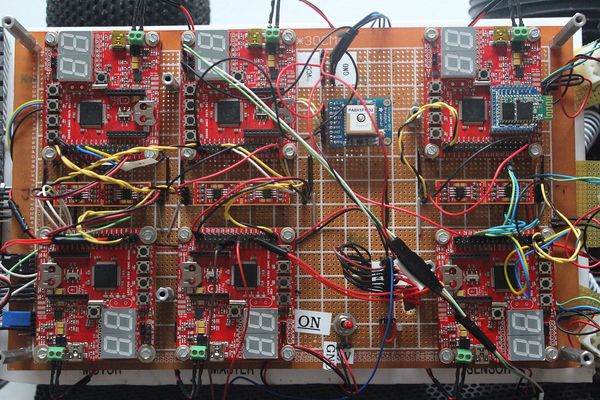
Following is the top view of the car showing the connection of all the 6 controllers and the hardware interfaced to each of them.
Hardware Challenges and Difficulties
- The major challenge is to design a common CAN bus structure. One need to understand the electrical characterisitcs of CAN in order to design it better. We had to go through several debugging stages to evaluate the perfromance of the CAN bus as it used to fail at times.
- Care must be taken in designing the connections for CAN-HIGH and CAN_LOW. The supply for each CAN needed to be separate in our case in order to provide sufficient drive current to the CAN transceiver.
- Next to this another challenge was to make the Hardware robust. During the testing phase it takes a lot of hits and bangs, the module fitting and the circuitary needs to be good enough to absorb all the pressure. By reducing the number of wired connections the robability of hardware fails can be reduced.
- Another difficulty was to supply PWM signals to the Motor. The Signals should be strong enough to run the DC motor and Servo motor of the car. It happened to be that if the trace/wire connection is too long the PWM signal is losing its strength. So it should be as much near to the motor as possible.
- The positioning of the Sonar sensors should be appropriate to avoid any bounce off, To deal with the bouncing effect we should place it at some height/angular height to reduce the possiblity of bouncing from the ground. Also each sensor should be at a distance and angle with respect to other sensors to facilitate sufficient area of detection.
- The positioning of Compass module is a little bit tricky. This should be far away from Electrical/Magnetic interferences as it very sensitive to these effects. So we placed it on the top at a height to avoid any corrupted values.
Hardware Interface
| Description | Your Device Port | SJOne Development Board Port |
|---|---|---|
| Supply Voltage | Supply +5V | Board +5V |
| Ground | Supply GND | Board GND |
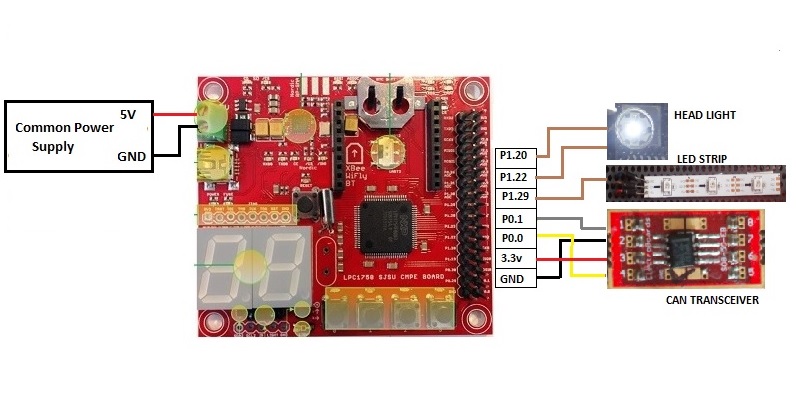
| CAN Transceiver | Pin no. 1 Driver Input
Pin no. 4 Receiver Output |
P0.1 CAN TD1
P0.0 CAN RD1 |
| Head Lights | LED +3.3V
LED GND |
Pin 1.20, 1.22 GPIO
Common GND |
| LED Strip | LED Strip DIN
LED Strip +5V LED Strip GND |
Pin 1.29 GPIO
Common VCC Common GND |
Software Design
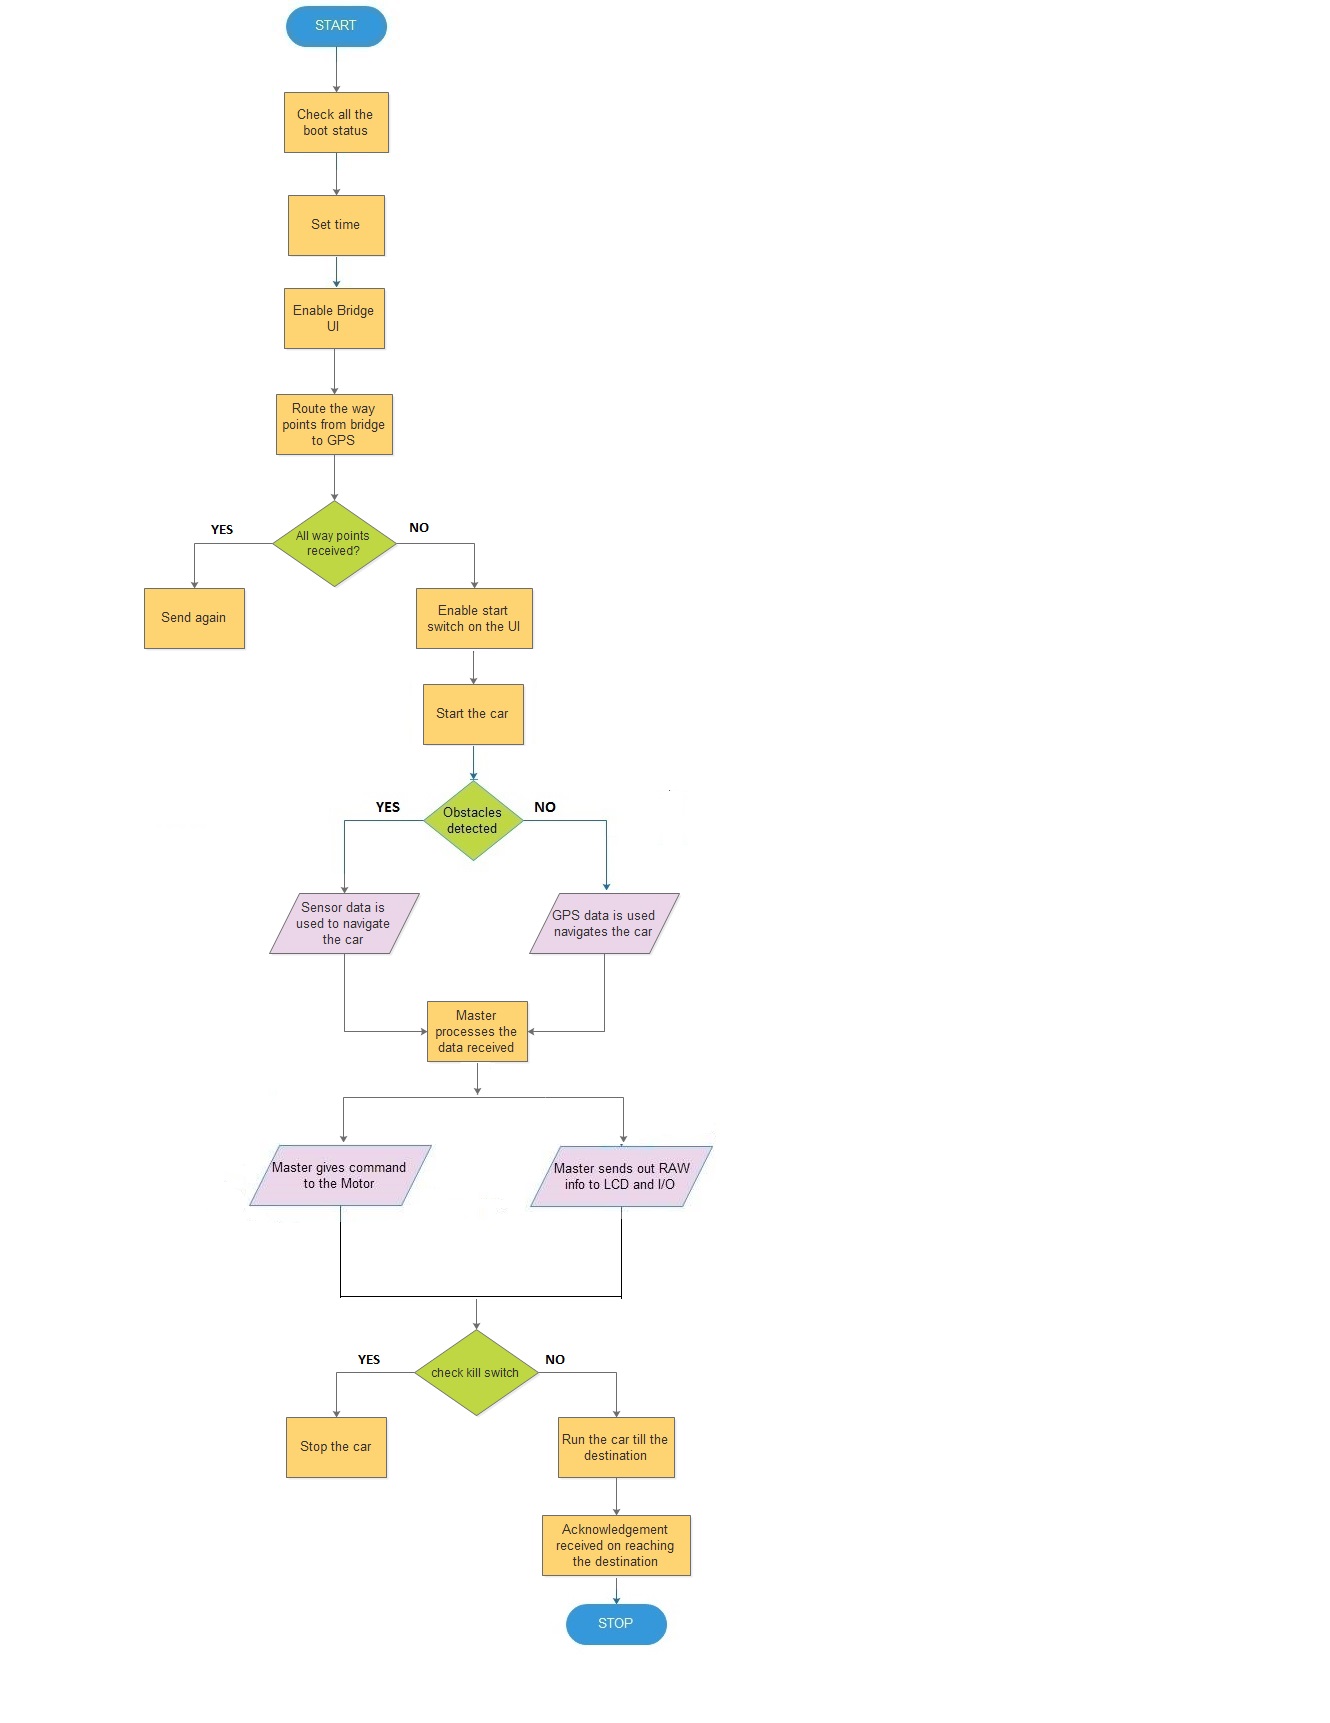
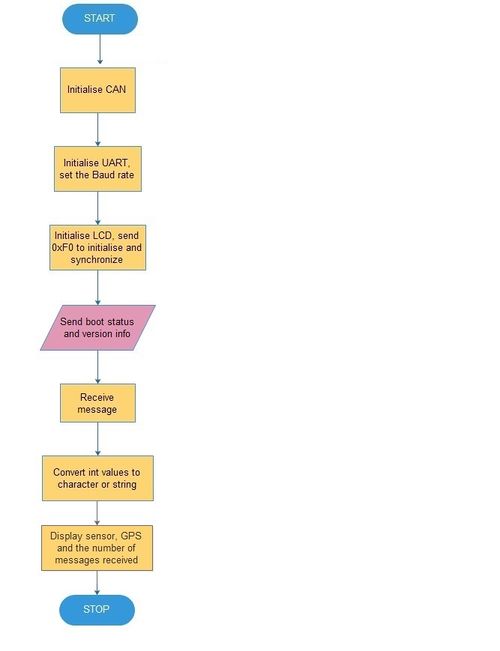
The software implementation of the master controller is explained by the flowchart.
Implementation
| Message Number | Purpose | Data Byte Pattern | |
| 0x101 | Ask for Boot and Version Info. of all Controllers |
Byte[0]: Send a '1' |
|
| 0x103 | Sync. Master System Time on all Controllers |
Byte[0-3]: System Time [HH:MM:SS] |
|
| 0x201 | Master Gets Status Update from all controllers |
Byte[0]: Boot Status Byte[1]: Version Info. |
|
| 0x203 | Master Gets current Time from all Controllers |
Byte[0-3]: Time in [HH:MM:SS] |
|
| 0x301 | Master Enable Main UI in Android |
Byte[0]: Send a '1' |
|
| 0x302 | Master set GPS Destination on Geo Controller |
Byte[0-3]: Latitude Value Byte[4-7]: Longitude Value |
|
| 0x303 | Master set Longitude Way-Points on Geo |
bytes [0-1] : Total Way-Points count bytes [2-3] : Way-Point index bytes [4-7] : Longitude(float) |
|
| 0x304 | Master set Latitude Way-Points on Geo |
bytes [0-1] : Total Way-Points count bytes [2-3] : Way-Point index bytes [4-7] : Latitude(float) |
|
| 0x305 | Master Send GPS FIX Ack to Bridge |
Byte[0]: Send a value '1' |
|
| 0x306 | Master Send Dest. Reached Ack to Bridge |
Byte[0]: Send a Value '1' |
|
| 0x500 | Display Boot and Version Info. on LCD |
Byte[0]: Boot Status Response Byte[1]: Version Info. |
|
| 0x501 | Display Controllers Time on LCD |
Byte[0-3]: Time in [HH:MM:SS] |
|
| 0x502 | Display Destination Has Reached |
Byte[0]: Send a '1' |
|
| 0x503 | Master Set Speed and Direction of Motor |
Byte[0]: LEFT/RIGHT (or) FRONT/BACK command |
|
| 0x504 | Display Speed of Motor on LCD |
Byte[0]: Speed Value |
|
| 0x505 | Display GPS and Compass values on LCD |
Byte[0-1]: New Degree to Head Byte[2-3]: Dist to Destination Byte[4-5]: Current Degree value |
|
| 0x506 | Display Sensor Values on LCD |
Byte [0]: Front sensor value in inches Byte [1]: Front Left sensor value in inches Byte [2]: Front Right sensor value in inches Byte [3]: Back sensor value in inches |
|
| 0x507 | Display Battery Status on LCD |
Byte[0]: Battery Status Value |
|
| 0x540 | Send GPS Data to Bridge |
Byte[0-1]: Heading Degree Byte[2-3]: Dist. to Destination Byte[4-5]: Current Bearing Degree Byte[6-7]: Difference between Heading and Bearing angle |
|
| 0x550 | Send Sensor Data to Bridge |
Byte[0]: Front Sensor Byte[1]: Front Right Sensor Byte[2]: Front Left Sensor Byte[3]: Back Sensor Byte[4]: Speed value |
Testing and Technical Challenge
We have faced several Difficulties during Software design implementation for Master Controller. Some of these issues are discussed here.
- Top of the list is the Integration. We have faced difficulty in achieving the integration of all the individual controllers working together in parallel.
- Another issue is the CAN bus communication failure which is due to improper transmitting formats like message ID duplication causing the CAN bus error. There are also issues due to improper configuration of acceptance filter, which is later resolved.
- We have also faced difficulty when using the FreeRTOS queues, This is caused due to using a particular queue at some locations before it is actually declared declared.
- Apart from this the Queue timing implementation has to be observed carefully as it may conflict the frequency of real time Data that causes error status as the receiving queue task cannot see any data on the queue.
- We have faced difficulty in data synchronization during testing. The real-time data needs forced us to modify the Transmitting frequencies from certain controllers, particularly for Geographical controller.
Motor Controller
Group Members
Shashank Tupkar
Naghma Anwar
Shiva Moballegh
Motor Controller Team Schedule
| Week No. | Start Date | Planned End Date | Task | Status | Actual End Date |
|---|---|---|---|---|---|
| 1 | 9/30/2014 | 10/7/2014 |
|
|
10/7/2014 |
| 2 | 10/7/2014 | 10/14/2014 |
|
|
10/11/2014 |
| 3 | 10/14/2014 | 10/21/2014 |
|
|
10/19/2014 |
| 4 | 10/21/2014 | 10/28/2014 |
|
|
11/04/2014 |
| 5 | 10/28/2014 | 11/04/2014 |
|
|
11/04/2014 |
| 6 | 11/04/2014 | 11/11/2014 |
|
|
11/11/2014 |
| 7 | 11/11/2014 | 11/18/2014 |
|
|
11/18/2014 |
| 8 | 11/18/2014 | 11/25/2014 |
|
|
12/12/2014 |
Hardware Design
Parts and their functions
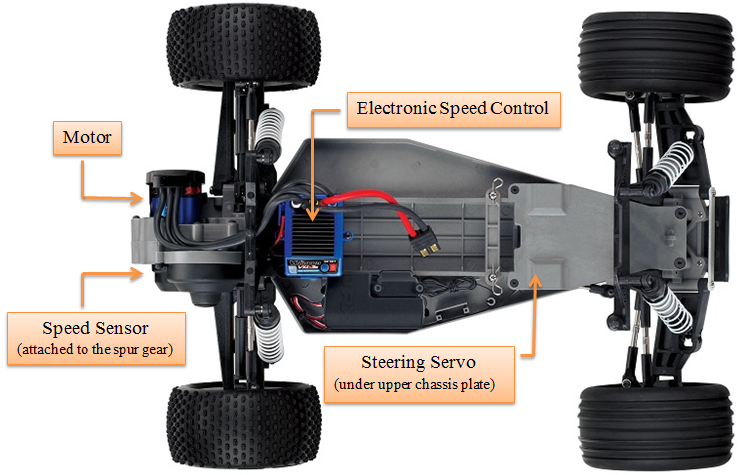
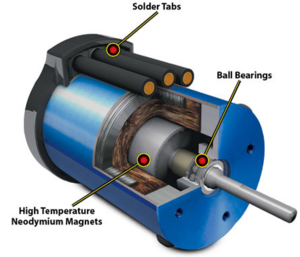
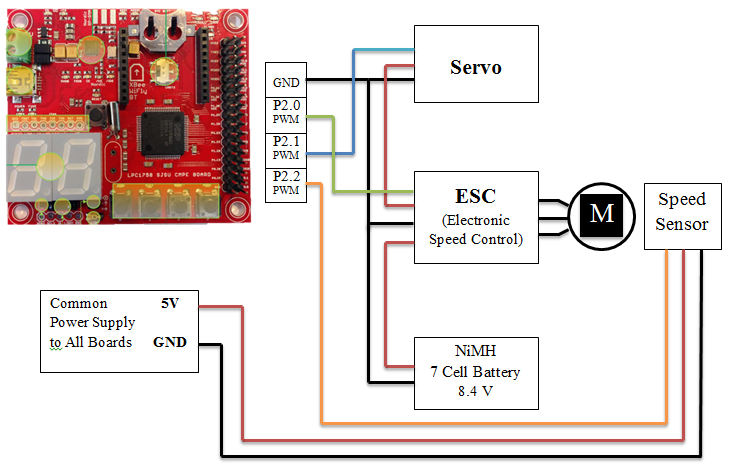
Motor : Our RC car came with Velineon 3500 Brushless Motor. One of the main drawbacks of brushless motor is that it requires a speed controller to change the field polarity. We can't just give power to the motor directly and expect it to go. We can almost consider the controller as an integral part of the motor itself.
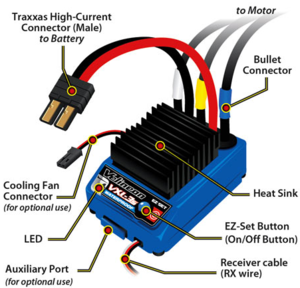
ESC : Electronic speed controller was the trickiest part to deal with, since it comes with a previously programmed microcontroller inside it. It needs callibration, for which you need to refer to the user manual. An electronic speed controller basically controls the power given to the motor. Our RC car came with VXL-3s ESC, which accepted 100 Hz PWM input signal whose duty cycle varied from 10% to 20%. When supplied with a 15% duty cycle at 100 Hz, the ESC responded by turning off the motor attached to its output.
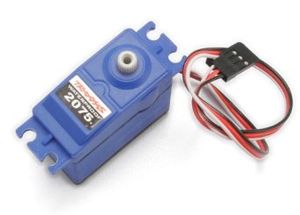
Steering Servo : Our RC car was equipped with a digital servo (Traxxas part #2075) for steering control. It does not require an ESC to operate. We can give PWM signal directly to the servo from the SJOne board. The servo accepted 100 Hz PWM input signal whose duty cycle varied from 10% to 20%, where 10% represents extreme right turn and 20% represents extreme left turn.Speed Sensor : To measure the RPM and speed of our car, we used the speed sensor provided by Traxxas Telemetry. This magnetic speed sensor worked on Hall effect. To learn more about Hall effect sensors, you can click on this wikipedia article. Since the sensor was provided by the same brand of our car, the installation was quick and easy. Here's a reference video on how to attach magnetic speed sensor to the RC car.
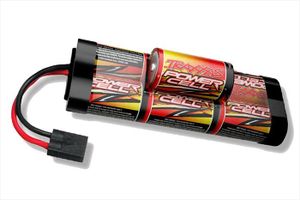
Battery : We used 7 Cell NiMH (Nickel-Metal Hydride) battery pack for our car but would recommend others to use Lipo (Lithium Polymer) batteries instead. NiMH batteries tend to discharge very quickly. Also we realized later that since this car was made for racing purpose, its speed was too fast for our project. We reduced the voltage by removing 2 cells from the 7 cell battery pack. So, go for the 5 cell battery pack instead. A Traxxas EZ-Peak Charger would help a lot while doing testing.
Gears : Gears also play an important role in determining the Speed of the car. A gear is defined by the number of Cogs (teeth) which determines if the gear increases (or) decreases the output speed delivered to the axle. So, we can also opt for different gears to reduce the overall speed in any case necessary. In our case changing the gears isn't an option since our car is set with the minimum gear as it belongs to sports car category. But however some custom gears can still do the job in reducing the unnecessary speed, though they are a little bit hard to get our hands on it.
Hardware Interface
Motor, Servo and Speed Sensor Interface
| Description | Your Device Port | SJOne Development Board Port | Commands | Note |
|---|---|---|---|---|
| Supply Voltage | 6V from NiMH battery | N/A | ||
| Ground | GND (Black Wire) | GND | ||
| ESC |
Control (White Wire) |
P2.0 PWM |
PWM motor(PWM::pwm1, 101); motor.set(14.5); |
Sets PWM signal of 101 Hz Sets duty cycle of 14.5% for forward movement |
| Servo |
Control (White Wire) |
P2.1 PWM |
PWM servo(PWM::pwm2, 101); servo.set(15); |
Sets PWM signal of 101 Hz Sets duty cycle of 15% for no turn |
| CAN Transceiver |
Pin no. 1 Driver Input Pin no. 4 Receiver Output |
P0.1 CAN TD1 P0.0 CAN RD1 |
TI CAN Transceiver SN65HVD232D Pin 7 - CAN H & Pin 6 - CAN L |
Software Design
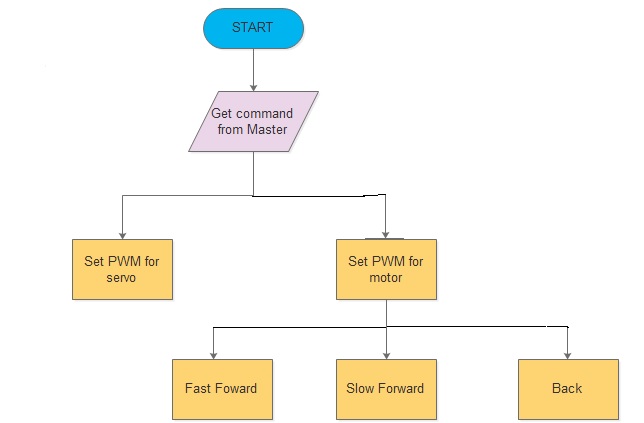
Implementation
| Message Number | Purpose | Data layout |
| 0x508 | Speed Sensor Data |
byte [0] : Speed sensor value in rpm |
| 0x509 | Vehicle Direction/Movement Data |
byte [0] : Movement Control
     0x1 : Forward
     0x2 : Reverse
     0x3 : Stop
byte [1] : Steering Control
     0x1 : Left
     0x2 : Right
     0x3 : Straight
|
Testing and Technical Challenge
- Motor Controller
- ESC
- Electronic Speed Control is tricky to handle since it has its own pre-programmed micro-controller inside it which needs calibration according to the user manual.
- We started with calibrating the ESC using RC car's transmitter, but later we had to write our own calibration code.
- Motor
- We tested the motor speed by measuring the PWM signal on oscilloscope. We started by reading the PWM signal on oscilloscope while manipulating the speed of the RC car using its transmitter module.
- Since the car was made for racing purpose, we had to keep the speed to its lowest value.
- The transmitter and receiver of the RC car was detached from it. We gave PWM signal to the ESC and Servo through SJOne board.
- It turned out that ESC was not accepting the PWM signal because it needed calibration each time its setting is changed.
- We overcame this problem by including a calibration init code in our program.
- We also noticed that as we added more hardware on top of the car, its speed was affected because of the load. We had to change the PWM value accordingly.
- Servo
- Since servo was not connected to the ESC it was pretty easy to handle. We could give PWM signal directly to servo and it moved accordingly.
- ESC
Sensor Controller
Group Members
Deepak Yadav
Vinod Pangul
Sensor Team Schedule
| Sl.No | Start Date | End Date | Task | Status | Actual Completion Date |
|---|---|---|---|---|---|
| 1 | 10/6/2014 | 10/18/2014 | Order Ultra Sonic Sensors | Completed [Got two sensors (front and back), 2 more (front right & left) to order ->Completed.] | 10/19/2014 |
| 2 | 10/9/2014 | 10/9/2014 | Sensor Data Sheet review with the team | Completed | 10/9/2014 |
| 3 | 10/9/2014 | 10/16/2104 | Sensor code development | Completed (Implementing filter (HW/SW) to get more accurate data ->(Done). Add logic to get the rest of the three sensor(front right/left and back data)->(Done) (Note: Delayed due to the implementation of CAN structure and calibration of IR sensor) | 10/21/2014 |
| 4 | 10/22/2014 | 10/25/2014 | Sensor software testing | Completed | 10/25/2014 |
| 5 | 10/25/2014 | 10/28/2014 | Sensor real time testing | Completed | 10/28/2014 |
| 6 | 10/13/2014 | 10/15/2014 | Light sensor code Development | Completed | 10/14/2014 |
| 7 | 10/13/2014 | 10/15/2014 | Accelerometer sensor code Development to detect tilt | Completed | 10/14/2014 |
| 8 | 10/15/2014 | 10/15/2014 | Light Sensor and Accelerometer Testing | Completed | 10/15/2014 |
| 11 | 11/03/2014 | 11/04/2014 | Common Communication SW code implementation and testing | Completed | 11/04/2014 |
| 11 | 11/04/2014 | 11/09/2014 | Complete Hardware testing-1 | Completed | 11/09/2014 |
| 12 | 11/10/2014 | 11/15/2014 | Complete Hardware testing-2 | Completed | 11/15/2014 |
Sensors : Sonar Sensors + Light and Accelerometer sensor
Hardware Design
A) Sonar Sensor:
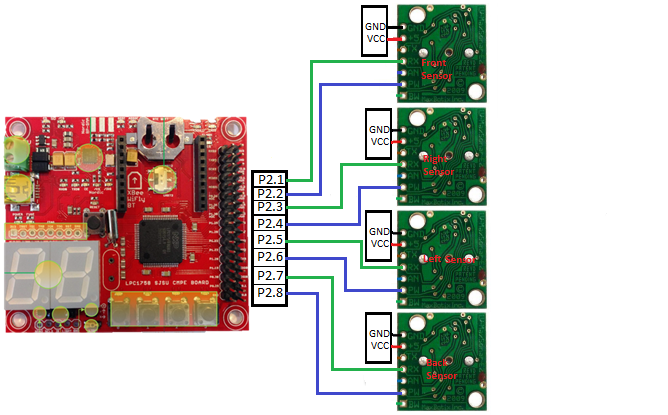
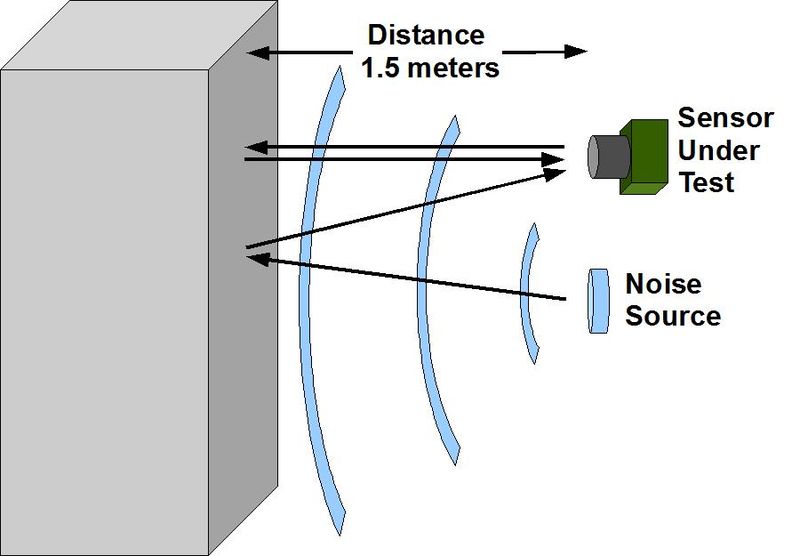
- The LVMax long distance sonar sensors are used to detect the objects. We used four such sensors, three in the front and one in the back to get wide angle vision for the car. The Sonar Sensors sends sound waves when triggered and then the sensor signal emits a PWM that needs to be timed to detect the distance. The PWM width depends on the time it takes for the sound waves to bounce back from an object. The following figure explains how the distance is calculated.
B) Light and Accelerometer Sensor:
- The inbuilt accelerometer and light sensor on SJoneBoard is used to read their values. The inbuilt driver libraries provide by Prof. Preet is used to read both the accelerometer and the light sensor value and broadcast it over CAN bus for the detection of Car's light and front light of the car.
Software Design
Sonar Sensor
- Configure PW as input
- Enable PW as Rising and falling edge interrupt
- Configure RX as output, and give a 20uS Pulse of HIGH then LOW
- Take a snapshot of a hardware timer (T1) or start a hardware timer When Rising edge interrupt occur on PW.
--> After few microsecond <--
- PW will go HIGH,take a snapshot of a hardware timer or start a hardware timer When Rising edge interrupt occur
--> After some time <--
- PW will go LOW and the interrupt on falling edge will now trigger, Take a snapshot of a hardware timer (T2).
- Calculate the time difference (T2-T1) and convert the time into inches/CM (Formula is provided by the datasheet).
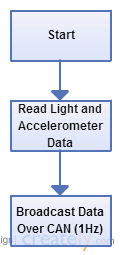
Light and Accelerometer
- The library provided with SJOne Board has drivers for light and Accelerometer sensors. The only thing is to be done is to read the light sensor and accelerometer sensor data and broadcast to Master controller over CAN bus at rate of 1Hz.
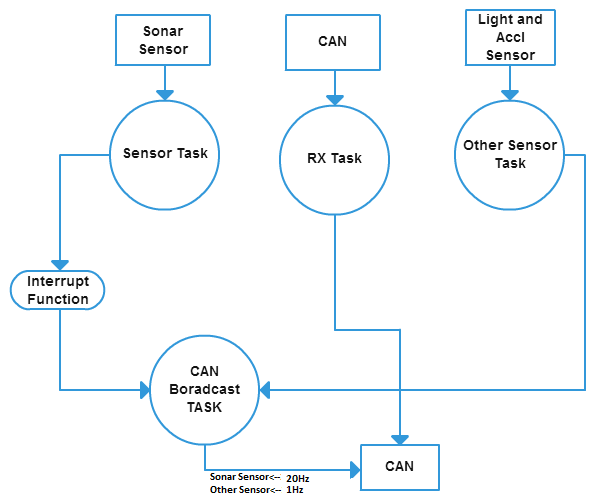
Sensor Controller Task
- Below is the overall flowchart of the sensor controller task.
Implementation
| Message Number | Purpose | Data layout |
| 0x510 | Front/Back Range Sensor Data |
byte [0] : Front sensor value in inches byte [1] : Front Left sensor value in inches byte [2] : Front Right sensor value in inches byte [3] : Back sensor value in inches |
| 0x511 | Accelerometer/Light Sensor |
byte [0] : X axis Value byte [1] : Y axis Value byte [2] : Z axis Value byte [3] : Light sensor value |
Testing and Technical Challenge
- Front and Back Sensors Controller
- To test the Sonar sensors, We placed the object in front of the sonar sensor and checked the pulse generated by the sonar sensors on Oscilloscope. The sensors data is verified by printing it on the Output terminal. We also tested the working of sensor with the moving car. We logged the data on the SD card and also displayed it on the seven segment display when we the car was moving.
We used Maxbotix LV-MaxSonar sensors. It has Three mode for getting data-Pulse width (PW), Analog (AN) and RS232. We went for Pulse width mode, because RS232 found to be very inaccurate and needed more pin connections (RX,TX,GND and 4 UART), SJOne board has only three available analog pins for use and we needed 4 of them and also they were not fast enough and their minimum distance is only 6 inch. So, we decided to go for Pulse width mode. The PW mode are much accurate and they are fast. Their distance range is from 3 inch to 254 inch. Moreover, PW can be connected to GPIO pins with external interrupt functionality. Since SjOne Board has more available GPIO pins on Port2 with external Interrupt functionality, PW mode option was chosen.
The sonar sensors needs some time of delay to complete the full distance reading if no object is detected within the max range.The delay is ~50ms for each sensor to complete the distance calculation. So, a min 50ms delay is needed between every next triggering of RX pin. The value provided by the sensors are accurate, but not very stable. We tried using mode filters to avoid unstable readings. The only drawback of using filters was that it slowed down the sensors reading. After few experiment we found out that sensors are much more stable and provide a very accurate reading when we put a large delay around 20 ms between toggling the trigger pin (RX) and polling on CPU and not using external interrupt for calculating the distance time. This method is a very bad design as it can consume unnecessary CPU time, and its max range is not accurate and fixed (due to timeout delay), and it may give inaccurate reading if any interrupt occur. Since sensor task had no other major task running and after few experiment we found out that without using external interrupt and just polling the sensor value (bad design approach) was more reliable and accurate!!. The future implementation would be to find the solution to get the more reliable and accurate data using external interrupt function.
Geographical Controller
Group Members
Bhushan Gopala Reddy
Ryan Marlin
Rishikesh Nagare
Geographical Team Schedule
| Sl.No | Start Date | End Date | Task | Status | Actual Completion Date |
|---|---|---|---|---|---|
| 1 |
10/4/2014 |
10/13/2014 |
Research and Order GPS module |
Received GPS module |
10/7/2014 |
| 2 |
10/7/2014 |
10/18/2014 |
Interface GPS module with LPC1758 |
Finished |
10/17/14 |
| 3 |
10/14/2014 |
10/18/2014 |
Receive Compass module from Preet |
Received |
10/9/2014 |
| 4 |
10/18/2014 |
11/4/2014 |
Parse GPS data and setup constructs to send appropriate data |
Finished |
11/1/2014 |
| 5 |
10/14/2014 |
10/18/2014 |
Interface the Compass Module |
Finished |
10/16/2014 |
| 6 |
10/25/2014 |
11/4/2014 |
Calibration of Compass |
Finished |
11/1/2014 |
| 7 |
11/4/2014 |
11/11/2014 |
Integrate GPS and Compass data |
Finished |
11/4/2014 |
| 8 |
10/25/2014 |
11/30/2014 |
Testing and mapping of GPS co-ordinates |
Finished |
11/20/2014 |
| 9 |
11/18/2014 |
12/18/2014 |
Final integration and testing |
Finished |
12/15/2014 |
Hardware Design
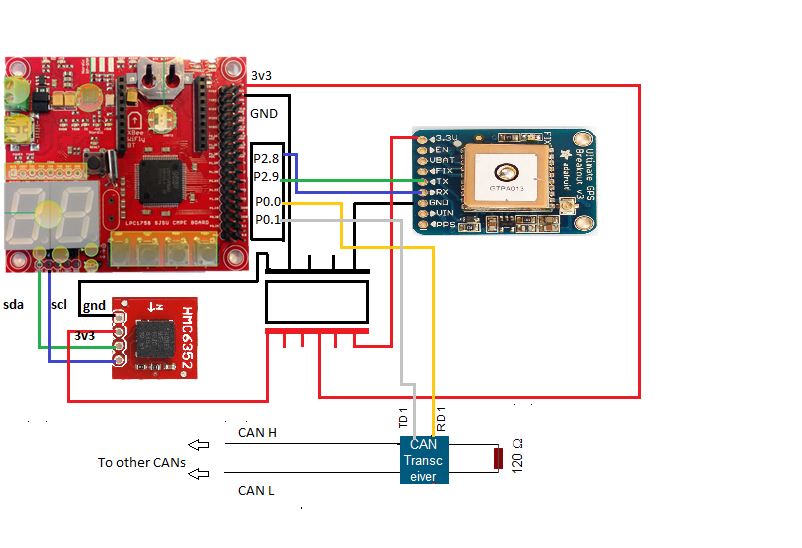
Hardware Interface
| Description | Your Device Port | SJOne Development Board Port |
|---|---|---|
| Supply Voltage | Vcc | 3v3 |
| Ground | GND | GND |
| GPS Module |
Channel 1 -> Rx, Channel 2 -> Tx |
Channel 1-> Tx P2.8, Channel 2-> Rx P2.9 |
| Compass |
SCL SDA |
SCL2 -> P0.11 SDA2 -> P0.10 |
| CAN Transceiver |
Pin no. 1 Driver Input Pin no. 4 Receiver Output |
P0.1 CAN TD1 P0.0 CAN RD1 |
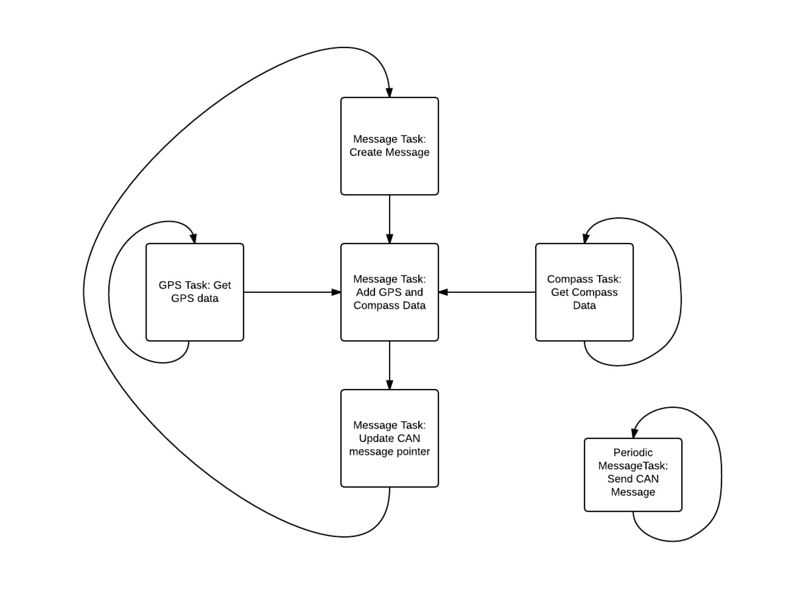
Software Design
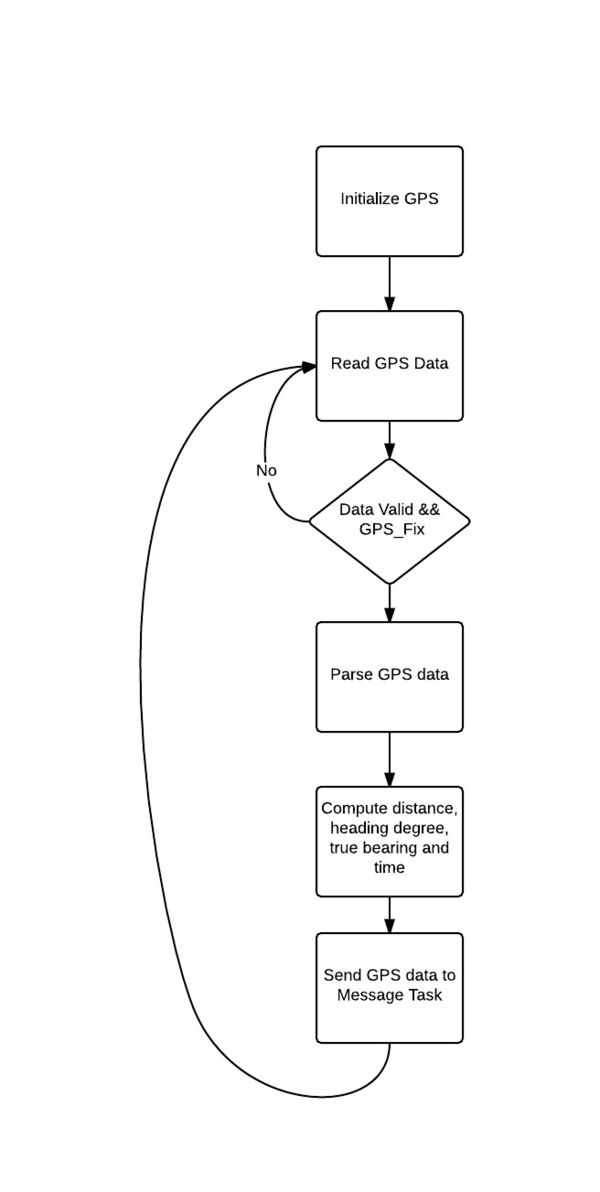
The figure above shows a top level view of the geographical team's software flow. The main message task, shown in the middle, is responsible for handling and updating the CAN message pointer. The CAN message pointer is read and handled in a separate periodic task that runs and sends messages across the CAN bus at frequencies of 1, 5, 10 or 20 Hz.
The GPS and compass tasks, shown on the left and right respectively, collect their respective data and send that data to the message task. The message task will grab this data and stuff the CAN message variable to be sent to the Master module.
GPS
NMEA (National Marine Electronics Association)
- NMEA consists of sentences, the first word of which, called a data type, defines the interpretation of the rest of the sentence.
- Each Data type would have its own unique interpretation and is defined in the NMEA standard.
- In our project we are using RMC (Recommended Minimum GPS data).Below is an example of RMC data.
$GPRMC,123519,A,4807.038,N,01131.000,E,022.4,084.4,230394,003.1,W*6A
Where:
    RMC          Recommended Minimum sentence C
    123519       Fix taken at 12:35:19 UTC
    A            Status A=active or V=Void.
    4807.038,N   Latitude 48 deg 07.038' N
    01131.000,E  Longitude 11 deg 31.000' E
    022.4        Speed over the ground in knots
    084.4        Track angle in degrees True
    230394       Date - 23rd of March 1994
    003.1,W      Magnetic Variation
    *6A          The checksum data, always begins with *
Connection and Software Flow GPS:
SJone board and GPS module is connected using UART. At boot-up GPS tries to get fix for all possible satellites to get proper GPS values.
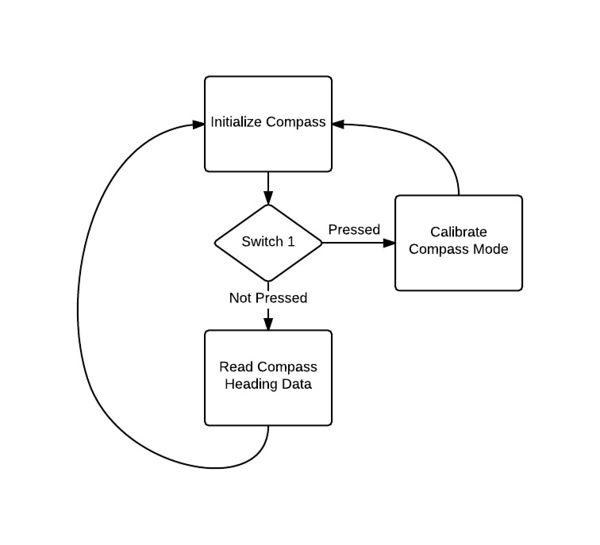
Compass
The Compass works over the I2C bus interface. Based on the datasheet, the compass will send data when it receives a 'A' command.
Implementation
| Message Number | Purpose | Data layout |
| 0x518 | Send GPS Data to Master |
byte [0] : New Degree byte [1] : Distance byte [2] : Current Degree |
| 0x519 | Send GPS FIX ACK to Master |
byte[0]: Send a '1' |
| 0x52A | Send Destination Reached ACK to master |
byte[0]: Send a '1' |
Testing and Technical Challenge
- Geographical Controller
- GPS
- GPS data was relatively straightforward to receive, however we ran into quite a few issues trying to parse the data.
- Often times we would read the UART data in the middle of the buffer being changes to the next data point, for example, the reading would look like this:
- $GPRMC,123519,A,4807.038,N,01131.000,E,022.4,084.4$GPRMC,123519,A,4807.038
- Instead of the normal data point: $GPRMC,123519,A,4807.038,N,01131.000,E,022.4,084.4,230394,003.1,W*6A
- By checking the Checksum at the end of the string, *6A, we were able to determine the number of characters that were supposed to be in the string and exclude any strings that did not have the correct number of characters.
- Compass
- The Compass data was also straight forward to get. The compass HMC6352 has many useful features as provided in the datasheet, We focused on using the basic output data mode with heading mode.
- The Compass is very sensitive to any kind of magnetic interference. In our project it were the motors and we had to make sure we mount the compass as far as possible from the motors to avoid any interference even though we had the calibration mode set up.
- Sometimes the SDA and SCL used to get short (not because of hardware problem) maybe due to line impedance or parasitic capacitance since the wires were close to each other. A software reset can solve the problem.
- GPS
Android & Communication Bridge Controller
Group Members
Chia-Pin Tseng (Ben)
Johnny Yam
Kevin Beadle
Communication Bridge & Android Team Schedule
| Sl.No | Start Date | Planned End Date | Task | Status | Actual End Date |
|---|---|---|---|---|---|
| 1 | 9/30/2014 | 9/30/2014 | Obtain Bluetooth Module (already had one) | Done | 9/30/2014 |
| 2 | 9/30/2014 | 10/14/2014 | Develop Basic Android App with Bluetooth Sensor Communication | Done | 10/7/2014 |
| 3 | 10/11/2014 | 10/14/2014 | Interface Bluetooth Module with SJSU Dev Board | Done | 10/11/2014 |
| 4 | 10/12/2014 | 10/19/2014 | Be able to send bi-directional arbitrary messages between Android App and Dev Board via Bluetooth | Done | 10/14/2014 |
| 5 | 10/14/2014 | 11/21/2014 | Subscribe to all CAN messages and dump all of them via Bluetooth to Android App or web interface | Done | 11/24/2014 |
| 6 | 10/14/2014 | 11/21/2014 | Ajax & Websocket server remote structure | Done | 11/01/2014 |
| 7 | 10/14/2014 | 11/21/2014 | Be able to input GPS coordinates through either (or both) Android App and web interface and send through Bluetooth then CAN bus | Done | 11/24/2014 |
| 8 | 10/21/2014 | 11/24/2014 | Android App and webpage GUI enhancements (Google Maps, Google Drive) | Done | 11/24/2014 |
| 9 | 10/21/2014 | 11/30/2014 | Data visualization (status, compass, speed, location,....) | Done | 11/30/2014 |
Hardware Design
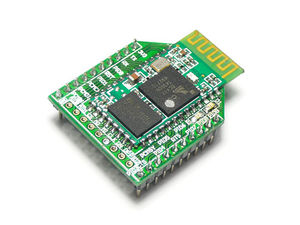
- In order to facilitate wireless communication between the SJSU One Board and a Android device, a Bluetooth Bee module is used. This module was chosen because it can connect and mount directly onto the SJSU One Board's XBee breakout socket.
- The Bluetooth Bee is a Serial Profile Port (SPP) Bluetooth interface that connects with the SJSU development board's UART3.
Hardware Interface
The relevant pin connectivity table between the Bluetooth Bee module and the SJSU One Development Board is shown below:
| Description | Bluetooth Bee Port | SJSU Development Board Port | CAN Transceiver |
| 3.3V Supply Voltage | 3V3 | 3V3 | 3V3 |
| Ground | GND | GND | GND |
| UART Channel 1 | TX | RX | |
| UART Channel 2 | RX | TX | |
| CAN TXD | CAN TD1 | TXD | |
| CAN RXD | CAN RD1 | RXD |
The Bluetooth Bee Module interfaces with an Android device through Bluetooth. In addition, various commands and data are then sent and received to and from the CAN bus through the Bluetooth Module to the Android device.
Software Design
- The bridge controller and Android APP work as routers
Bridge Controller
- Bridge controller translates CAN bus data into plain text and send it to android platform
- The Bridge controller is comprised of the SJSU Development Board with the Bluetooth Bee Module.
- The Bluetooth Bee Module can be configured by writing to UART3 specific commands as specified in the Bluetooth Bee Seeedstudio Wiki.
- The Bluetooth Bee Module was configured as SLAVE MODE via the command: \r\n+STWMOD=0\r\n (The Android device will act as the Bluetooth Master)
- The Bluetooth device name was set to "Yam_BluetoothBee" using the command: \r\n+STNA=Yam_BluetoothBee\r\n
- Allowing other devices to connect to the Bluetooth Module was enabled using the command: \r\n+STOAUT=1\r\n
- Finally the Bluetooth Bee Module started broadcasting/inquiring to connect to another device using the command: \r\n+INQ=1\r\n
- There are many other commands, such as to change the default pincode value, but they were not used for this project.
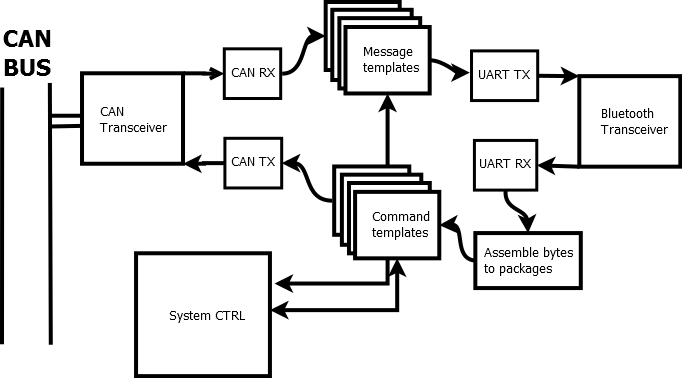
The architecture for our bridge controller is to interconvert the data between Bluetooth message and CAN bus message. Bluetooth message uses simple plaintext to transfer data. However, before we can deal with the string data, to collect and assemble several bytes into a package is needed, because UART is byte based data transmission. I use a byte 0x13(which is ‘\r’ in C code) at the end byte.The bluetooth sender must send 0x13 in the end of every text message. This process is achieved by BluBeeTask_BT2CAN class. CAN bus message uses 29bits as message ID and 8bytes data length as a single package to communicate with the master controller. There are two main classes for the controller. BluBeeTask_BT2CAN and BluBeeTask_CAN2BT.
- BluBeeTask_BT2CAN
BluBeeTask_BT2CAN is responsible for receiving the data which comes from bluetooth(via UART).We can setup multiple message filters to receive and process certain message data.
Filter setting format.
    blutoothReceiverTask->addCMD(
    BluBeeTask_BT2CAN::CMDProp::gen((char* cmd,
               bool (*func)(BluBeeTask_BT2CAN *, char* CMDStr)));
For example, there is a message format “Speed” to control the speed of the automatic car. We can simply apply a filter as below
    blutoothReceiverTask->addCMD(
    BluBeeTask_BT2CAN::CMDProp::gen("Speed", SpeedCMD));
then, we have a callback function “SpeedCMD” that can only receive speed setting messages.(For instance there is a message “Speed23” was sent by Android)
    bool SpeedCMD(BluBeeTask_BT2CAN *sender, char* CMDStr)//CMDStr will be “23”
    {
        int speed = 0;
        CMDStr=parseInt(CMDStr,&speed);//parse string “23” into integer 23
        can_msg_t msg = { 0 };//CAN message
        msg.msg_id = make_id(cid_master_controller, CAN_TX_CAR_SPEED_MSG_ID);
        //Set the ID to send to master controller with speed message ID
        *(int *) &(msg.data.bytes[0]) = speed;//First byte is the speed 23
        return sender->Send2CAN(msg);//Send message via CAN bus
    }
You can see the call back function SpeedCMD is doing a very simple string processing, then, send it to the master controller via CAN bus.
- BluBeeTask_CAN2BT
What BluBeeTask_CAN2BT doing is actually very similar to BluBeeTask_BT2CAN. First, you need to apply CAN message filters and set the corresponding callback functions.
Filter setting format.
    CANReceiverTask->addMsgTamp(
           BluBeeTask_CAN2BT::MsgProp::gen(
                 (controller_id_t MsgIdTmp, controller_id_t Mask,
           bool (*func)(BluBeeTask_CAN2BT *, can_msg_t Msg)));
controller_id_t is the set of information of CAN message ID including source, destination, and message number. To setup a controller_id_t variable you can simply use a function make_id.
controller_id_t ID= make_id(destination,source,message Number);
MsgIdTmp is the message ID that you wanna receive. Bit 1 in mask means that certain bit you need to compare between MsgIdTmp and received message ID.
|
received message ID [00,12,07] MsgIdTmp [20,12,31] Mask [00,FF,00] Success First mask data 00 means ignore the first data difference between received message ID and MsgIdTmp(ignore 00!=20). Second mask data FF means you need to compare the second data. In this case both are 12, therefore, it passes the comparison Third mask data is 00 (ignore 07!=20). |
received message ID [00,12,07] MsgIdTmp [20,12,31] Mask [00,FF,FF] Failed Third mask data is FF, so we need to compare 07 and 31. Apparently, 07 is not equal to 31, so the comparison is failed. |
For example, there is a compass message comes from master. We can simply apply a filter as below
   can2btptr->addMsgTamp(
           BluBeeTask_CAN2BT::MsgProp::gen(
                   make_id(0, cid_master_controller,
                           CAN_RX_DA_COMPASSSTATUS_MSG_ID), //Message ID templete
                   make_id(0,0xFFF,0xFFF)//Mask means don’t compare source section
                   , compassMSG));//Set Callback function compassMSG
We have a callback function “compassMSG” that can only receive compass messages and whichmessage was come from master controller. Since bridge controller receive this information, so we don’t need to compare destination.
 bool compassMSG(BluBeeTask_CAN2BT *canbt, can_msg_t Msg)
 {
     sprintf(STRBUFF, "geo::%d,%d,%d,%d\r", (int16_t) Msg.data.words[0],
           (int16_t) Msg.data.words[1], (int16_t) Msg.data.words[2],
           (int16_t) Msg.data.words[3]);
     //convert those data into a string
     //notice the end of the string is ‘\r’, which is needed
     canbt->Send2BT(STRBUFF);// send to UART(Bluetooth)
     return true;
 }
Android Controller
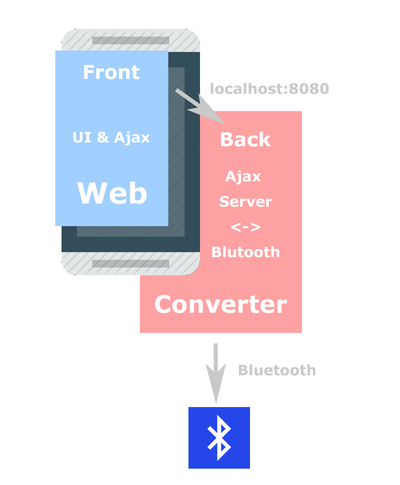
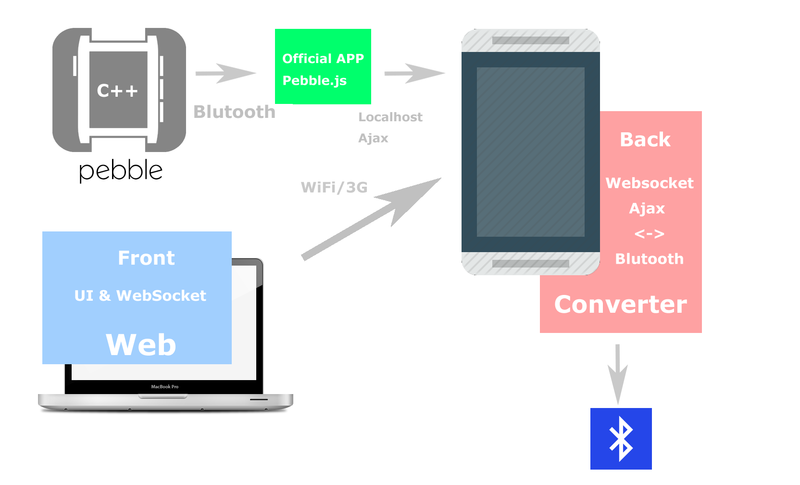
- Android platform receives the text data from bridge controller, then, transmit the data through ajax or websocket
- External controller could be any TCP accessible device (simple pebble watch program (20 lines) are used to control start and stop)
- One administrator(control and receive), multiple observers(only receive)
- Number of way points and routing is dynamically determined and done using the Google Maps API
Implementation
| Message Number | Purpose | Data layout |
| 0x528 | Set Car Speed (Kill Switch) - temporary allow for other non-zero value for demo | byte[0] - speed value |
| 0x529 | Destination GPS location |
bytes [0-3] : latitude (float) bytes [4-7] : longitude (float) |
| 0x52A | Turn to degree |
bytes [0-3] : degree(float) |
| 0x52B | Way points longitude |
bytes [0-1] :total waypoints count bytes [2-3] :waypoint index bytes [4-7] : longitude(float) |
| 0x52C | Way points latitude |
bytes [0-1] :total waypoints count bytes [2-3] :waypoint index bytes [4-7] : latitude(float) |
| 0x52D | remote status (ie. Android connection status) |
bytes [0]=> 0:disconnected(passive send) 1:on disconnect(active) 2:connected(passive) 3:on connect(active) 0xFF:error(active/passive) |
Testing and Technical Challenge
TESTs
- 100000 message(20bytes per message) Bluetooth transmission between board and android under 200fps with range <5m
- 100% success
ISSUE
- 3G network server could not be access(3G network is used for long range communication)
- might use google sheet or external server to communicate
I/O Unit Controller
Group Members
Shreeram Gopalakrishnan
Sreeharsha Paturu Gangadhara
IO Team Schedule
| Sl.No | Start Date | End Date | Task | Status | Actual Completion Date |
|---|---|---|---|---|---|
| 1 | 10/7/2014 | 10/13/2014 | Research and Order LCD Display | Ordered LCD Display | 10/13/2014 |
| 2 | 10/14/2014 | 10/21/2014 | Interfacing LCD Display with LPC1758 | Completed | 10/21/2014 |
| 3 | 10/21/2014 | 10/28/2014 | Implementing CAN structure with LCD tasks. | Completed | 11/30/2014 |
| 4 | 10/28/2014 | 11/04/2014 | Subscribe data from sensor and GPS controller,display it on LCD. | Completed | 11/08/2014 |
| 5 | 11/04/2014 | 11/11/2014 | Setup hardware and write code for START, STOP and Headlight buttons. | Completed | 11/12/2014 |
| 6 | 11/11/2014 | 11/18/2014 | Testing and mounting hardware on car. | Completed | 11/27/2014 |
| 7 | 11/18/2014 | 11/25/2014 | Final Testing | Completed | 12/15/2014 |
Hardware Design
- The IO Control Unit manages the LCD Display, switch to start and stop the car
- It receives CAN data from the Master controller and accordingly processes to display on the LCD through UART
- The 7 segment LED displays the CPU usage
LCD Display
- The LCD Display is placed on the rear side of our RC Car
- It displays the sensor and GPS values in real time.
Hardware Interface
| Description | Your Device Port | SJOne Development Board Port | Commands | Note |
|---|---|---|---|---|
| Supply Voltage | 5V supply |
Receives 5V supply that is used to power up all the boards | ||
| Ground | GND | GND | ||
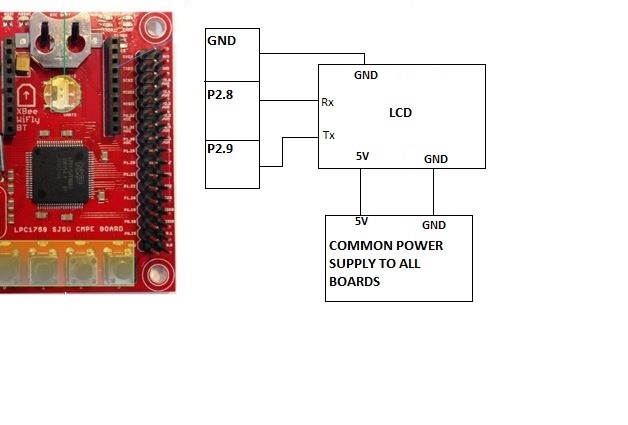
| LCD Display |
Rx pin Tx pin |
Rx ---> TXD2 (Port 2.8) Tx ---> RXD2 (Port 2.9) |
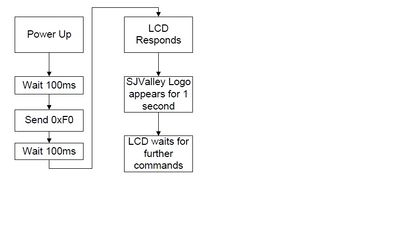
 u2.putline("F0")
 u2.putline("$CLR_SCR")
 u2.putline("$GOTO:3:0")
|
Initialization command for LCD Clears the screen Point the cursor to line number 0 and character number 3 |
| CAN Transceiver |
Pin no. 1 Driver Input Pin no. 4 Receiver Output |
P0.1 CAN TD1 P0.0 CAN RD1 |
Software Design
Implementation
| Message Number | Purpose | Data layout |
| 0x102 | Send boot status and version info | bytes [0-2] : Status and version info |
| 0x505 | Display GPS and compass values |
Byte[0-1]: New Degree to Head Byte[2-3]: Dist to Destination Byte[4-5]: Current Degree value |
| 0x506 | Display Sensor Values |
Byte [0]: Front sensor value in inches Byte [1]: Front Left sensor value in inches Byte [2]: Front Right sensor value in inches Byte [3]: Back sensor value in inches Byte [4]: Speed value |
Testing and Technical Challenge
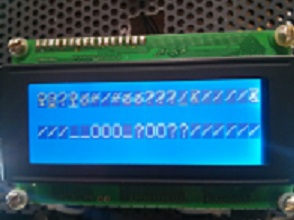
->Junk values being printed:
- Although this error was not a show stopper, LCD printed junk values whenever it was on and any of the boards were programmed.
- So, the only solution was to never program the board (connect the board to laptop) when LCD is on.
->Coding improvement
- In the code, initially, the GPS, Sensor values were being printed in one line in the code. So, either the values were overwritten or there was shifting of those values. This was a synchronization issue.
- Resolved it by, clearing each line in the LCD before printing it and used individual line in the code to print the values.
Conclusion
The whole project experience was fun and very educational. We learned about how CAN bus, sonar sensor, accelerometer sensor, light sensor, gps and compass module and motor controllers works. We faced some technical challenges such as controlling the motor speed, getting the right distance value from the sonar sensor, getting accurate readings from gps and compass and some of the power issues such as the right amount of current to the DC motors.
This project can be expanded to include more features such as an sonar sensor connected to the servo motor that rotates 360 degree to get distance from all the sides. This can reduce the number of sonar sensors. Furthermore, a improvement can be done in master and motor controller to control the car more precisely by controlling the car movement more accurately. A future suggestion would be to avoid non avoidable obstacles such as grass or follow only the planned route (may be be using some sensors or image detection).
Project Demonstration Video
Project Source Code
References
Acknowledgement
We would like to thank Professor Preet for encouraging us to learn and build some practical projects related to embedded systems. This embedded design project was our first project based on CAN bus architecture and we learned a lot from it. All the homeworks, the inbuilt programming code and the detailed explanation of the Real-time OS on Embedded System on socialledge website designed by professor Preet helped us to build this project. We thank you once again for this wonderful experience that we gain from taking this course.
References Used
http://www.ti.com/product/sn65hvd232
http://www.socialledge.com/sjsu/index.php?title=Self-driving_Car
http://www.nxp.com/documents/user_manual/UM10360.pdf
http://www.socialledge.com/sjsu/images/d/de/2012SJOneBoardSchematic.pdf
http://www.maxbotix.com/documents/MB1010_Datasheet.pdf
http://www.sharpsma.com/webfm_send/1208
https://www.sparkfun.com/datasheets/Components/HMC6352.pdf
