S14: Wireless Control Car
Contents
Grading Criteria
- How well is Software & Hardware Design described?
- How well can this report be used to reproduce this project?
- Code Quality
- Overall Report Quality:
- Software Block Diagrams
- Hardware Block Diagrams
- Schematic Quality
- Quality of technical challenges and solutions adopted.
Project Title
Wireless Control Car
Abstract
This project is about the development of a robotic car which can be controlled wirelessly. A robotic car has two front and back motors which are controlled independently. Both the motors are attached to a wireless module in built in the microcontroller so that it can be controlled wirelessly. This car also has three ultrasonic sensors which are attached to front, left and right side of the car. These three sensors help in avoiding any collision with the obstacle. This car also has an auto mode which enables the car to run without the user's help.
Objectives & Introduction
The objective of this project is to build a wireless robotic car. This car is designed so that it can be controlled wirelessly. This car has two DC motors to control front and back tires, an H bridge dual motor controller to control the speed and direction of the motor, three ultrasonic sensors for obstacle avoidance, an Accelerometer sensor to detect the direction of board rotation and a wireless module to control the car wirelessly.
The project is divided into following objectives:
- Design the circuit and algorithm for motor controller to control both front and back motor independently.
- Write the driver to control in build accelerometer sensor on the microcontroller.
- Write the wireless driver to send and receive commands between two microcontroller boards.
Team Members & Responsibilities
- Deepak Yadav
- Project Design and Testing
Schedule
| Week# | Date | Task | Actual |
|---|---|---|---|
| 1 | 02/24 | Project Planning | Completed on Time |
| 1 | 03/06 | Order Parts | Completed on Time |
| 1 | 03/10 | Reviewing part's user manual and datasheet | Completed on Time |
| 3 | 03/24 | PWM Driver | Understanding PWM took more time than I was expecting. It's Completed on (04/6) |
| 3 | 03/24 | Wireless Driver | Completed on Time |
| 3 | 04/1 | Acceloremoter Driver | Completed on Time |
| 3 | 04/12 | Design Integration | Completed on Time |
| 2 | 04/14 | Testing and Debug-Phase 1 | Completed on Time |
| 2 | 04/21 | Testing and Debug-Phase 2 | Partially Completed. Found some software bugs that needs to be fixed. |
| 1 | 05/08 | Project Demo | Pending |
Parts List & Cost
| Item# | Part Desciption | Vendor | Qty | Cost |
|---|---|---|---|---|
| 1 | SJOne Board (LPC1758) | One board from SJSU CmpE and one board by Preet | 2 | $80.00 |
| 2 | Toy car(including two DC Motors) | Grocery Outlet (Any toy store/grocery store such as Walmart) | 1 | $15.00 |
| 3 | Ultrasonic Sensor | Amazone | 1 | $5:00 |
| 4 | 9V Battery | Frys | 1 | $12:00 |
| 5 | Accessories (Jumper Wires, prototype board and battery charger) | Frys | 1 | $20:00 |
| Total Cost | $132:00 |
Design & Implementation
Hardware Design
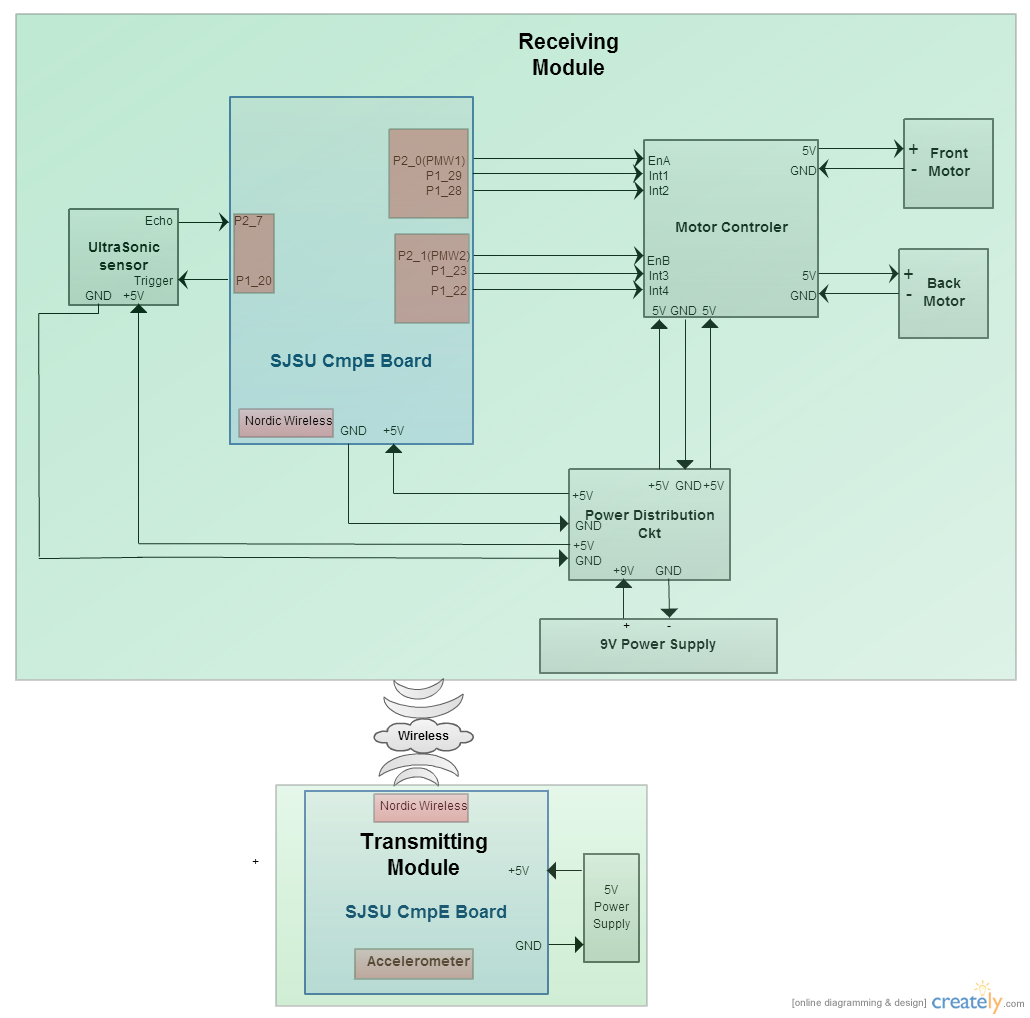
The hardware is designed by going through each project part's datasheet and LPC1758 microcontroller. After understanding the pin connections and the design, all the parts are connected by jumper wires. The Power to the microcontroller is supplied by USB cable which is spliced so that one end is connected to the 5V power supply. The Power source used for this project is rechargeable 9V battery, which is then connected to a power distribution circuit. A Power distribution circuit takes 9V from rechargeable battery converts to 5V. The Following block diagram shows the overall connection between the project parts:
Hardware Interface
The Transmitting Module used the following interfaces:
- I2C Bus
- Used to read the board orientation from Accelerometer sensor
- SPI Bus
- Used to transmit commands from Nordic wireless from receiving board
- GPIO
- Control Motor direction and speed, read ultrasonic sensor and Switches for start and stop
The Receiving Module board used the following interfaces:
- SPI Bus
- Used for receiving commands from a Nordic wireless from transmitting board
- GPIO
- PWM interface for front and back motor
- Direction control for front and back motor
- Send Trigger to Ultrasonic sensor
- Detect Echo back pulse from Ultrasonic sensor
Software Design
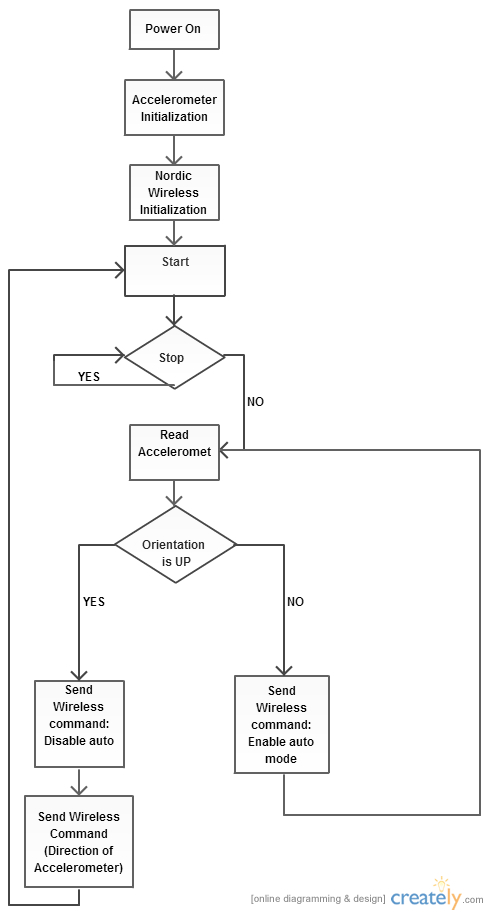
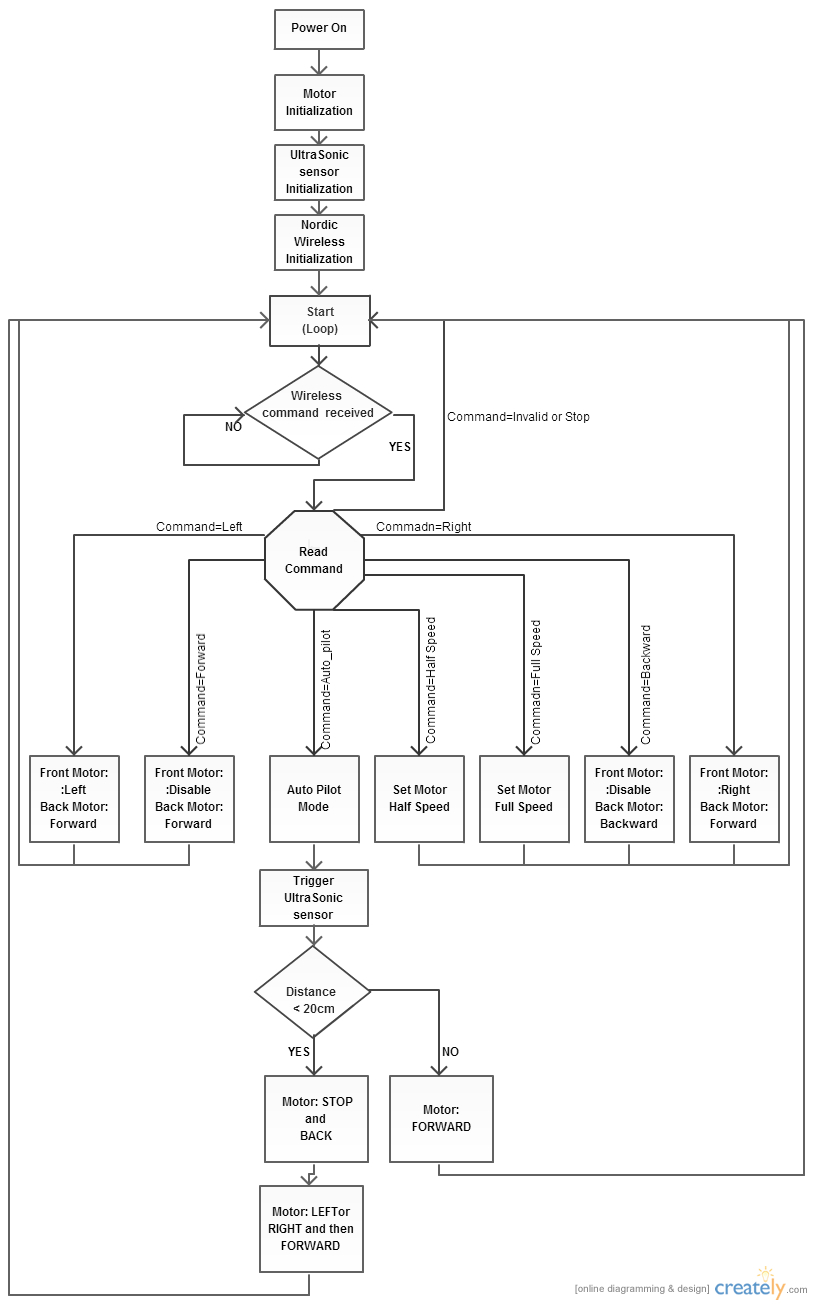
The Software is implemented by following the below flowchart:
Transmitting module
Receiving module
Implementation
Accelerometer Sensor
Ultrasonic Sensor
Motor Controller
Power Distribution Circuit
Nordic Wireless Sensor
Testing & Technical Challenges
Testing & Technical Challenges
Testing of this project is done before and after complete project integration. The whole project is tested by printing the output values from each sensor's to the laptop's terminal screen for validation.
Transmitting module: The software testing of transmitting module is done by printing the value from Accelerometer sensor and the command it sends from Nordic wireless sensor on the terminal screen. The SJone board has inbuilt accelerometer and wireless sensor, so it didn't need any hardware testing.
Receiving module: Receiving module is tested by printing the output value that it received from transmitting module and the value that it sends to the motor controller and the ultrasonic sensor.
Ultrasonic sensor is tested by probing (by oscilloscope) on the trigger and echo pins on the ultrasonic sensor. It validated that the microcontroller is sending the trigger and the sensor is outputting the echo back pulse. The timer1 function provided with the code gives the precise timing result as compared to the in build timing function (such as simple for loop).
Motor controller is tested by printing out the speed and the direction of motor value on the terminal screen. At first the motor didn't run because of low current supply, but after correct power supply it started run. The interupt pins needed to be set correctly to rotate the motor clock and anticlock wise.
Completed Project testing: The whole project is tested by connecting everything together and then sending the command through transmitting board to receving board and observing it behaviour.At first the controlling of car such as direction and speed control was difficult, but after increasing the speed(PWM signal)and fixing the signals send to interrupt pins on motor controller for direction. There was also an delay problem that both receving and transmitting module has to controll the car more precisely. This is issue was resolved by minimizing the delay that I put in the code after every command that both the boards send and receive.
Conclusion
Conclude your project here. You can recap your testing and problems. You should address the "so what" part here to indicate what you ultimately learnt from this project. How has this project increased your knowledge?
Project Video
Upload a video of your project and post the link here.
Project Source Code
Send me your zipped source code and I will upload this to SourceForge and link it for you.
References
Acknowledgement
Any acknowledgement that you may wish to provide can be included here.
References Used
List any references used in project.
Appendix
You can list the references you used.


