S24: Team X
Contents
Project Title
Team X
Abstract
Our main goal of this project was to utilize the knowledge acquired from the lectures in CMPE 243. The report summarizes the overall process taken to develop an autonomous driving RC car using FreeRTOS, various periodic tasks, and the CAN bus to combine and run the different code modules.
Introduction
The project was divided into 5 modules:
- Sensor Node
- Motor Node
- Driver Node
- Geo Node
- Mobile Application
Team Members & Responsibilities
<Team Picture>
| Team Members | Task Responsibility |
|---|---|
|
|
|
|
|
|
|
|
Schedule
| Week# | Start Date | End Date | Task | Status |
|---|---|---|---|---|
| 1 | 02/19/2024 | 02/25/2024 |
|
|
| 2 | 02/26/2024 | 03/03/2024 |
|
|
| 3 | 03/04/2024 | 03/11/2024 |
|
|
| 4 | 03/18/2024 | 03/24/2024 |
|
|
| 5 | 03/25/2024 | 03/31/2024 |
|
|
| 6 | 04/01/2024 | 04/07/2024 |
|
|
| 7 | 04/08/2024 | 04/14/2024 |
|
|
| 8 | 04/15/2024 | 04/21/2024 |
|
|
| 9 | 04/22/2024 | 04/28/2024 |
|
|
| 10 | 04/29/2024 | 05/05/2024 |
|
|
| 11 | 05/06/2024 | 05/12/2024 |
|
|
| 12 | 05/06/2024 | 05/12/2024 |
|
|
| 13 | 05/13/2024 | 05/19/2024 |
|
|
| 14 | 05/20/2024 | 05/26/2024 |
|
|
Parts List & Cost
| Item# | Part Desciption | Vendor | Qty | Cost |
|---|---|---|---|---|
| 1 | RC Car | Traxxas | 1 | $250.00 |
| 2 | RC Car Battery | Traxxus | 2 | $110 |
| 3 | CAN Transceivers MCP2551-I/P | Microchip | 8 | Free Samples |
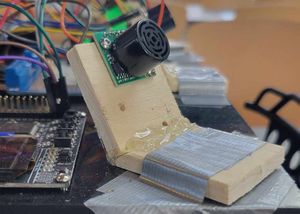
| 4 | MB1010 LV-MaxSonar | <Insert Company> | 4 | $29.95 |
| 5 | GPS | <Insert Company> | <Insert Amount> | <Insert Price> |
| 6 | Compass | <Insert Company> | <Insert Amount> | <Insert Price> |
| 7 | LCD | Amazon | 1 | $11.69 |
CAN Communication
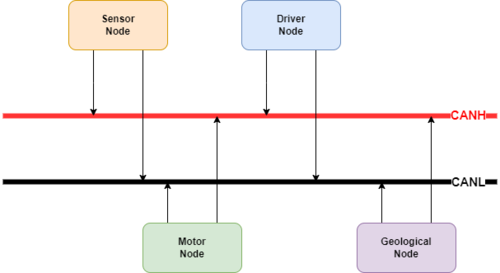
Each node is connected to a CAN transceiver that are connected to a bus with a 120 Ohm resistor on each end. We handled each message on the 10Hz, with the sensor and motor messages having the highest priority.
Specifically, we classified each node with these (see table below) message IDs.
| Node | Message ID Range | |
|---|---|---|
| 1 | MOTOR | 300 - 310 |
| 2 | SENSOR | 200 |
| 3 | GEO | 400 - 450 |
| 4 | DEBUG | 600 - 700 |
Hardware Design
DBC File
Shown below are the messages utilized in our DBC file:
BO_ 200 SENSOR_SONARS: 4 SENSOR
 SG_ SENSOR_SONARS_left : 0|10@1+ (1,0) [6|254] "inch" DRIVER
 SG_ SENSOR_SONARS_right : 10|10@1+ (1,0) [6|254] "inch" DRIVER
 SG_ SENSOR_SONARS_middle : 20|10@1+ (1,0) [6|254] "inch" DRIVER
BO_ 300 MOTOR_CMD: 1 DRIVER
 SG_ MOTOR_CMD_steer: 0|4@1- (1,0) [-2|2] "" MOTOR
 SG_ MOTOR_CMD_forward: 4|4@1- (1,0) [-5|5] "" MOTOR
BO_ 310 MOTOR_STOP: 1 SENSOR
 SG_ MOTOR_STOP_stop: 0|1@1+ (1,0) [0|0] "" MOTOR
BO_ 400 GPS_NAV: 2 GEO
 SG_ GPS_NAV_latitude : 0|8@1- (1,0) [-90|90] "" DRIVER
 SG_ GPS_NAV_longitude : 8|8@1- (1,0) [-180|180] "" DRIVER
BO_ 420 GPS_HEADING: 4 SENSOR
 SG_ GPS_HEADING_RAW_DEGREES: 0|16@1+ (1,0) [0|0] "Degrees" GEO
BO_ 430 GEO_STATUS: 4 GEO
  SG_ GEO_STATUS_COMPASS_HEADING : 0|5@1+ (1,0) [0|18] "Degrees" DRIVER
  SG_ GEO_STATUS_COMPASS_BEARING : 5|5@1+ (1,0) [0|18] "Degrees" DRIVER
  SG_ GEO_STATUS_DISTANCE_TO_DESTINATION : 10|16@1+ (0.1,0) [0|0] "Meters" DRIVER
BO_ 450 GPS_DESTINATION_LOCATION: 8 DRIVER
 SG_ GPS_DEST_LATITUDE_SCALED_100000 : 0|32@1- (1,0) [0|0] "Degrees" GEO
 SG_ GPS_DEST_LONGITUDE_SCALED_100000 : 32|32@1- (1,0) [0|0] "Degrees" GEO
BO_ 600 DBG_MSG_MOTOR: 4 MOTOR
 SG_ SPEED_M_PER_S : 0|32@1+ (0.001,-100) [0|0] "" SENSOR
BO_ 700 DBG_MSG_GPS: 3 GEO
 SG_ DBG_GPS_latitude : 0|8@1- (1,0) [-90|90] "" DBG
 SG_ DBG_GPS_longitude : 8|8@1- (1,0) [-180|180] "" DBG
 SG_ DBG_GPS_lock : 16|1@1+ (1,0) [0|0] "" DBG
Sensor and Bridge Controller ECU
Gitlab Sensor and Bridge Controller Node Link
Hardware Design
Software Design
Sensor Code:
void ultrasonic_sensor__run_once() {
  // left, middle, right respectively
  for (int i = 0; i < 8; i++) {
    uint16_t adc_raw[3];

    // start range and wait till all sensors are done
    ultrasonic_range_once();

    adc_raw[0] = adc__get_adc_value(ADC__CHANNEL_2);
    adc_raw[1] = adc__get_adc_value(ADC__CHANNEL_4);
    adc_raw[2] = adc__get_adc_value(ADC__CHANNEL_5);

    // printf("adc2: %d\n", adc_raw[0]);
    sensor_data.left = ((float)adc_raw[0] * SCALE_FACTOR);   // / 2.0;
    sensor_data.middle = ((float)adc_raw[1] * SCALE_FACTOR); // / 2.0;
    sensor_data.right = ((float)adc_raw[2] * SCALE_FACTOR);  // / 2.0;

    if (sensor_data.left < 36) {
      gpio__reset(board_io__get_led3());
    } else {
      gpio__set(board_io__get_led3());
    }

    if (sensor_data.middle < 36) {
      gpio__reset(board_io__get_led2());
    } else {
      gpio__set(board_io__get_led2());
    }

    if (sensor_data.right < 36) {
      gpio__reset(board_io__get_led1());
    } else {
      gpio__set(board_io__get_led1());
    }
  }
}
Bridge Controller Code:
void bridge_get_data(void) {
  char byte;
  const uint32_t zero_timeout = 0;

  while (uart__get(bridge_uart, &byte, zero_timeout)) {
    printf("received byte: %c\n", byte);
  }
}
void bridge_send_data(void *buf, uint8_t buf_size, uint8_t msg_id) {
// Format the float value from the buffer
char tx_buf[30];
if (msg_id == 0) {
float speed = *(float *)buf;
snprintf(tx_buf, sizeof(tx_buf), "spd: %f\n", (double)speed);
} else if (msg_id == 1) {
dbc_GEO_STATUS_s *msg = (dbc_GEO_STATUS_s *)buf;
snprintf(tx_buf, sizeof(tx_buf), "hd: %d, br: %d\n", msg->GEO_STATUS_COMPASS_HEADING,
msg->GEO_STATUS_COMPASS_BEARING);
}
uart_printf(bridge_uart, "%s", tx_buf);
// printf("sent: %s\n", tx_buf);
}static void process_uart_data_buf(void) {
int temp;
char *token;
int coord_received = 0;
token = strtok(uart_rx_buf, ",");
temp = atoi(token);
if (temp != 0) {
dest_latitude = temp / 1000000.0f;
printf("la: %f ", (double)dest_latitude);
coord_received++;
}
token = strtok(NULL, ",");
temp = atoi(token);
if (temp != 0) {
dest_longitude = temp / 1000000.0f;
printf("lo: %f\n", (double)dest_longitude);
coord_received++;
}
if (coord_received == 2) {
dbc_GPS_DESTINATION_LOCATION_s dest_location;
dest_location.GPS_DEST_LATITUDE_SCALED_100000 = dest_latitude * 100000;
dest_location.GPS_DEST_LONGITUDE_SCALED_100000 = dest_longitude * 100000;
can__msg_t can_msg = {};
dbc_message_header_t header;
header = dbc_encode_GPS_DESTINATION_LOCATION(can_msg.data.bytes, &dest_location);
can_msg.msg_id = header.message_id;
can_msg.frame_fields.data_len = header.message_dlc;
can__tx(can1, &can_msg, 0);
}
}Technical Challenges
< List of problems and their detailed resolutions>
Motor ECU
<Picture>
Hardware Design
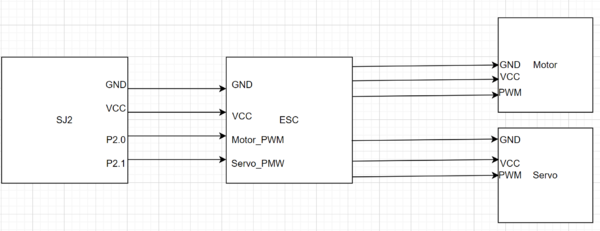
The motor is directly connected to the RC car's ESC device, which is what initially controlled the car's PWMs prior to hijacking. The SJ2 now becomes the PWM transmitter as opposed to the remote and sends the corresponding PWMs based on driver signals (see Software Design for more details)
Software Design
The motor software takes in driver-motor commands through the CAN bus and based on those commands, modifies the PWMs of the motor and the servo to move the wheels forward, backward, left, or right. We mapped the PWM values as seen in the table below:
| Motor PWM | Direction | |
|---|---|---|
| 1 | 16.2 | Forward |
| 2 | 14.5 | Backward |
| 3 | 15.02 | Idle |
| Servo PWM | Direction | |
|---|---|---|
| 1 | 11.0 | Hard Left |
| 2 | 13.0 | Slight Left |
| 3 | 15.48 | Straight |
| 4 | 17.0 | Slight Right |
| 5 | 19.0 | Hard Right |
void motor_pwm__set_pwm(void) {
  motor_pwm__set_motor_pwm();
  motor_pwm__set_servo_pwm();
}
static void motor_pwm__set_servo_pwm(void) {
static float set_servo_duty_cycle = servo_pwm_idle_duty_cycle;
if (motor_cmd_local.MOTOR_CMD_steer == 0) {
// idle
set_servo_duty_cycle = servo_pwm_idle_duty_cycle;
} else if (motor_cmd_local.MOTOR_CMD_steer == 1) {
// slightly right
set_servo_duty_cycle = 17.00;
} else if (motor_cmd_local.MOTOR_CMD_steer == 2) {
// max right
set_servo_duty_cycle = 19.00;
} else if (motor_cmd_local.MOTOR_CMD_steer == -1) {
// slightly left
set_servo_duty_cycle = 13.00;
} else if (motor_cmd_local.MOTOR_CMD_steer == -2) {
// max left
set_servo_duty_cycle = 11.00;
}
pwm1__set_duty_cycle(servo_pwm, set_servo_duty_cycle);
}static void motor_pwm__set_motor_pwm(void) {
static float set_motor_duty_cycle = motor_pwm_idle_duty_cycle;
if (motor_stop_local.MOTOR_STOP_stop) {
motor_speed_pid_set_target_pwm(motor_pwm_idle_duty_cycle);
} else {
if (!ignore_cmds) {
if (motor_cmd_local.MOTOR_CMD_forward == -1) { // Reverse
set_motor_duty_cycle = 14.50;
if (reverse_flag == false) {
motor_speed_pid_set_target_pwm(motor_pwm_idle_duty_cycle);
ignore_cmds = true;
start_time = sys_time__get_uptime_ms();
reverse_flag = true;
return;
}
} else if (motor_cmd_local.MOTOR_CMD_forward == 0) { // Stop
set_motor_duty_cycle = motor_pwm_idle_duty_cycle;
} else if (motor_cmd_local.MOTOR_CMD_forward == 3) { // Forward
set_motor_duty_cycle = 16.2; // 15.7 originally?, 16.2
if (reverse_flag == true) {
motor_speed_pid_set_target_pwm(motor_pwm_idle_duty_cycle);
ignore_cmds = true;
start_time = sys_time__get_uptime_ms();
reverse_flag = false;
return;
}
}
motor_speed_pid_set_target_pwm(set_motor_duty_cycle);
} else if (sys_time__get_uptime_ms() - start_time >= DIRECTION_CHANGE_DELAY) {
ignore_cmds = false;
} else {
}
}
}Technical Challenges
The main issue we had with the motor controller occurred during PWM hacking because we did not want the motor running the car too fast. As such, we had to guess and check a good PWM value to run the motor so that the car would move at the slowest speed possible without running into issues where it could not move. However, with continual tests, we managed to identify the ideal range we wanted to run the motor.
Additionally, we encountered minor issues where, when transitioning from reverse to forward and vice versa, the car would go into neutral and never exit from the neutral state. We found that this issue occurred due to the delay being too small, and so the motor would not have enough time to truly go into neutral and thus would remain in that state. To counter this, we increased the delay and also slightly increased the forward PWM in order to combat the potential that it was stopping due to having too low of a PWM value.
Geographical Controller
<Picture>
Hardware Design
Software Design
<List the code modules that are being called periodically.>
Technical Challenges
Most of our problems occurred due to an inaccurate compass reading. Mainly, the compass heading angles would not return as very stable values, which resulted in unstable driving behavior for the car. We initially thought it would resolve itself with some software calibration; however, we found that even with software calibration for the LSM, it would still be inaccurate and would not even give the full 360 degree heading range. As such, we resolved to simply buying a more expensive and more accurate magnetometer, which solved our issues. The new module returned more stable values, despite it still fluctuating, the angle changing was not enough to affect the driving behavior since we built our module with the intent of not needing the exact degree of the angles. We also found some trouble mounting the compass due to not wanting to have to handle any further offsets after mounting. Because of this, when mounting the compass, we identified where the compass was detecting north and faced the front of the car in that direction. Following that step, we mounted the compass so that it, along with the front of the car, was facing north.
Additionally, we ran into some errors with the GPS module due to us receiving latitude and longitude values that were miles away from our current location. However, we identified an error on our end where we had misinterpreted the data returned from the GPS module and thus were calculating the wrong latitude and longitude values. Once we identified the error, we found the correct way to extract the correct latitude and longitude values for a more accurate location.
Driver and LCD Module
Hardware Design
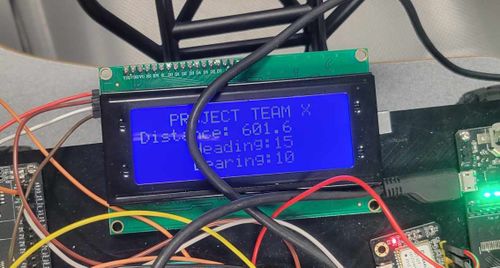
The driver node, aside from its connection to the CAN bus, is also connected the the LCD module through I2C. the SJ2 board provides the LCD with 3.3V power and sends data through SDA and SCL.
Software Design
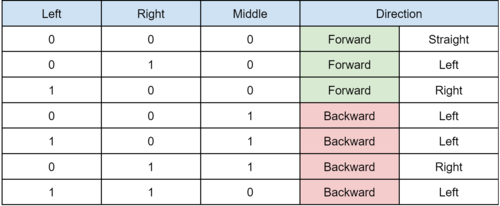
The driver logic came down to a basic logic (show in table below) where 0 implies there is no obstacle, and 1 implies an obstacle is present.
dbc_MOTOR_CMD_s driver__get_motor_commands(void) {
  driver__avoid_obstacle();
  return motor_commands;}
static void driver__avoid_obstacle(void) {
obstacle_below_threshold_s below_thresholds = driver__closest_obstacle();
if (!(below_thresholds.MIDDLE) && !(below_thresholds.LEFT) && !(below_thresholds.RIGHT)) {
driver__go_to_destination();
} else {
driver__steering();
}
driver__led_indicators();}dbc_MOTOR_CMD_s driver__get_motor_commands(void) {
driver__avoid_obstacle();
return motor_commands;
}// slight turns for destination movement
static void driver__go_to_destination(void) {
int angle_difference = local_geo_status.GEO_STATUS_COMPASS_HEADING - local_geo_status.GEO_STATUS_COMPASS_BEARING;
if (local_geo_status.GEO_STATUS_DISTANCE_TO_DESTINATION > 0) {
if (angle_difference > 0) {
// go right
motor_commands.MOTOR_CMD_steer = 1;
motor_commands.MOTOR_CMD_forward = 3;
} else if (angle_difference < 0) {
// go left
motor_commands.MOTOR_CMD_steer = -1;
motor_commands.MOTOR_CMD_forward = 3;
} else { // go straight
motor_commands.MOTOR_CMD_steer = 0;
motor_commands.MOTOR_CMD_forward = 3;
}
} else { // reached destination
motor_commands.MOTOR_CMD_forward = 0;
motor_commands.MOTOR_CMD_steer = 0;
}}Technical Challenges
Most of the issues surrounding the driver node occurred after field testing. We found there were some issues regarding how soon the driver made the decision compared to when it received the sensor data. As such, we made adjustments so that, despite the delay, there would be time for the driver to receive the sensor data, identify the correct action to take, and then move the wheels. Overall, our driver node worked as expected once we started field testing due to the multitude of unit tests that were done to ensure proper logic. We also identified some minor issues when testing the reverse; however, this was easily fixed by modifying the sensor priorities so that the middle sensor's values, when below the threshold, had the most precedence. In this way, the car would not fluctuate between going forward and reverse when there was clearly an object in front of it.
Additionally, we ran into issues integrating the LCD screen through I2C. The screen's slave address would not get detected, despite the device having the proper connections and power supply. However, it was found to have just been a hardware issue and worked with a different I2C LCD device.
Mobile Application
<Picture>
Hardware Design
Software Design
<List the code modules that are being called periodically.>
Technical Challenges
< List of problems and their detailed resolutions>
Conclusion
Overall, through the course of this project, we learned a lot of different types of skills. Starting with the obvious, we learned better coding habits such as code modularization and code decoupling. We also understood how to utilize the CAN bus and messages in addition to PWM hacking for the RC car. In the scope of the project, we learned communication and group coordination and distribution skills. Although we had a bit of a rough start, as the project continued, we better understood how to organize weekly goals and tasks that needed to be done and properly distributed these tasks to each member. In addition, we learned how to collaborate with each other to build the RC car.
Project Video
Project Source Code
Advice for Future Students
- Start early! Order things as soon as you have your team, and keep track of finances for reimbursements
- Unit-testing lets you know the obstacle avoidance works the way you generally want it to and saves a lot of time when field testing
- Try to keep the logic simple, over-complicating the code modules makes your debugging time a lot harder since you won't know where things went wrong
Acknowledgement
Thank you Preet for the class and for guiding us through the process of building the RC car.
References
1. LCD Datasheet
2. LCD Display Initialization and Configuration Example Tutorial
