F21: Treasure Dive
Contents
Grading Criteria
- How well is Software & Hardware Design described?
- How well can this report be used to reproduce this project?
- Code Quality
- Overall Report Quality:
- Software Block Diagrams
- Hardware Block Diagrams
- Schematic Quality
- Quality of technical challenges and solutions adopted.
Treasure Dive
Abstract
TBD
Objectives & Introduction
Show list of your objectives. This section includes the high level details of your project. You can write about the various sensors or peripherals you used to get your project completed.
Team Members & Responsibilities
- Brian Ho
- Billy Lai
- Jasdip Sekhon
- Isaac Wahhab
Schedule
| Week# | Start Date | End Date | Task | Status |
|---|---|---|---|---|
| 1 |
|
|
|
|
| 2 |
|
|
|
|
| 3 |
|
|
|
|
| 4 |
|
|
|
|
| 5 |
|
|
|
|
| 6 |
|
|
|
|
| 7 |
|
|
|
|
| 8 |
|
|
|
|
| 9 |
|
|
|
|
| 10 |
|
|
|
|
| 11 |
|
|
|
|
| 12 |
|
|
|
|
Parts List & Cost
Give a simple list of the cost of your project broken down by components. Do not write long stories here.
BILL OF MATERIALS
| Item# | Part Description | Part Model & Vendor | Quantity | Cost |
|---|---|---|---|---|
| 1 | Microcontroller Board | LPC4088-32 Developer's Kit | 1 | $300.00 |
| 2 | Microcontroller Board | SJ2 Board | 1 | $50.00 |
| 3 | Bluetooth Module | Digi XBee-S1 | 2 | N/A |
| 4 | DAC PCB | JLCPCB (Set of 5) | 1 | $15.00 |
| 4 | Monitor | Asus TFT Monitor | 1 | N/A |
| 5 | Mini Breadboard | ELEGOO Mini Breadboard | 1 | $13.99 |
| 6 | Arcade buttons | N/A | 2 | N/A |
| 7 | VGA cable | N/A | 1 | N/A |
| 7 | SD card | N/A | 1 | N/A |
Design & Implementation
The design section can go over your hardware and software design. Organize this section using sub-sections that go over your design and implementation.
Hardware Design
Discuss your hardware design here. Show detailed schematics, and the interface here.
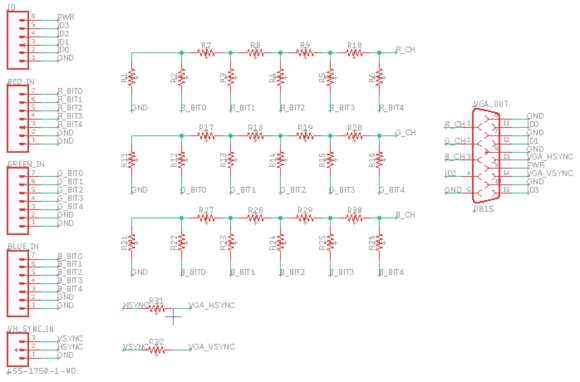
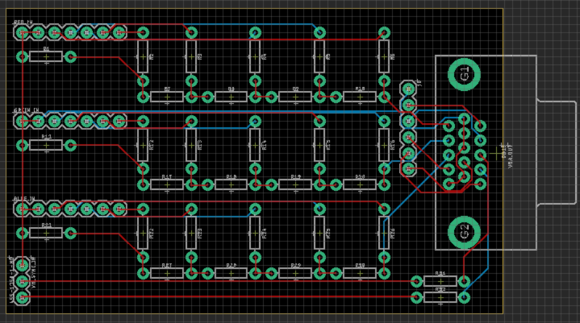
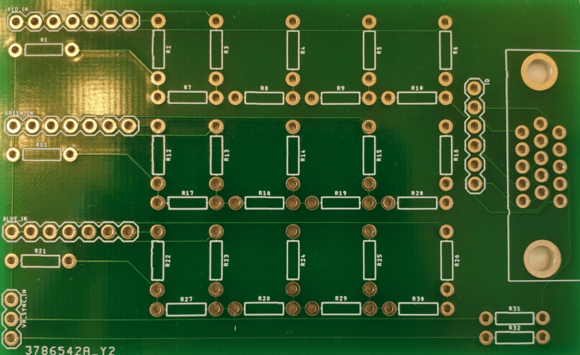
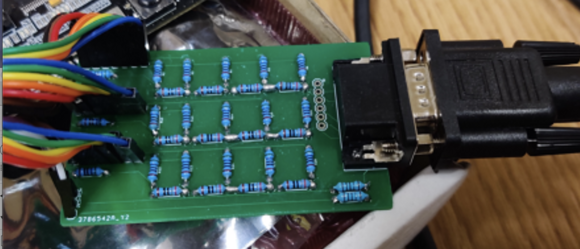
We designed our PCB using Autodesk EAGLE based on the tutorial on PCB design during class lecture. We ordered our PCB to be manufactured from JLCPCB. The PCB consists of a R-2R resistor ladder DAC for the purpose of converting the digital signal from the microcontroller to analog to display graphics on the VGA monitor. Five bits are passed to each of the red, green, and blue channels of the VGA in addition to other signals, such as Horizontal sync (HSYNC) and Vertical sync (VSYNC).
Hardware Interface
In this section, you can describe how your hardware communicates, such as which BUSes used. You can discuss your driver implementation here, such that the Software Design section is isolated to talk about high level workings rather than inner working of your project.
Software Design
Show your software design. For example, if you are designing an MP3 Player, show the tasks that you are using, and what they are doing at a high level. Do not show the details of the code. For example, do not show exact code, but you may show psuedocode and fragments of code. Keep in mind that you are showing DESIGN of your software, not the inner workings of it.
Implementation
This section includes implementation, but again, not the details, just the high level. For example, you can list the steps it takes to communicate over a sensor, or the steps needed to write a page of memory onto SPI Flash. You can include sub-sections for each of your component implementation.
Testing & Technical Challenges
Describe the challenges of your project. What advise would you give yourself or someone else if your project can be started from scratch again? Make a smooth transition to testing section and described what it took to test your project.
Include sub-sections that list out a problem and solution, such as:
<Bug/issue name>
Discuss the issue and resolution.
Conclusion
Conclude your project here. You can recap your testing and problems. You should address the "so what" part here to indicate what you ultimately learnt from this project. How has this project increased your knowledge?
Project Video
Upload a video of your project and post the link here.
Project Source Code
References
Acknowledgement
Any acknowledgement that you may wish to provide can be included here.
References Used
Appendix
You can list the references you used.


