S20: Bucephalus

From Embedded Systems Learning Academy
Revision as of 06:47, 11 May 2020 by Proj user3 (talk | contribs) (ESC & DC Motor)

Jump to: navigation, search
Bucephalus Logo

ABSTRACT

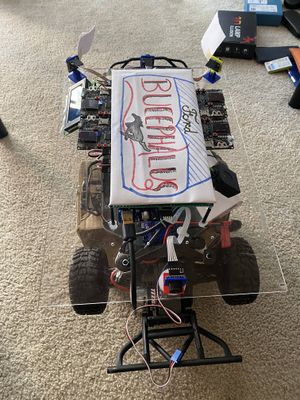
Bucephalus is a Self Driving RC car using CAN communication based on FreeRTOS(Hard RTOS). The RC car takes real time inputs and covert it into the data that can be processed to monitor and control to meet the desired requirements. In this project, we aim to design and develop a self-driving car that autonomously navigates from the current location to the destination (using Waypoint Algorithm )which is selected through an Android application and at the same time avoiding all the obstacles in the path using Obstacle avoidance algorithm . It also Increases or Decreases speed on Uphill and downhill (using PID Algorithm)as well as applies breaks at required places. The car comprises of 4 control units communicating with each other over the CAN Bus using CAN communication protocol, each having a specific functionality that helps the car to navigate to its destination successfully.

INTRODUCTION

Objectives of the RC Car:-

1) Driver Controller:- Detection and avoidance of the obstacles coming in the path of the RC car by following Obstacle detection avoidance.
2) Geographical Controller:- Getting the GPS coordinates from the Android Application and traveling to that point using Waypoint Algorithm
3) System hardware communication using PCB Design.
4) Bridge and Sensor Controller:- Communication between the Driver Board and Android Mobile Application using wireless bluetooth commmunication.
5) Motor Controller:- Control the Servo Motor for Direction and DC motor for speed. Implementation of PID Algorithm on normal road uphill and down hill to maintain speed

The project is divided into six main modules:

CORE MODULES OF RC CAR

  • Android Mobile Application
  • Bridge and Sensor Controller
  • Geographical Controller
  • Driver and LCD Controller
  • Motor Controller
  • Hardware Integration and PCB Designing

Team Members & Responsibilities

<Team Picture>

Bucephalous GitLab - [1]

  • Mohit Ingale GitLab LinkedIn
    • Driver and LCD Controller
    • Hardware Integration and PCB Designing
    • Testing Team / Code Reviewers
  • Shreya Patankar GitLab LinkedIn
    • Geographical Controller
    • Hardware Integration and PCB Designing
    • Testing Team / Code Reviewers
    • Wiki Page
  • Nicholas Kaiser GitLab LinkedIn
    • Bridge and Sensor Controller
    • Wiki Page
    • Hardware Integration and PCB Designing
  • Hari Haran Kura GitLab LinkedIn
    • Motor Controller
    • Testing Team / Code Reviewers
    • Hardware Integration and PCB Designing
  • Basangouda Patil GitLab LinkedIn
    • Android Mobile Application
    • Testing Team / Code Reviewers
  • Abhinandan Burli GitLab LinkedIn
    • Driver and LCD Controller
    • Testing Team / Code Reviewers
    • Hardware Integration and PCB Designing


Schedule

Week# Start Date End Date Task Status
1 02/16/2020 02/22/2020
  • Setup a team Google Docs folder
  • Brainstorm RC car design options
  • Research past semester RC car projects for ideas and parts needed
  • Put together a rough draft parts list
  • Setup a team GitLab repository
  • Completed
  • Completed
  • Completed
  • Completed
  • Completed
2 02/23/2020 02/29/2020
  • Decide on and order chassis
  • Discuss possible GPS modules
  • Discuss schedule for meeting dates and work days (Tuesdays are for code review and syncing, Saturdays are work days)
  • Discuss bluetooth communication approach (1 phone on car, 1 phone in controller's hands)
  • Discuss vehicle's driving checkpoints (checkpoints calculated after point B is specified)
  • Discuss wiring on RC car (1 battery to power motors and 1 power bank for everything else)
  • Discuss GitLab workflow (mirror our repo with Preet's, 3 approvals to merge to "working master" branch, resolve conflicts on "working master" branch, then can merge to master branch)
  • Completed
  • Completed
  • Completed
  • Completed
  • Completed
  • Completed
  • Completed
3 03/01/2020 03/07/2020
  • Decide on sensors (4 ultrasonic sensors: 3 in front, 1 in back)
  • Decide on a GPS module (Adafruit ADA746)
  • Research GPS antennas
  • Decide on CAN transceivers (SN65HVD230 IC's)
  • Request 15 CAN transceiver samples from ti.com
  • Discuss tasks of all 4 board nodes (geographical, driver, motors, bridge controller/sensors)
  • Completed
  • Completed
  • Completed
  • Completed
  • Completed
  • Completed
4 03/08/2020 03/14/2020
  • Assemble car chassis and plan general layout
  • Delegate tasks for each 2 person teams
  • Create branches for all nodes and add motor and sensor messages to DBC file
  • Discuss and research possible GPS antennas
  • Design block diagrams for motor node, bridge controller/sensor node, and full car
  • Solve GitLab branches vs folders issue (1 branch per node, or 1 folder per node)
  • Order 4 + 1 extra ultrasonic sensors (MaxBotix MB1003-000 HRLV-MaxSonar-EZ0)
  • Completed
  • Completed
  • Completed
  • Completed
  • Completed
  • Completed
  • Completed
5 03/15/2020 03/21/2020
  • Decide what to include on PCB board
  • Read previous student's reports to decide on a compass module (CMPS14)
  • Order GPS antenna
  • Add GPS node messages (longitude, latitude, heading) and bridge sensor node messages (destination latitude and longitude) to DBC file
  • Start learning Android app development
  • Begin researching filtering algorithms for ultrasonic sensors
  • Ultrasonic sensor values are converted to centimeters and transmit to driver node
  • Research ultrasonic sensor mounts
  • Transmit CAN messages from sensor to driver node, and from driver to motor node
  • Driver node is able to respond correctly based on sensor obstacle detection scenarios (correct LED's light up)
  • Decide movement and steering directions based on all possible sensor obstacle detection scenarios
  • Begin research on PID implementation to control speed of RC car
  • Completed
  • Completed
  • Completed
  • Completed
  • Completed
  • Completed
  • Completed
  • Completed
  • Completed
  • Completed
  • Completed
  • Completed
6 03/22/2020 03/28/2020
  • Draw block diagrams with pin information for each board and begin PCB design based on these diagrams
  • Order a new compass module (CMPS14)
  • Finalize parts list and place orders for remaining unordered items
  • Decide on tap plastic acrylic sheet dimensions and PCB dimensions
  • Start implementing a basic Android app without Google maps API and create a separate GitLab repo for app
  • Bridge sensor node is able to transmit a destination latitude and longitude coordinates message to geological node
  • Decide on ultrasonic sensor mounts and order extra if needed
  • Geological node is able to transmit a heading message to the driver node
  • Integrate driver board diagnostic testing with LEDs and ultrasonic sensors (car goes left, left LEDs light up, etc.)
  • Continue research on PID controller design and begin basic implementation
  • Finish designing team logo and upload to Wiki page
  • Completed
  • Completed
  • Completed
  • Completed
  • Completed
  • Completed
  • Completed
  • Completed
  • Completed
  • Completed
  • Completed
7 03/29/2020 04/04/2020
  • Complete rough draft of DBC file messages and signals
  • Purchase tap plastic acrylic sheet
  • Learn how to integrate Google maps API into Android app
  • Finish a basic implementation of filtering ultrasonic sensor's ADC data
  • Design a block diagram for optimal ultrasonic sensor placement
  • Bluetooth Module driver is finished, can connect to Android phone, and can receive "Hello World" data from phone
  • Geological node is able to parse the GPS NMEA string to extract latitude and longitude coordinates
  • Geological node is able to receive a current heading (0-360 degrees) from the compass module
  • Geological node is able to receive an NMEA string from the GPS
  • Geological node is able to compute the destination heading (0-360 degrees) and send to driver node
  • Add PWM functionality to motor board code and test on DC and servo motors
  • Complete a basic implementation of encoder code on motor board
  • Complete rough draft of schedule and upload to Wiki page
  • Completed
  • Completed
  • Completed
  • Completed
  • Completed
  • Completed
  • Completed
  • Completed
  • Completed
  • Completed
  • Completed
  • Completed
  • Completed
8 04/05/2020 04/11/2020
  • Google maps API is fully integrated into Android App
  • Finish ultrasonic filtering algorithm for ultrasonic sensor's ADC data
  • Design ultrasonic sensor shields to minimize sensor interference with each other
  • Bluetooth Module is able to receive data from Android app
  • Test obstacle avoidance algorithm (indoor)
  • Complete motor board code controlling RC car's DC motor and servo motor
  • Complete "push button" motor test (servo turns wheels left and right, and DC motor spins wheel forwards and backwards)
  • Begin car chassis wiring on a breadboard
  • Finalize and review PCB schematic
  • Complete a rough draft car chassis block diagram for the placement of all boards and modules
  • Completed
  • Completed
  • Completed
  • Completed
  • Completed
  • Completed
  • Completed
  • Completed
  • Completed
  • Completed
9 04/12/2020 04/18/2020
  • Discuss checkpoint algorithm
  • Display sensor and motor data on Android app
  • Bluetooth module is able to receive "dummy" destination latitude and longitude coordinates from Android app
  • Finish GPS module integration with geographical controller
  • Test obstacle avoidance algorithm (outdoor)
  • Test existing motor board code on RC car's motors
  • Begin wheel encoder implementation and unit testing
  • Complete car chassis wiring on a breadboard
  • Establish and test CAN communication between all boards
  • Design and solder a prototype PCB board in case PCB isn't delivered in time
  • Mount sensors, motors, LCD, and all four sjtwo boards onto car chassis
  • Finish routing PCB and review to verify the circuitry
  • Completed
  • Completed
  • Completed
  • Completed
  • Completed
  • Completed
  • Completed
  • Completed
  • Completed
  • Completed
  • Completed
  • Completed
10 04/19/2020 04/25/2020
  • Android app is able to send start and stop commands to the car
  • Android app is able to display car data (speed, sensor values, destination coordinates, source coordinates)
  • Bluetooth module is able to receive actual destination latitude and longitude coordinates from Android app
  • Test drive outdoors to check obstacle avoidance algorithm
  • Complete motor control code with optimal speed and PWM values without PID control
  • Begin unit testing the PID control algorithm
  • Finish wheel encoder implementation and unit testing
  • Make final changes to PCB and place order
  • Test drive the soldered PCB board to ensure everything is working properly
  • Completed
  • Completed
  • Completed
  • Completed
  • Completed
  • Completed
  • Completed
  • Completed
  • Completed
11 04/26/2020 05/02/2020
  • Test drive from start to destination (outdoor)
  • GEO controller can compute the heading from Android app's actual destination coordinates, and send to driver board
  • Finalize obstacle avoidance algorithm
  • LCD display is able to display car's speed, PWM values, destination coordinates, and sensor values
  • Complete a basic PID algorithm and begin uphill and downhill testing
  • Fully integrate wheel encoder onto car chassis
  • Finish basic implementation of PID control and test on car
  • Solder and integrate PCB onto car and test drive to make sure everything is working properly
  • Mount GPS and compass modules onto car chassis
  • Completed
  • Completed
  • Completed
  • Completed
  • Completed
  • Completed
  • Completed
  • Completed
  • Completed
12 05/03/2020 05/09/2020
  • Test drive from start to destination with obstacles and making U-turns (outdoor)
  • Finalize DBC file
  • Complete Android app's basic features (start, stop, connect, google maps, displaying car data)
  • Begin implementing additional Android app features (extra screen to display car data, checkpoint selection capability) and improving the look of the UI
  • Finalize sensor shields and mounting heights/positions
  • Design and 3D print front sensor stand
  • Complete basic implementation and unit testing of checkpoint algorithm
  • Test checkpoint algorithm on car (outdoor)
  • Finalize PID control implementation and test on car (outdoor)
  • Integrate GPS antenna onto car chassis
  • Drill acrylic sheet and mount circuity with screws instead of glue
  • Completed
  • Completed
  • Completed
13 05/10/2020 05/16/2020
  • Test drive from start to destination on 10th Street garage and determine checkpoints
  • Finalize Android app's checkpoint selection capability, display car data screen, and UI improvements
  • Finalize checkpoint algorithm based on feedback from test drives
  • Tweak obstacle avoidance algorithm based on feedback from test drives
  • Tweak PID control implementation based on feedback from test drives
  • Upload rough draft of report to Wiki page
14 05/17/2020 05/23/2020
  • Test drive from start to destination on 10th Street garage
  • Demo
  • Push final code to GitLab
  • Submit individual contributions feedback for all team members
  • Make final updates to Wiki report


Parts List & Cost

Item# Part Desciption Vendor Qty Cost
1 RC Car Chassis Traxxas 1 $250.00
2 Lithium-Ion Battery 1
3 Battery Charger 1
4 Tap Plastics Acrylic Sheet 1
5 Ultrasonic Sensors Amazon [2] 4
6 GPS Module 1
7 GPS Antenna 1
8 Compass Module 1
9 UART LCD Display 1
10 Bluetooth Module 1
11 CAN Transceivers SN65HVD230DR 15 Free Samples
12 Sjtwo Board Preet 4 $50.00
13 12" Pipe 1
14 Android Mobile Phone 1
15 Sensor Mounts 4


Hardware Integration:- Printed Circuit Board


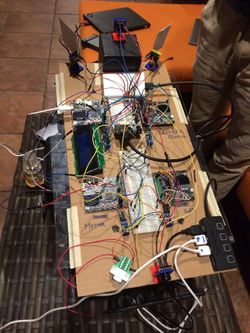
We Initially started with a very basic design of mounting all the hardware on a cardboard sheet for our first round of Integrated hardware testing.
Challenges:- The wires were an entire mess and the car could not navigate properly due to the wiring issues as all the wires were entangling and few had connectivity issues. Hence we decided to go for a basic dot matrix Design before finalizing our final PCB Design as a Prototype board for testing if anything goes haywire.

Initial Mounting on Cardboard Sheet


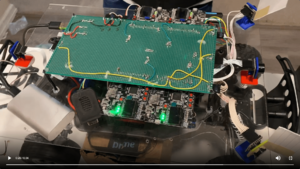
The Prototype Board just before the actual PCB board was created on a dot matrix PCB along with all the hardware components for the Intermediate Integrated testing phase is as follows:

Prototype board 1
Prototype board 2
Prototype board 3


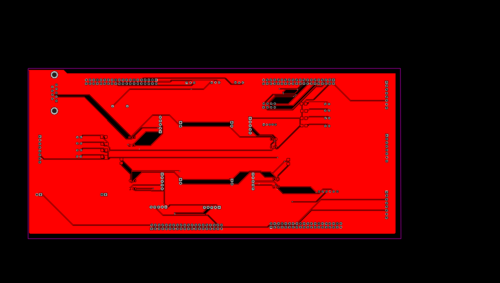
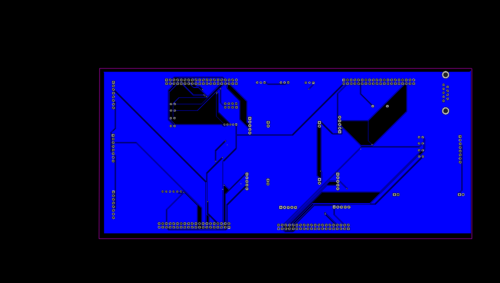
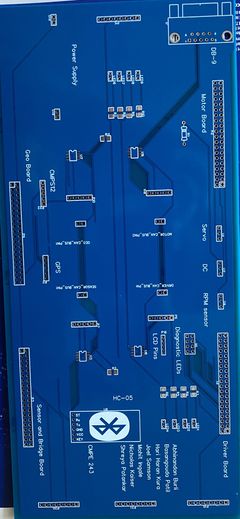
1) To avoid all the above challenges We designed the custom PCB using EasyEDA in which we implemented connections for all the controller modules(SJTwo Board LPC4078) all communicating/sending data via CAN bus. The data is sent by individual sensors to the respective controllers. GPS and Compass are connected to Geographical Controller. RPM sensor, DC and Servo Motors are connected to Motor Controller.
2) Ultrasonic are connected to Bridge and Sensor Controller. LCD is connected to Driver Controller. Bluetooth is connected to Bridge and Sensor Controller. CAN Bus is implemented using CAN Transceivers SN65HVD230 terminated by 120 Ohms; with PCAN for monitoring CAN Debug Messages and Data. Some Components need 5V while some sensors worked on 3.3V power supply. Also it was difficult to use separate USB's to power up all boards.Hence we used CorpCo breadboard power supply 3.3V/5V.
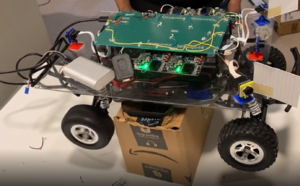
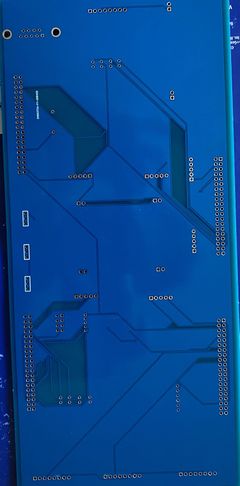
3) PCB was sent to fabrication to JLCPCB China which provided PCB with MOQ of 5 with the lead time of 1 week. We implemented 2 layers of PCB with most of the parts in top layer GPS sensor and Compass sensor. We implemented rectangular header connector for SJTwo boards, RPM sensor, DC & Servo Motor on the bottom layer. There were 2 iterations of this board.
4) Challenges :-We also need to change the header for LCD since it was having different pitch.


DESIGNING:-

Top Layer development
Bottom Layer development

AFTER DELIVERY:-

Top Layer development
Bottom Layer development


CAN Communication

<Talk about your message IDs or communication strategy, such as periodic transmission, MIA management etc.>

Hardware Design

<Show your CAN bus hardware design>

DBC File

DBC File


Bridge and Sensor Controller

<Picture and link to Gitlab>

Hardware Design

Software Design

<List the code modules that are being called periodically.>

Technical Challenges

< List of problems and their detailed resolutions>


Motor Controller

The Motor Controller SJ2-Board is mainly responsible for RC-Car’s steering and speed to move the car towards the destination. The RC-Car we are using is 2 Wheel Drive which means the front wheels are used for steering which is controlled by servo motor and the rear wheels are used for car’s forward and reverse movements which are controlled by DC Motor through ESC.

Hardware Design

<Motor_Module_Schematic.png>

ESC & DC Motor

The ESC(Electronic Speed Control, Traxxas ESC XL-05) and DC Motor we used were provided with the RC car. The DC motor is controlled by ESC using PWM signals provided by the motor controller for forward and reverse movements. We used the 7.4v LiPo battery to power up the ESC. The DC motor is powered by the ESC which has a dc-to-dc converter which converts 7.4v to 6v. ESC can provide high current to the power-hungry DC motor running at faster speeds. ESC has an LED and a button which is used for calibration and setting different modes for the car.

The car can be operated in the following 3 modes: Sport mode(100% Forward, 100% Brakes, 100% Reverse) Racing mode(100% Forward, 100% Brakes, No Reverse) Training mode(50% Forward, 100% Brakes, 50% Reverse)

As we needed more than 50% speed for steep ramps, we used Sport mode. The frequency of the PWM signal fed to the servo motor is 100Hz. Based on the duty cycle set by the user, the car will go forward, reverse, or neutral. 10% - 20% duty cycle for reverse. 15% duty cycle for neutral. 15%-20% duty cycle for the forward motion.

SERVO

The servo motor we used is Traxxas 2075 which was provided with the car and it is responsible for steering the car. It takes the 6V power directly from ESC. The servo motor is controlled directly from the SJ2 micro-controller board. The PWM signal fed to the servo motor is of frequency 100Hz. Based on the duty cycle of the signal sent to the servo, it rotates in the left / right direction. 10% - 20% duty cycle for left. 15% duty cycle for straight. 15%-20% duty cycle for right.

RPM SENSOR

<rpm_sensor.jpg> <trigger_magnet.jpg>

There are two parts to the RPM sensor - one is the trigger magnet and the other is the sensor. The RPM sensor is used as an input to maintain a constant speed of the vehicle. The sensor mounts on the inside of the gear cover, the trigger magnet mounts on the DC motor shaft. The gear cover and motor shaft need to be removed using the toolkit provided along with the RC car. The procedure is similar to this video, but note that the car used in the video is a 4WD RC car by Traxxas. We made use of the trigger magnet attached to the spur gear to trigger a pulse on the sensor for every rotation of the spur gear. These pulses are then read by the SJ2 board to calculate rotations in a second and later convert it to RPM and MPH. The RPM sensor has 3 wires, the white wire is the output wire that provides the pulses to the SJ2 Board, and the other wires are Supply(6V) and GND. We also used a Pull Down 1K Resistor between Supply and RPM output wires.

Software Design

<List the code modules that are being called periodically.>

Technical Challenges

< List of problems and their detailed resolutions>


Geographical Controller

<Picture and link to Gitlab>

Hardware Design

Software Design

<List the code modules that are being called periodically.>

Technical Challenges

< List of problems and their detailed resolutions>


Driver Module

<Picture and link to Gitlab>

Hardware Design

Software Design

<List the code modules that are being called periodically.>

Technical Challenges

< List of problems and their detailed resolutions>


Mobile Application

<Picture and link to Gitlab>

Hardware Design

Software Design

<List the code modules that are being called periodically.>

Technical Challenges

< List of problems and their detailed resolutions>


Conclusion

<Organized summary of the project>

<What did you learn?>

Project Video

Project Source Code

Advise for Future Students

<Bullet points and discussion>

Acknowledgement

=== References ===