S17: Smart Planter
Contents
Smart Planter
Abstract
Almost everyone has a plant at home or at workplace, be it an avid lover of nature, a person who experiences pure joy in nurturing a plant or someone who appreciates the aesthetic beauty a plant adds to the place. However, it adversely affects a plant's health if it is deprived of the right amount of water, at regular intervals, and sunlight which is often difficult to quantify and hence, easy to get wrong. This project aims at developing an automatic watering and lighting system for plants based on data collected from a set of sensors. This ensures that the plant gets the adequate amount of water and sunlight. The system sends timely sensor data reports to the owner that allows him/her to remotely monitor and manually control the watering and lighting for the plant through an Android application.
Objectives & Introduction
Smart Planter is a prototype project that facilitates automatic watering and lighting for indoor plants with the potential to be implemented on a larger scale as automatic irrigation system in the field of agriculture. The Smart Planter monitors the soil moisture level, temperature, humidity, amount of light and the event of rain to intelligently take a decision to water the plants in case of low moisture content in soil and provide adequate lighting to the plants if it is dark and cloudy. It also sends the user with a report of sensor data collected and the last watered time through a server. The user can check the same on an Android app.
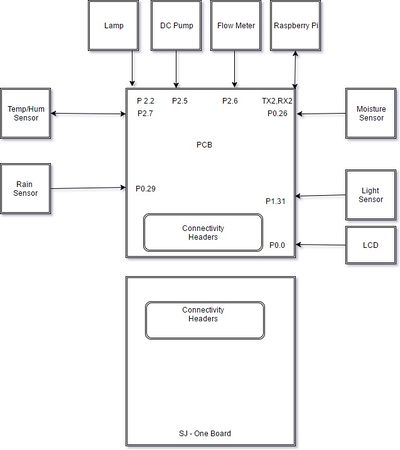
The SJOne board is interfaced to a PCB to which all sensors are connected. The SJone board sends sensor readings to an Android app through a server. The Android app can also send commands to the SJOne board through the server such as turning the water pump and light on or off. An Android Things app runs on a Raspberry Pi 3 to provide Internet connectivity to the SJOne board and to get timestamps of when the plant was last watered.
The objective of the project has been:
- To learn the working of various sensors
- To learn FreeRTOS multi-tasking based on priority
- To learn inter-task communication using queues
- To learn FreeRTOS resource management using semaphore
- To learn the implementation of device drivers like GPIO, UART, single-wire protocol
- To learn interrupt servicing including GPIO external interrupts and timer interrupt
- To learn implementation of ADC and PWM
Team Members & Responsibilities
- Sona Bhasin
- Temperature/Humidity sensor
- Rain sensor
- Code integration and testing
- Johnny Nigh
- Android app
- Server application
- Android Things app
- Communication between the SJOne and Android Things app
- Thrishna Palissery
- Soil moisture sensor
- Light sensor
- LCD
- Code Integration and testing
- Hugo Quiroz
- PCB design
- Hardware assembly
- Flowmeter, DC pump and lighting
- Code integration and testing
Schedule
| Week # | Start Date | End Date | Task | Status | Actual Completion Date |
|---|---|---|---|---|---|
| 1 | 03/14/2017 | 03/21/2017 |
|
Completed | 03/23/2017 |
| 2 | 03/24/2017 | 04/04/2017 |
|
Completed | 04/06/2017 |
| 3 | 04/04/2017 | 04/14/2017 |
|
Completed | 04/15/2017 |
| 4 | 04/04/2017 | 04/11/2017 |
|
Completed | 04/10/2017 |
| 5 | 04/11/2017 | 04/28/2017 |
|
Completed | 04/22/2017 |
| 6 | 04/11/2017 | 04/25/2017 |
|
Completed | 04/25/2017 |
| 7 | 04/11/2017 | 04/28/2017 |
|
Completed | 05/05/2017 |
| 8 | 04/18/2017 | 04/30/2017 |
|
Completed | 04/30/2017 |
| 9 | 04/20/2017 | 05/05/2017 |
|
Completed | 04/28/2017 |
| 10 | 05/06/2017 | 05/10/2017 |
|
Completed | 05/12/2017 |
| 11 | 05/10/2017 | 05/15/2017 |
|
Completed | 5/19/2017 |
| 12 | 05/11/2017 | 05/21/2017 |
|
Completed | 5/25/2017 |
Parts List & Cost
| Item # | Description | Distributor | Qty | Cost |
|---|---|---|---|---|
| 1 | SJOne Board | 1 | $80.00 | |
| 2 | Soil Moisture sensor | Amazon | 1 | $5.99 |
| 3 | Light sensor | Amazon | 1 | $8.99 |
| 4 | Rain sensor | ebay | 1 | $1.99 |
| 5 | Temperature and Humidity sensor | Amazon | 1 | $7.99/4 pieces |
| 6 | DC water pump | Amazon | 1 | $12.99 |
| 7 | Flow meter | Amazon | 1 | $10.99 |
| 8 | Raspberry Pi 3 | Amazon | 1 | $36.78 |
| 9 | Voltage regulator (3.3V) | Sparkfun Amazon | 1 | $1.95 |
| 10 | Voltage regulator (5V) | Amazon | 1 | $7.99/12 pieces |
| 11 | LCD display (20x4) | Amazon | 1 | $32.10 |
| 12 | Lamp + Bulb | Walmart | 1 | $20.00 |
| 13 | MOSFET | Radio Shack | 2 | $2.38/2 pieces |
| 14 | Transistor | Radio Shack | 1 | $0.11 |
| 15 | Solid State Relay | Amazon | 1 | $8.55 |
| Total: $238.80 |
Design & Implementation
Hardware Design
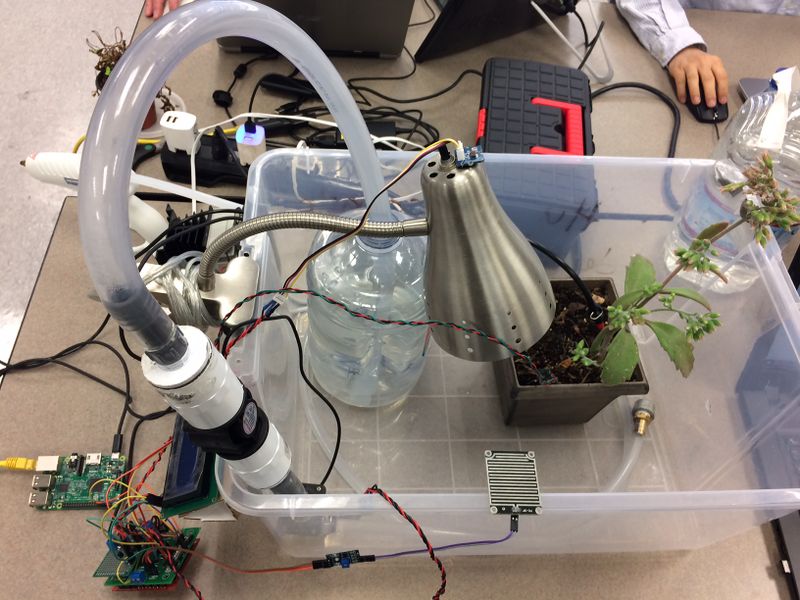
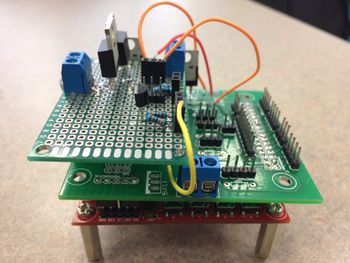
The above diagram shows the hardware setup of Smart Planter.
The setup includes the PCB designed to interface the sensors and other hardware components to SJOne board. The PCB has temperature/humidity sensor, soil moisture sensor, rain sensor, light sensor, LCD, lamp, DC pump, flowmeter and Raspberry Pi connected to it. The PCB also has two MOSFETs to connect a 5V relay to light the lamp and to run 12V DC pump.
PCB Design
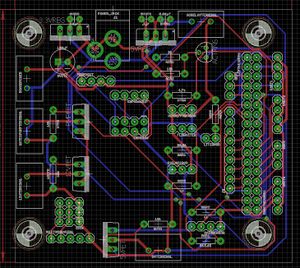
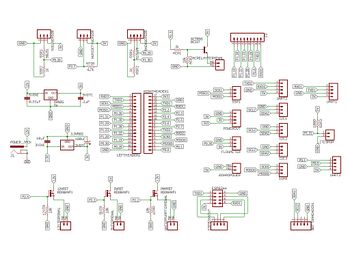
PCB was designed using Autodesk Eagle V8.1.0 and using libraries from Sparkfun.com to interface the hardware components to SJOne board.
The following factors were considered while designing PCB and deciding the placement of each component on it:
- the sensors and other components like DC pump, relay and lamp that would be used in the project
- the supply voltage required for each hardware components
- the voltage capabilities of pins on SJOne board based on the pin functionality
- the communication interfaces that each sensor uses
- the pins that support the functionalities required for the hardware components
The PCB board layout was prepared and the setup was replicated on a breadboard and tested to ensure smooth functioning. The various Sparkfun tutorials helped in each stage of PCB designing. The PCB design was then sent to the manufacturer.
Hardware Interface
Raspberry Pi 3
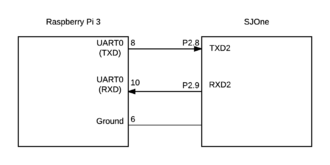
The Raspberry Pi 3 connects to the SJOne using UART (the SJOne utilizes UART2 and the Pi 3 uses its UART0).
Rain Sensor
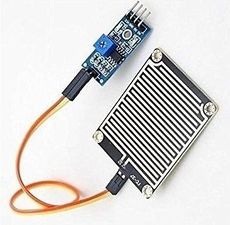
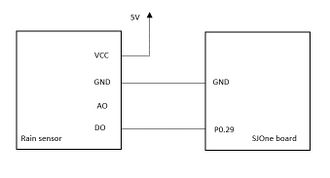
The rain sensor is used in the project to detect if it is raining. This helps the Smart Planter to decide if it needs to water the plants if the moisture level falls below desired value. The sensor requires 5 V power supply. The digital output of the pin is connected to P0.29 of SJOne board. When rain drops fall on the conductive plate connected to rain sensor, the conductive plate elements are bridged by the rain water and the digital pin output goes low. To read the rain sensor, we have implemented GPIO external interrupt to be triggered on detecting falling edge.
Temperature/Humidity Sensor
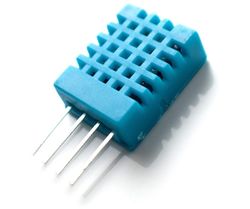
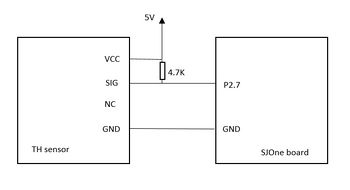
The temperature/humidity sensor being used in the project is AOSONG DHT11 that uses single-wire protocol for communication. The sensor requires 5V power supply. The output signal of the sensor is connected to P2.7 of SJOne board and to 5V VCC with a pull-up resistor of 4.7kΩ. The sensor keeps track of the temperature and humidity for the Smart Planter system. The ideal temperature range for plants is between 50 °F and 80 °F while the humidity range is between 40% and 60%. If the temperature falls below 54°F, the user is intimated using the Android app. The pin diagram for interfacing the temperature/humidity sensor with SJOne board is shown below.
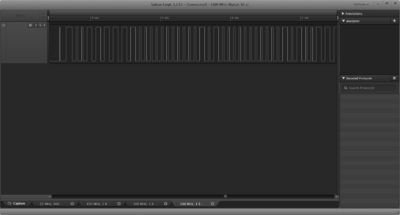
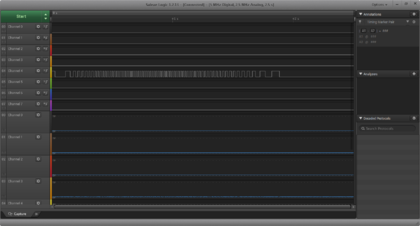
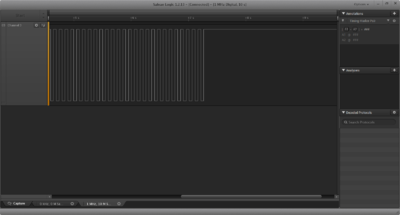
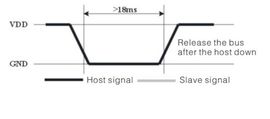
The sensor waits for the microcontroller to pull the line low for a period of 18 ms on its signal pin. The sensor then briefly pulls the line high as “wait time” and then sends an acknowledgment signal which comprises of 80 µs of low time and 80 µs of high time. Subsequently, the sensor sends 40 bits of humidity, temperature and checksum data respectively. The bits are differentiated as 0 or 1 based on the duration for which the signal remain high. The bit 0 is represented by a signal which goes low for 50 µs followed by high time of 28-30 µs while the bit 1 is represented by a signal which goes low for 50 µs and then high for 60-70 µs. The sensor needs 1 s between reads to provide correct data. The data provided by sensor is of the form: 8-bit integer humidity data + 8-bit decimal humidity data + 8-bit integer temperature data + 8-bit decimal temperature data + 8-bit checksum.
Soil Moisture Sensor
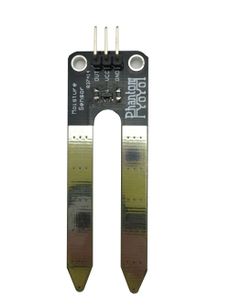
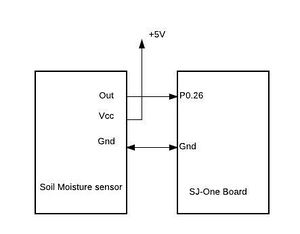
This soil moisture sensor can read the amount of moisture present in the soil surrounding it. It uses the two probes to pass current through the soil, and then it reads that resistance to get the moisture level. More water makes the soil conduct electricity more easily (less resistance), while dry soil conducts electricity poorly (more resistance). It outputs an Analog signal. It is a simple, 5-volt dc collector, emitter follower output monitoring the soil resistance as a base drive of the emitter follower. The more moisture the lower the base resistance and the more base current. Therefore, the more moisture the greater the emitter follower output voltage 0 to approx. 3.3 volts max. This output pin is connected to P0.26 pin of SJ-One board. The pin is configured as an ADC pin. The analog output from the soil moisture sensor is converted to digital signal via ADC of SJ-One board. If the moisture content is below a threshold a DC pump is turned on which waters the plant.
Light Sensor
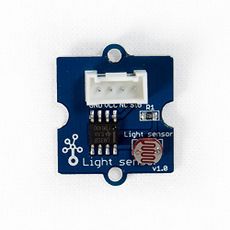
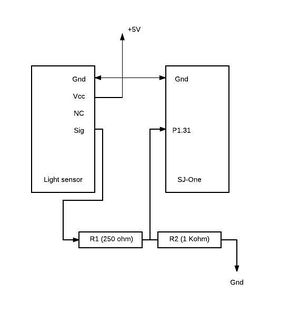
The light sensor is used to detect the current ambient light. The light sensor which is used in this project uses a photo resistor. It changes its resistance based on the amount of light that falls upon it. The light sensor produces an analog output voltage in the range of 0-4v max. This analog output is connected to the pin P1.31 of SJ-One board which is configured as ADC. Since the SJ-One pins can tolerate only a max of 3.3v, the output from the light sensor is stepped down to 3.3 v using a voltage divider. The stepped down voltage is then given as the input to the ADC pin. The light sensor requires 5V supply voltage. If the amount of light falls below a threshold a lamp is turned on.
LCD
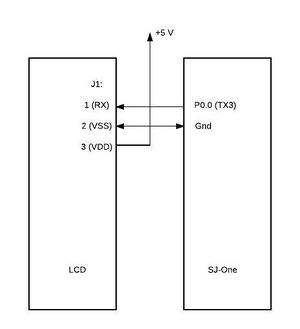
The Liquid Crystal Display used for this project was NHD-0420D3Z-NSW-BBW-V3. This display uses a built-in PIC16F690 for serial communication. It can work in different modes (I2C, SPI, RS232/UART). RS232/UART was used for this project as communication. To enter the RS-232 mode, both R1 and R2 on LCD should be open. A 5v voltage supply is provided. The pin P0.0 of SJ-One board is used as the TX 3 (UART3) pin. This pin is connected to the RX pin of LCD display. The baud rate used for communication was 9600. The communication format is 1 Start bit, 8-bit data, 1 Stop bit, no parity, no hand-shaking.
Flow Meter
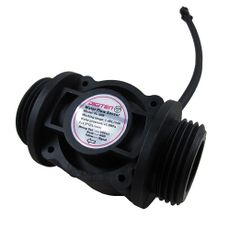
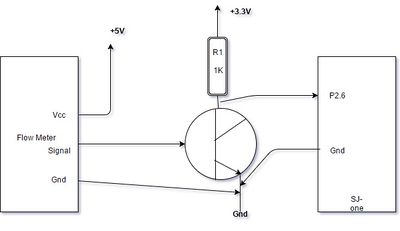
A flow meter is a device used to measure the flow rate or quantity of a gas or liquid moving through a pipe. In this project we have used flow meter to measure the water usage.It works on external interrupt. The output signal from flow meter is given to a transistor. The output from collector is given as input to pin P2.6 of SJ-One.
DC Pump
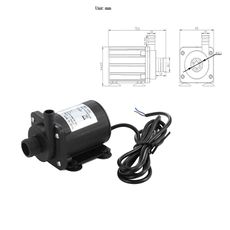
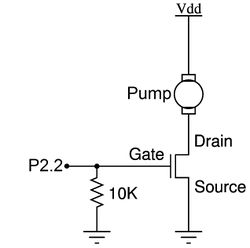
The DC pump was controlled using an N-Channel MOSFET that was controlled by P2.2 on the SJOne. P2.2 was chosen since it is PWM capable and we could vary the pump flow rate using PWM. The pump which we used in our project was magnetic drive centrifugal submersible water pump. It is a type of non-positive displacement pump. Magnetic drive pumps are driven by the force of magnets instead of being directly coupled to a motor. Such pumps do not require mechanical shaft seal, and as an added benefit, they are also leak-proof.Water is drawn from the pump in through the inlet casing into the impeller eye where pressure is less than atmospheric pressure. The function of the impeller is to increase the kinetic energy of fluid by whirling it outwards by increasing the angular momentum of the fluid. Both pressure and velocity are increased within the impeller. Outside the impeller, fluid is collected into volute where further kinetic energy is converted into pressure energy and delivered into the outlet pipe.
Lamp
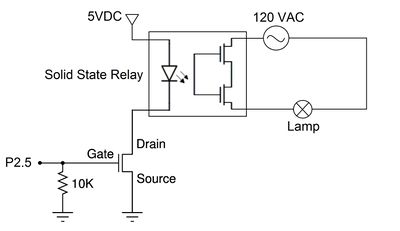
The lamp used in this project was a standard AC Desk Lamp, however, any type of incandescent, fluorescent, high-intensity/gas discharge, and/or light-emitting diode lamp with an AC outlet is compatible with our system. This is because our lamp was controlled using a Solid State Relay. This solid state relay was activated using an N-Channel MOSFET and the N-Channel was in turn controlled by P2.5 on the SJOne board.
Software Design
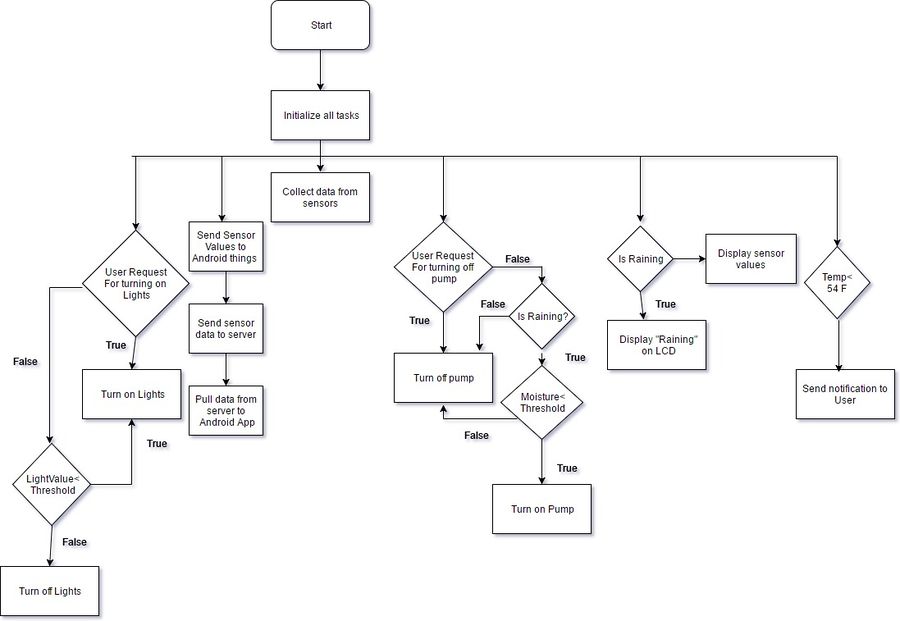
The below flowchart shows the high-level software design of Smart Planter.
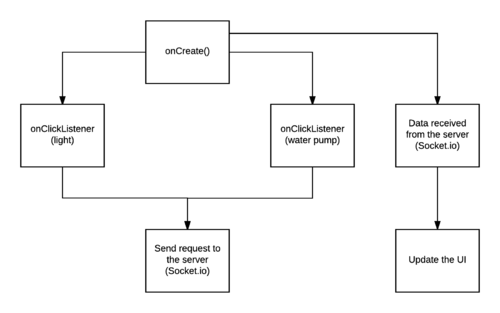
The below flowchart shows the software design of Android application.
Android App
The Android app will send a request to the server after a user presses one of the switches (either to turn on or off the water pump or light). Whenever the water pump switch is turned on the timestamp of the watering will be saved and displayed in the Android app.
The app will continuously listen for data from the server. When data is received the UI is updated with the most recent sensor data.
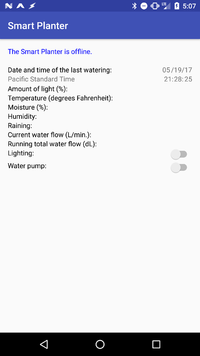
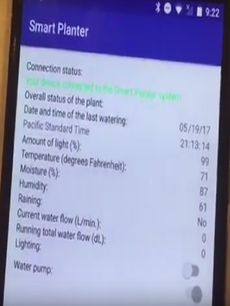
The app displays the following information:
- Connection status of the Android app to the server and Smart Planter system
- Warning messages (i.e. if the temperature is too low or too high).
- Timestamp of the last time that the plant was watered manually from the app
- Date
- Time zone
- Time
- Amount of light (as a percentage)
- Temperature
- Moisture (soil, as a percentage)
- Humidity
- Rain (whether it is currently raining or not)
- The current amount of water being fed to the plant (in liters per minute)
- The amount of water given to the plant over the past 24 hours (in deciliters)
- Switch to turn on or off the light
- Switch to turn on or off the water pump (to water the plant)
Server Application
The server uses the Socket.io JavaScript library to receive data from the Android Things app (such as the sensor data) and forwards the data to the Android app.
An example of the light sensor readings being received by the server from the Android Things app (the socket.on portion) and forwarding this data to the Android app (the io.sockets.emit) is below:
io.sockets.on("connection", function (socket) {
socket.on("sensorLight", function(sensorLight) {
      io.sockets.emit("sensorLight", sensorLight);
  });
})
The server receives requests from the Android app and forwards these requests (for turning on or off the water pump or light) to the Android Things app.
An example of the light switch being received by the server from the Android app and forwarding the request to the Android Things app is below:
app.get('/', function (req, res) {
lighting = req.query.lighting;

if(lighting === "true" || lighting === "false") {
    io.sockets.emit("lighting", lighting);
  }

res.send(`lighting = ${lighting}
  `);
});
Android Things App
Android Things (an OS based on the low levels of Android targeting IoT projects) runs on a Raspberry Pi 3.
The app communicates with the SJOne over UART (using interrupts on both boards) and with the server using the Socket.io JavaScript library.
The configuration of the UART on the Pi 3 using Android Things is shown here:
// UART Configuration Parameters
private static final int BAUD_RATE = 9600;
private static final int DATA_BITS = 8;
private static final int STOP_BITS = 1;

// The number of bytes in a data transfer over UART.
private static final int DATA_SIZE_RECEIVING = 3;

// Configure the UART
mUART.setBaudrate(baudRate);
mUART.setDataSize(DATA_BITS);
mUART.setParity(UartDevice.PARITY_NONE);
mUART.setStopBits(STOP_BITS);
A portion of the method that reads the data over UART (received from the SJOne) is shown here. The opcode is what tells us the data corresponds to a specific sensor or other information sent to the Android Things app from the SJOne.
The data here is the sensor reading or information that must be sent to the server and/or Android app.
// For receiving data on UART.
private void readUartData() {
        if ( mUART != null ) {
            // Loop until there is no more data in the RX buffer.
            try {

                byte[] buffer = new byte[DATA_SIZE_RECEIVING];

                while ( ( mUART.read(buffer, buffer.length) ) > 0 ) {

                    mReceiveOpcode = new String(buffer, 0, 1, "UTF-8");

                    mReceiveData = new String(buffer, 1, 2, "UTF-8");
               }
            } catch (IOException e) {
                Log.w(TAG, "Log.d: Unable to receive data over UART", e);
            }
        }
    }
The snippet of code below shows how the data is written over UART to send to the SJOne (for the month of the timestamp). In this app we are using UTF-8 encoding for all of the characters that are sent over UART.
// For sending data on UART.
    private void writeUartData() {
        if ( mUART != null ) {
            // Loop until there is no more data in the RX buffer.
            try {
                // Buffer for sending data.
                byte[] buffer2;

                if( timeStampFlag ) {
                    /*
                        Month of the timestamp.
                    */

                    // Move the opcode for the month of the timestamp into the buffer.
                    buffer2 = mOpcodeLastWateredMonth.getBytes("UTF-8");

                    // Send the opcode over UART.
                    mUART.write(buffer2, buffer2.length);

                    // Move the month into buffer2.
                    buffer2 = timeStampMonthDevice.getBytes("UTF-8");

                    // Send the data over UART.
                    mUART.write(buffer2, buffer2.length);
                }
            } catch (IOException e) {
                Log.w(TAG, "Log.d: Unable to transfer data over UART", e);
            }
        }
    }
Rain Sensor
Rain sensor uses GPIO external interrupt functionality to convey if it is raining to the SJOne board.
bool isRaining = false;
eint3_enable_port0(29, eint_falling_edge, rainsensor_isr);
The pin P0.29 is set as input and on external interrupt being triggered at falling edge, the callback function 'rainsensor_isr' will be called to set the flag isRaining as true. This flag is made use of by 'test_task'.
Temperature/Humidity Sensor
The temperature/humidity sensor uses single-wire protocol implemented using GPIO external interrupt, timer interrupt, semaphore and tasks. The following tasks are used by the sensor.
scheduler_add_task(new temperature_task(PRIORITY_LOW));
xTaskCreate(read_TH_sensor_task, (const char* )"read_th_task",STACK_BYTES(2048), 0, PRIORITY_LOW, 0);
scheduler_add_task(new terminalTask(PRIORITY_HIGH));
xTaskCreate(test_task, (const char* )"test", STACK_BYTES(2048), 0,PRIORITY_MEDIUM, 0);
The 'temperature_task' periodically calls a function to send a low signal of 18 ms to the temperature/humidity sensor and enable external interrupt at rising edge on pin P2.7. The 'read_th_task' converts the sensor data stored in an array in binary form to decimal and updates two global variables corresponding to temperature and humidity.
The timer 3 is enabled for triggering an interrupt every 30 µs to read the 40 bits of sensor data and storing them to an array. A binary semaphore is also used for deferred processing. The semaphore is given from the callback function for external interrupt 'temperaturesensor_isr' to the 'read_th_task'.
timer3_init();
eint3_enable_port2(7, eint_rising_edge, temperaturesensor_isr);
vSemaphoreCreateBinary(binary_sem);
Soil Moisture Sensor
Soil moisture sensor works on ADC. The following tasks are used by the soil moisture sensor.
scheduler_add_task(new moisture_sensor_task(PRIORITY_LOW));
xTaskCreate(test_task, (const char* )"test", STACK_BYTES(2048), 0,PRIORITY_MEDIUM, 0);
The 'moisture_sensor_task' reads the analog value from pin P0.26 and converts it into a digital value. This value is passed to the 'test_task' using a queue. The 'test_task' compares the value obtained from the moisture sensor with a threshold and takes appropriate action.
 class moisture_sensor_task: public scheduler_task
 {
   uint16_t moisture_value = adc0_get_reading(moisture_sensor_channel);
   xQueueSend(moisture_sensor_handle, &moisture_value, 0);
 }
 void test_task(void* p)
 {
   //Receives value from queue
   if(moisture_value<threshold)
   {
       turn_on_pump();
   }
   else
   {
       turn_off_pump()
   }

 }
Light Sensor
Light sensor works on ADC. The following tasks were used for light sensor.
scheduler_add_task(new light_sensor_task(PRIORITY_LOW));
xTaskCreate(test_task, (const char* )"test", STACK_BYTES(2048), 0,
			PRIORITY_MEDIUM, 0);
The analog value from pin P1.31 is converted to digital value using the task 'light_sensor_task'. The value is send to 'test_task' for comparing it with a threshold. If the value is below particular threshold a lamp is turned on.
class light_sensor_task: public scheduler_task
{
  uint16_t light_value = adc0_get_reading(light_sensor_channel5);
  xQueueSend(light_sensor_handle, &light_value, 0);
}

void test_task(void* p)
{
   //Receive item from a queue
   if(light_value<threshold)
   {
      turnOnLight()
   }
   else
   {
      turnOffLight()
   }
}
LCD
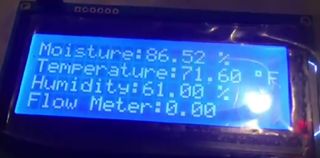
The following task was used for LCD. LCD is interfaced to SJ-One board using UART3. LCD displays soil moisture sensor value, temperature sensor value, humidity sensor value and Flow meter reading in Liters if here is no rain. When it rains, it displays 'Its Raining!'.
class display_LCD_task: public scheduler_task
 {
    init_UART3();
    if(!Raining)
    display_LCD(mois_perc, temp_val, humid_val, FlowMeterliters);
    else
    display("Raining!");
 }
Flow Meter
The flowmeter provides the measure of water used for watering the plant. Within the 'flowmeter_task', the pin P2.6 is set as GPIO output and external interrupt is set for rising edge. Also, conversion of deciliters to liters is done. The callback function for external interrupt 'fm_high' keeps track of number of ticks and subsequent conversion to deciliters.
xTaskCreate(flowmeter_task, (const char* )"flwmtr", STACK_BYTES(2048), PRIORITY_LOW, &flwmtrHandle);
eint3_enable_port2(6, eint_rising_edge, fm_high);
void flowmeter_task(void* p)
{

  flow = (deciliter - prev_deciliters)*6;
}DC Pump
The GPIO pin P2.2 is used to control the pump. The pump is turned on and off based on soil moisture level or as per command from the Android application by user. The PWM functionality is enabled on the pin for controlled operation of the pump with duty cycle set to 50%.
PWM pump(PWM::pwm3, 100000);
if(enableWatering)
{
   pump.set(50);
}
else
{
   pump.set(0);
}Lamp
Lamp is connected through a relay to GPIO pin P2.5 using PWM functionality to control the intensity with which bulb glows in lamp. The light sensor value or command from Android application serves as the basis for turning the lamp on or off.
PWM light(PWM::pwm6, 100000);
if(enableLighting)
{
  light.set(100);
}
else
{
  light.set(0);
}
Implementation
Rain Sensor
Rain sensor value is read using the GPIO interrupt functionality.
To read the rain sensor output, the steps followed are:
- The GPIO pin P0.29 is set as input pin.
- The external interrupt at falling edge is enabled on P0.29.
- On detecting a falling edge, a flag is set within the callback function for external interrupt on pin 0.29. This flag is checked by the master task in decision-making process for watering the plant.
Temperature/Humidity Sensor
To implement the single-wire protocol for temperature/humidity sensor, we have made use of a timer interrupt and GPIO external interrupt. The timer interrupt has been configured to be triggered every 30 µs and the GPIO external interrupt has been configured to be triggered when a rising edge is detected on the pin. We have also made use of semaphore and tasks to effectively achieve the purpose.
The sequence of steps to read the temperature/humidity sensor is as follows:
- The GPIO pin P2.7 is set as an output pin.
- The microcontroller sets the pin low for 18 ms.
- The pin P2.7 is set as input pin.
- The external interrupt at rising edge is enabled on P2.7.
- The sensor then pulls the signal high briefly as wait time followed by an acknowledgment signal and 40 bits of data.
- On detecting rising edge, the timer interrupt is enabled in the callback function for external interrupt on pin P2.7.
- Within the timer interrupt ISR, if the signal is still high after the 30 µs, it in interpreted as bit 1 and if the signal falls low after 30 µs, then it is interpreted as bit 0. The values are stored in an array. Once all 40 bits of data have been received, a function to convert the values stored in array to decimal equivalent is called, which provides the humidity data in % and temperature data in °C, converted to °F.
Soil Moisture Sensor
Soil moisture sensor works on ADC. To read values from soil moisture sensor the steps were followed:
- Configure the pin P0.26 as ADC.
- Connect the soil moisture sensor out to pin P0.26.
- Give 5 volt supply to Vcc of soil moisture sensor.
- Connect the ground of SJ-One board and the sensor.
- The analog signal is converted to digital value, which is compared against a threshold value in master task/test task.
- The dc pump is turned on or off based on moisture value.
Light Sensor
Light sensor works on ADC. To read values from light sensor the following steps were followed:
- Configure the pin P1.31 as ADC.
- Use a voltage divider circuit.
- The output across 1K resistor is applied to pin P1.31.
- Give 5 volt supply to Vcc of light sensor.
- Connect the ground of SJ-One board and the sensor.
- The analog signal is converted to digital value, which is compared against a threshold value in master task/test task.
- The lamp is turned on or off based on light sensor value.
LCD
LCD uses RS232/UART3 protocol to receive data from SJ-One board.
- Configure pin P0.0 as TX3 pin.
- Set the baud rate as 9600.
- Connect the RX pin of LCD to TX3 pin of SJ-One.
- Give 5V supply to Vcc pin of LCD.
- Connect the ground of SJ-One board and the sensor.
Flowmeter
The flowmeter uses GPIO external interrupt functionality. The following steps were used to connect flowmeter to SJOne board:
- Pin P2.6 was configured as GPIO input.
- External interrupt capability was enabled to be triggered at rising edge.
- Within the callback function for the external interrupt, the tick rate is being counted. If the tick rate count is 45, it is equivalent to 1 deciliters.
DC pump
- Pin P2.2 was configured as GPIO output
- PWM was enabled to allow for faster or slower flow rates
- The pump is enabled based on moisture level as well as user input from the Android app
Testing & Technical Challenges
Issue #1
While trying to integrate the task for reading the temperature/humidity sensor along with other sensor tasks, it was seen that the system crashes. Also, since reading the temperature/humidity sensor is time-sensitive, the temperature and humidity values received were found to be erroneous after a few consecutive reads.
On debugging, it was found that the function that performed the conversion of binary values of temperature and humidity to decimal equivalents was taking too long which led to system crash. This issue was resolved by rewriting the binary-to-decimal conversion logic to use fewer for loops. Also, semaphore was made use of inside the interrupt handler for deferred processing and synchronization. This reduced the CPU utilization to a great extent.
The delay between consecutive reads performed on temperature/humidity sensor was adjusted in way to provide better synchronization in the event of multiple reads.
Issue #2
We faced several issues integrating sensors to our PCB design, there were several components that needed further circuit implementation. This was do to the SJOne not being able to supply enough current to activate the transistors/Solid State Relay that we had at our disposal. The components that required further hardware included light sensor, DC Pump, and AC Lamp. We addressed these issues by creating another custom perforated board design on top of our PCB. The circuit diagrams for these can be seen in the DC Pump, Light Sensor, and AC Lamp sub-sections of Hardware Interface section. To address this issue in the future our PCB design would include level shifting circuits as well as buffer to be able to activate a wider variety of devices.
Conclusion
This project has been a great learning experience in that we could work on integrating a variety of sensors using different device drivers into a functioning embedded system unit. We came across various challenges along the way and the process of resolution of the same helped to gain a better understanding of the real-time operation of an embedded system. Aspects like achieving efficient CPU utilization, scheduling of time-sensitive tasks, inter-task communication, resource management, interrupt processing, establishing communication to an Android application via a server as well as PCB designing and hardware assembly are some of the valuable takeaways from having completed this project. It also gave us an insight into areas where there is scope for improvement and heightened our inclination towards the subject.
Project Video
Project Source Code
Future Enhancements
- Provide better packaging to the embedded system module and aesthetic arrangement of wires to make the components less prone to disconnection.
- Automatically get the timezone based on the location of the board that is running the Android Things app (using the Google Maps Timezone API).
- Add push notifications.
- A soft watchdog task can be implemented in the SJOne application that can tell the Android Things application to alert the user of a possible failure.
- Add support to turn watering and lighting on or off through voice commands using the Google Assistant SDK.
Acknowledgement
Working on the project 'Smart Planter' was a source of immense knowledge to us. We would like to express our sincere gratitude to Professor Preetpal Kang for his guidance and valuable support throughout the course of this project work. We acknowledge with a deep sense of gratitude the encouragement and inspiration received from him. His effective lectures on FreeRTOS and Embedded C programming provided great clarity in planning and implementing this project.
Johnny Nigh would like to thank Michael Nigh for his help with setting up the server and help with the basics on the Socket.IO JavaScript library.
References
[1] "Android Things - Getting Started with the SDK Preview"
[2] Android Things - Samples - UART Loopback
[3] Hoisington, Corinne. Android Boot Camp for Developers Using Java: A Guide to Creating Your First Android Apps. Boston, MA: Cengage Learning,2016
[4] Hardy, Brian; Marsicano, Kristin; Phillips, Bill; Steward, Chris. Android Programming: The Big Nerd Ranch Guide, Edition 2. Atlanta, GA: Big Nerd Ranch, LLC. 2015
[5] DHT11 Temperature/Humidity sensor
[6] NHD-0420D3Z-NSW-BBW-V3
[7] Professor Preet's lecture notes
