S23: X Æ A-13
Contents
Project Title
<Team Name>
Abstract
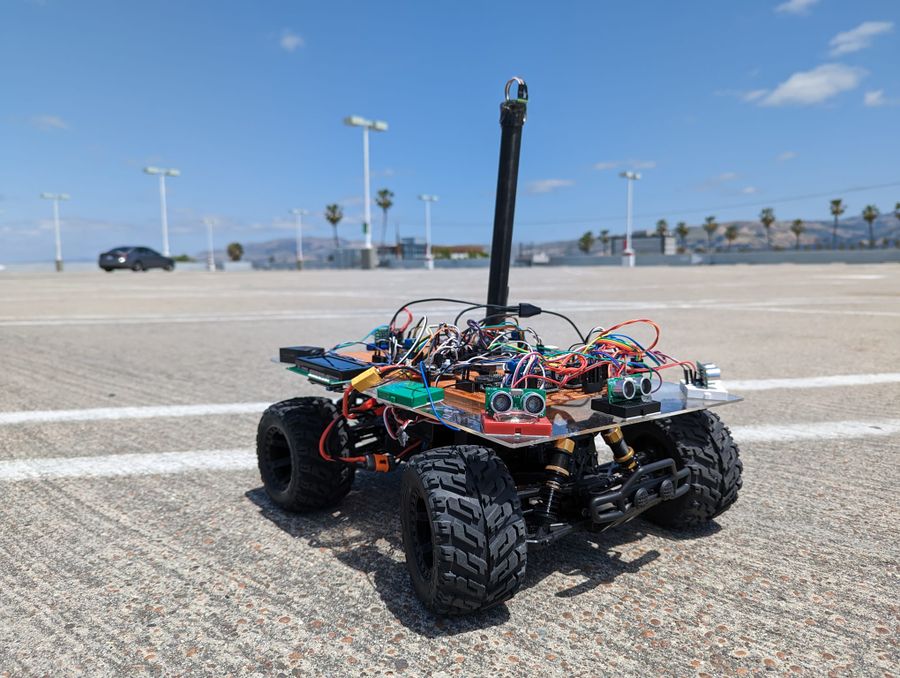
This report presents an overview of the technical progress made during the development of an autonomous RC car. The project involved comprehensive research, establishing a private git repository for version control, and procuring essential components such as CAN transceiver modules. Significant achievements included successful integration of ultrasonic sensors, compass module, and RPM sensor. The team successfully implemented obstacle avoidance algorithms, efficient GPS parsing, and precise PID control. Additionally, a mobile app was developed for real-time data visualization and control. Rigorous hardware testing and fine-tuning were conducted to ensure optimal performance. The report provides the technical advancements achieved in hardware-software integration and algorithm implementation for the successful development of the prototype.
Introduction
The project was divided into 5 modules:
- Sensor Node
- Motor Node
- Driver Node
- Geo Controller Node
- Android Application
Team Members & Responsibilities
<Team Picture>
The source code of our car can be found here: X Æ A-13 Gitlab Repository
|
Team Members |
Administrative Roles |
Technical Roles | ||
|---|---|---|---|---|
| ||||
| ||||
| ||||
| ||||
| ||||
Schedule
| Task# | Start Date | End Date | Task | Status | Point of Contact |
|---|---|---|---|---|---|
| 1 | 02/13/2023 | 02/18/2023 |
|
Completed | Team |
| 2 | 02/19/2023 | 02/22/2023 |
|
Completed | Iftiza |
| 3 | 03/03/2023 | 03/10/2023 |
|
Completed | Sharan, Prabhat, Tushara |
| 4 | 03/11/2023 | 03/17/2023 |
|
Completed | Team |
| 5 | 03/18/2023 | 03/21/2023 |
Work on the RC Car Infrastructure Task
|
Completed |
|
| 6 | 03/22/2023 | 04/04/2023 |
Work on the Geo Controller Task
|
Completed |
|
| 7 | 04/05/2023 | 04/18/2023 |
Work towards the Prototype 1 Task
|
Completed |
|
| 8 | 04/19/2023 | 04/25/2023 | Work towards the Prototype 2 Task
|
Completed |
|
| 9 | 04/20/2023 | 05/02/2023 | Work towards the Prototype 3 Task
|
Completed |
|
| 10 | 05/03/2023 | 05/09/2023 | Work towards the Prototype 4 Task
|
Completed |
|
| 11 | 05/10/2023 | 05/24/2023 | Work towards the final demo
|
Completed |
|
| 12 | 05/10/2023 | 05/26/2023 | Project Wrap-up
|
Ongoing |
Team |
Parts List & Cost
| Item# | Part Desciption | Vendor | Qty | Cost |
|---|---|---|---|---|
| 1 | RC Car | Maverick Quantum MT [1] | 1 | $180.00 |
| 2 | RC Car Battery | Lithium Polymer Two-Cell | 1 | $20.0 |
| 3 | CAN Transceiver Modules | SN65HVD230 | 4 | $43.56 |
| 4 | SJTwo Microcontroller Development Board | SJSU | 5 | $250 |
| 5 | Ultrasonic Sensor | Adafruit US 100[2] | 4 | $48.69 |
| 6 | GPS Module | Adafruit PA1616S [3] | 1 | $32 |
| 7 | Compass Module | CMPS12 - RobotShop [4] | 1 | $39.77 |
| 8 | LCD Module | LCD1602 [5] | 2 | $12.02 |
Printed Circuit Board
<Picture and information, including links to your PCB>
CAN Communication
<Talk about your message IDs or communication strategy, such as periodic transmission, MIA management etc.>
Hardware Design
<Show your CAN bus hardware design>
DBC File
Gitlab link to the X Æ A-13 DBC file
VERSION "2.5"

NS_ :
	BA_
	BA_DEF_
	BA_DEF_DEF_
	BA_DEF_DEF_REL_
	BA_DEF_REL_
	BA_DEF_SGTYPE_
	BA_REL_
	BA_SGTYPE_
	BO_TX_BU_
	BU_BO_REL_
	BU_EV_REL_
	BU_SG_REL_
	CAT_
	CAT_DEF_
	CM_
	ENVVAR_DATA_
	EV_DATA_
	FILTER
	NS_DESC_
	SGTYPE_
	SGTYPE_VAL_
	SG_MUL_VAL_
	SIGTYPE_VALTYPE_
	SIG_GROUP_
	SIG_TYPE_REF_
	SIG_VALTYPE_
	VAL_
	VAL_TABLE_

BS_:

BU_: GEOLOGICAL SENSOR DRIVER MOTOR

BO_ 101 CHKPT_GPS_POSITION: 8 GEOLOGICAL
 SG_ CHKPT_GPS_LATITUDE_SCALED : 0|32@1- (1,0) [-90000000|90000000] "degree" DRIVER
 SG_ CHKPT_GPS_LONGITUDE_SCALED : 32|32@1- (1,0) [-180000000|180000000] "degree" DRIVER

BO_ 102 CURRENT_GPS_POSITION: 8 GEOLOGICAL
 SG_ CURRENT_GPS_LATITUDE_SCALED : 0|32@1- (1,0) [-90000000|90000000] "degree" DRIVER
 SG_ CURRENT_GPS_LONGITUDE_SCALED : 32|32@1- (1,0) [-180000000|180000000] "degree" DRIVER

BO_ 103 GEO_STATUS: 8 GEOLOGICAL
 SG_ GEO_STATUS_COMPASS_ANGLE : 0|10@1+ (1,0) [0|359] "degree" DRIVER
 SG_ GEO_STATUS_BEARING_ANGLE_TO_DESTINATION : 10|10@1+ (1,0) [0|359] "degree" DRIVER
 SG_ GEO_STATUS_DISTANCE_TO_DESTINATION : 20|16@1+ (1,0) [0|2000] "meter" DRIVER
 SG_ GEO_STATUS_BEARING_ANGLE_TO_CHKPT : 36|10@1+ (1,0) [0|359] "degree" DRIVER
 SG_ GEO_STATUS_DISTANCE_TO_CHKPT : 46|16@1+ (1,0) [0|2000] "metre" DRIVER

BO_ 104 GEO_ANGLE_DELTA: 4 GEOLOGICAL
 SG_ GEO_ANGLE_DIFF_TO_DEST : 0|16@1- (1,0) [-359|359] "degree" DRIVER
 SG_ GEO_ANGLE_DIFF_TO_CHKPT : 16|16@1- (1,0) [-359|359] "degree" DRIVER

BO_ 105 GEO_LOCK: 1 GEOLOGICAL
 SG_ GEO_LOCK_TO_DESTINATION : 0|8@1+ (1,0) [0|1] "boolean" DRIVER

BO_ 201 SENSOR_SONARS: 5 SENSOR
 SG_ SENSOR_SONARS_left : 0|10@1+ (1,0) [0|1000] "cm" DRIVER
 SG_ SENSOR_SONARS_right : 10|10@1+ (1,0) [0|1000] "cm" DRIVER
 SG_ SENSOR_SONARS_middle : 20|10@1+ (1,0) [0|1000] "cm" DRIVER
 SG_ SENSOR_SONARS_rear : 30|10@1+ (1,0) [0|1000] "cm" DRIVER

BO_ 202 DEST_GPS_POSITION: 8 SENSOR
 SG_ DEST_GPS_LATITUDE_SCALED : 0|32@1- (1,0) [-90000000|90000000] "degree" GEOLOGICAL,DRIVER
 SG_ DEST_GPS_LONGITUDE_SCALED : 32|32@1- (1,0) [-180000000|180000000] "degree" GEOLOGICAL,DRIVER

BO_ 203 CAR_HEARTBEAT: 1 SENSOR
 SG_ HEARTBEAT_DATA : 0|8@1+ (1,0) [0|1] "boolean" DRIVER

BO_ 302 MOTOR_CMD: 3 DRIVER
 SG_ MOTOR_CMD_steer: 0|8@1- (1,-5) [-5|5] "" MOTOR
 SG_ MOTOR_CMD_drive : 8|16@1- (1,-9) [-9|9] "kph" MOTOR

BO_ 401 LCD_DATA_FROM_MOTOR_NODE: 3 MOTOR
 SG_ RPM_SENSOR_SPEED: 0|6@1+ (1,0) [0|50] "kph" DRIVER
 SG_ SERVO_PWM: 6|7@1+ (1,0) [0|100] "percent" DRIVER
 SG_ MOTOR_PWM: 13|7@1+ (1,0) [0|100] "percent" DRIVER

BO_ 901 DEBUG_CHK: 8 GEOLOGICAL
 SG_ GPS_PASS_COUNTER: 0|16@1+ (1,0) [0|64000] "count" DRIVER
 SG_ GPS_FAIL_COUNTER: 16|16@1+ (1,0) [0|64000] "count" DRIVER
 SG_ CMPS_PASS_COUNTER: 32|16@1+ (1,0) [0|64000] "count" DRIVER
 SG_ CMPS_FAIL_COUNTER: 48|16@1+ (1,0) [0|64000] "count" DRIVER

CM_ BU_ DRIVER "The driver node of the car";
CM_ BU_ MOTOR "The motor controller node of the car";
CM_ BU_ SENSOR "The sensor controller node of the car";
CM_ BU_ GEOLOGICAL "The geoposition and geodirection controller of the car";
CM_ BO_ 101 "Sync message used to synchronize the controllers from driver node";
CM_ BO_ 102 "Sync message used to synchronize the controllers from sensor node";
CM_ SG_ 101 DRIVER_HEARTBEAT_cmd "Heartbeat command from the driver";
Sensor ECU
<Picture and link to Gitlab>
Hardware Design
Adafruit US-100 Ultrasonic Range Finder
- Detection Range(reliable): 2 cm to 250 cm.
- 3-5V operation range.
- UART Output, PWM output.
- Accuracy: 3mm
- Measuring angle covered: <15°
- Operating Current: <15mA
- Operating Frequency: 40Hz
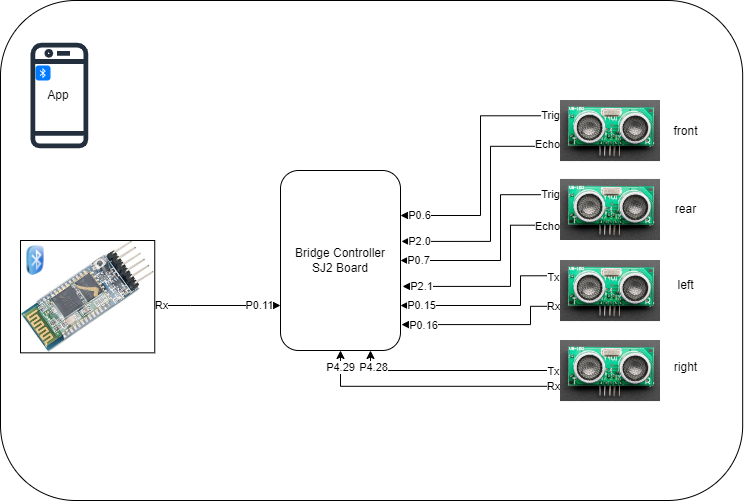
We employed a set of four Adafruit US-100 Ultrasonic Range Finders as sensory components in our project. These ultrasonic sensors were integrated into the RC car system with the objective of enabling effective obstacle avoidance. To achieve this, we strategically positioned three sensors on the front side of the RC car, while the remaining sensor was placed at the rear. The sensors were powered by a +5V supply voltage. An indicative sign of successful data retrieval was the toggling of LED3 on the SJ2 board.
The operational principle is as follows: When the trigger pin is set to a HIGH state for a minimum duration of 10 microseconds, the module automatically emits a 40 kHz ultrasonic wave from the Ultrasonic transmitter. This wave propagates through the air and, upon encountering an obstruction, it reflects back towards the sensor. The Ultrasonic receiver module detects this reflected wave. As soon as the wave returns, the Echo pin becomes HIGH for a specific duration, equivalent to the time it took for the wave to travel back to the sensor.
for UART: To establish communication with the sensor, a UART baud rate of 9600 is utilized. In UART mode, a command is sent by transmitting the hexadecimal value 0x55 to the sensor. Following the command transmission, two bytes (a 16-bit value) are read back, representing the distance in millimeters (mm).
The SJ2 board measures the length of time during which the Echo pin remains HIGH, providing information about the duration of the wave's round trip. Utilizing this information, the distance is calculated, as described in the previous section. The formula used to measure the distance to the object is Distance = Speed × Time, where the speed represents the speed of sound.
Software Design
Among these sensors, two employed UART communication to transmit distance data to the SJ2 microcontroller, whereas the other two utilized interrupt-based communication. To facilitate communication with the SJ2 microcontroller, UART1 and UART3 were designated for the right and left sensors, respectively. Additionally, pins P0.6 and P0.7 were allocated as trigger pins, while pins P2.0 and P2.1 served as echo pins for the front and rear sensors.
Sensors were divided into two groups:
- Front and Rear
- Left and Right
Each group utilizes a frequency of 10Hz. The provided code demonstrates its periodic invocation.
void periodic_callbacks__10Hz(uint32_t callback_count) {
  get_sonar_values();
  if ((ultrasonic_can_tx()) && (car_heartbeat_tx_10hz()) && (destination_coordinate_tx_10hz())) {
    gpio__toggle(board_io__get_led3());
  }
The following code snippet demonstrates the initialization of the triggers for the front and rear sensors in 100Hz.
void periodic_callbacks__100Hz(uint32_t callback_count) {
ultrasonic_implementation__initiate_ultrasonics_range();
}
Technical Challenges
- Issue: The presence of noise in the sensor measurements is causing instability in the car's steering, resulting in a wobbly motion.
- Solution: To address the issue of noise in the sensor measurements and stabilize the car's steering, we have implemented an average buffer. This buffer calculates the average value based on the last 10 readings rather than relying on a single value. By taking into account multiple readings over a period of time, the average buffer helps to reduce the impact of noise and provide a more stable steering response for the car.
Motor ECU
<Picture and link to Gitlab>
The primary function of this module involves establishing a communication interface with the Driver Node, employing the CAN (Controller Area Network) communication protocol. Through this communication protocol, the module receives and retrieves the desired speed and steering angle information from the Driver Node. The CAN protocol facilitates the exchange of data between the module and the Driver Node, enabling seamless transmission of control signals for speed and steering angle adjustments.
Motors work on the PWM (pulse width modulation) values which are given by the ESC. ESCs process input signals, convert them into digital values, use algorithms to determine motor speed, generate PWM signals with variable pulse width, calculate duty cycle, and drive motors through power transistors to control speed. Understanding these PWM values for motor movements is a critical task which has to be done when we start working on the project.
Hardware Design
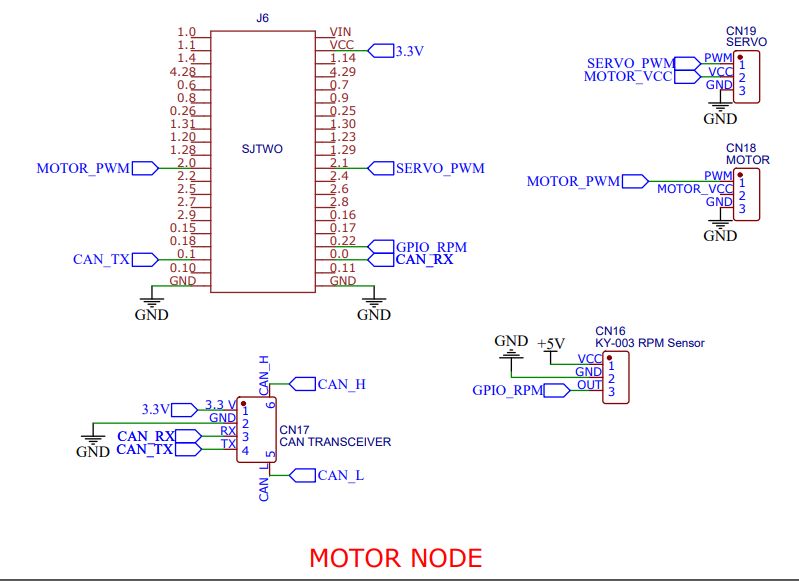
Schematics
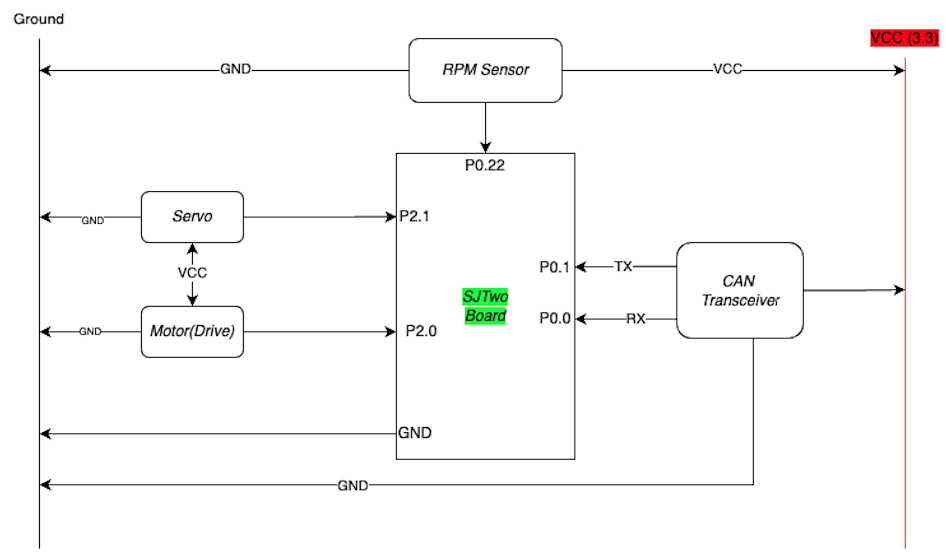
The SJTwo board provided us with the necessary PWM pins, specifically P2.1 and P2.0, to which we connected the servo and DC motor, respectively. These pins were selected based on their capability to generate PWM signals required for precise control of the motors.
The SJTwo board is equipped with a powerful microcontroller, offering ample processing power and I/O capabilities. With its PWM functionality, we were able to modulate the output signals to control the servo and DC motor with high precision.
RPM Sensor
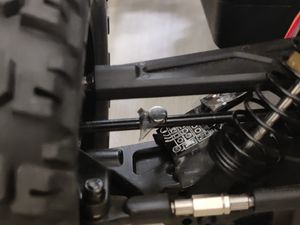
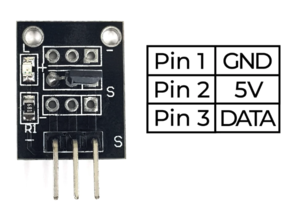
In our project, we have incorporated a Hall effect RPM sensor for monitoring the rotational speed of the vehicle's wheels. The RPM sensor is strategically positioned on the car's chassis, adjacent to the shock absorbers. This placement ensures accurate measurement of the wheel's rotational speed. The RPM sensor serves as a vital input for maintaining a consistent speed of the vehicle.
The RPM data obtained from the sensor is utilized by a PID (Proportional-Integral-Derivative) controller to regulate and fine-tune the vehicle's speed. By continuously monitoring the RPM, the PID controller makes necessary adjustments to ensure the vehicle maintains the desired speed. The RPM sensor acts as a critical source of speed information, enabling the PID controller to effectively and dynamically govern the vehicle's speed to achieve the desired stability and control.
Hacking the RF Module
In order to make the RC car autonomous, we faced the challenge of eliminating the need for the remote control typically used to operate the car. Our specific model, the Maverick Quantum MT, did not have its PWM (Pulse Width Modulation) sequence readily available in open-source form. Therefore, we had to delve into the process of detecting the PWM signals transmitted by the RC receiver to the Electronic Speed Controller (ESC) module.
To accomplish this, we employed an oscilloscope or a logic analyzer. However, we found that the logic analyzer was particularly advantageous due to its user-friendly interface and software capabilities for analyzing the obtained signals. By connecting the logic analyzer to the RC car's receiver, we were able to capture and analyze the PWM signals in detail.
Through the analysis, we were able to identify important parameters of the PWM signals, such as the duty cycle and frequency. These parameters corresponded to various actions performed by the servo and motor in the RC car. By understanding the relationship between these parameters and the desired actions, we gained the ability to replicate and control these actions autonomously, effectively replacing the functionality of the remote control.
This process of detecting and interpreting the PWM signals was essential for enabling autonomous control of the RC car. It allowed us to develop a custom control system that could replicate the desired actions based on the analyzed PWM signals. With this system in place, the RC car became capable of executing predefined maneuvers and tasks without relying on manual input from a remote control.
Overall, the utilization of an oscilloscope or logic analyzer, along with the analysis of PWM signals, played a crucial role in our endeavor to make the RC car autonomous. By gaining insights into the PWM parameters and implementing a custom control system, we were able to take control of the car's functions and pave the way for autonomous operation.
Here are the data we obtained
| Control Unit | Direction | Frequency (Hz) | Duty Cycle (%) |
|---|---|---|---|
| Servo Motor | Right Max | 61.02 | 5.9 |
| Left Max | 61.02 | 12.62 | |
| Motor | Forward Max Speed | 61.02 | 12.65 |
| Idling (Zero) Speed | 61.02 | 9.27 | |
| Reverse Max Speed | 61.02 | 5.66 |
The duty cycle for crawling the car at the slowest speed = 9.47%.
Software Design
The motor node code has been meticulously structured into multiple modules, showcasing a robust implementation of modularization principles. This approach enhances code organization, readability, and maintainability. The core section of the code encompasses the motor driver logic, precisely defining the motor's response in the presence of obstacles or impediments. By encapsulating this functionality, the code remains focused and comprehensible, facilitating future updates and modifications.
The codebase has been segregated into distinct files, each serving a specific purpose. One such file handles the RPM-related operations, enabling precise control and monitoring of the motor's rotational speed. Another file is dedicated to the implementation of the proportional-integral-derivative (PID) control, governing the motor's behavior based on feedback and error correction. This separation of concerns ensures modularity, allowing developers to modify or enhance specific aspects without disrupting the overall functionality.
A separate code base is devoted to the initialization process, streamlining the configuration of GPIO (General Purpose Input/Output) and PWM (Pulse Width Modulation) channels associated with the motor. This modularized initialization file provides a clear overview of the motor-related setup, making it easier to manage and maintain.
Periodic Callback Functions
Periodic Callback: Init
- The CAN bus is initialized
- The RPM sensor interrupts are initialized.
- The Motor and servo PWM signals are initialized and set to default values.
Periodic Callback: 1Hz
- The motors start-up sequence is designed.
Periodic Callback: 10Hz
- Decode the driving speed and steering sent by the Driver node after reading all CAN messages.
Motors Startup sequence
void run_once_motor_startup_sequence(uint32_t callback_count, bool *test_flag){
  static float test_duty_cycle = 9.84;
  static bool run_once = true;
  if (run_once) {
    if ((callback_count > 1) && (test_duty_cycle <= 10)) {
      pwm1__set_duty_cycle(PWM1__2_0, test_duty_cycle);
      test_duty_cycle += 0.3f;
      if (test_duty_cycle >= 10) {
        *test_flag = true;
        run_once = false;
      }
    }
  }
}
The run_once_motor_startup_sequence function is designed to perform an initial motor startup sequence. It takes two parameters: callback_count, which represents the number of callbacks, and test_flag, a boolean pointer.
Within the function, a duty cycle value is gradually incremented until it reaches 10. During each iteration, the duty cycle is set using the pwm1__set_duty_cycle function. Once the duty cycle reaches 10, the test_flag is set to true, indicating that the motor startup sequence is complete. This flag can then be used as a trigger to start reading CAN messages or perform other actions in the code.
Code Flow
When motor_cmd->MOTOR_CMD_drive is 1: The motor gradually accelerates to a target speed of 8.5 kph using the compute_and_set_motor_pwm function. The speed is controlled by adjusting the PWM duty cycle, specifically using the motor_fwd_slow_speed_pwm value.
When motor_cmd->MOTOR_CMD_drive is 0: The motor enters a hard stop braking state, indicated by setting the PWM duty cycle to motor_hard_stop_braking.
When motor_cmd->MOTOR_CMD_drive is -1: The motor enters reverse mode, with the PWM duty cycle set to motor_reverse_speed.
When motor_cmd->MOTOR_CMD_drive is 7: The motor is set to a neutral position, maintaining a constant speed using the motor_neutral_pwm value.
When motor_cmd->MOTOR_CMD_steer is -1: The motor is steered slightly to the left using the turn_slight_left PWM duty cycle.
When motor_cmd->MOTOR_CMD_steer is -2: The motor is turned fully to the left using the turn_full_left PWM duty cycle.
When motor_cmd->MOTOR_CMD_steer is 2: The motor is turned fully to the right using the turn_full_right PWM duty cycle.
When motor_cmd->MOTOR_CMD_steer is 1: The motor is steered slightly to the right using the turn_slight_right PWM duty cycle.
These control actions enable precise control of the motor's speed and steering, allowing it to respond to different drive and steer commands. The PWM duty cycles determine the motor's behavior, ensuring smooth acceleration, deceleration, and controlled steering angles based on the input commands.
Why did we choose to follow this above approach ?
Modularity and Readability: The code is organized into separate functions, each handling specific motor control tasks. This modular structure enhances code readability, making it easier to understand and maintain. By isolating different functionalities, it promotes code reusability and scalability.
Flexibility and Extensibility: The code incorporates well-defined variables and constants, such as motor_fwd_slow_speed_pwm, motor_hard_stop_braking, and turn_slight_left. By using these parameters, it becomes effortless to fine-tune the motor's behavior without modifying the core logic. This flexibility enables easy adjustment of speed, braking, and steering parameters based on specific requirements.
Controlled Acceleration and Braking: The code implements gradual acceleration and deceleration techniques through the go_to_neutral_gradually and go_to_reverse_gradually functions. This controlled approach ensures smooth transitions between different speed states, enhancing safety and stability during motor operations.
Real-time Feedback: The code utilizes variables like current_kph and target_kph to monitor the motor's speed and provide real-time feedback. By continuously assessing the current speed and adjusting the PWM duty cycle accordingly, the code can dynamically regulate the motor's behavior to maintain the desired target speed.
Consistent and Predictable Steering: By associating specific PWM duty cycles with various steering commands, such as turn_slight_left and turn_full_right, the code ensures consistent and predictable steering behavior. This allows for accurate maneuvering and navigation control of the motor.
PID Implementation
double pid_controller_compute_value(double setpoint, double input_speed) {

  double error = setpoint - input_speed;
  double proportional = Kp * error;
  integral += Ki * error * dt;
  double derivative = Kd * (error - last_error) / dt;
  double output = proportional + integral + derivative;
  last_error = error;

  return output;
}
The function pid_controller_compute_value takes in the setpoint (the desired target value) and the input speed as parameters. It calculates the error by subtracting the input speed from the setpoint. The proportional term (proportional) is computed by multiplying the error by the proportional gain (Kp), representing the immediate response to the error. The integral term accumulates the error over time, as the error is multiplied by the integral gain (Ki) and the time increment (dt), and added to the integral variable. The derivative term (derivative) considers the rate of change of the error, calculated by multiplying the difference between the current and last errors by the derivative gain (Kd), and dividing by the time increment (dt).
The output of the PID controller is obtained by summing the proportional, integral, and derivative terms. The last error is stored for reference in the next iteration. The resulting output is returned by the function.
This implementation allows the PID controller to dynamically adjust the control output based on the error and its rate of change, enabling effective control and regulation of the system
Technical Challenges
1. Understanding the startup sequence
The electronic speed controller (ESC) incorporates a specific startup sequence that must be followed in order to initiate and activate the motors. Failure to replicate this sequence accurately will result in the inability to start the motors. Determining this startup sequence requires a significant investment of time and effort. To understand and replicate the sequence, we continuously analyze the PWM (pulse width modulation) values transmitted by the remote control. By carefully studying the data and observing the pattern of PWM values, we can develop a code that mimics the exact sequence in our own programming. During this process, a logic analyzer proves to be immensely valuable. It assists us in navigating through the complexities of the startup sequence, providing insights and facilitating the accurate replication of the required PWM values in our code. The logic analyzer enables us to effectively analyze and interpret the timing and patterns of the PWM signals, aiding in the successful implementation of the ESC's startup sequence.
2. Making the reverse work properly
To ensure proper reverse operation, we implemented a synchronization mechanism between the rear sensor data and control commands. By aligning and correlating these inputs, we achieved controlled and seamless transitions between forward and reverse motion. This synchronization played a crucial role in preventing unintended movements and facilitating effective maneuvering around obstacles. The careful coordination of rear sensor data and control commands enabled us to maintain control and achieve reliable reverse operation while ensuring a smooth transition back to normal forward motion.
Geographical Controller
<Picture and link to Gitlab>
In today's technologically advanced world, navigation has become an indispensable part of peoples lives. Whether exploring unfamiliar territories or simply trying to find way through a bustling city, reliable and accurate navigation systems have become paramount. Among the various advancements in this field, one remarkable innovation is the development of Automatic GEO navigation, which combines the power of GPS (Global Positioning System) and compass sensor technology. This groundbreaking fusion enables users to effortlessly navigate their surroundings, ensuring precise location tracking and directional guidance.
For this feature development in the project two standard GPS and COMPASS sensor were selected after a thorough market research. The following sensors are more reliable and easier from the perspective of data extraction.
GPS module
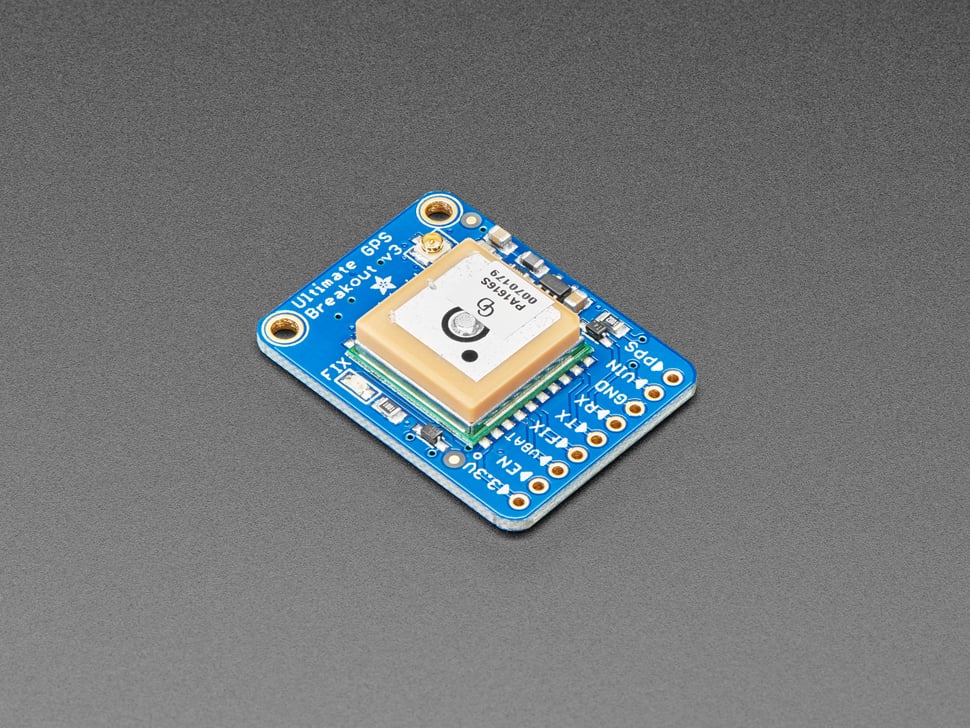
Adafruit Ultimate GPS Breakout Board; interacts in UART 9600 BAUD_RATE
COMPASS module
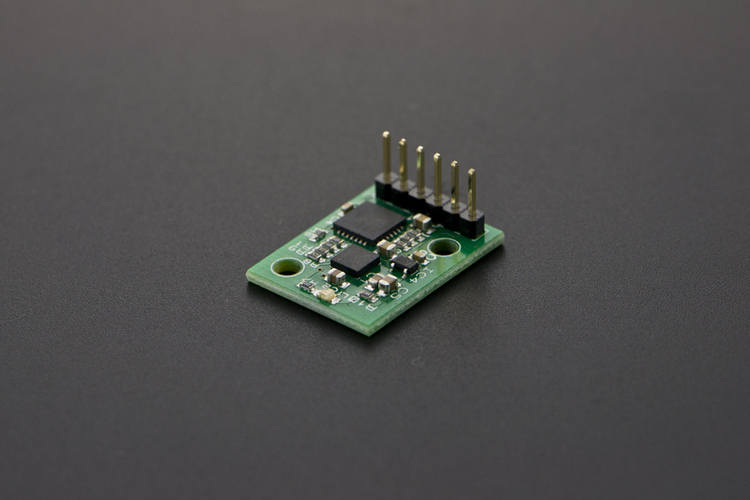
Tilt Compensated Magnetic COMPASS (CMPS12) from BOSCH; interacts in I2C
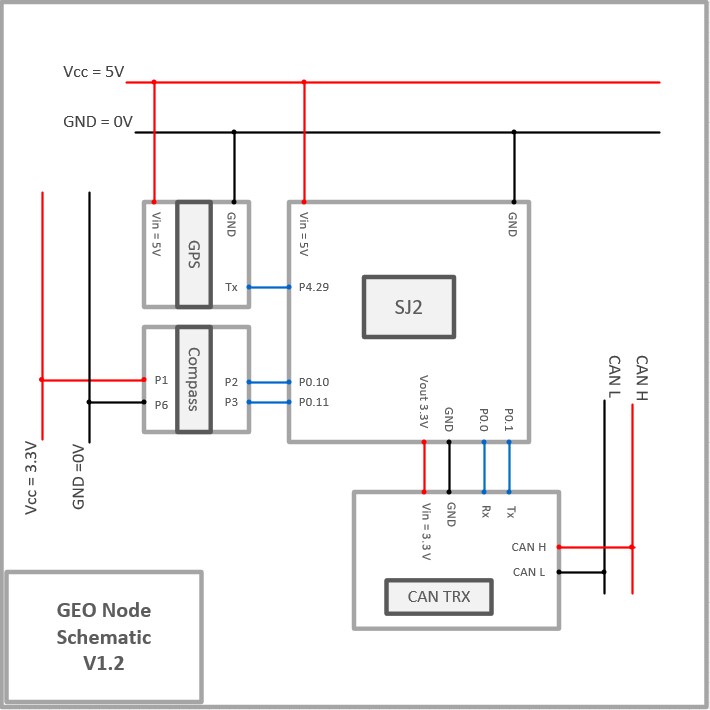
GEO_NODE_Sketch with MS_VISIO
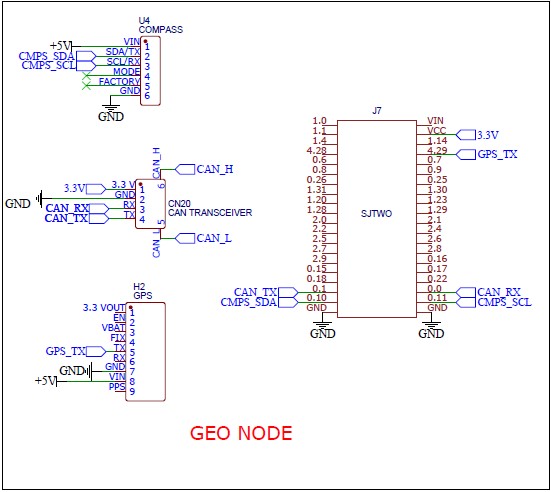
Pin Diagram for the GEO Node with SJ2 Board and CAN_bus
Hardware Design
COMPASS module
Hardware architecture for GEO_NODE with SJ2 Board and CAN_bus
Software Design
<List the code modules that are being called periodically.>
Technical Challenges
< List of problems and their detailed resolutions>
Communication Bridge Controller & LCD
<Picture and link to Gitlab>
Hardware Design
Software Design
<List the code modules that are being called periodically.>
Technical Challenges
< List of problems and their detailed resolutions>
Driver ECU
<Picture and link to Gitlab>
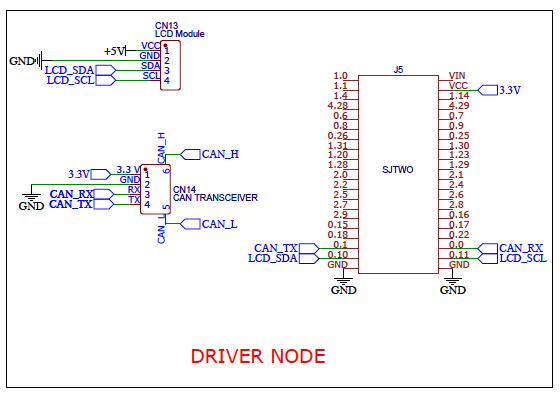
The driver node a.k.a the MCU for the MCUs is a critical unit that needs high importance. Since all the nodes will interact with driver node, it is important that CAN message reception and transmission is always operational in the desired manner.
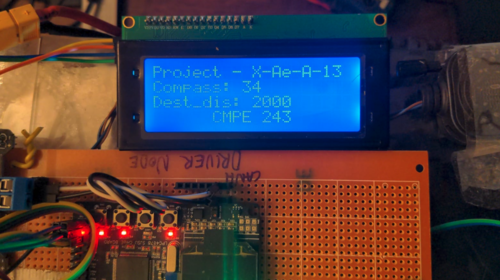
The function of the driver node is to: Run obstacle avoidance Manage CAN reception and transmission of CAN bus data from all nodes Interact with sensor data from other nodes and process the relevant data locally Print and display diagnostic data on the LCD display
Hardware Design
Software Design
We carefully thought over what data needs to be sent and received over each of the periodic callbacks. It was ensured that there is not too much of an unnecessary overload high frequency callbacks as it may consume more than 1000 ms and force reboot the MCU. In our design, we used `periodic_callbacks__1Hz` for low priority operations, `periodic_callbacks__10Hz` for more critical operations, but not the most time sensitive applications such as sonar and compass sensing. At 10 Hz, we are reading out the GPS data that include the present location, distance to checkpoint, and distance to destination. In 20 Hz callback, we are reading out the compass and sonar sensor data. It was observed that the response rate of the car towards obstacle improved significantly when the sensors were read at atleast 20 Hz. Since our car was controlled to move to 8.5 km/hr, the reaction time of the car from an obstacle needs to be fast at this point in time. Hence, the driver node reads the data at 20 Hz periodic callbacks.
void periodic_callbacks__20Hz(uint32_t callback_count) {
  can__rx_20Hz();
  can_handler__manage_mia_20hz();
  DP__obstacle_avoidance_processor(get_decoded_sensor_data());
  can__tx_motor_commands_20Hz();
}
OBSTACLE AVOIDANCE
Obstacle avoidance is one of the most important aspect that enables the car to reach the destination. A robust obstacle avoidance algorithm enables the car to dodge the obstacle and move towards the destination in a smooth manner. If the car is made to turn right/left with maximum degree, then the car will make abrupt turns and make the obstacle avoidance less smoother.
To solve this issue, we added an intermediate left and right turn that lies in between a full turn and straight direction.
Obstacle Avoidance Logic
There is infinite possibilities for an obstacle to arrive while the car is in motion. It is impossible to hard-code the obstacle scenarios for obstacle avoidance. Therefore, a smart approach will be to use a truth table listing the possibilities of obstacle with respect to sensors.
void DP__obstacle_avoidance_processor(const dbc_SENSOR_SONARS_s sensor_data) {
  if (get_decoded_GEO_STATUS_data().GEO_STATUS_DISTANCE_TO_CHKPT < 2) {
    stop_car_destination_reached();
  } else if (OA__is_obstacle_detected(sensor_data)) {
    OA__run_obstacle_avoidance_algorithm(sensor_data);
  } else {
    OA__follow_destination(get_decoded_GEO_STATUS_data().GEO_STATUS_BEARING_ANGLE_TO_CHKPT -
                           get_decoded_GEO_STATUS_data().GEO_STATUS_COMPASS_ANGLE);
  }
}


void OA__run_obstacle_avoidance_algorithm(const dbc_SENSOR_SONARS_s sensor_data) {
  if (OA__is_middle_sonar_in_emergency_range(sensor_data)) {
    ReverseAdd_7();
    processed_commands_to_motor_node.MOTOR_CMD_steer = TURN_LEFT;
    processed_commands_to_motor_node.MOTOR_CMD_drive = MOVE_BACKWARD;
    can__tx_motor_commands_20Hz();
    reverse_flag = true;
  }


  else {
    if (OA__is_middle_sonar_less_than_threshold(sensor_data) &&
        OA__is_left_and_right_sensors_less_than_threshold(sensor_data)) {
      ReverseAdd_7();
      processed_commands_to_motor_node.MOTOR_CMD_steer = TURN_LEFT;
      processed_commands_to_motor_node.MOTOR_CMD_drive = MOVE_BACKWARD;
      can__tx_motor_commands_20Hz();
      reverse_flag = true;
    }


    else if (OA__is_right_sonar_less_than_threshold(sensor_data) ||
             ((OA__is_right_sonar_less_than_threshold(sensor_data) &&
               OA__is_middle_sonar_less_than_threshold(sensor_data)))) {
      processed_commands_to_motor_node.MOTOR_CMD_steer = TURN_LEFT;
      processed_commands_to_motor_node.MOTOR_CMD_drive = MOVE_FORWARD;
      can__tx_motor_commands_20Hz();
      reverse_flag = false;
    }


    else if (OA__is_left_sonar_less_than_threshold(sensor_data) ||
             ((OA__is_left_sonar_less_than_threshold(sensor_data) &&
               OA__is_middle_sonar_less_than_threshold(sensor_data)))) {
      processed_commands_to_motor_node.MOTOR_CMD_steer = TURN_RIGHT;
      processed_commands_to_motor_node.MOTOR_CMD_drive = MOVE_FORWARD;
      can__tx_motor_commands_20Hz();
      reverse_flag = false;
    }


    else if (OA__is_left_sonar_less_than_threshold(sensor_data) &&
             OA__is_right_sonar_less_than_threshold(sensor_data)) {
      ReverseAdd_7();
      processed_commands_to_motor_node.MOTOR_CMD_steer = STEER_STRAIGHT;
      processed_commands_to_motor_node.MOTOR_CMD_drive = MOVE_BACKWARD;
      can__tx_motor_commands_20Hz();
      reverse_flag = true;
    }


    else if (OA__is_middle_sonar_less_than_threshold(sensor_data)) {
      if (sensor_data.SENSOR_SONARS_left > sensor_data.SENSOR_SONARS_right) {
        processed_commands_to_motor_node.MOTOR_CMD_steer = TURN_LEFT;
        processed_commands_to_motor_node.MOTOR_CMD_drive = MOVE_FORWARD;
        can__tx_motor_commands_20Hz();
        reverse_flag = false;
      } else {
        processed_commands_to_motor_node.MOTOR_CMD_steer = TURN_RIGHT;
        processed_commands_to_motor_node.MOTOR_CMD_drive = MOVE_FORWARD;
        can__tx_motor_commands_20Hz();
        reverse_flag = false;
      }
    }
  }
}
Technical Challenges and Lessons Learnt - Advice to future students
Since the driver node is completely dependent on the sensors, firstly - it is important that the sensors are integrated and fixed as early as possible.
1. In our case, since the sensors were not ready in the early weeks, we followed a completely TDD approach where we wrote the code along with the test cases. Since TDD is like a simulation of the algorithm, it gave us the confidence that the obstacle avoidance algorithm would work even without the sensors. So, use TDD as much as possible.
2. Do not use hypothetical sensor threshold values. Take the car out, make it run and then decide what is the ideal threshold value. At early stages, while designing the algorithm we assumed that threshold of 50 cm would be sufficient for an obstacle avoidance. We soon realised, that the thresholds vary largely as it is directly proportional to the speed of the car. More the speed, larger the threshold.
3. Obstacle avoidance is all about trial and error and practical testing. Get the sonars integrated as early as possible, and get the car running in the field.
4. LEDs are free, use it lavishly. Since driver node interacts with all other nodes, it becomes very difficult to debug and realise if the reception from and transmission to other nodes is successful from the driver’s perspective. It is difficult to always connect BusMaster just to detect if reception and transmission is working. Flashing a particular LED that is assigned to a particular node will quickly help in detecting the faulty node.
5. Use multiple thresholds - hard stop threshold and safe threshold to prevent the car from generalising all obstacles as one. Sometimes, a hard stop is needed when the obstacle is suddenly too close to the car.
Mobile Application
<Picture and link to Gitlab>
Hardware Design
Software Design
<List the code modules that are being called periodically.>
Technical Challenges
< List of problems and their detailed resolutions>
Conclusion
<Organized summary of the project>
<What did you learn?>
Project Video
Project Source Code
Advise for Future Students
<Bullet points and discussion>
Acknowledgement
=== References ===
