S19: Automophiles
Contents
Project Title
Abstract
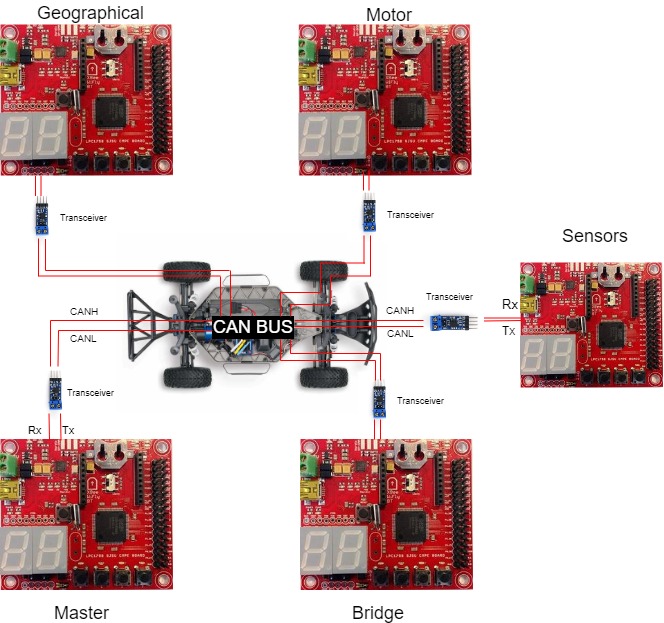
Automophiles is a an autonomous RC car capable of navigating to destination set from Android application with obstacle avoidance and GPS navigation along certain routes on the SJSU campus. The embedded system driving the car is essentially a distributed system of different nodes communicating with one another and each focusing on a specific task such as polling sensor data, driving motor or monitoring GPS location data. These nodes are then integrated into a functional vehicle on the CAN bus exchanging meaningful data and commands to drive the car.
Introduction
The project was divided into 7 modules:
- Sensor Controller: This unit initializes and constantly reads the three front-facing laser sensors using I2C. These unfiltered readings are then immediately sent over the CAN bus to the Master controller for processing.
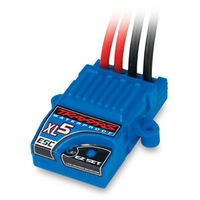
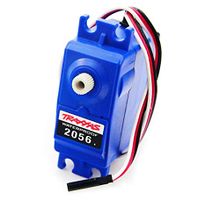
- Motor Controller: This unit directly interfaces with the Electronic Speed Controller (ESC) for the DC motors as well as the servo motors. The two PWM interfaces for each of the respective motors are controlled depending on commands sent from the Master controller.
- Master Controller: This unit is responsible for implementing a state machine and determining the current behavior of the vehicle depending on the various inputs fed from the four other support controllers.
- Geographical Controller: This unit is responsible for interfacing with a digital compass and GPS and determining the current location state of the vehicle at all times. GPS checkpoints are also defined and handled here for the purposes of route calculation. This information is then fed to the Master and Bridge controllers over the CAN bus.
- Bridge Controller: This unit acts as the central communication module for the vehicle. All interactions with the Android application back and forth are handled here.
- Android Application: The application works as the entry point for users to interact with the vehicle. Critical interactions like setting destination as well as viewing debug information are handled through the application.
- PCB/Hardware Integration: Hardware integration over PCB/protoboard is done to reduce the likelihood of potential failures coming from hardware connections/interfaces
Team Members & Responsibilities
<Team Picture>
- Geographical
- Bridge/Android Application
- Hardware, Connections
- Integration/Repository Management
Schedule
| Week# | Date | Task | Status | Completion Date |
|---|---|---|---|---|
| 1 | 02/12/19 |
|
Completed |
02/12/19 |
| 2 | 02/19/19 |
|
Completed |
02/19/19 |
| 3 | 02/26/19 |
|
Completed |
02/26/19 |
| 4 | 03/05/19 |
|
Completed |
03/11/19 |
| 5 | 03/12/19 |
|
Completed |
03/18/19 |
| 6 | 03/19/19 |
|
Completed |
03/25/19 |
| 7 | 03/26/19 |
|
Completed |
04/01/19 |
| 8 | 04/02/19 |
|
Completed |
04/08/19 |
| 9 | 04/09/19 |
|
Completed |
04/15/19 |
| 10 | 04/16/19 |
|
Completed |
04/22/19 |
| 11 | 04/23/19 |
|
Completed |
04/29/19 |
| 12 | 04/30/19 |
|
Completed |
05/06/19 |
| 13 | 05/07/19 |
|
Completed |
05/07/19 |
| 14 | 05/14/19 |
|
Completed |
5/14/19 |
| 15 | 05/22/19 |
|
Completed |
5/22/19 |
Parts List & Cost
| Item# | Part Desciption | Vendor | Qty | Cost |
|---|---|---|---|---|
| 1 | RC Car | Traxxas | 1 | $240.00 |
| 2 | RC Car Charger Wall Adapter | Traxxas | 1 | $25.00 |
| 3 | CAN Transceiver PCB Board | Waveshare | 7 | $48.03 |
| 4 | HC-06 Bluetooth Module | eBay | 1 | $10.51 |
| 5 | PCB | Bay Area Circuits | 2 | $250 |
| 6 | Laser Sensors | Amazon | 4 | $29.97 |
| 7 | LCD | Preet | 1 | Free |
| 8 | DB9 Connector Breakout | Amazon | 1 | $6.99 |
| 9 | Adafruit GPS Breakout | Amazon | 1 | $43.61 |
| 10 | External GPS Antenna | Amazon | 1 | $14.99 |
| 11 | Mini-PCI to RP-SMA Antenna Cable | Amazon | 1 | $4.99 |
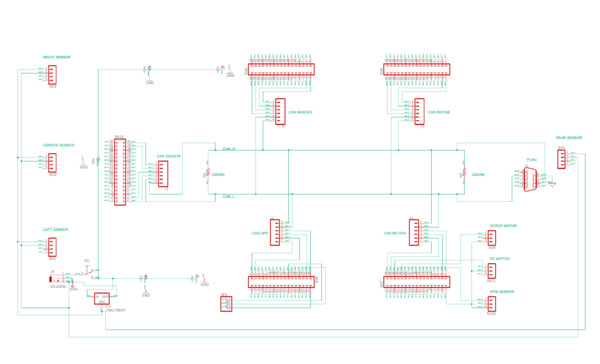
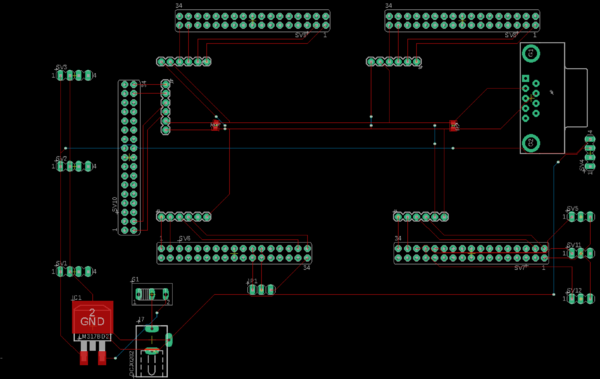
Printed Circuit Board
CAN Communication
<Talk about your message IDs or communication strategy, such as periodic transmission, MIA management etc.>
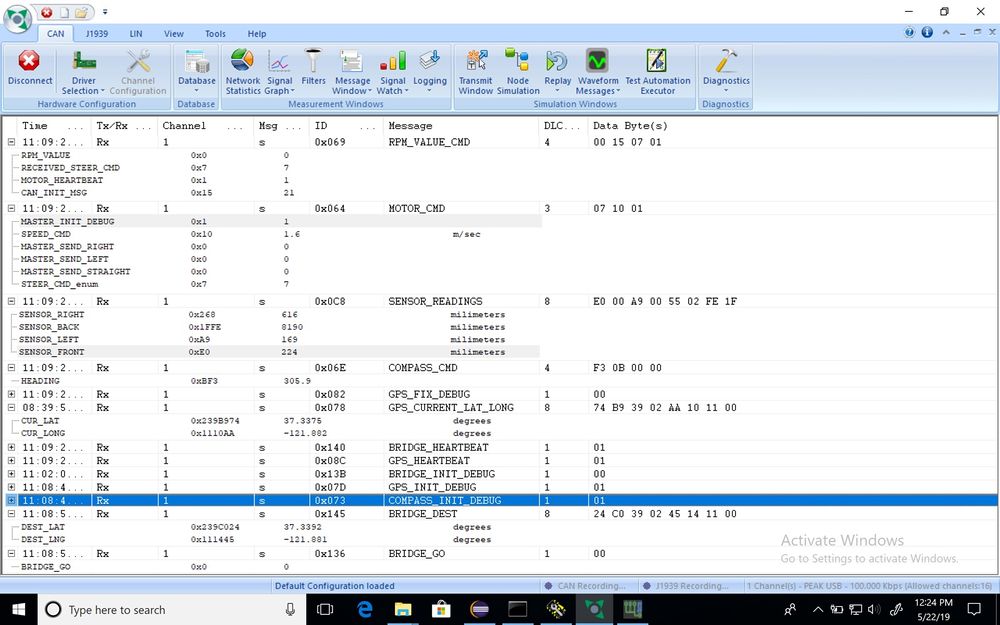
Each controller has its own block of CAN message IDs, with master and motor commands/feedback taking highest priority at the early 100s block. Compass messages come in at the 110 block with current heading and debug, and gps information takes up the rest of the 100 block. Starting at the 200 ID block, sensor readings come in.
Hardware Design
DBC File
VERSION ""

NS_ :

BS_:

BU_: MASTER GPS BRIDGE MOTOR SENSOR

BO_ 100 MOTOR_CMD: 3 MASTER
 SG_ STEER_CMD_enum : 0|8@1+ (1,0) [0|0] "" MOTOR
 SG_ SPEED_CMD : 8|8@1+ (0.1,0) [0|0] "m/sec" MOTOR
 SG_ MASTER_INIT_DEBUG : 16|1@1+ (1,0) [0|0] "" MOTOR
 SG_ MASTER_SEND_LEFT : 17|1@1+ (1,0) [0|0] "" MOTOR
 SG_ MASTER_SEND_STRAIGHT : 18|1@1+ (1,0) [0|0] "" MOTOR
 SG_ MASTER_SEND_RIGHT : 19|1@1+ (1,0) [0|0] "" MOTOR

BO_ 105 RPM_VALUE_CMD: 4 MOTOR
 SG_ RPM_VALUE : 0|8@1+ (1,0) [0|0] "" BRIDGE,MASTER
 SG_ CAN_INIT_MSG : 8|8@1+ (1,0) [0|0] "" BRIDGE,MASTER
 SG_ RECEIVED_STEER_CMD : 16|8@1+ (1,0) [0|0] "" BRIDGE,MASTER
 SG_ MOTOR_HEARTBEAT : 24|1@1+ (1,0) [0|0] "" BRIDGE,MASTER

BO_ 110 COMPASS_CMD: 4 GPS
 SG_ HEADING : 0|32@1+ (0.1,0) [0|0] "" BRIDGE,MASTER

BO_ 115 COMPASS_INIT_DEBUG: 1 GPS
 SG_ INIT_DEBUG : 0|1@1+ (1,0) [0|0] "" MASTER

BO_ 120 GPS_CURRENT_LAT_LONG: 8 GPS
 SG_ CUR_LAT : 0|32@1+ (0.000001,0.000000) [36.000000|38.000000] "degrees" BRIDGE,MASTER
 SG_ CUR_LONG : 32|32@1+ (0.000001,-123.000000) [-123.000000|-120.000000] "degrees" BRIDGE,MASTER

BO_ 125 GPS_INIT_DEBUG: 1 GPS
 SG_ INIT_DEBUG : 0|1@1+ (1,0) [0|0] "" MASTER

BO_ 130 GPS_FIX_DEBUG: 1 GPS
 SG_ GPS_FIX_DEBUG : 0|1@1+ (1,0) [0|0] "" BRIDGE,MASTER

BO_ 135 COMPASS_MAN_CAL_DEBUG: 1 GPS
 SG_ IS_CAL_DEBUG : 0|1@1+ (1,0) [0|0] "" MASTER

BO_ 140 GPS_HEARTBEAT: 1 GPS
 SG_ GPS_HEARTBEAT : 0|1@1+ (1,0) [0|0] "" MASTER

BO_ 145 GPS_TARGET_HEADING: 8 GPS
 SG_ TARGET_HEADING : 0|32@1+ (0.1,0) [0.00|360.00] "degrees" MOTOR,BRIDGE,MASTER
 SG_ DISTANCE : 32|32@1+ (0.1,0) [0|0] "meters" MOTOR,BRIDGE,MASTER

BO_ 150 GPS_CHECKPOINT_INDEX: 1 GPS
 SG_ NEXT_CHECKPOINT : 0|8@1+ (1,0) [0|0] "" BRIDGE

BO_ 200 SENSOR_READINGS: 8 SENSOR
 SG_ SENSOR_FRONT : 0|16@1+ (1,0) [0|0] "milimeters" BRIDGE,MASTER
 SG_ SENSOR_LEFT : 16|16@1+ (1,0) [0|0] "milimeters" BRIDGE,MASTER
 SG_ SENSOR_RIGHT : 32|16@1+ (1,0) [0|0] "milimeters" BRIDGE,MASTER
 SG_ SENSOR_BACK : 48|16@1+ (1,0) [0|0] "milimeters" BRIDGE,MASTER

BO_ 205 SENSOR_DEBUG_MESSAGES: 1 SENSOR
 SG_ SENSOR_LEFT_BLOCKED : 0|1@1+ (1,0) [0|0] "" BRIDGE,MASTER
 SG_ SENSOR_CENTER_BLOCKED : 1|1@1+ (1,0) [0|0] "" BRIDGE,MASTER
 SG_ SENSOR_RIGHT_BLOCKED : 2|1@1+ (1,0) [0|0] "" BRIDGE,MASTER
 SG_ SENSOR_BACK_BLOCKED : 3|1@1+ (1,0) [0|0] "" BRIDGE,MASTER
 SG_ SENSORS_HEARTBEAT : 4|1@1+ (1,0) [0|0] "" BRIDGE,MASTER

BO_ 300 BRIDGE_STOP: 1 BRIDGE
 SG_ BRIDGE_STOP : 0|1@1+ (1,0) [0|0] "" MASTER

BO_ 310 BRIDGE_GO: 1 BRIDGE
 SG_ BRIDGE_GO : 0|1@1+ (1,0) [0|0] "" MASTER

BO_ 315 BRIDGE_INIT_DEBUG: 1 BRIDGE
 SG_ INIT_DEBUG : 0|1@1+ (1,0) [0|0] "" MASTER

BO_ 320 BRIDGE_HEARTBEAT: 1 BRIDGE
 SG_ BRIDGE_HEARTBEAT : 0|1@1+ (1,0) [0|0] "" MASTER

BO_ 325 BRIDGE_DEST: 8 BRIDGE
 SG_ DEST_LAT : 0|32@1+ (0.000001,0) [36.000000|38.000000] "degrees" GPS
 SG_ DEST_LNG : 32|32@1+ (0.000001,-123) [-123.000000|-120.000000] "degrees" GPS

BO_ 330 BRIDGE_HEADLIGHTS: 1 BRIDGE
 SG_ HEADLIGHT_VALUE : 0|1@1+ (1,0) [0|0] "" MASTER

CM_ BU_ MASTER "The master controller driving the RC car";
CM_ BU_ SENSOR "The obstacle avoidance sensor module";
CM_ BU_ MOTOR "The motor module driving the car";
CM_ BU_ GPS "The GPS module";
CM_ BU_ BRIDGE "The main communications module between car and app";

BA_DEF_ SG_ "FieldType" STRING ;

BA_DEF_DEF_ "FieldType" "";

BA_ "FieldType" SG_ 100 STEER_CMD_enum "STEER_CMD_enum";

VAL_ 100 STEER_CMD_enum 2 "steer_straight" 1 "slight_left" 3 "slight_right" 0 "stop" 6 "steer_right" 4 "steer_left" 8 "reverse" 7 "left_reverse" 9 "right_reverse" 5 "brake";
BusMaster Can Bus Messages
Sensor ECU
Gitlab link https://gitlab.com/cmpe-243-group/cmpe-243-self-driving-car/tree/master/Sensors
Group Members
- Sarvpreet Singh
- Sanjana Devegowdanakoppalu Swamy Gowda
- Sagar Kalathia
Sensor Introduction
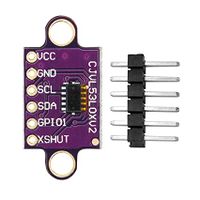
We have used VL53L0X Time of Flight(ToF) Ranging Sensor by ST Microelectronics, which offers several advantages over Ultrasonic sensor counterparts. It can measure absolute distances up to 2m in its long range mode. Four different modes of operation namely Default mode, High Speed mode, High Accuracy mode and Long Range mode make it customizable for suitable applications.
Advantage of Laser Sensor over popular Ultrasonics
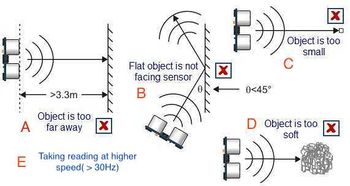
Ultrasonic Sensors are quite popular in use in this class, but they have several limitations described in the picture in next. VL53L0X Laser sensor avoids limitations B,D,E very easily in following ways
- B : Even if obstacle surface is tilted to more than 60 degrees, laser would still detect it and give the distance reading accordingly.
- D : Light can be passed through soft surfaces.
- E : In High speed mode, we can get reliable sensor values even at 50Hz frequency.
- Laser sensor beam has Field of View(FOV) of 25 degrees which is suitable in our left, center and right set up and it doesn't add interference between center-right pair or center-left pair like Ultrasonic; hence, all three sensor readings can be taken simultaneously.
Problem Resolution
Sensor should be fast enough to detect rapid obstacles movement in all 3 primary directions; i.e. forward, right and left. In order to do that, all 3 front sensor should be taking readings at minimum 20Hz frequency, but faster the better. As laser sensor doesn't work based on reflected wave like ultrasonic, there is no interference even if two centers are next to each other and simultaneous readings are taken. Hence, we were able to take simultaneous readings from all sensors. Sensor data is obtained on I2C bus, hence, all sensors are operated as slave with different Slave address and Sensor ECU is Master on I2C bus.
Hardware Design
Our Self Driving Car consists of 4 VL53L0X, time of flight sensors. Three of them mounted on the front for the Front, Left and Right obstacles and one for the obstacles on the back. The time of flight consists of 6 pins named, Vcc, GND, SCL, SDA, GPIO and XSHUT respectively. We use 5 pins out of those 6 such that the GPIO is left unused.
The Time of Flight sensors uses I2C such that the I2C transmits data and clock with SDA and SCL pins. Both these pins are open drain which means I2C master and slave devices can only drive these lines low or leave them open. For this reason, more than one slave can communicate at the same time. The XSHUT pin is connected to a GPIO pin on the SJone board.
The XSHUT pin controls the register address of the sensor. The GPIO that is connected first gets the default address. We can change the address at the boot time of the sensor. This is used when more than one sensor is used, which is the case for us.
Software Design
<List the code modules that are being called periodically.>
Technical Challenges
- problem
- solution
Motor Controller & LCD
Motor controller is designed to execute functions as commanded by the master. Motor controller performs operations to steer in any direction by driving the dc motor consistently and also performs reverse operations. This unit drives the dc motor and steers servo wheels by increasing or decreasing the pulse width modulation.
LCD unit is used display useful data regarding the motor operation. This is interfaced to our SJ One board with the help of UART protocol.
https://gitlab.com/cmpe-243-group/cmpe-243-self-driving-car/tree/master/Motor/L1_FreeRTOS
Group Members
- Uma Nataraj
- Alisha Jean Patrao
- Sanjana Devegowdanakoppalu Swamy Gowda
Hardware Design
Design & Implementation
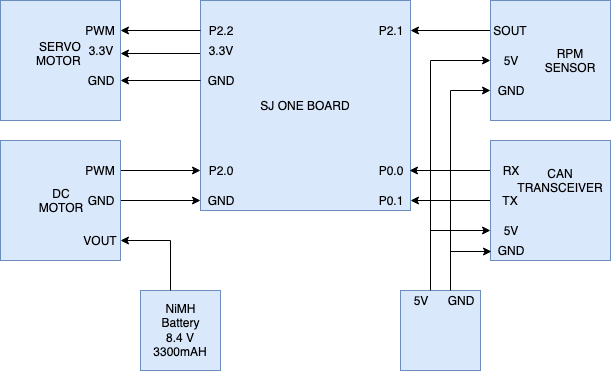
Motor controller in our design communicates only with the master module.
DC Motor
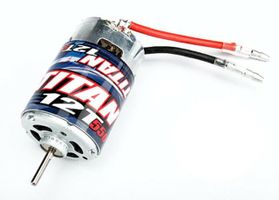
The RC car has a DC Motor embedded in it. DC Motor is powered up using the 5V supply.The car is driven either forward or backward by setting the different PWM values.A frequency of 100Hz used for running the DC Motor. The DC motor converts electrical signal to mechanical power(movement in this case) The PWM signal from the Sjone Board is given ESC(Electronic Speed Control). ESC is an electronic circuit that controls and regulates the speed of an electric motor. It may also provide reversing of the motor and dynamic braking.An electronic speed control will have 3- sets of wires. The signal and Gnd pins of DC motor are connected to the pins 2.0 and Gnd pins of the Sjone Board.
Servo Motor
The RC Car had a servo motor embedded in it. The Servo is driven using 3.3V supply and it is is handled by setting the PWM values. The different values of PWM are used to turn the wheels right or left. The servo motor is running at a frequency of 100HZ. Servo motor pins are connected to P2.2 of the Sjone Board.The Vcc and Gnd pins of servo are connected to the Vcc and Gnd pins of the Sjone Board
RPM Sensor
LCD Module Interface
LCD module is used to display information such as the speed at which our motor is running, the command received by master and distance remaining to the destination. Serial LCD driver is interfaced with SJ one board using Universal Asynchronous Transmitter and Receiver protocol. The TXD and RXD pins of the serial LCD is connected to RXD2 and TXD2 pins of the micro controller respectively with a 5v power supply. Sj one board is initialized with baud rate, TX and RX queue size. Serial LCD module is initialized by sending a baud of 0xF0 that will be detected by Sj one board. Later we will invoke functions which will print speed in msec, command and distance in m on the serial LCD driver. The LCD module picture shows a sample of the initial values of the motor module before the motor module is initiated.
Software Design
Technical Challenges
- DC Motor Calibration: This unit initializes and constantly reads the three front-facing laser sensors using I2C. These unfiltered readings are then immediately sent over the CAN bus to the Master controller for processing.
- RPM Sensor(PID): This unit initializes and constantly reads the three front-facing laser sensors using I2C. These unfiltered readings are then immediately sent over the CAN bus to the Master controller for processing.
- Reverse Logic: This unit initializes and constantly reads the three front-facing laser sensors using I2C. These unfiltered readings are then immediately sent over the CAN bus to the Master controller for processing.
- Braking Mechanism: This unit initializes and constantly reads the three front-facing laser sensors using I2C. These unfiltered readings are then immediately sent over the CAN bus to the Master controller for processing.
Braking Mechanism <Problem Summary> <Problem Resolution>
Geographical Controller
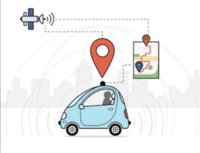
Geographical Controller is used for the navigation of the vehicle to reach from its current location to the desired destination. This can be achieved by using the GPS module and the Compass module.
GPS: The Global Positioning System(GPS) is a network of about 30 satellites orbiting the earth at an altitude of 20,000Km. Anyone with a GPS device (mobile phone or handheld GPS unit) can receive the radio signals broadcasted from the satellites. At any time, there are at least 4 or more GPS satellites in a line of sight communication to a receiver on the earth.
GPS is used for three major tasks:
Location - determining the current location of the vehicle,
Navigation - to move from the source to destination location,
Tracking - to keep track of the vehicle movement
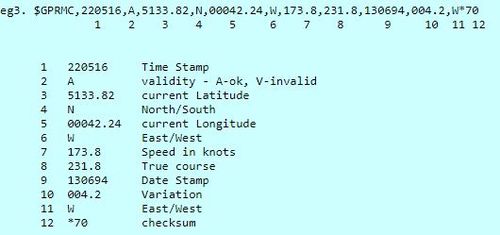
Our GPS module outputs NMEA sentences containing several pieces of useful information as shown below. The most relevant parts of this sentence are located in the first half of the sentence.
Compass:
Compass has a small magnetic needle suspended that rotates freely around a fixed axis until it settles pointing towards magnetic north. The major task performed using a compass is to calculate the difference of angle between the source and destination location then navigate/direct it accordingly. The LSM303D combines a digital 3-axis accelerometer and 3-axis magnetometer into a single package that is ideal for making a tilt-compensated compass. The six independent readings, whose sensitivities can be set in the ranges of ±2 to ±16 g and ±2 to ±12 gauss, are available through I²C and SPI interfaces.
Link: https://gitlab.com/cmpe-243-group/cmpe-243-self-driving-car/tree/master/GPS
Group Members
- Kevin Gadek
- Nivedita Shiva Murthy
- Alisha Jean Patrao
Hardware Design
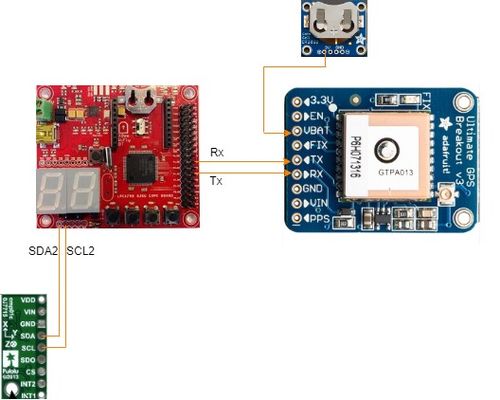
The interface with the Adafruit GPS module follows a standard UART connection with Rx going to Tx and vice versa. The compass is interfaced through I2C with SDA and SCL wires. Both modules are tied to the Geo Controller's common ground. In addition, a battery backup module is tied to the GPS chip's voltage battery chip in order to allow for a quicker time-to-first-fix and more stable readings.
Software Design
<List the code modules that are being called periodically.>
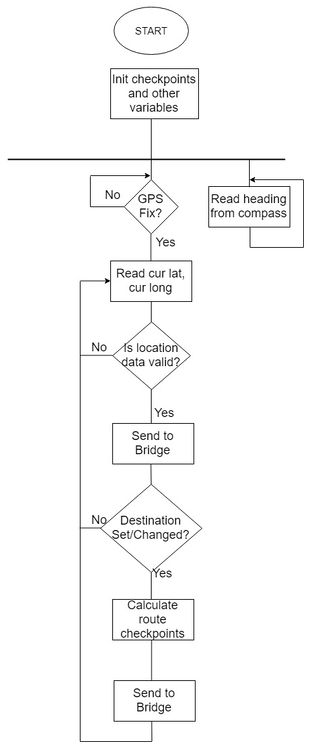
The Geographical Controller's software design consists of several main periodic tasks, gps_1Hz(), gps_50Hz(), and compass_50Hz().
Technical Challenges
Unreliable Compass heading
Summary: The LSM303D as well as many other compasses used for this kind of project is subject to big fluctuations depending on factors such as "magnetic noise" and movement. This can cause a whole host of issues which scale depending on the magnitude of fluctuations. For instance, since the master controller relies on current compass bearing and tries to steer the vehicle towards a target bearing, having fluctuations of greater than 10 degrees can cause erratic and inaccurate behavior for the vehicle.
Resolution:This fluctuation issue can be reduced by measures to reduce the impact of outside forces such as the DC motor's magnetic fields. Tin foil is wrapped around the motor and the compass breakout is physically lifted higher from the car. In addition, the master module also takes measures to reduce the impact of erroneous compass headings by simply dividing the heading received by 10 and then measuring its difference from the target heading that's also divided by 10. This could act to reduce the amount of rapid steer actions by a measurable factor.
Unreliable GPS lock
Summary: The time-to-first-fix interval is largely inconsistent regardless of whether a battery backup is attached to the GPS breakout. Sometimes, it may take several minutes to get a fix while at other times, almost instantaneously. Once it gets a fix, it may also take an inconsistent amount of time to report accurate locations. Location at first fix may be a kilometer off and then the GPS will take some time to slowly correct itself. Even after some time, the GPS might be slightly inaccurate as in it believes it's inside a building when it's actually a few dozen feet outside of it. This can cause issues when calculating target bearing and distance as an accurate understanding of the car's current location needs to be established to figure out where to go.
Resolution: A coin cell battery backup was added to allow the GPS module to keep track of time and satellite positions while the geo controller is off. This drastically reduces the time-to-first-fix interval as well as allows the gps module to provide more accurate readings in a shorter amount of time. In certain cases, the gps module was able to get a fix inside buidings with this battery backup hooked up as well.
Communication Bridge Controller
<Picture and link to Gitlab>
Bridge Controller is essentially the communication apparatus between the car and the Android application. Critical pieces of information such as destination latitude and longitude are received and processed in this controller before getting sent to the geographical controller.
Group Members
- Kevin Gadek
Hardware Design
The hardware design of the bridge is simply an Xbee Bluetooth UART module plugged into the built-in SJOne port. The connections necessary for CAN communication, namely CAN Rx and Tx are all that's required in terms of physical cable connections.
Software Design
<List the code modules that are being called periodically.>
Implementation
- In 1 Hz periodic
- Reset CAN bus if bus off
- Send heartbeat to master
- In 10 Hz
- Receive all messages in CAN_rx loop
- Receive all queued bytes on UART3 from Xbee module
- Send UART messages to Bluetooth Xbee module depending on received CAN messages
Because the transmission of bytes by the bridge controller and the reception of these bytes by the Android application can't necessarily be synchronized, a primitive implementation of a frame header is used by the bridge to let the app know what message it's about to receive. For instance, when bridge is about to send 12 bytes of data for 3 sensor float values, it first puts an 0x53 ('S') out on UART. Once the Android application's Bluetooth handler reads that byte, it knows to expect 12 bytes immediately after and knows what to do with them. For instance, it knows to read the next 4 bytes and convert those into a float for the left sensor value. While this works for the limited implementation of this project, it will ultimately fail as more and more types of data is sent to the application. Even with the half-a-dozen pieces of information received, corrupt data is already being seen from the application. For instance, this start of frame header can't be seen in another message's data or there will be a risk of lost data. A more professional implementation of this transmission protocol would be a more fully-featured header frame as well as a checksum at the end of message. However, the critical pieces of data sent back and forth over the Bluetooth socket are ultimately preserved and accurate over the course of this project.
Technical Challenges
<Bullet or Headings of a module>
Lost transmission
Summary: Even while using a start of frame byte to essentially tell the Android app what information it's getting and how many bytes to expect for that information, some information is lost or garbled. This data loss/corruption seems to depend on the frequency of which the bridge is running at. The faster the bridge runs at, the more non-sense seems to be sprinkled into the transmission, which can cause issues with debug panels. For instance, as sensor values are constantly getting transmitted to the app, the app's debug panel might show rapidly changing but accurate values, there are occasionally abnormally large values sprinkled in.
Resolution: A resolution to this fix can be done on the Android side where received bytes are put through a filter to make sure they make sense before they are displayed. For instance, since sensor values are always between 0 and 8190 millimeters, any value outside of that range can be simply discarded and the previous accurate value is preserved until the next sensor frame comes in. While this may reduce the update rate of debug and other information, it provides a somewhat cleaner interface on the app.
Master Module
Gitlab link https://gitlab.com/cmpe-243-group/cmpe-243-self-driving-car/tree/master/Master
Group Members
- Sarvpreet Singh
- Sagar Kalathia
Hardware Design
Software Design
<List the code modules that are being called periodically.>
Technical Challenges
<Bullet or Headings of a module>
Improper Unit Testing
<Problem Summary> <Problem Resolution>
Mobile Application
<Picture and link to Gitlab>
Group Members
- Kevin Gadek
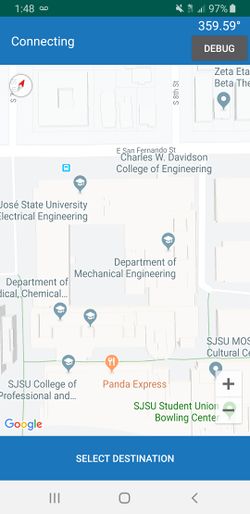
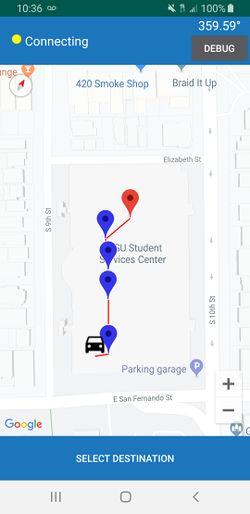
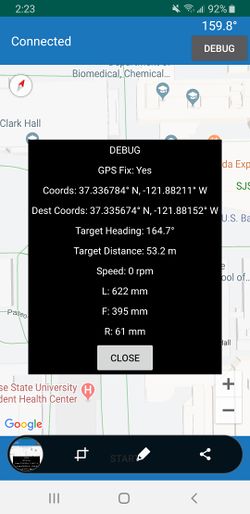
The Android application was the main gateway for user interaction with the vehicle and as such is crucial to the overall utility of the project. Critical elements such as setting destination and verifying debug values such as sensor values and current GPS coords without having to physically hook up the vehicle to Busmaster are all facilitated through the application. The app was designed for Android 8.1 (API level 27) with a minimum support requirement of Android 5.0 (API level 21).
Software Design
The application uses UI fragments to allow for better modularity and flexibility when building the application. In our case, all Google Map related activity could be constrained to MainActivity.java, all Bluetooth UI related activity to BluetoothFragment.java and Bluetooth background service activity to BluetoothService.java. Various UI layouts that are used such as activity_main.xml, bluetooth_fragment.xml and debug_popup.xml are subsequentially hooked up to these source files. This view-controller setup ensures a somewhat more focused interaction between Java source code and the various UI elements being hooked up.
MainActivity.java
The main focus of this code module is to hook up and interact with the Google Maps fragment as well as the toolbar at the top of the screen. activity_main.xml and debug_popup.xml are hooked up to this code module with the latter layout being displayed only when the debug button's onClickListener is invoked. An onClickListener is also implemented on the map to regard a clicked point on the map as the destination and essentially run the same route calculation as in the geo controller in order to display the selected checkpoints on the map fragment.
MainActivity.java serves as the launching point of the entire application. From this module's onCreate method, all of the various UI elements such as the toolbar and Maps fragment are instantiated. The bluetooth fragment that inflates the primary button at the bottom of the app is also inserted within this method as well. MainActivity.java also provides many public methods to allow BluetoothFragment to update private member variables that will ultimately update MainActivity's various UI elements such as the toolbar and map.
BluetoothFragment.java
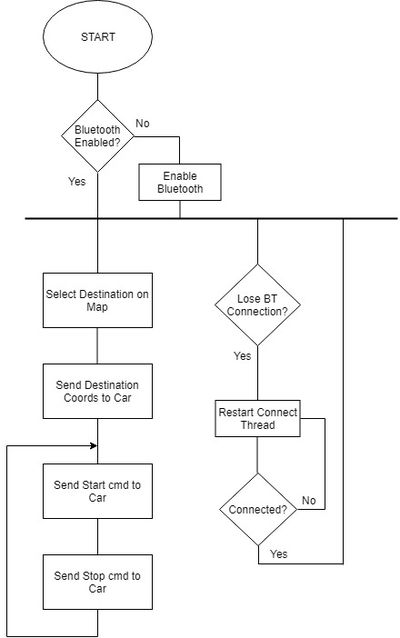
The primary UI element of this source file is the central button at the bottom of the screen. This Bluetooth button has an onClickListener that is tied to the app's global state machine. Depending on the current state of the app transaction, the main Bluetooth button will vary between "Select Destination", "Send Destination", "Start" and "Stop". This module is also responsible for verifying that Bluetooth is enabled on the phone as well as starting the background BluetoothService module that is responsible for connecting and managing the actual socket connection. A message handler is defined in this file and is used in BluetoothService's constructor in order to provide a means for this fragment to communicate with BluetoothService. This is critical as all of the sent and received data that will go through the Bluetooth socket will at some point be forwarded through this handler. The fragment is also responsible for communicating with MainActivity in cases where the map would need to get updated with Bluetooth information, such as the car's current latitude and longitude.
BluetoothService.java
This java module contains no UI elements but instead consists entirely of a helper class to connect and manage a Bluetooth socket connection. Two thread classes are defined with one (ConnectThread) dedicated entirely to discovering the HC-06 Xbee module with its specific MAC address and the other (ConnectedThread) devoted entirely to managing an active socket connection and processing received information. Both of these threads have try-catch blocks that are incredibly useful in cases such as where ConnectThread would need to continually be restarted until the HC-06 is available. ConnectedThread is launched once ConnectThread successfully connects to the vehicle. Its primary purpose is to allow BluetoothFragment to write bytes to the socket as well as handle received bytes. Once received bytes go through basic parsing and processing, such as conversion to floats or ints, this data is bundled into a message that is then sent over to BluetoothFragment's handler. From there, BluetoothFragment can decide what to do, such as updating MainActivity's UI elements or the app's transaction state.
Technical Challenges
Connecting over Bluetooth
Summary: Application was was only connecting at startup and not continually trying to connect to car. The issue was that when the initial connect thread failed to connect to the paired HC-06, the thread would throw an exception and quit instead of relaunching and trying to connect again.
Resolution: When connect thread fails, simply restart the thread repeatedly until connection succeeds.
Junk data
Summary: Application frequently shows junk data for debug values such as for target distance/heading. This was determined to be an app issue as Busmaster showed that the correct values were getting sent by the GPS and the bridge successfully decoded those values before sending them.
Resolution: The problem was likely caused by out-of-order bytes being received after the start of frame byte sent by the bridge is received. This issue largely went away after slowing down the bridge to 10Hz.
Conclusion
<Organized summary of the project>
<What did you learn?>
Project Video
Project Source Code
https://gitlab.com/cmpe-243-group/cmpe-243-self-driving-car
Advise for Future Students
- Splurge on sensors: Having reliable sensors along with stable sensor mounts can go a long way towards dealing with obstacle avoidance. Having an idea of how selected sensors should be mounted and orientated and then creating a custom 3D printed mount to see that vision come to fruition can protect against problems down the road during crunch time.
- Pick compass carefully: Pick a compass that can reliably produce accurate headings. Do research and read the datasheets on possible parts and don't simply buy the cheapest compass chip.
