Difference between revisions of "S19: Run D.B.C"
Proj user10 (talk | contribs) (→GPS Module) |
Proj user10 (talk | contribs) (→Technical Challenges) |
||
| Line 1,284: | Line 1,284: | ||
| − | + | The original encoder we sourced was designed for slower speed purposes, such as for a knob. <br> | |
| + | The additional rotational resistance with this encoder caused vibrations and resulted in it becoming disconnected from the motor shaft several times. <br> | ||
| + | Our solution was to use an encoder with higher quality although more expensive. <br> | ||
| + | Our new encoder was designed for higher speed and continuous operation on a fast paced motor. <br> | ||
| + | This higher grade encoder provided us with more reliable and more accurate encoder sensor values. <br> | ||
| + | In addition to a hardware solution, we also implemented a software solution. <br> | ||
| + | The original purpose of our software solution was to control the damage that a loose encoder cause on the rest of the car. <br> | ||
| + | Our PID loop works such that if the commanded speed is higher than the actual speed calculated by the encoder sensor, then the PWM drive will increase accordingly (the motor will work harder). <br> | ||
| + | If the encoder comes loose, the values from the encoder sensor will always result in being a 0 value. This consequences in the actual speed being calculated to 0 m/s even though the car may actually be moving. <br> | ||
| + | Without software protection, this effect will eventually result in the PWM being driven to full strength. At full strength, our RC car could move very fast and definitely was at risk of being damaged if it collided with an object at such speeds. <br> | ||
| + | For autonomous car operation, many subsystems and electronics need to be perfectly connected and stable in order to work safely. <br> | ||
| + | To keep all of these systems safe from high speed collisions, we enforced hard limits on the PWM drive strength (in terms of duty cycle output). <br> | ||
| + | We also checked for cases where our PWM was driven to these limits we enforced. If it did reach these limits, we would shut off the motor if the encoder was reading values of 0. <br> | ||
| + | Another stability check we included was limiting the amount of integral windup that could occur during an iteration of our PI loop. This helped to make sure the car gradually increased and decreased its speed accordingly. <br> | ||
=== <font color="EE82EE"> Bill Of Materials </font> === | === <font color="EE82EE"> Bill Of Materials </font> === | ||
Revision as of 05:02, 23 May 2019
Contents
- 1 ABSTRACT
- 2 INTRODUCTION AND OBJECTIVES
- 3 SCHEDULE
- 4 BILL OF MATERIALS (GENERAL PARTS)
- 5 HARDWARE INTEGRATION PCB
- 6 CAN NETWORK
- 7 ANDROID MOBILE APPLICATION
- 8 BRIDGE CONTROLLER
- 9 GEOGRAPHIC CONTROLLER
- 10 MASTER CONTROLLER
- 11 MOTOR CONTROLLER
- 12 SENSOR CONTROLLER
- 13 CONCLUSION
- 14 Grading Criteria
ABSTRACT
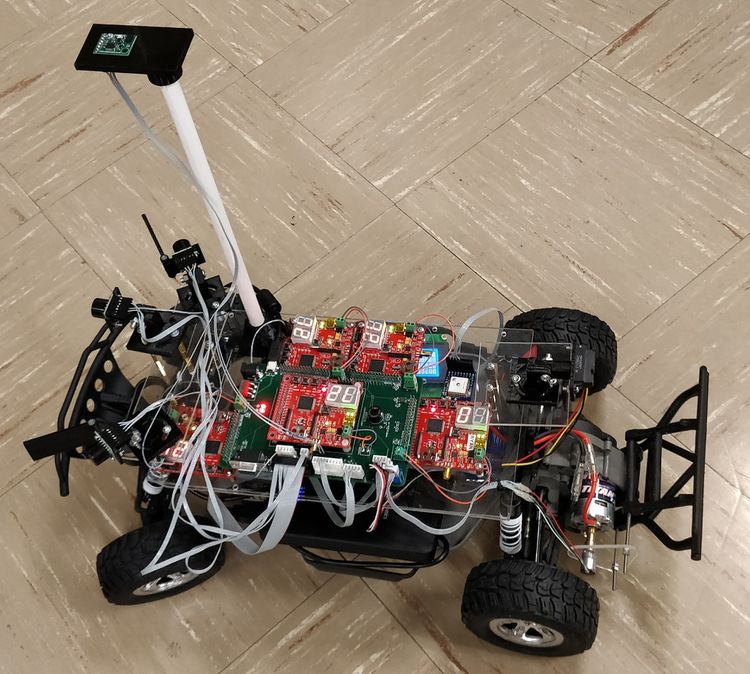
The RUN-D.B.C project, involves the design and construction of an autonomously navigating RC car. Development of the R.C car's subsystem modules will be divided amongst and performed by seven team members. Each team member will lead or significantly contribute to the development of at least one subsystem.
INTRODUCTION AND OBJECTIVES
|
RC CAR OBJECTIVES | ||||
|---|---|---|---|---|
| ||||
|
TEAM OBJECTIVES | ||||
|---|---|---|---|---|
| ||||
|
CORE MODULES OF RC CAR | ||||
|---|---|---|---|---|
| ||||
|
PROJECT MANAGEMENT ADMINISTRATION ROLES | ||||
|---|---|---|---|---|
| ||||
|
TEAM MEMBERS & RESPONSIBILITIES | ||||
|---|---|---|---|---|
|
Team Members |
Administrative Roles |
Technical Roles | ||
|
|
| ||
|
| |||
|
|
| ||
|
| |||
|
| |||
|
| |||
|
| |||
SCHEDULE
|
TEAM MEETING DATES & DELIVERABLES | ||||
|---|---|---|---|---|
|
Week# |
Date Assigned |
Deliverables |
Status | |
| 1 | 2/16/19 |
|
| |
| 2 | 2/24/19 |
|
| |
| 3 | 3/3/19 |
|
| |
| 4 | 3/10/19 |
|
| |
| 5 | 3/17/19 |
|
| |
| 6 | 3/24/19 |
|
| |
| 7 | 3/31/19 |
|
| |
| 8 | 4/7/19 |
|
| |
| 9 | 4/14/19 |
|
| |
| 10 | 4/21/19 |
|
| |
| 11 | 4/28/19 |
|
| |
| 12 | 5/5/19 |
|
| |
| 13 | 5/12/19 |
|
| |
| 13 | 5/19/19 |
|
| |
| 14 | 5/22/19 |
|
| |
BILL OF MATERIALS (GENERAL PARTS)
|
MICRO-CONTROLLERS | ||||
|---|---|---|---|---|
|
PART NAME |
PART MODEL & SOURCE |
QUANTITY |
COST PER UNIT (USD) | |
|
|
|
| |
|
RC CAR | ||||
|---|---|---|---|---|
|
PART NAME |
PART MODEL & SOURCE |
QUANTITY |
COST PER UNIT (USD) | |
|
|
| ||
|
|
| ||
|
|
| ||
HARDWARE INTEGRATION PCB
Hardware Design
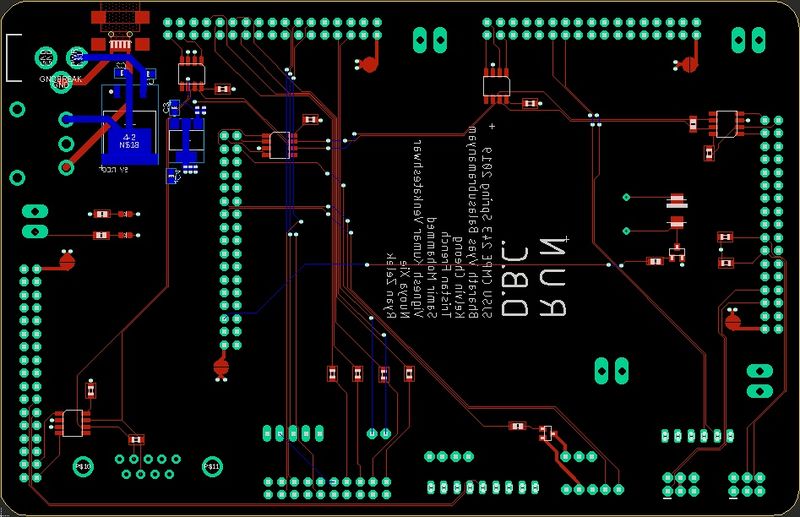
The hardware integration PCB was designed with two goals:
1. Minimize the footprint of the onboard electronics
2. Minimize the chances of wires disconnecting, during drives
To accomplish these goals, all controllers were directly connected to the board's 34 pin header arrays, while all sensors were connected to the board, using ribbon cables and locking connectors. The master controller's header pins were inverted and then connected to a header array on top of the PCB, while the other controllers were mounted to the bottom. This guaranteed secure power and signal transmission paths, throughout the system.
The board consisted of 4 layers:
Signal
3.3V
5.0V
GND
Technical Challenges
Design
- Balancing priorities between HW design and getting a working prototype
- Finalizing a PCB design, when some components and module designs are not nailed down
Assembly
- DB-9 connector for CAN dongle was wired backwards in the PCB design. Because there are several unused pins, we were able to just solder jumper wires to connect CAN HI and CAN LOW to the correct pins.
- Spacing for headers with clips were not accounted for properly in the design. two of them are very close. It's a tight fit, but it should work.
- Wireless antenna connector on master board not accounted for in footprint, it may have to be removed to avoid interference with one connector.
Bill Of Materials
|
HARDWARE INTEGRATION PCB | ||||
|---|---|---|---|---|
|
PART NAME |
PART MODEL |
QUANTITY |
COST PER UNIT (USD) | |
|
|
| ||
|
|
| ||
|
|
| ||
|
|
| ||
|
|
| ||
|
|
| ||
|
|
| ||
|
|
| ||
|
|
| ||
|
|
| ||
|
|
| ||
|
|
| ||
|
|
| ||
|
|
| ||
CAN NETWORK
In order to eliminate the risk of accidentally writing (and potentially sending) CAN messages with duplicate message id's, we created a rule that the first digit in messages for each submodule would be unique to that submodule. For example, CAN messages sent from the motor controller, always began with 5 (514, 515, 516, etc.), while messages for the geographic controller began with 7 (769, 770, etc.). This scheme proved to be effective and we never worried about duplicate message id's.
In order to detect MIA (missing in action) modules, we implemented a heartbeat system. We sent an integer value of 0, in the 1Hz periodic callback task (once a second), from the bridge controller, motor controller, sensor controller and geographic controller to the master controller. The master controller responded by illuminating one of the 4 onboard LED's on itself (specific to each sub module), if it detected an MIA node. In order to detect an MIA master node, we had the master controller send a heartbeat message to the motor controller, which responded the same way as the master did to MIA events. If a node waited more than 3 seconds to send a heartbeat message, that node was assumed to be MIA, until a heartbeat was received by the master controller. This approach was simple to implement and made it easy to spot MIA modules.
We took care never to send CAN messages faster than we were receiving them, in order to avoid distorting data. We almost always sent CAN data in the 10Hz periodic callback function.
Hardware Design
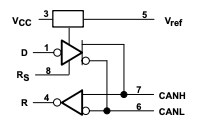
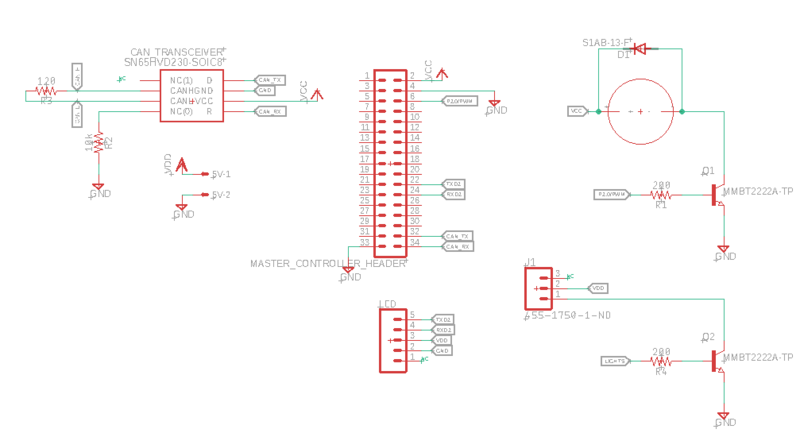
During the early stages of development, we purchased 5 Waveshare SN65HVD230 CAN modules, in order to implement our CANbus. We mounted them to a perfboard and wire-wrapped the CAN-H and CAN-L nodes. We found that the design was unecessarily bulky and unclean.
Because the CAN modules were designed around the SN65HVD230 CAN transceiver chip, we simply purchased 5 individual IC's and soldered them directly to our system integration PCB. The resulting circuit implemented the same functionality, while significantly reducing the CAN transceiver footprint.
We used SMD 603 120 ohm termination resistors; one connected between CAN-H and CAN-L near the DB-9 connector and one near the master controller. This design mitigated the influence of signal reflections on the CANbus. Due to our low CAN baud rate (100kbps), this wasn't a big problem, but if we increased our baud rate to around 1Mbps, it could have affected the integrity of the CANbus.
DBC File
<Gitlab link to your DBC file> <You can optionally use an inline image>
ANDROID MOBILE APPLICATION
Software Design
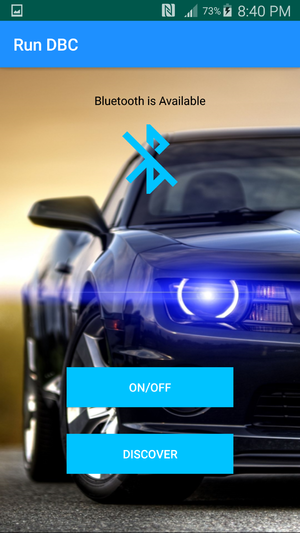
Development of the Android Mobile Application happened in two phases. The first involved setting up bluetooth communication between the HC-05 and the Android mobile phone, while the second involved integrating Google Maps into the application. Both phases presented unique technical challenges that we had to address.
Bluetooth Integration
NOTE: Future CMPE 243 students looking to develop an Android Mobile Application, should start here: Android Developer Guide
Maintaining a bluetooth connection between the Android phone and the HC-05 module, proved to be more arduous that we expected. Luckily, Google provided extensive resources to help with the process, on the Android developer website (this might be the best starting point for future CMPE 243 app developers, or anyone else interested in developing an app like this.
The first step was to grant the application bluetooth permissions as well as location permissions. This enabled the application to enable bluetooth (assuming the phone could support it), as well as access the phone's location. These permissions were included in the Application's manifest file.
Next, we created a bluetooth adapter, which represented the phone's bluetooth radio.
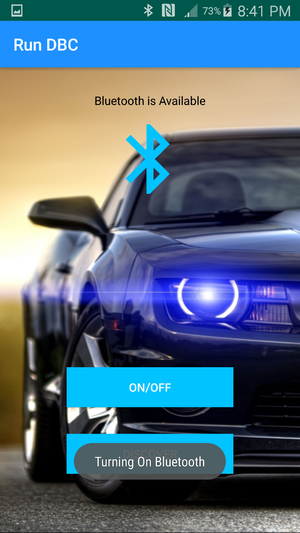
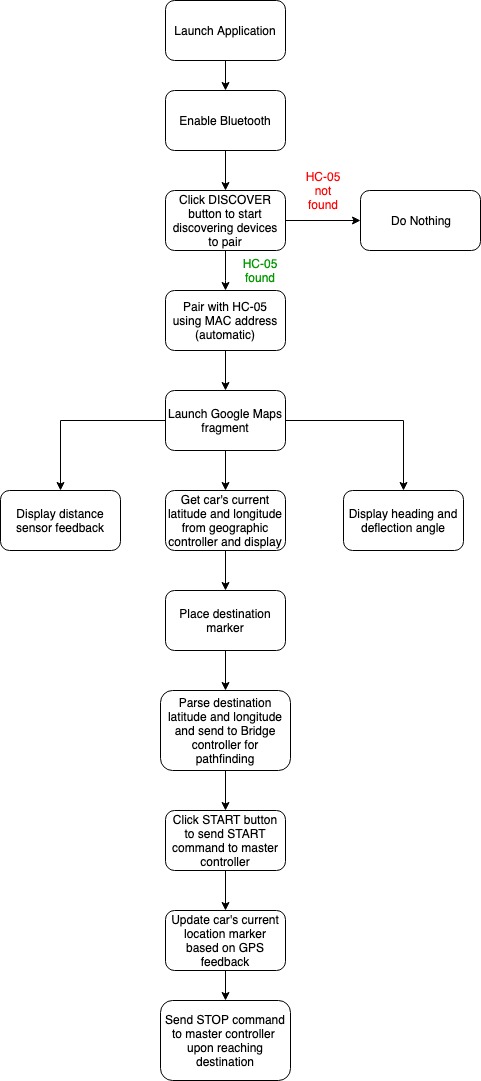
After enabling bluetooth, we started discovering available devices. We named our HC-05 module "HC-05", so that we could pair with the device name (as well as the MAC address).
In order for the RF communication socket to connect to the HC-05, we used the following UUID: 00001101-0000-1000-8000-00805F9B34FB. This enabled the socket to correctly identify the HC-05 and maintain the connection.
Google Maps Integration
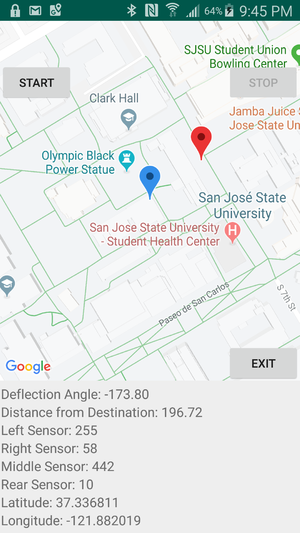
After the device was discovered, paired and connected, the next step was launching a Google Maps fragment. Below the fragment, we displayed feedback from various sensors on the car: distance sensors, heading, deflection angle and (the car's) starting latitude and longitude. The Sensor Controller and Geographic Controller sent updated feedback to the Bridge Controller during drives, allowing current data to be displayed on the application. This was useful for debugging and allowed us to avoid scanning the onboard LCD (mounted to the car) during drives.
Upon launching the map fragment, the user was able to place a destination marker on the map. This allowed the destination's latitude and longitude to be parsed and sent to the Bridge Controller, for pathfinding purposes. Once the destination coordinates were sent to the Bridge, it was able to use Djikstra's algorithm, to generate a path-to-goal (with checkpoints along the way).
Once a destination was set, the user was able to click the START button, which sent a START command to the master controller (letting it know that the car was ready to drive). While driving, the user was allowed to stop the car at any time, by clicking the STOP button. Regardless, upon reaching the destination, the car stopped itself anyway.
Technical Challenges
INTERNET Permission not enabled
One issue that set us back a day, during Google Maps integration, was not realizing that we never enabled the INTERNET permission the Application's manifest file. As a result, Google Maps was not able to launch properly; only a grey screen with the Google logo would display. While this may seem like a silly problem, as the code grows during development, it becomes easy to overlook basic requirements. Also, there are many factors involved in launching a Google Map Fragment (or intent) that can cause this type of issue. Once we enabled the INTERNET permission, the map fragment launched correctly.
Broken Android Phone
During Google Maps integration, our progress was delayed for 2 days, due to a broken phone. The phone was unable to launch the updated application correctly, even though it had done so without issue, prior. Upon rolling back our Application software and launching it on the phone, we realized that it wouldn't run properly either. Luckily, we were able to get another Android phone to run the App on. Both iterations of the code ran without problems, when launched on the new phone.
Bluetooth NULL pointer crashing App
This was by far the most problematic bug that we encountered during development.
Bill Of Materials
|
ANDROID MOBILE APPLICATION | ||||
|---|---|---|---|---|
|
PART NAME |
PART MODEL |
QUANTITY |
COST PER UNIT (USD) | |
|
|
|
| |
BRIDGE CONTROLLER
Hardware Design
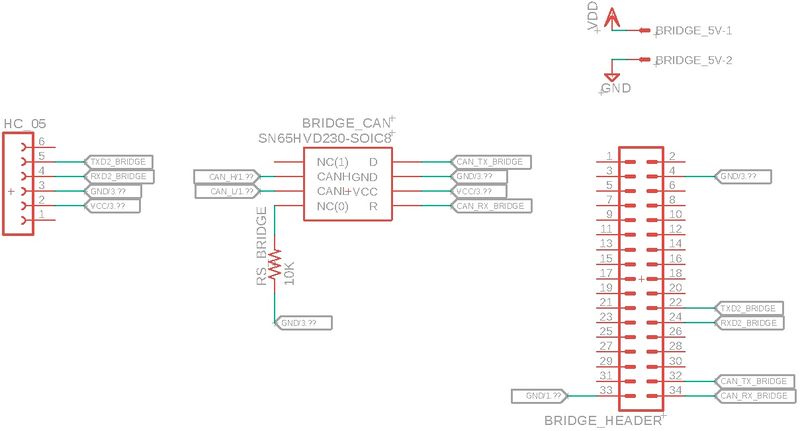
The Bridge controller acted as an interface between the Android mobile phone and the car. Its main purposes were to start and stop the car wirelessly and to send destination (latitude and longitude) coordinates to the geographic controller, for use with its pathfinding algorithm.
Our approach, involved pairing an HC-05 bluetooth transceiver with the Android mobile phone and then transmitting coordinates to and from the bridge controller using UART. Checkpoints along the path-to-goal, were transmitted over CAN, to the bridge, from the geographic controller.
Upon startup, 3.3V was supplied to the HC-05.
When the user clicked the "Discover" button the app, the Android mobile phone, initiated a pair and connect sequence, with the HC-05 (using its MAC address). Upon a successful pairing, the HC-05's LED blinks slowly as opposed to a few times a second (when unpaired).
The HC-05 used UART transmit and receive queues on the SJOne board, to store data, before transmitting it to the mobile app over bluetooth.
Bridge Controller Schematic
Software Design
Periodic Callback: Init
Upon startup, the bridge controller initiated both its UART and CAN peripherals. In order to communicate with the Android mobile phone over bluetooth, we had to use a baud rate of 9600bps. We set our transmit and receive queue sizes to 64 bytes, respectively. We also reset the CANbus, in order to ensure proper functionality.
Periodic Callback: 1Hz
In order to verify that the Bridge Controller's CAN transceiver was operational, we sent a heartbeat message every 1Hz, to the master controller. We used an integer value '0', for simplicity. If the bridge's CAN transceiver malfunctioned, the master controller illuminated the first (onboard) LED on itself (SJOne board). This allowed us to detect MIA modules quickly, without needing to connect to the Busmaster immediately.
We also checked the status of the CANbus every 1Hz and reset the bus if it was not operational. This was to ensure that a CAN glitch would not permanently compromise the bridge controller.
Periodic Callback: 10Hz
As stated before, the Bridge Controller acted as an interface between the Android Mobile phone and the car. Therefore we needed to transmit and receive coordinates and command from the phone, as well as to/from other modules on the car.
We checked the UART receive queue for START and STOP commands from the Android mobile phone. If one was received, then a CAN message was transmitted to the Master Controller, suggesting that it either apply or terminate power to the motor. For simplicity, we sent a character, '1' for START and '0' for STOP.
We also checked for essential navigation data from the Geographic Controller and Sensor Controller. We expected the car's starting coordinates (latitude and longitude), heading, deflection angle and distance to destination from the Geographic Controller. From the Sensor Controller, we expected feedback from the front, middle and rear distance sensors, as well as the infrared sensor mounted on the back of the car. This data was stored in a UART transmit queue and then transmitted to the Android mobile phone over bluetooth, every 2Hz. The Android application displayed feedback from the Geographic and Sensor controllers below its Google Map fragment.
Path-finding
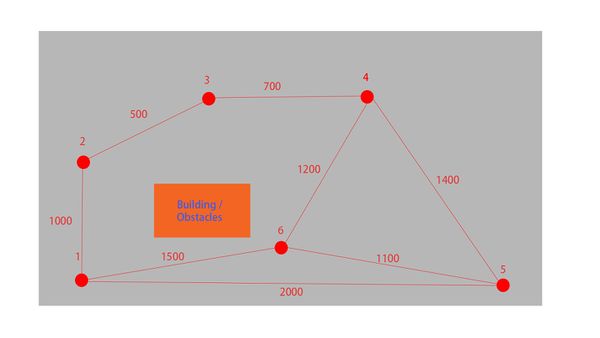
Because there might exist obstacles between the starting location and destination, In order to successfully navigate to the end, a map of intermediate checkpoints needs to be plotted. Although simpler algorithms are available, we chose Dijkstra's path-finding algorithm because of its readily available code online and the promise of no dead zone.
In order to use the actual algorithm, a NxN matrix that represents the allowed path between checkpoints needs to be populated manually, with N being the total number of checkpoints.The image below shows the actual map of checkpoints with their distances:
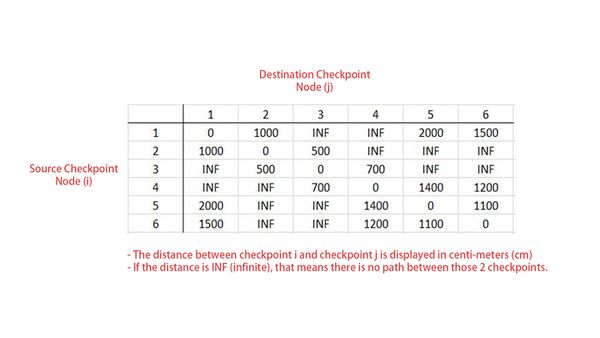
Here we have a total of 6 points. Because not all points are interconnected with each other, user of the algorithm has to fill out a matrix[i][j] with distance value. For example, if point 1 and 2 form a path, then in matrix[1][2] and matrix[2][1] the value should be 1000. Since a point has 0 distance with itself, the diagonal of the matrix is zero. When a path is not available, the distance is written as infinite. The filled matrix from the path image is shown below:
The populated matrix above then can be fed into Dijkstra algorithm, with other parameter such as the size of the matrix, the starting checkpoint, and the ending checkpoint. Actual parameters depend on the implementation of the algorithm. However, one more step is needed before obtaining the above matrix. Since our checkpoints are in the form of longitude-latitude pairs, a distance conversion function has to be called to change coordinate data to distance. Therefore, we have a hard-coded array of coordinate structs as available checkpoints, and when the time comes to populate the matrix, a get_distance() function is called on every pair to obtain distance data.
One problem surfaced as we were working on this task: Since we do not know where our starting location or destination would be, how do we use the algorithm to calculate path? We solved this problem by adding two more checkpoints to our matrix: one representing source and one representing destination. When the bridge SJone board starts, it receives source coordinates from geographic module and populate the source checkpoint. When the Android phone sends the destination coordinates to the bridge module, it then populates the destination checkpoint. When these two points are populated, a segment of code is run that makes path between each of these two points to their nearest neighbor. Once the make_path() function finishes, then the Dijkstra algorithm kicks in at the end.
Path-finding sample code
After the current location from the GEO module and the destination location from the bridge module are received, we put these two coordinates into an array which stores all the checkpoints.In order to connect the source location and the destination location to the rest of the checkpoints, we need to make a path between the source location and its closest checkpoint and another path between the destination location and its closest checkpoint with the code below. In this code segment, coordinate_array[] is an array filled with checkpoint coordinates in the form of structs. coordinate_distance[] is the NxN matrix mentioned above. gps_get_distance() function takes coordinate struct of two checkpoints and return the distance between them.
// place current location gotten from GPS into coordinate array
 coordinate_array[MAX_SIZE - 2].latitude = current_location.latitude;
 coordinate_array[MAX_SIZE - 2].longitude = current_location.longitude;
 // place destination location into coordinate array
 coordinate_array[MAX_SIZE - 1].latitude = destination.latitude;
 coordinate_array[MAX_SIZE - 1].longitude = destination.longitude;

//Now the 2 points has to link to the rest of the checkpoint array
 float min_distance_start = INF;
 int min_index_start = -1;
 float min_distance_dest = INF;
 int min_index_dest = -1;
//looping through all checkpoints to find the closest one to current location and to destination
 for (int i = 0; i < MAX_SIZE - 2; i++) {
   if (gps_get_distance(coordinate_array[MAX_SIZE - 2], coordinate_array[i]) < min_distance_start) {
     min_distance_start = gps_get_distance(coordinate_array[MAX_SIZE - 2], coordinate_array[i]);
     min_index_start = i;
   }
   if (gps_get_distance(coordinate_array[MAX_SIZE - 1], coordinate_array[i]) < min_distance_dest) {
     min_distance_dest = gps_get_distance(coordinate_array[MAX_SIZE - 1], coordinate_array[i]);
     min_index_dest = i;
   }
 }
 //after finding the index to the closest points, run make_path function
 make_path(MAX_SIZE - 2, min_index_start);
 make_path(MAX_SIZE - 1, min_index_dest);
The following code snippet is used to calculate the distance between two checkpoints and the result will be stored in the Dijkstra’s matrix. (if there is a path exists between these two checkpoints.)
void make_path(int i, int j) {
 coordinate_distance[i][j] = gps_get_distance(coordinate_array[i], coordinate_array[j]);
 coordinate_distance[j][i] = coordinate_distance[i][j];
}
The following code snippet is used to determine whether the RC car has arrived to its checkpoint or destination. If the distance between the current coordinates and the checkpoint coordinates is less than 10 meters, we would consider the car has arrived to its checkpoint location and the bridge module would send the next checkpoint to the master module.
bool is_checkpoint_arrived(void) {
 return (gps_get_distance(current_location, coordinate_array[path[path_current_index]]) < 10); }
Technical Challenges
UART Receive While Loop
The primary technical challenge that we encountered, while developing the Bridge Controller, occurred during a demo. In an effort to display readings from sensor and geo on the Android application in real time, "CAN Receive" function was used, which in turn used a while loop to receive all CAN messages and then extract geo and sensor data, parse them and send them over UART to android application. Initially, we compiled all the data received and sent them within the CAN receive function which caused the app to crash/display junk values. To overcome this we replaced the while loop with if, however, this slowed down the rate at which messages were received and we displayed old data on App. It took a while to figure out, but we created a new function called compile and send where we concatenated data and called it at 2Hz which fixed the issue.
Interfacing Bridge and Geographic Modules
Another challenge we faced is the task of interfacing between geographic and bridge modules. Not long after starting the task, we realized that timing is very important. Since Dijkstra path-finding algorithm is only needed to run once, we need to make sure we obtain destination from Android phone first before running the algorithm. We also had to make sure geographic module receives the checkpoint from bridge module first before doing the bearing and distance calculations. We solved the first issue by setting a flag for Dijkstra algorithm. Every second the SJone board will check to see if the destination structure is populated. If it is, it sets a flag that enables the population of matrix needed by the algorithm and the algorithm itself is run shortly after. Latter issue by inputting a dummy distance of 1000m as the output of our distance calculation, before any checkpoint data arrives from bridge module. If a value of 1000 is showing on the LCD screen attached to the car, we know that geographic module has not yet gotten a checkpoint coordinate from bridge.
Bill Of Materials
|
BRIDGE CONTROLLER | ||||
|---|---|---|---|---|
|
PART NAME |
PART MODEL |
QUANTITY |
COST PER UNIT (USD) | |
|
|
| ||
GEOGRAPHIC CONTROLLER
Hardware Design
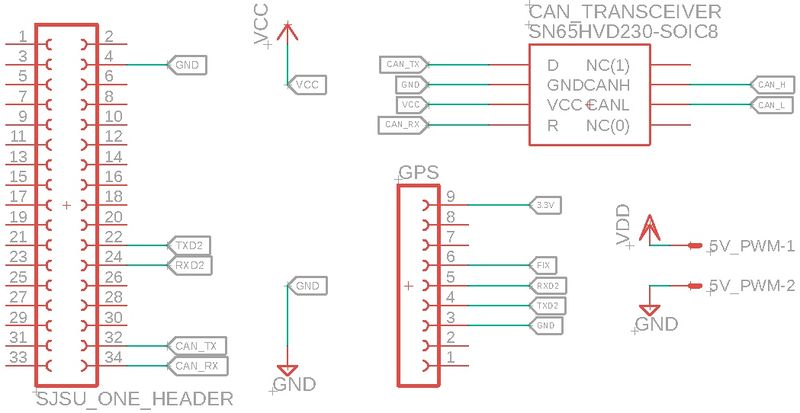
The geographical controller is responsible for providing the required directions for the car to reach its destination. This is achieved using the Adafruit MTK3339 Ultimate GPS module and the CMPS14 9DOF compass module to obtain the heading, bearing, and distance to checkpoint. Geographical controller receives checkpoint from bridge module, with which the distance and deflection angle are calculated. In our design, the pathfinding and the continuous sending of different checkpoints as car reaches each of them is checked by the Bridge module. The geographic controller is only responsible for obtaining the car’s current coordinates, computing distance and angle to the next checkpoint that is provided by the Bridge module over CAN and send these results over the CAN bus.
The car's starting latitude and longitude coordinates, were calculated by the GPS and then transmitted over CAN to the bridge controller, which transmitted them to the Android phone, using bluetooth. Upon executing the RUN-D.B.C Android mobile application, the user was able to select a destination location, by placing a marker on the Google Map fragment. The app parsed the destination's latitude and longitude coordinates and then sent them to the bridge controller. The pathfinding algorithm (Dikstra's algorithm) is used to calculate a path to the destination based on the starting location and a series of pre-defined checkpoints comprised of longitude and latitude data.
Geographic Controller Schematic
GPS Module
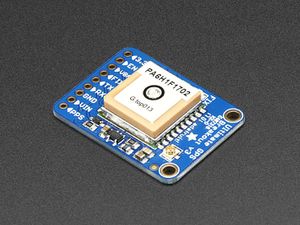
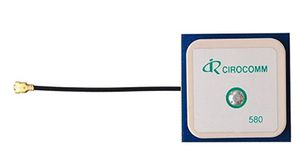
As stated before, we used an Adafruit MTK3339 Ultimate GPS module. The GPS, along with the compass, was responsible for calculating bearing angle and distance from destination checkpoints. An external antenna was integrated, in order to help parse the GPS data more efficiently. The GPS module used UART, to communicate with the SJOne board. The baud rate for the UART interface had to be initialized twice: 9600 bps at first and then again at 57600 bps. This was because the Ultimate GPS module could only receive data at 9600 bps upon startup, but its operational baud rate was specified as 57600 bps.
The GPS module came with a GPS lock, which allowed it to use satellite feedback to parse its location. This lock was indicated by an LED, which illuminated once every 15 seconds. If no lock was found then the LED illuminated once every 1-2 seconds. The parsing of data from the GPS was in terms of NMEA sentences, each of which had a specific functionality. Out of the several NMEA sentences, $GPRMC was used. It provided essential information, such as latitude and longitude coordinates. The $GPRMC sentence is separated by commas, which the user had to parse in order to get useful data out of the module. The strtok() function was used to parse data from the GPS module, with comma(,) as the delimiter.
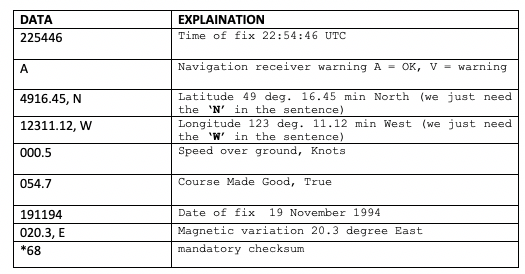
The $GPRMC sentence looks like this: $GPRMC,225446,A,4916.45,N,12311.12,W,000.5,054.7,191194,020.3,E*68
The below table explains what each of the datum in the GPRMC sentence stands for:
The first 6 fields in the NMEA sentence are the most important ones. If field 4 said ‘N’, we checked the data in field 3 which had the latitude. Likewise, if field 6 said ‘W’, we check the data in field 5 which contained the longitude. It is important to note that the longitude and latitude data are in the form degree-minute-seconds instead of true decimal. If not properly converted, they could have offset the location readings by miles.
Compass Module
The compass module is responsible for redirecting/navigating the car towards the required destination as chosen on the mobile app. The heading angle is obtained from the compass module, which tells us where the car is pointing to the magnetic north. Since it is true north that we want, we need to add an offset, called magnetic declination, to the heading angle.
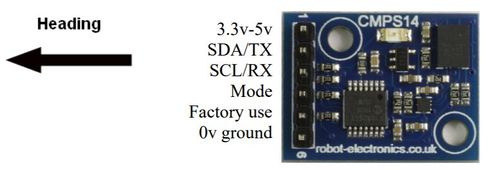
The compass module chosen is CMPS14 – Tilt compensated compass module which has a 3-axis gyro, 3-axis accelerometer and a 3-axis magnetometer. It is powered on by 3.6-5V but works on 3.3V too. It uses I2C to communicate with the SJOne board for which the mode pin can be left open or pulled up to the supply voltage. Due to the presence of the magnetometer, the compass must be placed away from all other components of the car to minimize magnetic interferences from other controllers. In our car, the compass was placed at an elevated position, high enough to be away from other controllers’ magnetic interferences. The compass need not be calibrated manually, as CMPS14 has automatic calibration.
Read Compass Heading
Compass heading is read by initiating the I2C read operation, and by passing the compass address (0xC0) and the register address (0x2). These values, along with the temporary array must be passed in a single I2C read operation. An example of the code snippet is as below:
if (read_byte_from_i2c_device(COMPASS_ADDRESS, first_reg_address, 2, temp)) {
   temp_result = temp[0] << 8 | temp[1];
   float temp_float = temp_result / 10.0;  // from 3599 to 359.9
   temp_float += 13.244;   // correct for magnetic declination
   if (temp_float >= 360) {
     temp_float -= 360;
   }
   *result = temp_float;
   return true;
 }
 return false;
Check Compass Calibration
The calibration level is checked to see how well the compass is calibrated. The 8-bit value resides in register 0x1E according to the diagram below:
When each of the 2-bit calibration value is 0, this means the specific field is not calibrated, a value of 3 means the field is fully calibrated. This is done by performing an I2C read operation, whilst reading the 0xC0 and the 0x1E registers, to determine if it’s calibrated or not. The code snippet looks as below:
bool check_calibration_level(uint8_t* result) {
 char calibration_state_address = 0x1E;  // register 30
 bool is_calibration_successful = false;
 if (read_byte_from_i2c_device(COMPASS_ADDRESS, calibration_state_address, 1, result)) {
   is_calibration_successful = true;
 }
 return is_calibration_successful;
 }
Essential GPS Data
Bearing, Distance, and deflection angle Calculation
Bearing, calculated as an angle from true north, is the direction of the checkpoint from where the car is. The code snippet to calculate bearing is below. Lon_difference is the longitude difference between checkpoint and current location. GPS is the current location, and DEST is checkpoint location. For all trig functions used below, the longitude and latitude values have to be converted to radian. After the operations, the final bearing angle is converted to degrees and a positive value between 0 and 360.
bearing = atan2((sin(lon_difference) * cos(DEST.latitude)), ((cos(GPS.latitude) * sin(DEST.latitude)) - (sin(GPS.latitude) *
cos(DEST.latitude) * cos(lon_difference))));
   bearing = (bearing * 180) / PI;
   if (bearing <= 0) bearing += 360;
      return bearing;
Distance between the car and the checkpoint can be calculated using GPS along. The code snippet to calculate distance is shown below. It utilizes the haversine formula to calculate the great-circle distance between two points on a sphere given their longitudes and latitudes. Like the bearing calculation, all coordinates must be in radian. The value 6371 below is earth’s radius in km.
float a = pow(sin((DEST.latitude - GPS.latitude) / 2), 2) + cos(GPS.latitude) * cos(DEST.latitude) *
pow(sin((DEST.longitude - GPS.longitude) / 2), 2);
float c = 2 * atan2(sqrt(a), sqrt(1 - a));
float distance = 6371 * 1000 * c;
return distance;
After obtaining heading and bearing values, deflection angle, the difference in angle between your car and the checkpoint, is calculated. This is the angle value that is given to the master for steering purposes. We made that if the deflection angle is negative, the car should steer to the left. If the angle is positive, then the car should steer to the right.
deflection = gps_bearing - compass_heading;
 if (deflection > 180)
   deflection -= 360;
 else if (deflection < -180)
   deflection += 360;
Software Design
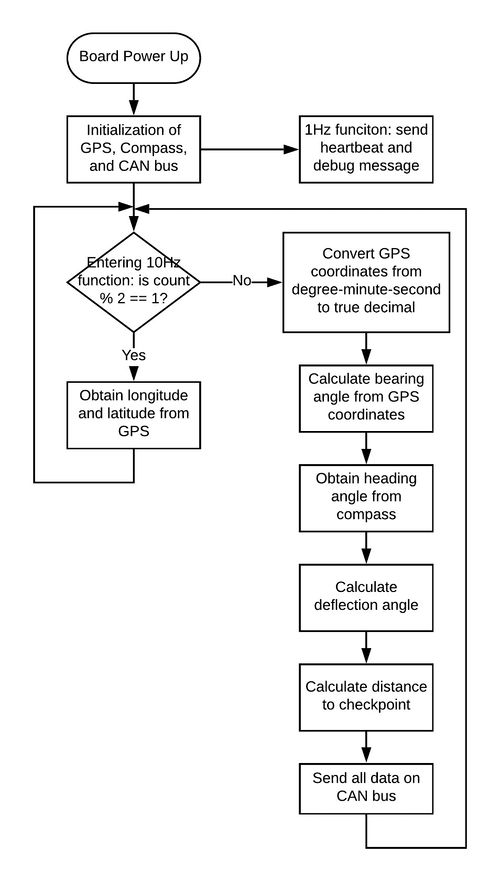
The complete flowchart for the geo module is shown below. We broke all the tasks in two iterations of the 10Hz function because if we do them in one iteration, we get the task overrun error. Therefore, the gps update rate is 5Hz.
Technical Challenges
Getting correct BAUD rate for GPS
- When we first started interfacing with GPS module, we can never get the gps to output the BAUD rate we want (57600). Hercules was showing random symbols when we switch BAUD rate to 57600 even though we made sure the message we send to the GPS was correct. Browsing through Adafruit's help forum showed that the GPS, upon startup, only accepts messages in 9600 bps. If the user wants to switch BAUD rate to a higher value, he/she has to first send the command to switch BAUD rate in 9600, then rest of the command can be in the higher BAUD rate. As soon as we added the missing component, our GPS was giving us correct information shown in Hercules.
Compass reading was not accurate and would deviate from initial calibration
- The initial compass we got (CMPS12) exhibited unstable heading reading. Even after we calibrated manually to make sure it points to magnetic north, after some testing we would check again and it would not point to magnetic north anymore. We tried to both factory preset and manually saving calibration profiles but nothing changed. We ended up buying another compass (CMPS14) that offered the ability to turn off auto-calibration. At the start of the SJone board we send a command to the compass to disable auto-calibration and auto-profile saving, we lengthened the wooden rod that takes the compass away from the EM-generating components of the car, and we replaced our GPS antenna for one without build-in magnet. All of these things together solved our issue and our compass was accurate within 2-3 degrees from magnetic north, which is sufficient for our application.
Parsing NMEA sentences
- When we are receiving NMEA sentences from the gps module, sometimes we would receive garbled up messages. Since our GPS module continuously send out NMEA sentences and lacks a trigger pin that send NMEA sentence when prompted, we have no idea, when we are using uart driver to read the message, when the start of the message will first appear. To solve this issue, we implemented several checks to our GPS parsing. First, the processing of the messages only happens if the first character of the message is the character '$', which begins our GPRMC sentence. Next, we will only take in latitude and longitude values if the third and fifth entries read are 'N' and 'W', respectively. These checks ensure that the message is not fragmented and allow us to obtain correct longitude and latitude data.
Bill Of Materials
|
GEOGRAPHIC CONTROLLER | ||||
|---|---|---|---|---|
|
PART NAME |
PART MODEL |
QUANTITY |
COST PER UNIT (USD) | |
|
|
| ||
|
|
| ||
|
|
| ||
MASTER CONTROLLER
Hardware Design
The master controller is primarily interfaced with the other controllers over CAN bus. The other main interface is control of the LCD display for debug data, which communicates over UART.
Software Design
- LCD display
- The LCD is controlled over UART, printing single lines at a time
- There are three available screens that can be cycled through by pushing button 0 on the master board
- Operation Data: This screen shows a range of info including the commanded and actual speed, the distance and deflection to the next checkpoint, and the current state of the state machine.
- Sensor Data: This screen shows the distances being read from each of the four distance sensors (in cm)
- Geo Debug: This screen shows the latitude, longitude, heading, and deflection angle of the car as well as compass calibration levels and distance to the checkpoint.
- CAN read and send
- All CAN messages are read and MIAs are handled in a single 50Hz receive function.
- There are separate send functions for the motor commands and the debug info.
- Navigation: The primary function of the master module is to process the geo and sensor data, and send steering and motor commands to the motor module.
- obstacle avoidance
- steer to checkpoint
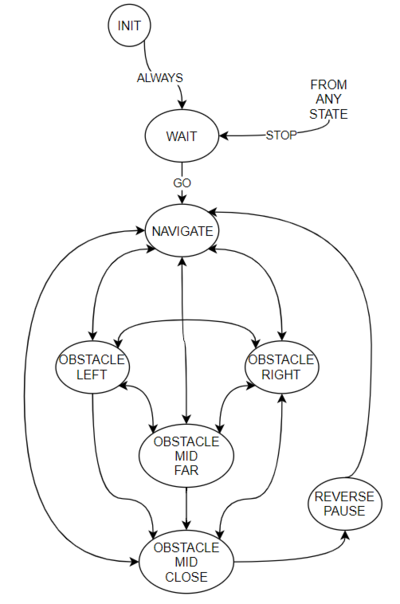
The state machine above handles the data processing to decide what steering and motor commands to send to the motor module.
- INIT: The state machine always starts here. It sets the motor speed and direction to zero and the steering to straight before transitioning to the WAIT state.
- WAIT: The car will stay in this state with the motor set to zero speed and steering set to straight until there is a go command is received, and the distance to the next checkpoint is > 10 meters, at which point it transitions to the NAVIGATE state.
- NAVIGATE: While in this state, the master will set the motor command to the predetermined NAVIGATE_SPEED (2.0m/s standard) and the steering angle based on the deflection between the bearing to the next checkpoint and the heading of the car.
- OBSTACLE LEFT/RIGHT: These states are triggered when the left or right ultrasonic sensor detect an object closer than the STEER_THRESHOLD, and will command the motor speed to OBSTACLE_SPEED and steer in the opposite direction of the obstacle.
- OBSTACLE MID FAR: This will be triggered when there is an obstacle straight ahead closer than the MIDDLE_THRESHOLD_FAR (and has a higher priority than the left and right obstacle states). The module will command the speed to OBSTACLE_SPEED and attempt to steer around the obstacle to the right.
- OBSTACLE MID CLOSE: This will be triggered when there is an obstacle straight ahead closer than the MIDDLE_THRESHOLD_CLOSE (and has the highest priority). The car will be commanded to drive backwards if there is nothing behind the car, or stop in place if there is something behind the car, until the front obstacle is cleared or far enough away to attempt to navigate around it.
- REVERSE_PAUSE: This is a short pause after the OBSTACLE MID CLOSE state. This allows the car to coast to a stop before commanding forward again, to avoid integral wind-up of the PI controller on the Motor module.
Technical Challenges
- Quickly switching from reverse to forward "winds up" integral term of PI controller on motor module
- Solved by adding short (1 second) delay after reversing
- One of the MIA LEDs would blink, even when the appropriate node was on the CAN bus and messages were being received.
- Probable related to not properly cleaning the build after making some changes. The problem resolved itself
Bill Of Materials
|
MASTER CONTROLLER | ||||
|---|---|---|---|---|
|
PART NAME |
PART MODEL |
QUANTITY |
COST PER UNIT (USD) | |
|
|
|
| |
MOTOR CONTROLLER
Hardware Design
The motor board was responsible for both steering and spinning the wheels in order to move the car towards the target destination.
The front 2 wheels of the car handled the steering portion and it accomplished this with the utilization of the servo.
The back 2 wheels of the car handled spinning the wheels and it accomplished this through the utilization of the Electronic Speed Control (ESC) that was interfaced to the DC motor directly.
The servo was included with the RC we purchased and it was interfaced with 3 pins:
1 pin for the power supply, which was powered by the battery that came with the RC car (as opposed to the same supply that other components shared on our PCB)
1 pin for the ground signal
1 pin for the servo dedicated PWM control signal
The ESC was included with the RC we purchased and it was interfaced with 3 pins:
1 pin for the power supply (powered similar to the servo)
1 pin for the ground signal
1 pin for the ESC dedicated PWM control signal
Managing the steering was relatively simple. The servo mainly requires a PWM signal in order to operate.
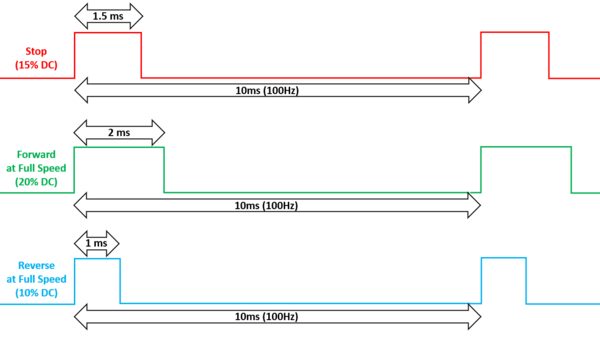
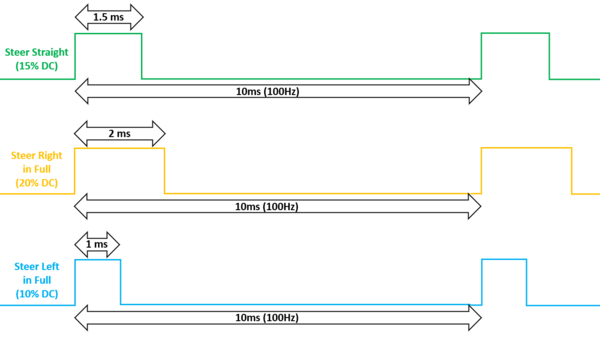
As seen through the timing diagrams below (and through experimentation), we found the frequencies and duty cycles that corresponded to actual steer left, steer right, and steer straight.
With our SJ1 board, we were able to match our frequencies and duty cycles and steer the car using the APIs that we designed.
Our code does allow for the steering to be set to any turn angle that is mechanically allowed by the car.
In order to reach the maximum turn angle setting, the programmer needs to set the PWM to either 10% (left) or 20% (right) duty cycle.
If the programmer wants a smaller turn angle, they need to program the PWM to a duty cycle that is closer to 15% (15% duty cycle means steer straight).
Managing wheel spin was a more complicated process. The ESC also requires a PWM signal in order to operate, but is not as simple as the servo's operation.
In order to reach the maximum speed in the forward direction, the programmer needs to set the PWM duty cycle to 20%.
In order to stop spinning the wheels, the programmer needs to set the PWM duty cycle to 15%.
In order to safely reverse the car, the RC car manufacturer implemented a special feature to make sure that the DC motor doesn't burn up when switching from high speed forward to going in the reverse direction.
When controlling the car with the handheld RC remote (manual control), this feature is present and the user needs to first stop and toggle some reverse commands before the car can actually move in reverse.
This means that a state machine was also needed in our code in order to enable reverse functionality.
Our software implementation of this reverse state machine is:
Stop for 100ms
Reverse for 100ms
Stop for 100ms
Reverse for 100ms
User can then reverse at any given PWM duty cycle from <15% (low speed) to 10% (full speed)
In order to maintain constant speed while moving up/down an inclined road, a Proportional-Integral-Derivative (PID) loop is commonly used.
We didn't find the need to include the derivative component, so our speed control loop just contained the proportional and integral components.
Actual moving car speed is another component of this loop, we were able to read and calculate actual car speed through the use of an encoder.
Portions of the PID loop use constant values for the gains of each component.
Our gains were determined through a trial and error testing process.
Speed Control Timing Diagrams
Steering Control Timing Diagrams
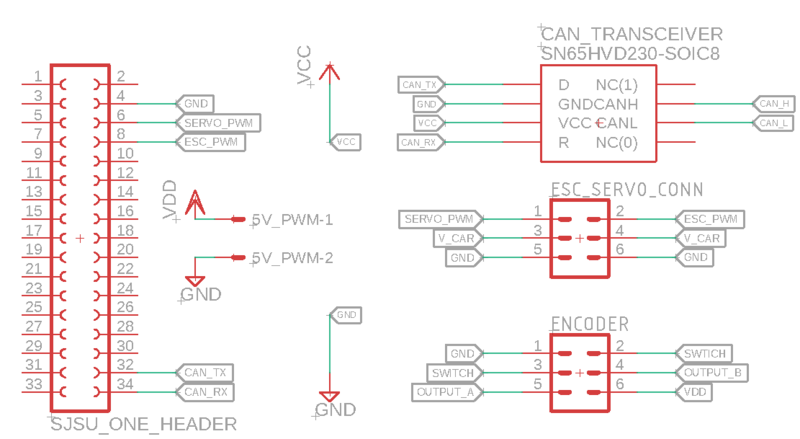
Motor Controller Schematic
Software Design
<List the code modules that are being called periodically.>
Periodic Callback: Init (beginning of program)
- The CAN bus is initialized
- The encoder interrupts are enabled
- The 2 PWM signals are initialized and set to default values
- Memory is initialized to speed values of 0 which imply the stopped state
Periodic Callback: 1Hz (every 1sec)
- Check if the motor board's CAN node is either on or off the CAN bus.
- If the motor board is not on the CAN bus, reset the CAN bus for this node.
Periodic Callback: 10Hz (every 100ms)
- Send a Heartbeat message to the Master board (to ensure these 2 boards have reliable communication).
- Read all CAN messages and filter out the ones we care about.
- Check and handle the BIST for basic motor functions (self test is started only when the user presses Button #1 on the SJ1 board).
- If the BIST is not currently running, control the steering and car movements based on CAN communication with the Master controller.
- Send the actual car speed, steering angles, and motor direction to the Master (for determining future drive commands) and to the Bridge (for displaying real-time data on the phone app).
- Send motor debug messages to the Master (for LCD display), Bridge (for phone app display), and Debug (for BusMaster display) nodes to help troubleshoot motor functionality.
Technical Challenges
<Bullet or Headings of a module>
When we were matching PWM signals of the SJ1 board to the same PWM frequencies and duty cycles based on the RC car's remote, we were not getting consistent results.
In the \SJSU_Dev\projects\lpc1758_freertos\L2_Drivers\src\lpc_pwm.cpp file on line #37, we found out that the function sys_get_cpu_clock() was giving different frequencies for several program executions.
Our short-term workaround was to replace that function call with the known system clock frequency.
Our long-term solution was to to keep that driver file as was originally developed and we could declare our PWM objects globally and each as a pointer.
This method gave us the correct result when matching our PWM frequencies and duty cycles.
The original encoder we sourced was designed for slower speed purposes, such as for a knob.
The additional rotational resistance with this encoder caused vibrations and resulted in it becoming disconnected from the motor shaft several times.
Our solution was to use an encoder with higher quality although more expensive.
Our new encoder was designed for higher speed and continuous operation on a fast paced motor.
This higher grade encoder provided us with more reliable and more accurate encoder sensor values.
In addition to a hardware solution, we also implemented a software solution.
The original purpose of our software solution was to control the damage that a loose encoder cause on the rest of the car.
Our PID loop works such that if the commanded speed is higher than the actual speed calculated by the encoder sensor, then the PWM drive will increase accordingly (the motor will work harder).
If the encoder comes loose, the values from the encoder sensor will always result in being a 0 value. This consequences in the actual speed being calculated to 0 m/s even though the car may actually be moving.
Without software protection, this effect will eventually result in the PWM being driven to full strength. At full strength, our RC car could move very fast and definitely was at risk of being damaged if it collided with an object at such speeds.
For autonomous car operation, many subsystems and electronics need to be perfectly connected and stable in order to work safely.
To keep all of these systems safe from high speed collisions, we enforced hard limits on the PWM drive strength (in terms of duty cycle output).
We also checked for cases where our PWM was driven to these limits we enforced. If it did reach these limits, we would shut off the motor if the encoder was reading values of 0.
Another stability check we included was limiting the amount of integral windup that could occur during an iteration of our PI loop. This helped to make sure the car gradually increased and decreased its speed accordingly.
Bill Of Materials
|
MOTOR CONTROLLER | ||||
|---|---|---|---|---|
|
PART NAME |
PART MODEL |
QUANTITY |
COST PER UNIT (USD) | |
|
|
| ||
SENSOR CONTROLLER
Hardware Design
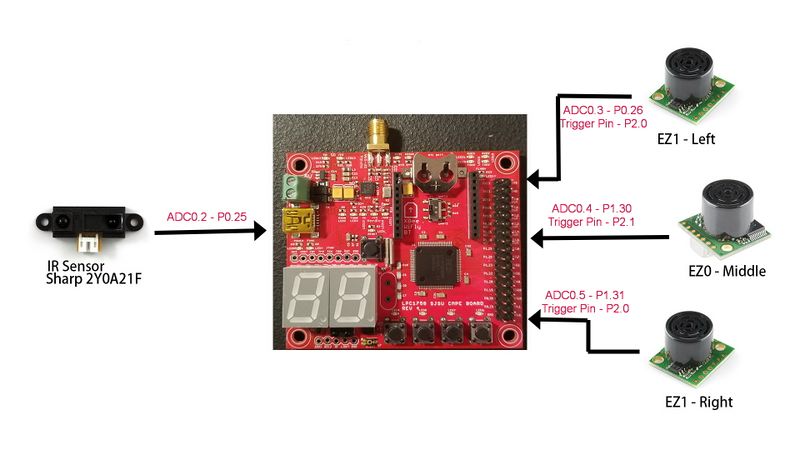
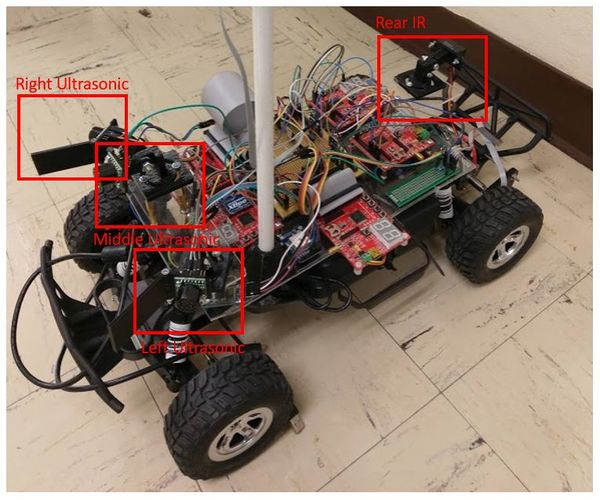
Sensor module consists of 4 sensors: 3 Maxbotix ultrasonic sensors in the front, and one ir sensor in the back. The three sensors in the front are detecting obstacles in three directions: directly in front, to the left, and to the right. We chose ultrasonic sensors instead of Lidar because of its cheaper price, easier implementation, and independence of lighting conditions.
On the SJone board there are only three ADC pins that has pin headers for users to attach sensors. Since we have a total of 4 sensors that need ADC to obtain data, we had to desolder the light sensor on the SJone board to free up ADC0.2 for our use.
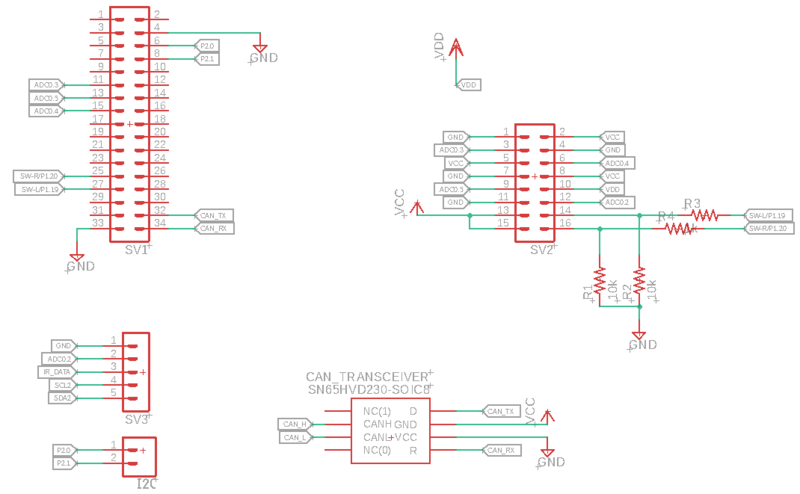
Sensor Controller Schematic
CAD Design
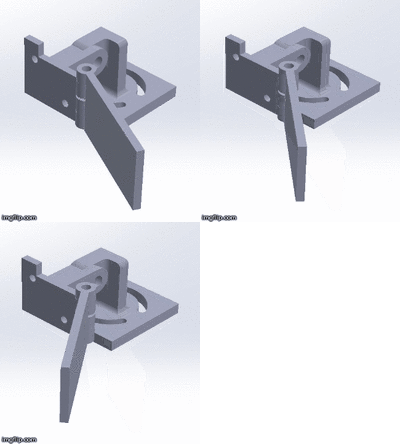
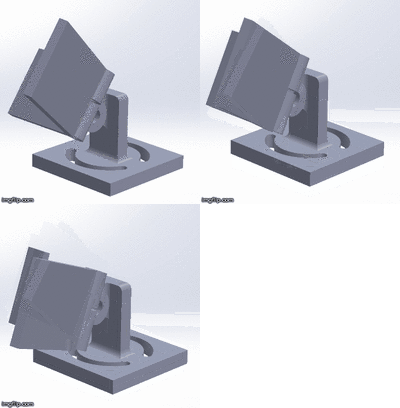
We gave a lot of thought regarding how and where sensors should be mounted to the car. In order to facilitate adjusting the directions of individual sensors, we incorporated circular grooves in the sensor bases. The hinge of the sensor mount also allowed sensors to be vertically adjusted Together with the sensor mount, this approach gave the sensor's two degrees of freedom.
The picture on the left shows that the hinge of the sensor guard can be adjusted to minimize the amount of interference between sensors.
The picture on the right shows the hinge of the sensor mount, allowing vertically adjustment.
Placement for the Ultrasonic Sensors
We realized that when the sensors were active, the left and right sensor ultrasonic wave output, sometimes interfered with the middle sensor, resulting in incorrect feedback. This occurred despite polling the sensors in separate periodic tasks. We discovered that, mounting the middle sensor on a higher surface than the left and right sensors decreased the interference substantially. Furthermore, by attaching two guard pieces on the left/right sensors (acting as shields), we further decreased the interference between sensors. We rigorously tested the integrity of sensor feedback with the guards in different positions, to ensure that they didn't introduce interference of their own (in certain positions).
Sensor Value Conversion
In order to convert ADC readings from sensors to distance, we needed to plot conversion curves for both the ultrasonic sensors and the IR sensor. We used a tape measure and laid a piece of wide metal board directly in front of the sensor and gradually move it back 5cm at a time to record the corresponding ADC value. According to datasheets, the Maxbotix sensors should have a linear relationship between distance and reading, whereas the Sharp IR sensor curve is nonlinear. After obtaining the values, we fitted a line over the Maxbotix sensors and a power curve to the IR. The curves can be seen below:
Software Design
Flowchart
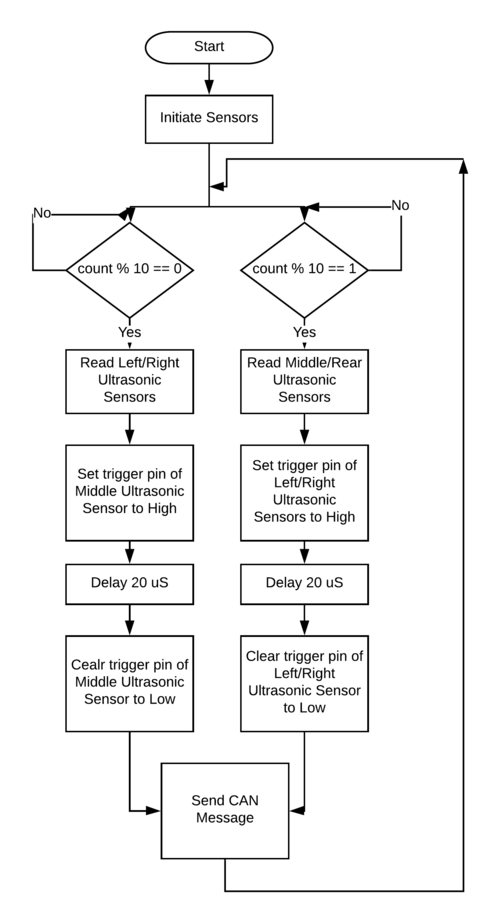
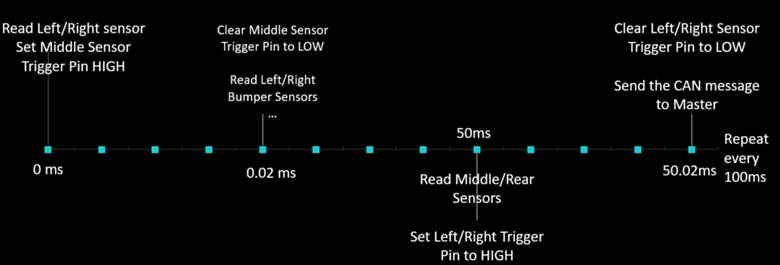
The flow diagram for sensor is shown below. We split the sensor readings to two different 10Hz tasks to minimize amount of interference between left/right and middle sensors. In one of the iterations, we read the left/right ultrasonic sensors using adcx_get_reading() function, and immediately after reading them we trigger the middle ultrasonic sensor to output ultrasonic wave. Since it takes time for sound waves to bounce back from solid surface, by the time the next task begins the middle ultrasonic sensor can then read the wave outputted from the previous task. In the other iteration, the middle and rear sensors are read, and left/right ultrasonic sensors are triggered to output sound wave. At the end, when all information are received by the SJone board, it is send out on the CAN bus in frequency of 5Hz. It is optional to use the trigger pin (RX) to trigger the sensors to send out ultrasonic waves, but we use it because instead of letting the sensors continuously outputting ultrasonic waves and allowing them to interfere with each other, it is better to let them output waves in bursts for a much cleaner signal.
Timing Diagram
Technical Challenges
Sensor Interference
We saw a lot of interference between the front 3 sensors. We were able to overcome the issue with both hardware and software tweaks:
- Higher placement of middle ultrasonic sensor and interference guard for the left and right sensors
- Instead of leaving the RX pin of the sensors unconnected, which causes the sensors to output ultrasonic waves continuously, we toggled the RX pin, to turn off sensor ranging and only allow wave output when we needed it. The periodic callback function was also written in a way that staggered sensor triggering and reading, to allow sufficient time to process the ADC feedback.
Power Deficiency
At first, when the sensors were tested individually (as well as together on early iterations of the car), they performed to specifications. However, when other subsystems were integrated into the car, the sensor feedback fluctuated wildly. After many hours of troubleshooting, we realized that our 1A power supply was not enough to supply sufficient power to all systems on the car. We addressed the problem by using a power supply with a 3.5A output.
Unstable HR-04 Readings
At first, we used two HC-SR04 modules, as our left and right sensors. However when we tested them during obstacle avoidance we realized that their range was too narrow to reliably detect obstacles. As a result we switched to more expensive, but reliable Maxbotix EZ line of sensors.
ADC Supply Voltage
The middle sensor's also fluctuated wildly at times. After hours of testing we realized that our 5V power supply was distorting its feedback signal, due to the SJOne's ADC peripheral being powered by 3.3V. Applying a 3V power signal to the middle sensor corrected the issue.
Slow car response to obstacle due to large queue size (running average)
During our first try at obstacle avoidance we found that the car reacts very slowly to obstacles, even though the sensor update rate is 10Hz. Later we found out that the reason is because of our queue implementation. We used to have a very large queue to calculate running average. This filters out spikes but also means when an obstacle is detected it takes very long time for the running average to be updated.
Decreasing the queue size and using the median value instead of the average value solved the issue.
Bill Of Materials
|
SENSOR CONTROLLER | ||||
|---|---|---|---|---|
|
PART NAME |
PART MODEL |
QUANTITY |
COST PER UNIT (USD) | |
|
|
| ||
|
|
| ||
|
|
| ||
CONCLUSION
This project was an introduction to the realities of putting together a team, with a common goal and then executing a strategy to bring the team's vision to life. In our case, it was developing an autonomously navigating RC car. Each team member brought unique skills, passions and personalities to the project. Some team people were skilled with designing components in SolidWorks, while others were skilled in PCB design, firmware development, project management, catching bugs, etc. Some people had the ability to lighten the mood on disappointing demo days, while others had the management skill to keep the team focused and firing on cylinders, while avoiding burning the team out. When these skillsets came together, it resulted in a product that we are all exceptionally proud of, as well as one that performed well on the final demo day. It sparked a fun and lively debate at the end of the semester as to who would keep the car.
It wasn't always fun and lively though. We experienced soaring highs, such as during our first progress demo, where we hit almost all of our specs. We also experienced devastating lows, such as when our encoder signal connector snapped on our second progress demo, resulting in the car not having any speed control. While we look back fondly on our project, the reality is that it was the result of 7 graduate students spending almost every day of the semester developing and fine tuning the final product. We failed as a team and then we succeeded as a team. No members were ever singled out. The goal was too important. Blame fell on the team as a whole. As one single unit. Yet, so did success and praise. When we succeeded, it was a team success. We succeeded because we were greater than the sum of our parts. We succeeded because we failed together. We succeeded because we didn't let failure break us. As Winston Churchill once said, "if you are going through hell, keep going". At times this project pushed us to our limits. It exhausted us. But we kept pushing. We grit out teeth and kept working, even on our worst days. We never stopped learning and that was what allowed our project to succeed.
There was so much to learn. Always something new, it felt like. We developed a 4-layer PCB, to integrate all of our subsystems together, even though none of us had experience developing a board that complex before. We also approached new challenges such as developing an Android Mobile Application, even though none of us knew JAVA or knew what Android Studio was beforehand. We never stopped learning. We learned the value of investing in quality components, such as robust distance sensors and a reliable GPS. We honed our unit testing skills, trying to write firmware that was as high quality as our hardware. We learned about CANbus on an intimate level and applied all of the knowledge. We simply never stopped learning. Our passion and drive even encouraged one of our friends (who wasn't even in the class) to drop what he was doing and help us debug a motor issue (thanks again Zach Smith!!!).
Working on this project was a difficult yet ultimately rewarding experience. We can't stress enough how important is to start the project as early as possible in the semester and to keep pushing until the final demo. Each of contributed roughly 20 hours a week to work on the project. As a result, we were exhausted by the end of it, but we also never had to pull an all nighter. We had excellent leadership from our team lead, Tristan, as well as our mentors, Preet and Pratap. We also had excellent peers in CMPE 243 and are proud of what they achieved as well. Overall, we were happy to be part of this class and we hope that our project will inspire future students (and non-students) to develop electric vehicles.
Project Video
Project Source Code
[RUN-D.B.C project source code]
Advice for Future Students
- FORM YOUR TEAM AS EARLY AS POSSIBLE AND START WORKING ON THE PROJECT AS EARLY AS POSSIBLE (WEEK 1 IF POSSIBLE)
- If you are having trouble with your GPS or compass, try testing on top of one of the SJSU parking garages on a weekend. There is much less signal interference.
- Order spare parts whenever possible. You will encounter defective parts and shipping wastes time and increases stress (especially nearing demo day)
- Make sure to get a power supply that can supply upwards of 1A. When all the car's subsystems are running, the current draw may be higher than expected
- Don't go for cheap modules from Ebay, those will probably waste more of your time than the difference in price. Get quality modules and they will pay for themselves down the road.
- AGAINT DON'T ORDER THE CHEAPEST MODULE...it won't work well and you will spend so many fruitless hours trying to get it to work reliably (especially when integrated into the car)
- Spring break is the best time to catch up to all the tasks. If that time is not utilized for this project, then most likely your group will be behind when the demo day comes.
- Getting access to a 3D printer can be very useful for this project, with which you can customize sensor, compass, and encoder mounts to your specification.
Grading Criteria
- How well is Software & Hardware Design described?
- How well can this report be used to reproduce this project?
- Code Quality
- Overall Report Quality:
- Software Block Diagrams
- Hardware Block Diagrams
- Schematic Quality
- Quality of technical challenges and solutions adopted.
