Difference between revisions of "Web Development Tutorial"
(→Interpret the Data in Javascript) |
|||
| Line 29: | Line 29: | ||
* '''sitelib.php''' and '''common.php''' | * '''sitelib.php''' and '''common.php''' | ||
*: More server side code | *: More server side code | ||
| + | |||
| + | == Hello World == | ||
| + | The first thing you want to do is setup your LAMP or get the web server up and running. Then, deploy the WDP package into your web server directory and make sure you get get to the website to begin with. If you did everything correctly, you'll see the following if you browse to http://localhost : | ||
| + | [[File:webtutorial_helloworld.png|center|frame|WDP Page]] | ||
== Learn by Doing == | == Learn by Doing == | ||
| Line 57: | Line 61: | ||
* '''updateMainContent()''' is the function that will update the main viewing area of the web-page | * '''updateMainContent()''' is the function that will update the main viewing area of the web-page | ||
* We simply use some HTML to display | * We simply use some HTML to display | ||
| + | |||
| + | Here is what you should see : | ||
| + | [[File:webtutorial_my_menu.png|center|frame|WDP My Menu]] | ||
| + | |||
=== Client-Server Interaction === | === Client-Server Interaction === | ||
| Line 64: | Line 72: | ||
* PHP code is server side. | * PHP code is server side. | ||
| − | + | === Jump Into Some Ajax === | |
Let's continue from '''myMenuHandler''' and request some information from server. Let's add some code in: | Let's continue from '''myMenuHandler''' and request some information from server. Let's add some code in: | ||
<syntaxhighlight lang="javascript"> | <syntaxhighlight lang="javascript"> | ||
| Line 122: | Line 130: | ||
* Your function in Javascript receives the response array members from PHP | * Your function in Javascript receives the response array members from PHP | ||
* You can access the data using response followed by a . and the members | * You can access the data using response followed by a . and the members | ||
| + | |||
| + | [[File:webtutorial_ajax_output.png|center|frame|WDP Data displayed]] | ||
| + | |||
| + | == Firebug == | ||
| + | Let's test the '''My Menu''' item again, but this time with Firebug enabled. To enable Firebug, hit F12 button in Firefox. After you click on '''My Menu''' you can visually see the data sent from Ajax and the data received from PHP : | ||
| + | [[File:webtutorial_firebug_post.png|center|frame|WDP Firebug POST]] | ||
| + | [[File:webtutorial_firebug_resp.png|center|frame|WDP Firebug Response]] | ||
Revision as of 04:56, 1 November 2012
This article is under construction
As more and more devices begin to be connected to the Internet, the need for a web interface surfaces. This tutorial guides you through a web-development lesson. Please be advised that I (Preet) am not a web developer by profession, so this probably shouldn't be a basis of a professional website. On the other hand, this can serve as a to-the-point lesson on how to development a website in minutes while using the latest and greatest tools such as AJAX and Jquery.
Contents
Resources Required
- Get my Web Development Package (WDP) from SourceForge
- Linux PC with LAMP (Google it up!)
- LAMP stands for Linux Apache MySQL and PHP.
- These are essential ingredients of any website.
- Experience with C.
- C is all you'll need and you'll learn PHP and Javascript "on-the-fly" :)
- Firefox
- Also install "FireBug" (again, google it up!)
If you don't have a Linux PC, I encourage you to run a virtual machine with Linux such as Ubuntu. I have an in-house linux PC dedicated for backup, media server, web server and more! So if you haven't invested in one, invest in a linux box now!
WDP (Web Development Package) Contents
The main contents of the WDP are :
- Bootstrap from Twitter
- JQuery and JQuery UI
- index.php
- Homepage (and the only HTML page) - you will never modify this
- jsphp.js (Client side file)
- Your javascript code goes here.
- This code helps you communicate with phpjs.php
- phpjs.php (Server side file)
- PHP code that interacts with jsphp.js
- sitelib.php and common.php
- More server side code
Hello World
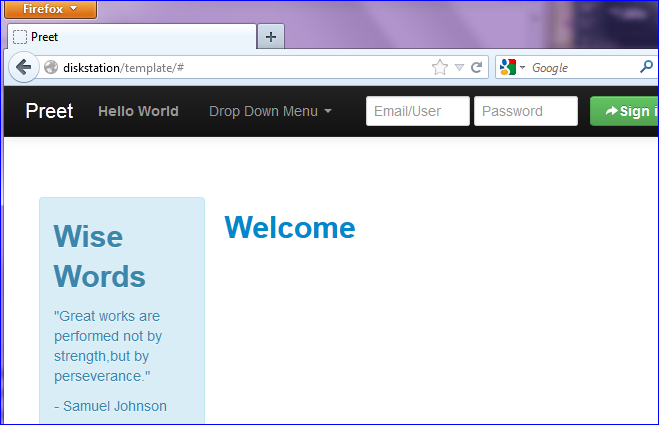
The first thing you want to do is setup your LAMP or get the web server up and running. Then, deploy the WDP package into your web server directory and make sure you get get to the website to begin with. If you did everything correctly, you'll see the following if you browse to http://localhost :
Learn by Doing
Since you will learn best by actually coding, let's just jump straight into a new page you wish to create and through this process, you will learn the role of each of the source code files described above. Due to the nature of this WDP, all of the user interaction is handled by Javascript and the web-page never reloads unlike usual websites out there. This is similar to how Facebook and Gmail work.
Modify Title Menu
Open up sitelib.php and modify getNavBar() by adding a new menu:
$barContent .= '<li><a href="#" onClick="myMenuHandler()"><b>My Menu</b></a></li>';
Notes:
- PHP uses variables that begin with $ and . is used as a += to concatenate a string.
- myMenuHandler() is a javascript function you will add to jsphp.js
Open up jsphp.js and add your function that will be invoked once My Menu will be clicked.
function myMenuHandler()
{
    updateMainContent('<div class="well">You clicked the my menu link!</div>');
}
Notes:
- updateMainContent() is the function that will update the main viewing area of the web-page
- We simply use some HTML to display
Here is what you should see :
Client-Server Interaction
Clicking a menu item and displaying static information is not very useful. Let's suppose that you wanted to get an array of integers from server side ... let's go through this lesson!
Reminder:
- Javascript is client side and knows nothing about server
- PHP code is server side.
Jump Into Some Ajax
Let's continue from myMenuHandler and request some information from server. Let's add some code in:
function myMenuHandler()
{
    sendAjaxRequest("getIntegers", "",
                     function(response) {
                     }
                    );
}
As is, save all the files, and press Ctrl+F5 in your web browser to reload the web-page. Ctrl+F5 will also refresh the javascript file you modified because browsers tend to cache this file. Now simply click on My Menu and you will get an error message! This is because you haven't handled what happens when AJAX Request "getIntegers" occurs at the server side.
Handle the AJAX Request in PHP
Open up phpjs.php and add the following code:
else if($javascriptReqType == "getIntegers")
{
    $response = array('ok' => true, 'msg' => "OK");
    $response['integers'] = array(1, 2, 3);
}
Notes :
- PHP code is setup to store the "getIntegers" you sent from sendAjaxRequest into $javascriptReqType.
- $response is the array returned back to Javascript
- You can add your data to this array by an index name, such as 'integers' used above.
At this stage, what you've accomplished is to send "getIntegers" AJAX request from Javascript, and in PHP, you are returning three variables back:
- response.ok
- response.msg
- response.integers (array)
Interpret the Data in Javascript
Now, let's use this data in Javascript by modifying myMenuHandler() @ jsphp.js :
function myMenuHandler()
{
    sendAjaxRequest("getIntegers", "",
                     function(response) {
                         var html = '<table class="table table-striped"></tr>';
                         for(var i=0; i<response.integers.length; i++) {
                             html += '<td>' + response.integers[i] + '</td>';
                         }
                         html += '</tr></table>';

                         updateMainContent(html);
                     }
                    );
}
Notes :
- Your function in Javascript receives the response array members from PHP
- You can access the data using response followed by a . and the members
Firebug
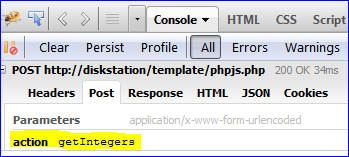
Let's test the My Menu item again, but this time with Firebug enabled. To enable Firebug, hit F12 button in Firefox. After you click on My Menu you can visually see the data sent from Ajax and the data received from PHP :


