Difference between revisions of "Eclipse : New Project & Tricks"
From Embedded Systems Learning Academy
(No difference)
|
Latest revision as of 15:16, 1 September 2012
The easiest way to create a new project in Eclipse is:
- Copy and paste the folder of a sample project.
- Rename the folder that you copied to your new project name.
- In Eclipse, go to File -> Import
- Click on General -> Existing Projects into Workspace
- Hit Next -> Browse and find your copied folder
- Click Finish
Create New Project
At minimum, you need a Linker file (loader.ld) and a specific startup file for a new project. You can copy loader.ld and cr_startup_lpc175x.cpp from the sample project into your new project. To create a new project, follow the steps below:
- Go to File -> New -> C++ Project
- Under ARM Cross Target Application click on Empty Project
- On the right side, choose ARM Windows GCC (Yagarto)
- Click Finish
Configure Project Settings
After you create a new project, you've still got several settings to configure!
- Right click on your project and go to Properties
- Browse to C/C++ Build --> Settings
- Click on Target Processor on the right side and select cortex-m3
- Click on Debugging and change the Debug level to none
- Click on ARM Yagarto Windows GCC Compiler --> Directories
- Include the directories of your project
- This is so that you will have to #include file's absolute path
- Repeat the same thing for ARM Yagarto Windows GCC C++ Compiler
- Click on ARM Yagarto Windows GCC C++ Compiler --> Miscellaneous
- Put check-mark on Do not use exceptions
- Put check-mark on Do not use RTTI
- You may want to turn on optimizations to Os
- C Optimizations are at ARM Yagarto Windows GCC Compiler --> Optimizations
- C++ Optimizations are at ARM Yagarto Windows GCC C++ Compiler --> Optimizations
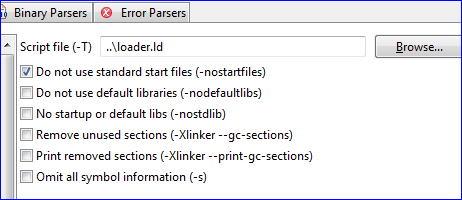
Most important project settings involve linker/loader file:
- Go to ARM Yagarto Windows GCC C++ Linker
- Click on General and if your loader.ld file is at project root, type in ../loader.ld next to Script file (-T)
- Put check-mark on Do not use standard start files
Eclipse Tricks
- Rename:
- Highlight the name to change then Ctrl+Shift+R
- Rename occurs globally in your project for all files.
- Auto Indent:
- Highlight the code to fix the indentation and press Ctrl+I
- Reformat Code:
- If a lot of code is not formatted, press Ctrl+Shift+F


