Difference between revisions of "S24: Team TerraByte"
m (→Wheel Encoder) |
m (→Motor Controller) |
||
| Line 359: | Line 359: | ||
== Motor Controller == | == Motor Controller == | ||
| − | |||
=== Hardware Design === | === Hardware Design === | ||
Revision as of 00:12, 25 May 2024
Contents
Title
TerraByte
Abstract
<2-3 sentence abstract>
Introduction
The project is divided into 5 modules:
- Sensor Node
- Motor Node
- Driver Node
- Geo Controller Node
- Android App
Team Members & Responsibilities
Gitlab Project Link - C243_TerraByte
| Module | Owner | Supporter |
|---|---|---|
| Sensor + Bridge | Vamsi Rushi Dhanekula | - |
| Driver + LCD | Minal Upadhye | Susmitha |
| Motor + ESC | Susmitha Ganesh | Minal |
| GPS + Geo Controller | Harikrishnan Kokkanthara Jeevan | - |
| App | Dikshant Kotla | Vamsi |
- Sensor & Bridge
- Motor
- Geographical
- Driver & LCD
- Android Application
- Link to Gitlab user1
Schedule
| Week# | Start Date | End Date | Task | Status |
|---|---|---|---|---|
| 1 | 03/04/2024 | 03/10/2024 |
|
Completed |
| 2 | 03/04/2024 | 03/10/2024 |
|
Completed |
| 3 | 03/11/2024 | 03/17/2024 |
|
Completed |
| 4 | 03/18/2024 | 03/24/2024 |
|
Completed |
| 5 | 03/25/2024 | 03/31/2024 |
|
Completed |
| 6 | 04/01/2024 | 04/07/2024 |
PROTOTYPE 1
|
Completed |
| 7 | 04/08/2024 | 04/14/2024 |
|
Completed |
| 8 | 04/15/2024 | 04/21/2024 |
PROTOTYPE 2
|
Completed |
| 9 | 04/22/2024 | 04/28/2024 |
|
Completed |
| 10 | 04/29/2024 | 05/05/2024 |
PROTOTYPE 3
|
Completed |
| 11 | 05/06/2024 | 05/12/2024 |
PROTOTYPE 4
|
Completed |
| 12 | 05/13/2024 | 05/19/2024 |
|
Completed |
Parts List & Cost
| Item# | Part Desciption | Vendor | Qty | Cost |
|---|---|---|---|---|
| 1 | RC Car - Traxxas Slash 2Wd BL | Traxxas [1] | 1 | $260.00 |
| 2 | SJ2 boards | CMPE SCE | 4 | $50.00 each |
| 3 | CAN Transceivers | Adafruit [2] | 4 | $3.95 each |
| 4 | LCD module 20*4 | GeekPi [3] | 1 | $0.00 |
| 5 | Bluetooth module | Adafruit [4] | 1 | $0.00 |
| 6 | Ultrasonic Sensors | Adafruit [5] | 4 | $0.00 |
| 7 | GPS module | Adafruit [6] | 1 | $0.00 |
| 8 | Compass | Adafruit [7] | 1 | $0.00 |
| 9 | GPS Antenna | ? | 1 | $0.00 |
| 10 | RPM Sensors | - | 1 | $12.00 |
| xx | DB9 connector female | Amazon [8] | 1 | $9.99 |
| xx | Jumper wires | Amazon [9] | 2 | $6.98 each |
| xx | Bread boards | Amazon [] | 2 | $0.00 each |
Printed Circuit Board
<Picture and information, including links to your PCB>
CAN Communication
<Talk about your message IDs or communication strategy, such as periodic transmission, MIA management etc.>
Hardware Design
<Show your CAN bus hardware design>
DBC File
Gitlab link to your DBC file -- https://gitlab.com/minalupadhye/C243_terrabyte/-/blob/master/dbc/project.dbc?ref_type=heads
Sensor Controller & Bridge
<Picture and link to Gitlab>
Hardware Design
Software Design
<List the code modules that are being called periodically.>
Technical Challenges
< List of problems and their detailed resolutions>
Driver Controller & LCD
<Picture and link to Gitlab>
Hardware Design
The SJ2 board hosting the driver module is connected to -
- CAN bus :
- LCD on I2C :
- Sensor LEDs :
Software Design
Driver module has 2 main objectives
- Process the input from sensor and geo module and provide control output to motor module.
- Display important information on the LCD.
Driver_logic() is the core part which manages the entire module.
Receive Handling/Data Processing
void periodic_callbacks__10Hz(uint32_t callback_count) {
  gpio__toggle(board_io__get_led1());
  can_bus_handler__process_all_received_messages();
  can_bus_handler__transmit_messages();
  driver_mia__manage_mia(10);
}
Technical Challenges
< List of problems and their detailed resolutions>
Motor Controller
Hardware Design
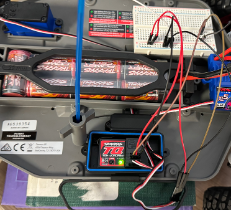
The motor controller, is the SJ2 board linked to powertrain, wheel encoder and CAN transceiver, which manages the motor's operation. It follows the direction and speed instructions provided by the Driver module. Additionally, it measures the wheel speed and maintains the preset speed across different terrains. This wheel speed data is transmitted to the Sensor-Bridge module for display on the Android App.
Powertrain
We used Traaxas Slash XL5 RWD for this project. The ESC (XL-5), BLDC motor, servo motor and battery come with the RC car. The 6V 3000mAh NiMH battery powers the ESC (XL-5), servo and BLDC motor. The ESC controls the BLDC however the servo is not connected via the ESC. The BLDC controls the forward, reverse and brake motion of the car along with the respective speed in the forward and reverse direction. The servo controls the steer angle. Brake and speed in both forward and reverse in case of BLDC motor and steer angle in case of Servo motor are controlled by PWM signals.
The ESC operates in 3 different modes as per the user manual, we choose to operate the car in Training mode where the forward and reverse speeds are half its original speeds. The maximum speed the car could reach is around 30Kmph in this mode. This mode can be set by long pressing the button on the ESC and releasing the button when there are 3 consecutive red blinks.
For the RC car the PWM signals are provided by the Radio Transmitter + Remote. We tried to understand the sequence of PWM that is to be provided to keep the ESC calibrated, for forward, reverse and brake by providing the commands on the remote and checking the waveform on oscilloscope.

The following were our observations which helped us develop motor control module:
| STATE | PWM | COMMENTS |
|---|---|---|
| ESC Calibration | 15% |
|
| Forward | 15.1% to 20% | Speed increases with the PWM dutycycle |
| Brake |
| |
| Reverse | 10% to 14.9% | Speed increases with the decrease in PWM dutycycle |
| Right | 15.1% to 20% | Angle increases with the PWM dutycycle |
| Left | 10% to 14.9% | Angle increases with decrease in PWM dutycycle |
| No steer | 15% |
Wheel Encoder
We opted reed switch for wheel encoding.
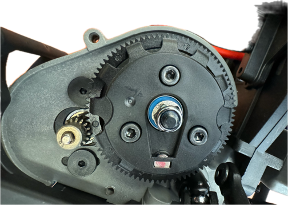
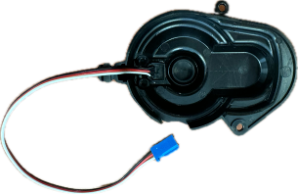
Placement : The magnet, along with its holder, was positioned on the spur gear, while the reed switch was housed within the casing covering the spur gear. The reed switch is connected between GPIO pin and ground. (NOTE: All GPIO pins of SJ2 board are pulled up to 3.3 V).
The reed switch is usually open (giving a 3.3V when observed on oscilloscope) but when it crosses the magnet the reed switch closes giving a 0V. The number of edge falls in a minute gives the rpm. This is converted into linear speed by considering the circumference of wheel and gear to wheel ratio (since the wheel encoder was placed in the spur gear every 2.73 rotations of spur gear yields 1 rotation of wheel).


Software Design
<List the code modules that are being called periodically.>
Technical Challenges
< List of problems and their detailed resolutions>
Geographical Controller
<Picture and link to Gitlab>
Hardware Design
Software Design
<List the code modules that are being called periodically.>
Technical Challenges
< List of problems and their detailed resolutions>
Master Module
<Picture and link to Gitlab>
Hardware Design
Software Design
<List the code modules that are being called periodically.>
Technical Challenges
< List of problems and their detailed resolutions>
Mobile Application
<Picture and link to Gitlab>
Hardware Design
Software Design
<List the code modules that are being called periodically.>
Technical Challenges
< List of problems and their detailed resolutions>
Conclusion
<Organized summary of the project>
<What did you learn?>
Project Video
Project Source Code
Advise for Future Students
<Bullet points and discussion>
Acknowledgement
=== References ===
