Difference between revisions of "S24: Team Falcons"
(→Technical Challenges) |
(→Technical Challenges) |
||
| Line 372: | Line 372: | ||
* '''Problem''': The GPS was giving no parsed outputs. | * '''Problem''': The GPS was giving no parsed outputs. | ||
** '''Solution''': The issue was traced back to soldering errors. The TX and RX wires were not swapped correctly; the TX of the board needed to connect to the RX of the GPS module, and vice versa. | ** '''Solution''': The issue was traced back to soldering errors. The TX and RX wires were not swapped correctly; the TX of the board needed to connect to the RX of the GPS module, and vice versa. | ||
| + | |||
| + | * '''Problem''': GPS was not acquiring stable lock inspite of testing it in open space and having the antenna connected. | ||
| + | ** '''Solution''': A button cell was added to the GPS module in the slot (rear side) provided in the module which enabled it to acquire locks faster. | ||
* '''Problem''': GPS parsing was incorrect and not returning proper data. | * '''Problem''': GPS parsing was incorrect and not returning proper data. | ||
Revision as of 02:00, 20 May 2024
Contents
Project Title
Falcons
Abstract
The Falcon RC car project is the combined efforts of our team to create an autonomously RC Car that avoids all obstacles and follow GPS to reach the destination. Here, we have put in all our experience in software design, hardware design, unit testing, power systems, and mobile application development. Project development started in March of 2024 and ended in May 2024.
Introduction
The project was divided into 4 modules:
- Sensor and Bridge Controller
- Driver Controller
- Geo Controller
- Motor Controller
Driver controller is the master controller that receive inputs from sensor controller and geo controller, and gives output commands to motor controller. The destination coordinate is send from Android application to sensor node via Bluetooth. The app also send a hard start and stop to the car. The car starts only on receiving start signal from the app and stops completely on receiving stop signal from app.
Team Members & Responsibilities
<Team Picture>
Gitlab Project Link - https://gitlab.com/jincyjose491/sjtwo-c[1]
- Sensor
- Link to Gitlab user1
- Link to Gitlab user2
- Motor
- Link to Gitlab user1
- Link to Gitlab user2
- Geographical
- Link to Gitlab user1
- Link to Gitlab user2
- Communication Bridge Controller & LCD
- Link to Gitlab user1
- Link to Gitlab user2
- Android Application
- Link to Gitlab user1
- Link to Gitlab user2
- Testing Team
- Link to Gitlab user1
- Link to Gitlab user2
Schedule
| Week# | Start Date | End Date | Task | Status |
|---|---|---|---|---|
| 1 | 02/22/2024 | 02/26/2024 |
|
Completed |
| 2 | 02/26/2024 | 03/10/2024 |
|
Completed |
| 3 | 03/10/2024 | 03/12/2024 |
|
Completed |
| 4 | 03/12/2024 | 03/19/2024 |
|
Completed |
| 5 | 03/19/2024 | 03/26/2024 |
|
Completed |
| 6 | 03/26/2024 | 04/02/2024 |
|
completed |
| 7 | 04/02/2024 | 04/09/2024 |
|
Completed |
| 8 | 04/09/2024 | 04/16/2024 |
|
Not completed |
| 9 | 04/16/2024 | 04/23/2024 |
|
Not completed |
| 10 | 04/23/2024 | 04/30/2024 |
|
Not completed |
| 11 | 04/30/2024 | 05/07/2024 |
|
Not completed |
Parts List & Cost
| Item# | Part Desciption | Vendor | Qty | Cost |
|---|---|---|---|---|
| 1 | RC Car | Traxxas | 1 | $265.00 |
| 2 | SJ2 boards | CMPE SCE | 4 | $50.00 each |
| 3 | CAN Transceivers | Adafruit [2] | 4 | $3.95 each |
| 4 | Ultrasonic sensor | Adafruit [3] | 4 | $114.00 |
| 5 | GPS PA1616S BREAKOUT | Digikey [4] | 1 | $29.95 |
| 6 | LSM303AGR ACC COMPASS | Digikey [5] | 1 | $12.50 |
| 6 | LSM303AGR ACC COMPASS | Digikey [6] | 1 | $12.50 |
| 7 | LCD Display | Amazon [7] | 1 | $12.99 |
| 8 | RPM sensor | Traxxas [8] | 1 | $12.00 |
Printed Circuit Board
<Picture and information, including links to your PCB>
CAN Communication
<Talk about your message IDs or communication strategy, such as periodic transmission, MIA management etc.>
Hardware Design
<Show your CAN bus hardware design>
DBC File
<Gitlab link to your DBC file> <You can optionally use an inline image>
Sensor ECU
<Picture and link to Gitlab>
Hardware Design
Software Design
<List the code modules that are being called periodically.>
Technical Challenges
< List of problems and their detailed resolutions>
Motor ECU
<Picture and link to Gitlab>
Hardware Design
Software Design
<List the code modules that are being called periodically.>
Technical Challenges
< List of problems and their detailed resolutions>
Geographical Controller
Geo controller: https://gitlab.com/jincyjose491/sjtwo-c/-/tree/master/projects/geo_controller?ref_type=heads
Navigation in modern systems seamlessly integrates GPS with compass technology to enhance driving experience and safety. GPS provides accurate location data by communicating with satellites, while the compass offers directional orientation of the vehicle. This combination is essential also in the RC car project as it enables the vehicle to autonomously maneuver to a given detsination coordinate. The GPS modules keeps track of the current position of the car, provides the direction that the car should move towards and the compass module keeps track of the direction in which the car is actually heading. Integrating the two modules, an algorithm has been developed as elaborated below to achieve the complete autonomous functionality.
Hardware Design
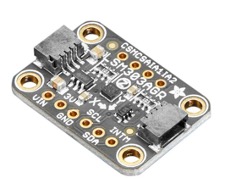
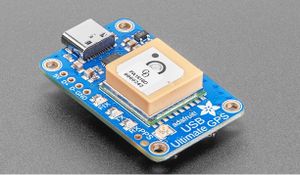
The Geo controller is interfaced to both the GPS module and the compass modules. Both these modules are powered using stable 3.3V inputs which are derived from the SJ Two boards. The GPS communicates with the board via UART and is connected to the controller at the P4.28 and P4.29, Rx and TX pins respectively. The GPS requires an antenna which is interfaced to the module via a UFL to SMA connector. Though the GPS module houses an led to indicate FIX on GPS lock, the led3 of SJTwo board was used to also show lock acquired after GPS string was received. The compass module communicates with the board via I2C and is connected at P0.10 SDA and P0.11 SCL pins respectively. As part of the hardware design, the compass module was mounted on a separate long pole, away from other interferences. The led1 of SJTwo board was used to indicate a successful comapss read.
<Layout pic>
Software Design
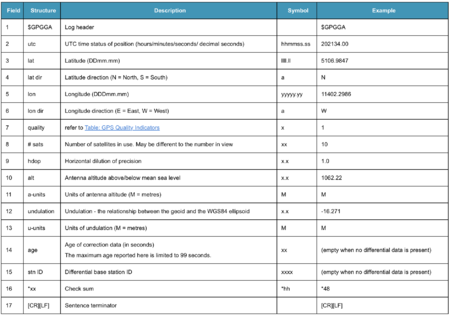
The GPS module provides data in the form of NMEA strings. NMEA (National Marine Electronics Association) is a standard protocol used by GPS receivers to transmit data. These strings contain various pieces of information, such as latitude, longitude, altitude, and time. The data bytes sent from the GPS module through UART are first loaded into a line buffer. The algorithm then parses this buffer to capture the specific $GPGGA strings that includes the correct position, time, and fix status.
<GPS parsing code>
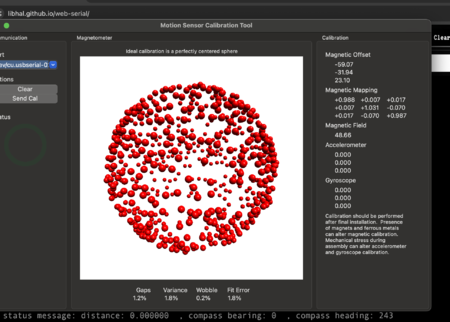
The compass module required calibration to provide accurate results. This was accomplished using MotionCal software, interfaced with an Arduino. After determining the hard and soft iron offsets, these values were applied in the code to perform software-based compass calibration. The compass heading relative to true north was then calculated based on the mounting direction. Proper register configuration was necessary to initialize the module and read the compass readings accurately.
<Compass calib and calculation code>
Technical Challenges
As the geo logic came as the final step in the project, it could only be tested thoroughly after all other modules performed reliably. Several issues were identified and resolved on the geo controller side:
- Problem: The compass was giving unreliable values and not pointing to true north.
- Solution: The compass needed to be calibrated for the environment in which it was used, especially with the motor running.
- Problem: The compass was giving a fixed range of values 170-250 dgrees, instead of the full 0-359 range, despite repeated calibrations.
- Solution: The register configurations had to be updated. Specifically, the block data update needed to be set, and offset cancellation had to be enabled.
- Problem: The GPS was giving no parsed outputs.
- Solution: The issue was traced back to soldering errors. The TX and RX wires were not swapped correctly; the TX of the board needed to connect to the RX of the GPS module, and vice versa.
- Problem: GPS was not acquiring stable lock inspite of testing it in open space and having the antenna connected.
- Solution: A button cell was added to the GPS module in the slot (rear side) provided in the module which enabled it to acquire locks faster.
- Problem: GPS parsing was incorrect and not returning proper data.
- Solution: The line buffer size was increased, and it was ensured that a lock was obtained before reading the data.
Communication Bridge Controller & LCD
<Picture and link to Gitlab>
Hardware Design
Software Design
<List the code modules that are being called periodically.>
Technical Challenges
< List of problems and their detailed resolutions>
Driver Node
Gitlab Link: https://gitlab.com/jincyjose491/sjtwo-c/-/tree/master/projects/driver?ref_type=heads
Hardware Design
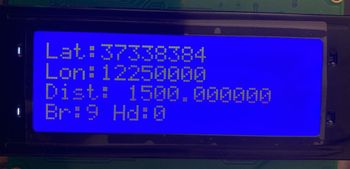
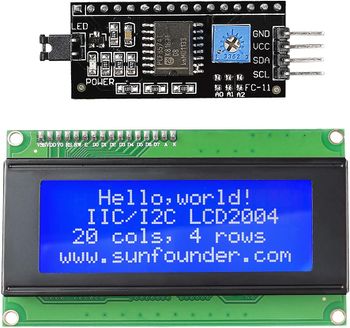
Driver node gives the interconnection between input and output. It receives input from geo node and sensor node and give commands to the motor node. The only hardware driver has is the LCD display and CAN transceiver. The LCD display used is a SunFounder IIC I2C TWI Serial 2004 20x4 LCD Module and is interfaced through an I2C bus through the I2C2 port. The module used and pin connections for LCD is shown below.
|
Software Design
Driver has more software and less hardware. For navigation, there are two algorithms - obstacle avoidance and GPS navigation. Obstacle avoidance has precedence over GPS navigation. In case of any obstacle, car avoids obstacle. In other cases, it follows the path from geo node input. When the destination is reached, car slows down and stops.
Obstacle Avoidance
The obstacle avoidance code is written in the form of a truth table that has 4 bit input and one bit output. Inputs are four sensor values and output the motor commands. Bases on changes in sensor values, the motor command also changes. The logic that worked for us is given below
|
For GPS navigation the angle difference between heading and bearing is calculated and motor turn commands are generated based on this. Heading gives the current position in angle with respect to north. Bearing gives the angle to destination with respect to north. The logic that worked for our hardware is given below:
|
Technical Challenges
Since driver comes as the interconnect between all other nodes, the driver logic could be verified by outside testing only when we had stable input from geo and sensor node and motor nodes working as expected for given PWM. Unit testing can help in building of logic. But for actual test, we have to make sure all inputs are reliable. This can be verified with debug messages on bluetooth, CAN messages on busmaster, LCD display or LED indicators. The verification or debugging should be done in same frequency as which driver is processing.
- Problem: LCD was not displaying anything.
- Solution: Initially tried with 3.3V supply, then 5V supply and finally added level shifter to I2C pins. But the issue was slave address given in the datasheet was wrong. I got the correct slave address from web serial. After this was corrected, LCD worked well with 3.3V.
- Problem: LCD flickered a lot when everything was connected together.
- Solution: We initially connected all 5V supplies to a single 5V source. This included servo motor also. And it was causing the flicker. So, we powered up servo and rpm from ESC, all other sensors were powered separately from power bank and the issue was solved. This problem could have been avoided if more reports were read on how to power everything up.
- Problem: Driver gave a reverse signal for one clock cycle when there was no obstacle.
- Solution: Sensors gave random value for just one clock cycle and this caused driver to generate reverse command. After sensor inputs were corrected and made stable, the problem was solved.
- Problem: Driver not able to correct turning commands to motor even after sensing obstacle on side. This happened in the clock cycle when there was obstacle on all three side and it took reverse.
- Solution: We gave steps in angle changes in size of 5. Instead of direct 45 degree turn, car always turned in steps. So even though it sensed obstacle step sized turn angles took long clock cycles. So I finally reverted back to simple code logic of 45 degree turn and obstacle avoidance started working perfectly.
- Problem: We thought driver was giving wrong commands to sensor values that was there on app.
- Solution: Sensor values were updated at 1 Hz. Driver was working at 10Hz which is 10 times faster than what we see on app. So incorrect sensor value for just one cycle was not displayed. Finally debugged it in a hard way from all debugging sources listed above.
Mobile Application
<Picture and link to Gitlab>
Hardware Design
Software Design
<List the code modules that are being called periodically.>
Technical Challenges
< List of problems and their detailed resolutions>
Conclusion
<Organized summary of the project>
<What did you learn?>
Project Video
Project Source Code
Advise for Future Students
- Make sure you have a clear idea on how to power up every modules in the project. This require careful distribution of power across the boards, sensors, motors. Connect everything together in the initial stage to see if entire module can work well when connected together. Doing this at an early stage helps to understand how to correctly power up everything. Again, you'll get an idea on which all modules should/should not be connected together, which module require additional power source, etc. from previous reports. Most of your problems could be solved from previous year reports. Don't limit yourself to 2-3 reports. Read more.. It'll be useful.
- Try to interface everything and see if communication is reliable between the nodes. Do this early so that you can work on project requirements.
- Find out your motor PWM for forward, neutral and reverse as soon as you get the car. You can save time here.
- Simplify the wire connections to save time when you meet. When we met in the initial few weeks, most of the time was spent on connecting everything from scratch and figuring out why something is not working.
- Get good quality hardware so that you don't have to invest more time here.
Acknowledgement
We would like to thank our instructor, Preet, for all his efforts in our class and all motivation and guidance lifelong. We have learnt so much about unit testing, C coding, software-hardware integration, team work, git and documentation, all because of Preet.
We also have to acknowledge all the teams who came before us, their reports helped us a lot.
