Difference between revisions of "S14: Asset Management and Location System"
Proj user7 (talk | contribs) (→Software Design) |
Proj user7 (talk | contribs) (→Software Design) |
||
| Line 254: | Line 254: | ||
In addition, Asset Management task controlled the Bluetooth and LCD devices that were represented by singleton design pattern: | In addition, Asset Management task controlled the Bluetooth and LCD devices that were represented by singleton design pattern: | ||
| − | [[File: | + | [[File:cmpe244_s14_am_bluetooth_class_diagram.png|center|frame|User Menu]] |
[[File:test.png|center|frame|User Menu]] | [[File:test.png|center|frame|User Menu]] | ||
Revision as of 06:48, 21 May 2014
Contents
Grading Criteria
- How well is Software & Hardware Design described?
- How well can this report be used to reproduce this project?
- Code Quality
- Overall Report Quality:
- Software Block Diagrams
- Hardware Block Diagrams
- Schematic Quality
- Quality of technical challenges and solutions adopted.
S14: Asset Management and Location System
Abstract
The ultimate vision of this project is to develop an asset management and location system to compete with The Tile App. There are two major components to the Tile solution: the tracker and the application. The tracker is small low-power embedded system that can be attached to an object. The application is primarily a user interface that provides visual feedback to guide a user to a specified tag.
Objectives & Introduction
Objectives
- To track a tile location within 100 meters
- To add/register tiles to user
- To remove tiles from user tiles database
- Display a histogram of tile vicinity
Team Members & Responsibilities
- Akash Ayare
- Pardeep Badhan
- Talha Ilyas
Schedule
Show a simple table or figures that show your scheduled as planned before you started working on the project. Then in another table column, write down the actual schedule so that readers can see the planned vs. actual goals. The point of the schedule is for readers to assess how to pace themselves if they are doing a similar project.
| Week | Date | Planned | Actual |
|---|---|---|---|
| 1 | 3/6 | Create Wiki page and add the schedule of the project. | Wiki page was created and preliminary scheduling was added. |
| 2 | 3/13 | Research on Bluetooth and Zigbee radio technologies. | Compared Bluetooth and Zigbee range and power consumption.
Although Zigbee has slightly better power consumption and better range, decision was made to use Bluetooth for the project to keep similarity with Tile project. |
| 3 | 3/20 | Order parts and research RSSI | Parts were not ordered mainly due to the number of options available; more research was still needed.
Instead, the team registered with GitLab. Project "lpc1758_freertos" was checked in as the base project. Furthermore, the team trained on Git workflow and branching methodology. |
| 4 | 3/27 | Interface Bluetooth Modules. | Ordered Class 1 Bluetooth version 2 modules. |
| 5 | 4/3 | Achieve basic Bluetooth communication. | Basic connectivity achieved.
Hercules Setup software was used to connect to the Bluetooth Serial port. |
| 6 | 4/10 | Fetch RSSI value from the Bluetooth module. | Discovered there are two ways to fetch the RSSI value. One mode worked better over the other, but it was slower. In a open room, with one of the modes, there wasn't significant change in RSSI value when proximity changed. The second mode provided better distance estimation, but it was slower to fetch RSSI value in this mode. |
| 7 | 4/17 | Experiment how this value changes with proximity. | Started interfacing with the Bluetooth module with SJ One Board instead of Hercules.
Also, added a task to receive Bluetooth data and display it on console. |
| 8 | 4/24 | Implement visual indicator (histogram) corresponding to RSSI values. | Interfaced LCD screen with SJ One Board.
Added tasks to control the user menu and monitor switches, and user menu infrastructure that:
|
| 9 | 5/1 | Packaging, battery installation, and testing. Expansion of feature-set | Enhanced features:
|
| 10 | 5/8 | Demo | The demo was postponed to 05/22
Enhanced features:
|
| 10 | 5/15 | Fixed bugs:
Enhanced features:
| |
| 10 | 5/22 | More feature development:
|
Parts List & Cost
| Item | Part Name | Part Cost | Qty | Total Cost |
|---|---|---|---|---|
| 1 | LPC1758 SJSU One Board | $80 | 1 | $80 |
| 2 | SparkFun BlueSMiRF Gold] | $64.95 | 2 | $209.90 |
| 3 | SparkFun Bluetooh Mate Gold | $64.95 | 1 | $274.85 |
| 4 | Serial Enabled 16x2 LCD | $24.95 | 1 | $299.80 |
Design & Implementation
The design section can go over your hardware and software design. Organize this section using sub-sections that go over your design and implementation.
Hardware Design
Discuss your hardware design here. Show detailed schematics, and the interface here.
Hardware Interface
SJSU One UART3 is interfaced with the Bluetooth module at 115200 bps with RX and TX queue depth of 1000 elements, respectively using the supplied UART3 driver. The following table depicts the connections:
| SJSU One | Peripheral | ||
|---|---|---|---|
| Power | 3.3V | VCC | Bluetooth |
| Ground | GND | GND | |
| N/A | CTS-I | RTS | |
| UART3 | TX | RX - O | |
| RX | TX - O | ||
| Power | 3.3V | VCC | LCD |
| Ground | GND | GND | |
| UART2 | TX | RX | |
Software Design
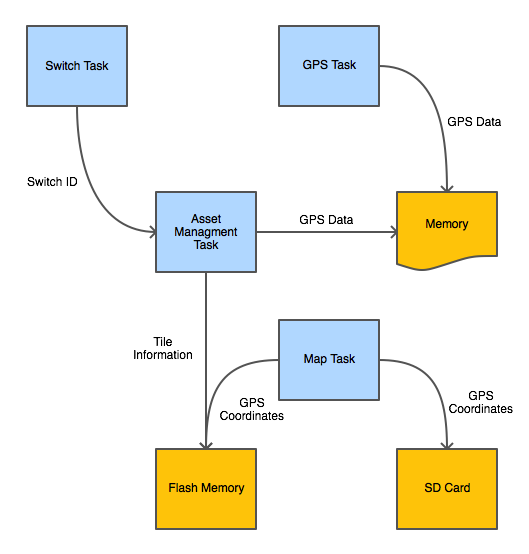
Asset Management and Location System consists of three tasks:
- Switch Task - Monitors the switches via which the user navigates the user menu
- GPS Task - Fetches the current location from the GPS module
- Asset Management Task - Controls the user menu navigation and Bluetooth module.
The interface between these tasks is described in the figure below:
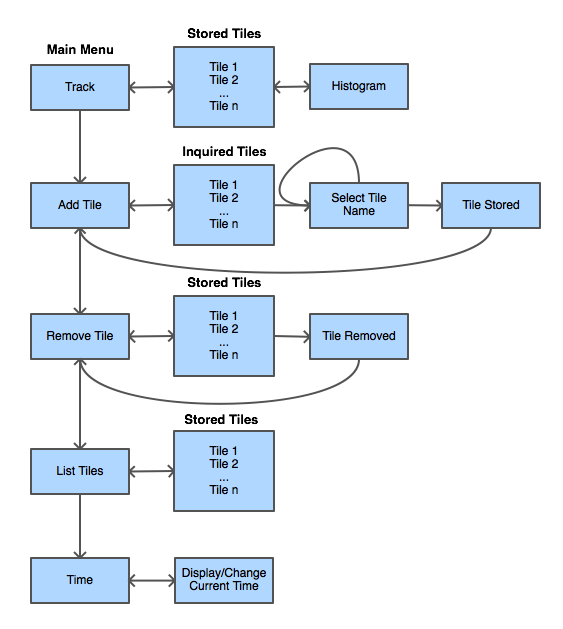
The Asset Management task manages the user menu based on events received from the Switch task. The user menu can be navigated in the following manner:
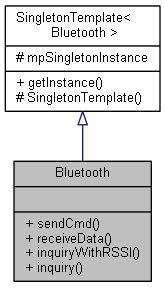
In addition, Asset Management task controlled the Bluetooth and LCD devices that were represented by singleton design pattern:
Implementation
This section includes implementation, but again, not the details, just the high level. For example, you can list the steps it takes to communicate over a sensor, or the steps needed to write a page of memory onto SPI Flash. You can include sub-sections for each of your component implementation.
Testing & Technical Challenges
Describe the challenges of your project. What advise would you give yourself or someone else if your project can be started from scratch again? Make a smooth transition to testing section and described what it took to test your project.
Include sub-sections that list out a problem and solution, such as:
My Issue #1
Discuss the issue and resolution.
Conclusion
Conclude your project here. You can recap your testing and problems. You should address the "so what" part here to indicate what you ultimately learnt from this project. How has this project increased your knowledge?
Project Video
Upload a video of your project and post the link here.
Project Source Code
Send me your zipped source code and I will upload this to SourceForge and link it for you.
References
Acknowledgement
Any acknowledgement that you may wish to provide can be included here.
References Used
List any references used in project.
Appendix
You can list the references you used.


