Difference between revisions of "F17: FoxP2"
Proj user5 (talk | contribs) (→Validation and Testing Plan) |
Proj user5 (talk | contribs) (→Implementation) |
||
| Line 508: | Line 508: | ||
This section includes implementation, but again, not the details, just the high level. For example, you can list the steps it takes to communicate over a sensor, or the steps needed to write a page of memory onto SPI Flash. You can include sub-sections for each of your component implementation. | This section includes implementation, but again, not the details, just the high level. For example, you can list the steps it takes to communicate over a sensor, or the steps needed to write a page of memory onto SPI Flash. You can include sub-sections for each of your component implementation. | ||
| + | |||
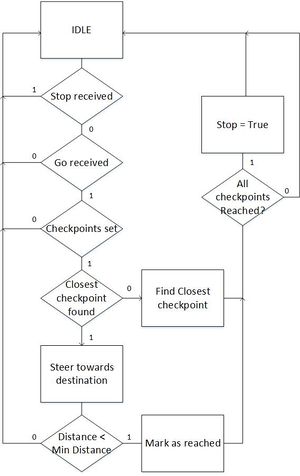
| + | [[File:CMPE243_F17_FOXP2_geo_checkpoint_algo.jpg|300px]] | ||
== Android Application == | == Android Application == | ||
Revision as of 05:37, 17 December 2017
Contents
- 1 Grading Criteria
- 2 FOXP2
- 3 Abstract
- 4 Objectives & Introduction
- 5 Schedule
- 6 Parts List & Cost
- 7 Overall Design and Methodology
- 8 LCD
- 9 Sensors
- 10 Motor Controller
- 11 Geographical Controller
- 12 Android Application
- 13 SCons - Build Automation
- 14 Validation and Testing Plan
- 15 Testing & Technical Challenges
- 16 Conclusion
- 17 References
Grading Criteria
- How well is Software & Hardware Design described?
- How well can this report be used to reproduce this project?
- Code Quality
- Overall Report Quality:
- Software Block Diagrams
- Hardware Block Diagrams
- Schematic Quality
- Quality of technical challenges and solutions adopted.
FOXP2
Abstract
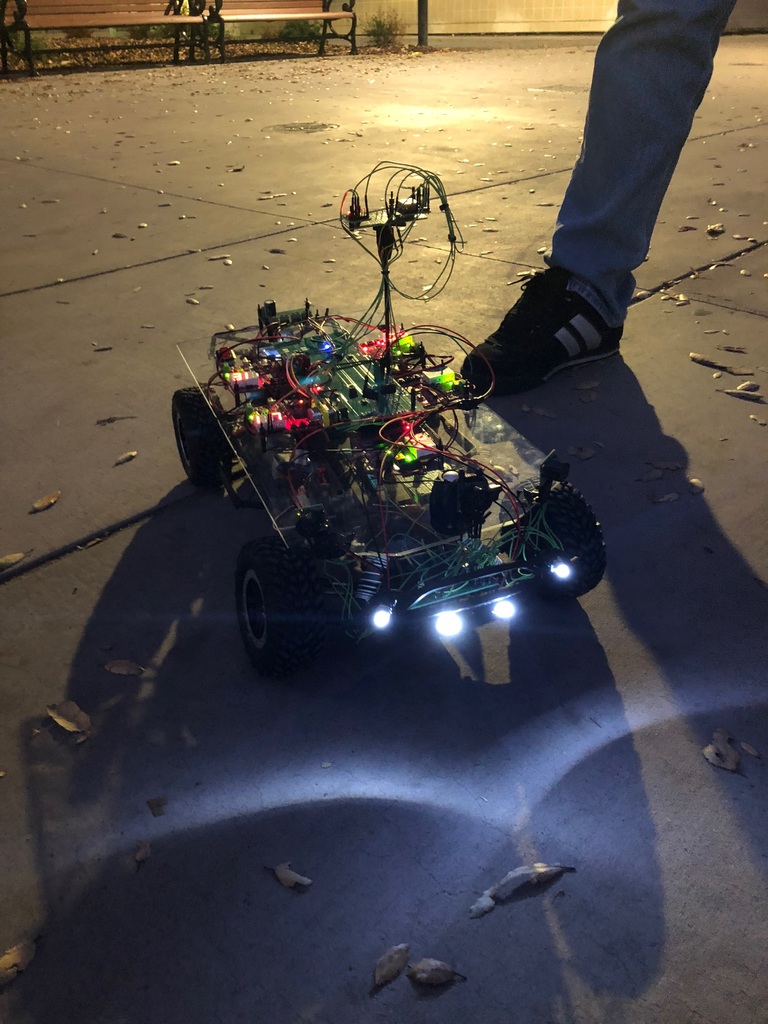
This project entails the aggregated knowledge from the Embedded System courses offered at SJSU leveraged into a fully functioning self-driving vehicle. This vehicle will navigate the terrain, avoid obstacles, and relay feedback to the user. The Initialization is enabled using the custom application which will set the final destination using GPS and destination node.
Objectives & Introduction
Show list of your objectives. This section includes the high-level details of your project. You can write about the various sensors or peripherals you used to get your project completed.
Team Members & Responsibilities
- R Nikfar
- Team Lead
- Electrical Circuits Engineering
- PCB design
- Sensor testing and implementation.
- Jason Tran
- Sensor IO Implementaion, and testing
- Master controller.
- Ahsan Uddin
- Git Admin
- Motor Control.
- Yuyu Chen
- GPS module implementation
- Bridge Support
- Marvin Flores
- Android Application development
- Bridge Implementation
- Rabeel Elahi
- Master Controller Implementation.
- Sophia Quan
- LCD interface
- Motor Control.
- Michael Jaradah
- Testing.
- Taylor Kearns
- Testing.
- Bohan Liu
- Master Controller.
Schedule
Show a simple table or figures that show your scheduled as planned before you started working on the project. Then in another table column, write down the actual schedule so that readers can see the planned vs. actual goals. The point of the schedule is for readers to assess how to pace themselves if they are doing a similar project.
| Week# | Date | End Date | Task | Status | Completion Date | |
|---|---|---|---|---|---|---|
| 1 | 10/8/2017 | 10/14/2017 | Geographical: Order GPS and Compass
Android: Setup Android Studio; Run test application Motor: PWM proof of concept Sensors: Research and requirement for the proper front and reverse sensors. IO design. PCB: Initial design of PCB without peripherals was Completed. Master: Research Self-driving car algorithm. |
Completed
Completed Completed Completed Completed Completed |
Android & Bridge: 10/21/2017 | |
| 2 | 10/15/2017 | 10/21/2017 | Geographical: Interface with micro-controller to receive raw data
Android & Bridge: Initial App UI running. Create a solid plan for checkpoint algorithm. Motor: Run the car in straight line in manual mode. Sensors: Purchase and create the protocols and IO. Master: Start the design of the master controller for all IO. |
Completed
On-going Completed Completed On-going |
Geographical: 10/21/2017 Android & Bridge: 10/28/2017 | |
| 3 | 10/22/2017 | 10/28/2017 | Geographical: Implement algorithm to parse GPS NMEA sentence and calibrate compass
Android & Bridge: Checkpoint algorithm implemented. Phone to SJSUOne board communication setup. Motor: LCD Display initial integration Sensors: Initialize testing and debugging on the sensors. Master: Set priorities for the connected IO, and design a flowchart of the whole system |
Geographical: Completed Android & Bridge: Completed Delayed due to shipping issues |
Geographical: 10/28/2017 Android & Bridge: 11/04/2017 | |
| 4 | 10/29/2017 | 11/04/2017 | Geographical: Integrate GPS and compass together to get heading, bearing, and distance
Android & Bridge: Checkpoint algorithm testing. Full Communication with SJSUOne board implemented. Motor: Implement Speed and Voltage sensor. Full functional motor system that can support Gateway Sensors: Implement the IO and sensors with the master controller. PCB: initial design sent out to be printed. Master: Create and Design the Algorithm to handle IO from sensors and output motor controls. |
Completed
Geographical: Completed Android & Bridge: Completed Master: Completed |
Geographical: 11/04/2017 Android & Bridge: 11/11/2017 | |
| 5 | 11/05/2017 | 11/11/2017 | Geographical: Update DBC with Bridge controller and interface with other nodes on CAN bus
Android & Bridge: Other commands such as start and stop implemented and tested. Checkpoint algorithm finalized. Motor: Implement full functional LCD and Speed sensor feedback control Sensors: Further testing and fine-tuning of sensors for a fluid and seamless drive. Master: Testing of Signals, CAN, and behavior of the vehicle. |
Geographical: On-going Android & Bridge: Completed Master: On-going |
Geographical: 11/11/2017 Android & Bridge: 11/18/2017 | |
| 6 | 11/12/2017 | 11/18/2017 | Geographical: Calibrate compass with car
Motor: Reverse end to end system integration test Android & Bridge: Forward commands to GEO board Sensors: Improve filtering algorithm. Develop proof of concept for TOF sensors. |
Android & Bridge: Completed Motor: Completed |
Geographical: 11/14/2017 Android & Bridge: 11/25/2017 | |
| 7 | 11/19/2017 | 11/25/2017 | Geographical: Checkpoint algorithm
Motor: Speed integration check for final speed settings Android & Bridge: Receive messages from GEO & SENSOR. Add features to the app to display sensor values. Sensors: Compare TOF sensor viability. Look into other forms of measurement such as voltage, etc. |
Android & Bridge: Completed Motor: Completed |
Geographical: 11/25/2017 Android & Bridge: 11/25/2017 | |
| 8 | 11/26/2017 | 12/02/2017 | Geographical: System testing
Motor: Code freeze after feature complete. Clean up and unit test Android & Bridge: Implement auto-connect. Sensors: System testing |
Android & Bridge: Completed Motor: Completed |
Geographical: 12/02/2017 Android & Bridge: 12/02/2017 | |
| 9 | 12/03/2017 | 12/09/2017 | Geographical: System testing
Android & Bridge: Testing Sensors: System testing |
|||
| 10 | 12/10/2017 | 12/16/2017 | Geographical: Testing | Android & Bridge: Testing | ||
| 11 | 12/17/2017 | 12/20/2017 | Demo autonomous car on 12/20 |
Parts List & Cost
| Item# | Part Desciption | Vendor | Qty | Cost $ |
|---|---|---|---|---|
| 1 | RC Car | Amazon | 1 | 240.00 |
| 2 | SJOne board | Preet | 7 | 560.00 |
| 3 | GPS Module | Adafruit | 1 | 40.00 |
| 4 | Compass | Sparkfun | 1 | 15.00 |
| 5 | Bluetooth Module | Sparkfun | 1 | 24.95 |
| 6 | LIPO Batteries + Charger | 1 | 130.00 | |
| 7 | Ultrasonic sensor | Maxbotix | 5 | 150.00 |
| 8 | PCB | Bay Area Circuits | 2 | 75.00 |
| 9 | DB9 Connector + PCB components | HSC | 1 | 40.00 |
| 10 | CAN Transceiver | Microchip | 10 | 20.00 |
| 11 | LED HeadLights | Amazon | 1 | 30.00 |
Overall Design and Methodology
Board Connection Architecture
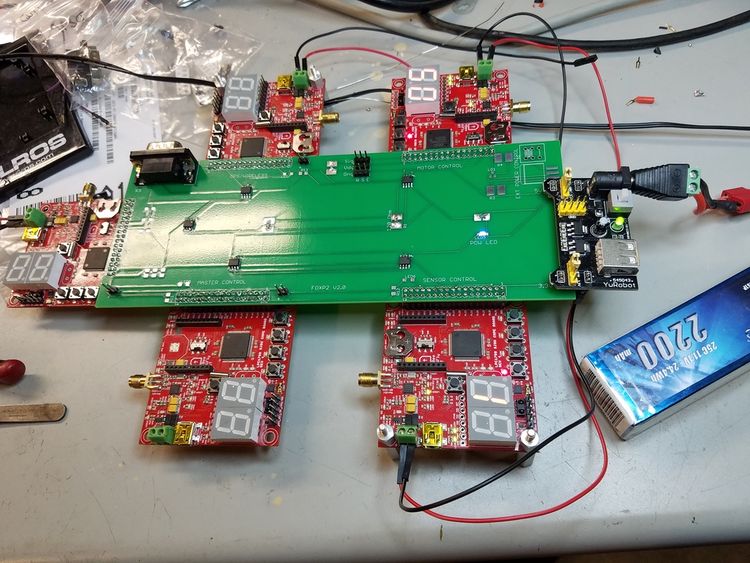
Our team's approach to the design of this project was solely based on the integrity of its connections and communication between the nodes. Each node would handle specific parts of the car that would require an extensive amount of computing. At the center of this communication would be our design and printed PCB(printed circuit board). This board was designed in a manner that would reduce the amount of noise within the circuitry of its components, and place its nodes at an optimal location relative to the car.
Insert Picture of the board connections here
Printed Circuit Board
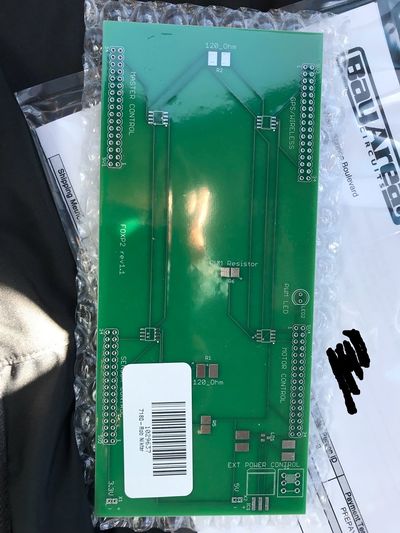
The PCB which is at the heart of this project was designed in Eagle CAD. There were 2 iterations of this board. The first one was designed without validation and had problems with noise within the CAN communications(discussed in problems encountered section). This design lacked several necessary connections and was limited by functionality.
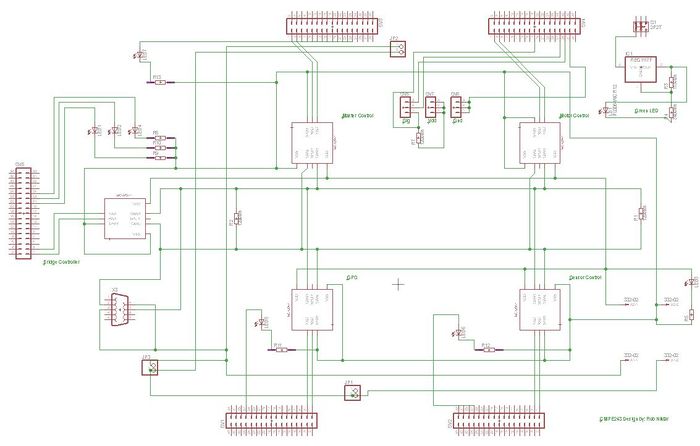
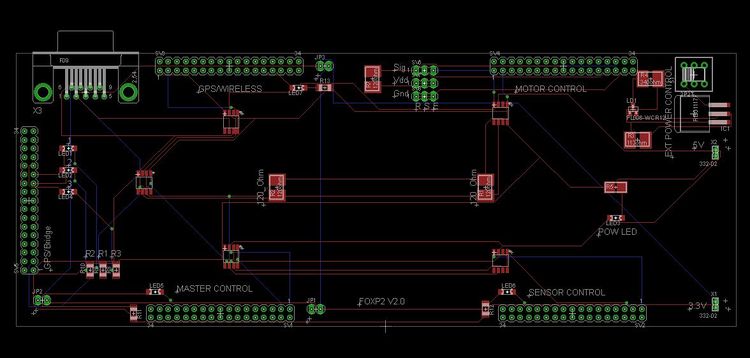
The Second version of the board would incorporate 4 external power outlets that supply 3.3V and 5V to external components as necessary. There would also be an external power unit with regulators that make sure that a clean power is fed to the boards if necessary. As shown in the schematic, the can transceivers are connected to the boards using the terminating resistors. This CAN bus line also connects to the DB9 connections to easily read the CAN data using the PCAN Dongle.
Before the Board was sent for printing, the rat nests had to be removed and the connections had to be routed in such a way that minimum amount of noise was created. this ensured a robust communication for the CAN bus and stable noise-free power supply for the external components such as the Ultrasonic Sensors.
LCD
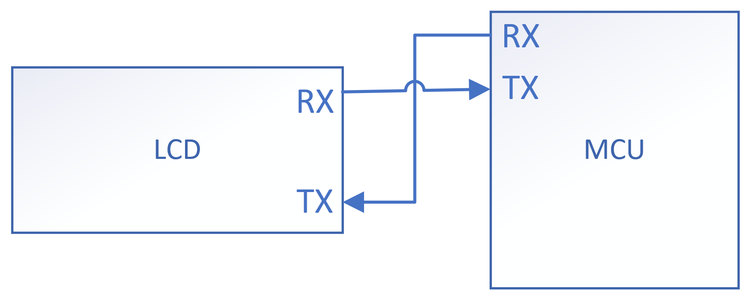
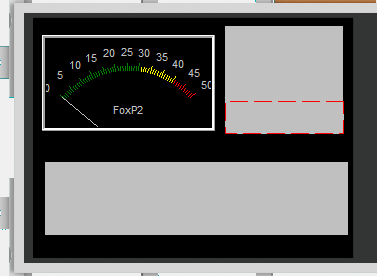
The uLCD-32PTU is a 3.2" (240x320) LCD screen with a micro SD connector, GPIO's along with I2C and serial COMMS. Workshop4 IDE was used to program the GUI, and data was transmitted from the SJOne board through UART communication. The LCD displays RPM clicks, GPS heading, bearing, distance, and also the current firmware version and branch name.
Note: The display here shows the angularmeter which will display the rpm, the top right box will display the bearing, heading, and distance from the GPS, and the bottom box will disply the firmware git hash, and branch.
Sensors
The primary responsibility of the sensor ECU is to provide object detection capabilities.
Hardware Design
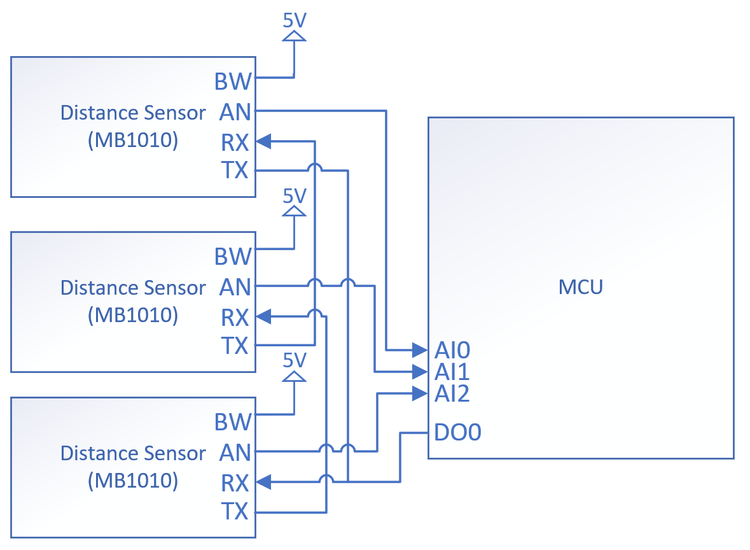
For object detection, distance sensors are used to provide proximity awareness. 3 distance sensors are placed on the front of the car (front left, front, and front right) to continuously measure the distance of the general directions. An object or obstacle can be detected when the distance of a given direction is below a threshold which indicates that the car cannot traverse in that direction and should attempt steer away from the blocked path.
Hardware Interface
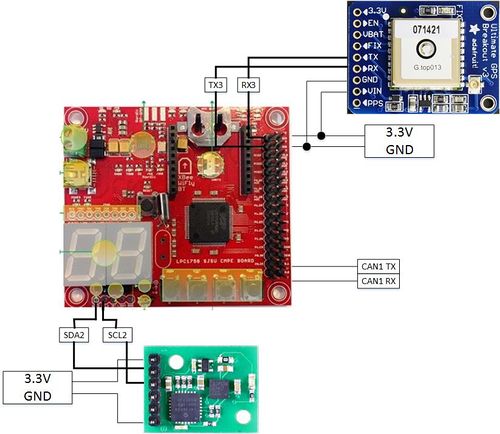
Note: Despite the names, the TX and RX pins do not function as asynchronous serial transmit and receive. The TX functions as an open-drain output that pulls the line down when the sensor wants to trigger a cascaded sensor. The RX functions as an digital input that acts as a trigger for the sensor to begin measuring a distance.
Software Design
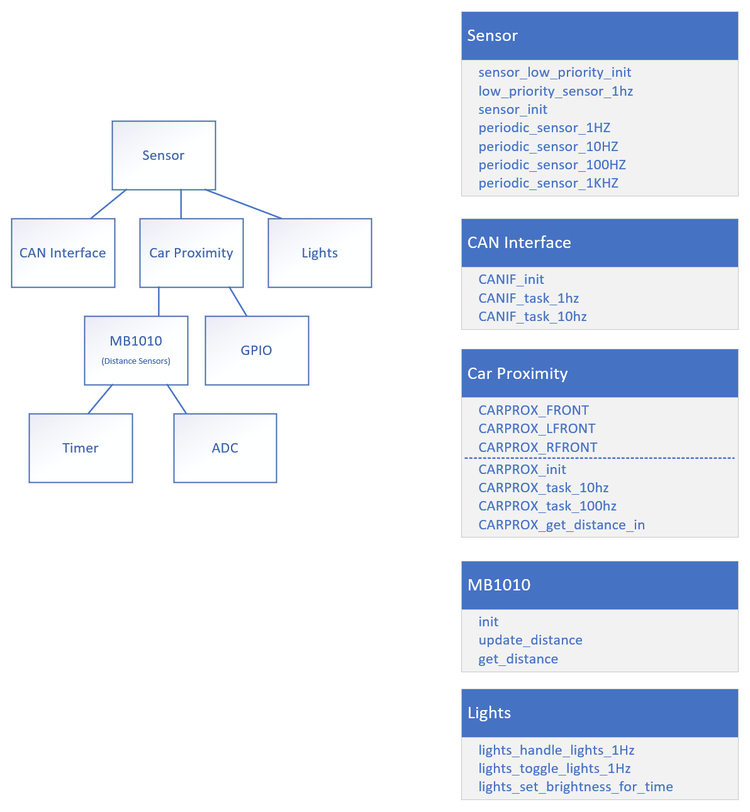
The sensor software follows a modular design pattern. Sensors is the top level module
Implementation
This section includes implementation, but again, not the details, just the high level. For example, you can list the steps it takes to communicate over a sensor, or the steps needed to write a page of memory onto SPI Flash. You can include sub-sections for each of your component implementation.
Motor Controller
Motor Controller primary tasks are as follows: 1. Control the rear wheels for moving forward, backward and stop 2. Control the front wheels to maneuver 3. Display contents on the LCD
Hardware Design
1. ESC
2. Servo
3. RPM Sensor
4. LCD
Hardware Interface
1. CAN bus
2. PWM to Motor and servo
3. RPM sensor for edge detection
4. UART to LCD
In this section, you can describe how your hardware communicates, such as which BUSes used. You can discuss your driver implementation here, such that the Software Design section is isolated to talk about high level workings rather than inner working of your project.
Software Design
1. Init
2. 1 Hz Task
3. 10 Hz task
4. 100 Hz task
Show your software design. For example, if you are designing an MP3 Player, show the tasks that you are using, and what they are doing at a high level. Do not show the details of the code. For example, do not show exact code, but you may show psuedocode and fragments of code. Keep in mind that you are showing DESIGN of your software, not the inner workings of it.
Implementation
This section includes implementation, but again, not the details, just the high level. For example, you can list the steps it takes to communicate over a sensor, or the steps needed to write a page of memory onto SPI Flash. You can include sub-sections for each of your component implementation.
Geographical Controller
Geographical Controller primary tasks are as follows:
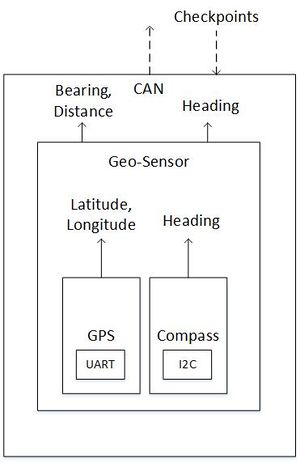
1. Process data from GPS and Compass module. 2. Navigate to nearest checkpoints and to set destination. 3. Receive checkpoints from Bridge controller.
Hardware Design
Hardware Interface
1. CAN bus
2. PWM to Motor and servo
3. RPM sensor for edge detection
4. UART to LCD
In this section, you can describe how your hardware communicates, such as which BUSes used. You can discuss your driver implementation here, such that the Software Design section is isolated to talk about high level workings rather than inner working of your project.
Software Design
1. Init
2. 1 Hz Task
3. 10 Hz task
4. 100 Hz task
Show your software design. For example, if you are designing an MP3 Player, show the tasks that you are using, and what they are doing at a high level. Do not show the details of the code. For example, do not show exact code, but you may show psuedocode and fragments of code. Keep in mind that you are showing DESIGN of your software, not the inner workings of it.
Implementation
This section includes implementation, but again, not the details, just the high level. For example, you can list the steps it takes to communicate over a sensor, or the steps needed to write a page of memory onto SPI Flash. You can include sub-sections for each of your component implementation.
Android Application
Main Tasks
- Generate checkpoints
- Send START and STOP commands
- Auto-connect to the Bridge module
- Display relevant information:
- map
- current phone location
- current car location
- connection heartbeat
- checkpoint
Software Design
High Level Architecture Design
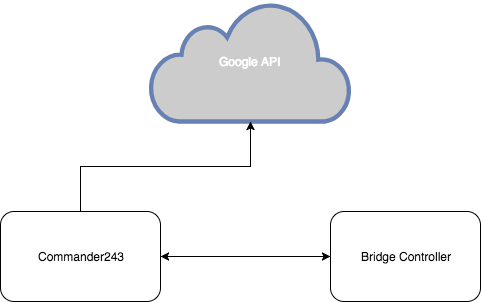
The application's high level design is simple: Use Google Maps API to get the checkpoints and forward it to the bridge controller.
Implementation
This section includes implementation, but again, not the details, just the high level. For example, you can list the steps it takes to communicate over a sensor, or the steps needed to write a page of memory onto SPI Flash. You can include sub-sections for each of your component implementation.
SCons - Build Automation
SCons is a build automation tool similar to Make and is based on the Python programming language. The 2 documents below describe the basic usage of SCons to build firmware and unit tests.
File:Cmpe243 f17 foxp2 SCons Build Automation.docx
File:Cmpe243 f17 foxp2 SCons Building Unit Tests.docx
There are 3 build environments defined for the FoxP2 project.
1. ARM build environment
2. DBC build environment
3. Unit test build environment
ARM Build Environment
The ARM build environment utilizes the GNU ARM embedded toolchain to compile code for ARM targets namely for the SJOne Board's LPC1758 powered by an ARM Cortex-M3 (ARMv7-M architecture). Resources used by this build environment include Cortex-M3 specific code, FreeRTOS, start up code, linker scripts, LPC1758 drivers, and finally application-specific code. To build an ECU-specific program, an ECU name can be provided as a command line argument.
DBC Build Environment
The DBC build environment utilizes the default Python interpreter (defined in PATH) and the DBC parser Python tool to generate a C header file. The build environment uses the target ECU name as the target NODE required by the DBC parser.
Unit Test Build Environment
The unit test build environment utilizes the native C compiler on Linux hosts and Cygwin's C compiler on Windows hosts. SCons automatically searches for all unit tests source files in a test directory with file names starting with "test_". When the unit test flag is provided on command line, SCons will build then executed all unit tests. If any unit test fails, the overall SCons build will fail. For Windows, the FoxP2 repository contains pre-built shared libraries (.dll) of Cgreen unit testing library and Cygwin's POSIX references which are linked at run-time.
Validation and Testing Plan
Sensor Testing:
- Front left sensor detection (values)
- Front right sensor detection (values)
- Front middle sensor detection (values)
- Back left sensor detection (values)
- Back right sensor detection (values)
- Response & accuracy / precision
- put object 1 ft away, and make sure it reads 12 in (inches are sent over can)
- response to approaching obstacles (start from 3ft away and move in)
- LED correspondence with values
- All sensor MIA handling
Object Avoidance Testing:
- If right sensor blocked, go left
- If left sensor blocked, go right
- If front sensor blocked, reverse, go right/left
- If right & left sensor blocked, reverse, go right/left
- If back sensor blocked, move forward
- If back and front left blocked, go right
- If back and front right blocked, go left
Motor Testing:
- If ramped up, speed up
- If ramped down, slow down
- If no ramp, constant speed
LCD Testing:
- Display compass
- Display voltage
- Display speed
- Githash version
- Branch name
- All values update accordingly
- Display values MIA handling
Voltage sensor Testing:
- Compare smart device, voltmeter, and sensor readings
App Testing:
- Automatic car connection
- Set a GPS location
- Sends stop to car until destination chosen
- MIA car / GPS lock handling
Geographical testing:
- Losing the GPS Lock
- Accuracy in sending coordinates
- Location accuracy in chosing destination
- MIA GPS sensor
Basic Hardware Testing:
- Confirm switch to turn on car works
- 7-Seg value indication
- LED indications
- No loose / flimsy wires
- Car doesn't move unless given a GPS coordinate
- Avoids obstacles while moving towards a target destination
- Can reverse away from obstacles and continue towards the destination
- Avoid GPS when reversing for 5 seconds
Testing & Technical Challenges
Describe the challenges of your project. What advise would you give yourself or someone else if your project can be started from scratch again? Make a smooth transition to testing section and described what it took to test your project.
Include sub-sections that list out a problem and solution, such as:
<Bug/issue name>
Discuss the issue and resolution.
Conclusion
Conclude your project here. You can recap your testing and problems. You should address the "so what" part here to indicate what you ultimately learnt from this project. How has this project increased your knowledge?
Project Video
Upload a video of your project and post the link here.
Project Source Code
References
Acknowledgement
Any acknowledgement that you may wish to provide can be included here.
References Used
List any references used in project.
Appendix
You can list the references you used.
