Difference between revisions of "F16: NotifyBox"
(→Design & Implementation) |
(→xBee Bluetooth Module) |
||
| Line 243: | Line 243: | ||
=== xBee Bluetooth Module === | === xBee Bluetooth Module === | ||
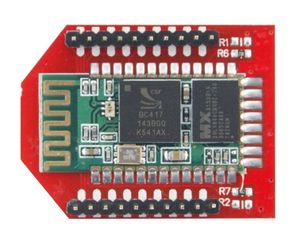
| − | [[File:CMPE_146_F16_NotifyBox_xBee.jpg|300px|thumb| | + | [[File:CMPE_146_F16_NotifyBox_xBee.jpg|300px|thumb|right|Figure X: xBee Bluetooth module]] |
| − | |||
| − | |||
| − | |||
| − | |||
| − | |||
| − | |||
| − | |||
| − | |||
| − | |||
| + | The xBee Bluetooth module used is made by Iduino. It interfaces a HC-06 Slave chip. The xBee peripheral allows us to pick to use either UART2 or UART3 to communicate. UART uses a RX for serial input and TX for serial output. | ||
| + | For our purpose, we chose to use UART2, and | ||
=== Software Design === | === Software Design === | ||
Revision as of 20:50, 20 December 2016
Contents
Grading Criteria
- How well is Software & Hardware Design described?
- How well can this report be used to reproduce this project?
- Code Quality
- Overall Report Quality:
- Software Block Diagrams
- Hardware Block Diagrams
- Schematic Quality
- Quality of technical challenges and solutions adopted.
NotifyBox
Abstract
With the rise of e-commerce, online shoppers are receiving more mail than they ever have before. This increase in online shopping will also come with an increase of mail and packages received. NotifyBox will help consumers remotely be more aware of when packages/mail has been delivered to their mailbox. NotifyBox will provide users with a notification on their phone showing when their mail has been delivered. An IR beam will be used to check when mail is received. This will be interfaced to an SJOne board. Once mail has been detected the SJOne board will send the data to another SJOne board over wireless communication. The second board will then communicate that data over Bluetooth to a phone. Every time the beam has an interference, the user will receive the notification on their phone.
Objectives & Introduction
The objective of this project is to create mailbox that will remotely notify a user when mail has been delivered. Upon mail being received in the mailbox, a notification will appear on a user's screen that mail has been received.
- Interface infrared sensor
- Transfer data to SJOne board
- Communicate two SJOne boards over wireless communication
- Connect to phone via Bluetooth
Team Members & Responsibilities
- Eric Lau
- Bluetooth interface
- UART communication
- Alex Zavala
- Infarred beam detection
- Wifi interface
Schedule
| Week# | Date | Task | Status | Date Completed | Notes |
|---|---|---|---|---|---|
| 1 | 10/21 | Finalize Project Idea and Porposal | Completed | 10/28 | Decided on idea and finalized proposal |
| 2 | 10/28 | Order Parts | Completed | 11/2 | Received parts on 11/2 |
| 3 | 11/4 | Familiarize with Datasheets | Complete | 11/11* | *Ongoing process, will continue to familiarize datasheets |
| 4 | 11/11 | Design circuit diagrams and IR sensor communication | Complete | 11/30 | Implemented using GPIO |
| 5 | 11/18 | Interface Bluetooth and research iOS app | Complete | 11/25 | iOS app was started very eary (11/13) and bluetooth part was started 11/20, but not fully completed until later |
| 6 | 11/25 | Interface WiFi and complete iOS app | Not Complete | Although the WiFi was done and iOS was almost done, the app was not completed until Bluetooth was fully functioning | |
| 7 | 12/2 | Integrating all peripherals | Complete | 12/19/16 | Our schedule was backlogged by building an iOS app to connect Bluetooth, but all peripherals were implemented. |
| 8 | 12/9 | Testing | Complete | 12/20/16 | |
| 9 | 12/16 | Testing | Not Complete |
Parts List & Cost
| Part Name | Part Number | Quantity | Cost | Notes |
|---|---|---|---|---|
| 2x WiFi Transceiver Module 1MB Flash | ESP8266 ESP-01 | 1 | $9.95 | For interfacing WiFi |
| Xbee Bluetooth Bee | Iduino Xbee V2.0 (HC-06) | 1 | $11.99 | For interfacing Bluetooth |
| SJOne Board with LPC1758 | SJOne Board | 2 | $80.00 | Microcontroller used to control peripherals |
| Jumper Wires 60 ct | 1 | $8.00 | For connecting pins | |
| Infrared Sensors - 3mm LEDs | IR Break Beam Sensor | 1 | $1.95 | Sensor used for sensing objects |
| Total | $191.89 |
- NOTE:
- Bluetooth module HC-06 only works as a slave, not as a master peripheral. Will need to get an HC-05 if you would like to perform as a master and slave.
- The Bluetooth module is also not a Bluetooth Low Energy (BLE) module. If you would like to connect to an iOS device, you need to have a BLE module.
Design & Implementation
The design section can go over your hardware and software design. Organize this section using sub-sections that go over your design and implementation.
Hardware Design
Discuss your hardware design here. Show detailed schematics, and the interface here. //will delete before finalizing
Hardware Interface
In this section, you can describe how your hardware communicates, such as which BUSes used. You can discuss your driver implementation here, such that the Software Design section is isolated to talk about high level workings rather than inner working of your project. // will delete before finalizing
In our block diagram, we have one infrared sensor(IR) that we will be using to determine if mail has been received. Once the IR sensor beam breaks, microcontroller 1 will receive that data. The IR sensor sends data to the microcontroller over GPIO interface. Once microcontroller 1 has the data it will package the data and then send that package to microcontroller 2 via wifi. When microcontroller 2 has received the package this will notify the user with a notification that mail has been received. The communication from microcontroller 2 to the iPhone will be done using a Bluetooth module.
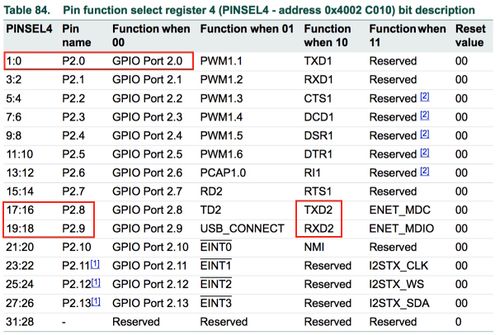
Above is a table from the LPC 176x/5x User Manual. This table shows the pins that we used on the SJOne boards to interface the GPIO port for the Infrared sensor and the UART port to interface the Bluetooth HC-06 module.
- Board 1:
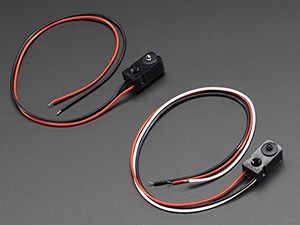
- The IR sensor has a transmitter and a receiver sensor. Both transmitter and receiver have a red and a white wire. These are to power the sensor. We are using 3.3 logic for the VCC of this project.
- The receiver has an extra white wire. This wire is used as an input for the GPIO port.
- NOTE: The receiver wire is an open collector. This means you need a pull-up resistor in order for it to work. Connect a 10K resistor between the white wire of the receiver and the red wire of the VCC.
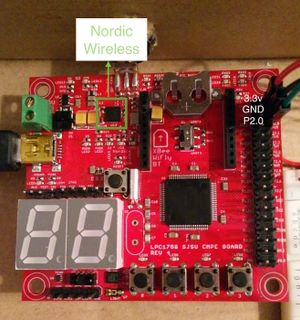
- Nordic wireless was used with the wireless FreeRTOS API to send a packet of data.
- Board 2:
- Nordic wireless was used with the wireless FreeRTOS API to receive a packet of data
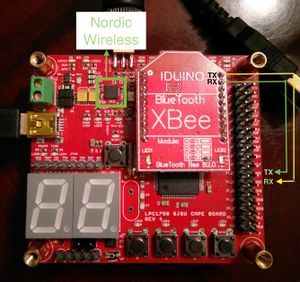
- UART ports are used to transfer data to the phone over the Bluetooth module. We used internal UART ports TXD2 and RXD2.
IR Beam Sensor
IR (infrared) beam sensor is a sensor that detects if something is blocking the path between an emitter and a receiver. The way that this infrared break-beam sensor work is having an emitter emit an IR beam that can is received by the receiver module. When something blocks the path between the emitter and receiver, the beam is "broken".
For our project, we used the IR Beam sensor to detect if the link is active or if there is a break/interference in the infrared connect between the emitter and receiver. When mail has been delivered, the infrared link will be broken, thus changing the state of the GPIO pin to true.
xBee Bluetooth Module
The xBee Bluetooth module used is made by Iduino. It interfaces a HC-06 Slave chip. The xBee peripheral allows us to pick to use either UART2 or UART3 to communicate. UART uses a RX for serial input and TX for serial output.
For our purpose, we chose to use UART2, and
Software Design
Show your software design. For example, if you are designing an MP3 Player, show the tasks that you are using, and what they are doing at a high level. Do not show the details of the code. For example, do not show exact code, but you may show psuedocode and fragments of code. Keep in mind that you are showing DESIGN of your software, not the inner workings of it.
- All the software was implemented on FreeRTOS. This is a free operating system that can be used to develop embedded systems. This Development Package is what was used to implement our project.
Implementation
This section includes implementation, but again, not the details, just the high level. For example, you can list the steps it takes to communicate over a sensor, or the steps needed to write a page of memory onto SPI Flash. You can include sub-sections for each of your component implementation.
Testing & Technical Challenges
Describe the challenges of your project. What advise would you give yourself or someone else if your project can be started from scratch again? Make a smooth transition to testing section and described what it took to test your project.
Include sub-sections that list out a problem and solution, such as:
Issue #1
Bluetooth implementation on the iOS app was by-far the hardest part of the project. After hours, days, weeks spent on interfacing our xBee HC-06 Bluetooth module, we found that it was impossible to have the HC-06 discoverable by iOS (iPhones, iPads, iPods). Because the HC-06 does not use with Bluetooth LE, and is not MFi certified, it was considered to be not following Apple's standards, thus not allowing any HC-06 Bluetooth modules to be able to be paired with iOS devices. We had to change our approach on our objectives. We opted to use a Bluetooth terminal app in Android to talk to our xBee HC-06 module.
Issue #2
The wireless communication gave us a very hard time to transfer the data from one board to the other. Thinking that the way that we implemented it was incorrect, we were trying to fix our code for many hours. It wasn't until we decided to try to attach antennas to our SJOne Board that it then started working properly. Our issues was instantly resolved with antennas.
Issue #3
When first trying to research about how the Infrared (IR) sensor worked, I was not able to fully understand how to implement the sensor with the SJOne board as the sensor was made for Arduino. With enough research and asking my professor what I had thought was the best way to interface the IR sensor, I was told that I was over complicating myself. Was resolved by simply interfacing with GPIO.
Conclusion
Conclude your project here. You can recap your testing and problems. You should address the "so what" part here to indicate what you ultimately learnt from this project. How has this project increased your knowledge?
Project Video
Upload a video of your project and post the link here.
Project Source Code
References
Acknowledgement
Any acknowledgement that you may wish to provide can be included here.
References Used
List any references used in project.
Swift Programming Language Guide
Bluetooth Terminal App used for debugging
Low Powered Mesh Network stack
Appendix
You can list the references you used.


