Difference between revisions of "F16: Spartan and Furious"
Proj user10 (talk | contribs) (→Project Title) |
Proj user10 (talk | contribs) (→Project Title) |
||
| Line 1: | Line 1: | ||
== Project Title == | == Project Title == | ||
Android Application controlled Self-Driving Car using CAN bus. | Android Application controlled Self-Driving Car using CAN bus. | ||
| − | |||
| − | |||
== Abstract == | == Abstract == | ||
Revision as of 03:15, 30 November 2016
Contents
Project Title
Android Application controlled Self-Driving Car using CAN bus.
Abstract
This section should be a couple lines to describe what your project does.
Objectives & Introduction
Show list of your objectives. This section includes the high level details of your project. You can write about the various sensors or peripherals you used to get your project completed.
Team Members & Responsibilities
- Android and Communication Bridge:
- Geographical Controller:
- Master Controller:
- Motor Controller
- Sensor and I/O Controller:
Schedule
Legend:
Motor Controller , Master Controller , Android Controller, Geo Controller, Sensor and I/O Controller , Team Goal
| Week# | Date | Task | Actual | Status |
|---|---|---|---|---|
| 1 | 9/17/2016 |
|
|
Complete. |
| 2 | 9/24/2016 |
|
|
Complete |
| 3 | 10/01/2016 |
|
|
Complete |
| 4 | 10/08/2016 |
|
|
Complete |
| 5 | 10/15/2016 |
|
|
Complete |
| 6 | 10/22/2016 |
|
|
Complete. |
| 7 | 10/29/2016 |
|
|
Complete. |
| 8 | 11/05/2016 |
|
Integration and Testing completed for the first demo. | Complete. |
| 9 | 11/12/2016 |
|
|
Complete. |
| 10 | 11/19/2016 |
|
|
Complete |
| 11 | 11/26/2016 |
|
|
Complete |
| 12 | 12/03/2016 |
|
In Progress | |
| 13 | 12/10/2016 |
|
Parts List & Cost
| Item# | Part Description | Vendor | Qty | Cost |
|---|---|---|---|---|
| 1 | SJ One Board (LPC 1758) | From Preet | 6 | $480 |
| 2 | RC Car | Sheldon Hobbyist | 1 | $309.99 |
| 3 | Accelerometer/Magnetometer LSM303 | Adafruit | 2 | $40.00 |
| 4 | Bluetooth Module | From Preet | 2 | $0 |
| 5 | CAN Transceivers | From Microchip. | 10 | $0 (Free Samples) |
| 6 | Battery Pack | From Sheldon Hobbist | 1 | $49.99 |
| 7 | Ultra Sonic Sensor | From Maxbotix | 5 | $91.15 (at 40% student discount) |
| 8 | LCD Display | From Digikey | 1 | $94.21 |
| 9 | GPS Module | From Adafruit | 1 | $43.34 |
| 10 | General Components | From HSC electronics | - | $83.17 |
| 11 | DC Current Sensor | From Adafruit | 1 | $14.39 |
| 12 | PCB | From Amazon | 1 | $10.66 |
| 13 | Corrugated Sheet for chasis | From Home Depot | 1 | $6.74 |
DBC File
ECUs
Motor Controller
Group Members
Design & Implementation
The motor controller is responsible for generating the driving and steering action of the car. For this purpose, we have two types motors viz DC motor for driving and Servo motor which is used for changing directions of the car. The motor controller is also interfaced with a speed encoder for generating a feedback mechanism to automatically control and monitor the speed of the car. Our car came equipped with a Servo motor and brushed DC motor which is connected Electronic Speed Control (ESC).
Hardware Design
- Hardware Specifications
- 1. DC Motor
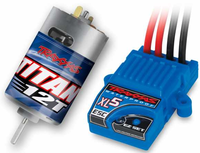
Our car came with Titan 12T 550 brushed motor and waterproof ESC. The ESC drives the DC motor based on the Pulse Width modulation (PWM) applied to it. The power supply required for this motor is 8.4 V. Maximum speed of upto 30mph can be achieved. The rotational speed is proportional to the EMF generated in its coil and the torque is proportional to the current.The main connection pins driving the motor are VCC,GND and the Control pin (PWM). The pin P2.1 of SJ-one board is connected to supply the required PWM to the motor. The basic working principle of DC motor is illustrated in the following figure : Since the preprogrammed controller has to be replaced by using our design ,the DC motor is then tested with Digital Oscilloscope for getting the frequency of operation and equivalent PWM values for full throttle condition in the forward as well as backward condition. It was observed from the waveform that the frequency of operation is 100Hz. The range of operational duty cycle is 10% to 20% with 15% being the neutral value or the stop condition. In order to accelerate the car a PWM value in the range of 15.6%-20.0% is applied. The 15.6 is the minimum pickup PWM that should be supplied in order to get the car moving at full load.
- 2. Servo Motor
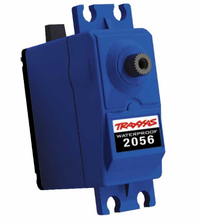
The servomotor used in the car is #2056 a waterproof all weather-action and double the steering power as compared to standard servos. The servo motor is responsible for controlling the steering action of right or left by applying a suitable PWM pulse. The servo motor can be driven with 3.3 V power supply. The pin P2.0 of SJ-one board is connected to supply the required PWM to the motor. After testing the servo motor, we found that the frequency of operation is 100Hz and the operational duty cycle range is 10.0%-20.0% with 15% being the neutral value. For a full right deflection, we provide input PWM pulse ranging from 15.0-20.0% and for full deflection to the left we apply 10.0-15.0% of PWM.
Hardware Interface
Software Design
Show your software design. For example, if you are designing an MP3 Player, show the tasks that you are using, and what they are doing at a high level. Do not show the details of the code. For example, do not show exact code, but you may show psuedocode and fragments of code. Keep in mind that you are showing DESIGN of your software, not the inner workings of it.
Implementation
This section includes implementation, but again, not the details, just the high level. For example, you can list the steps it takes to communicate over a sensor, or the steps needed to write a page of memory onto SPI Flash. You can include sub-sections for each of your component implementation.
Testing & Technical Challenges
- Wheel Alignment Error
Though the neutral value of PWM is 15% at which the servo is supposed to be aligned straight. In practice, however when we tested the car for straight run slight deflection towards right was observed when the PWM pulse width was set to 15.0 %. Thus, to correct this, we provided correction value of -0.98 giving a resultant PWM pulse width of 14.02%. Thus, we fixed the wheel alignment and obtained the desired straight path traversal.
Android and Communication Bridge
Group Members
Design & Implementation
The design section can go over your hardware and software design. Organize this section using sub-sections that go over your design and implementation.
Hardware Design
Discuss your hardware design here. Show detailed schematics, and the interface here.
Hardware Interface
In this section, you can describe how your hardware communicates, such as which BUSes used. You can discuss your driver implementation here, such that the Software Design section is isolated to talk about high level workings rather than inner working of your project.
Software Design
Show your software design. For example, if you are designing an MP3 Player, show the tasks that you are using, and what they are doing at a high level. Do not show the details of the code. For example, do not show exact code, but you may show psuedocode and fragments of code. Keep in mind that you are showing DESIGN of your software, not the inner workings of it.
Implementation
This section includes implementation, but again, not the details, just the high level. For example, you can list the steps it takes to communicate over a sensor, or the steps needed to write a page of memory onto SPI Flash. You can include sub-sections for each of your component implementation.
Testing & Technical Challenges
Describe the challenges of your project. What advise would you give yourself or someone else if your project can be started from scratch again? Make a smooth transition to testing section and described what it took to test your project.
Geographical Controller
Group Members
Design & Implementation
The design section can go over your hardware and software design. Organize this section using sub-sections that go over your design and implementation.
Hardware Design
Discuss your hardware design here. Show detailed schematics, and the interface here.
Hardware Interface
In this section, you can describe how your hardware communicates, such as which BUSes used. You can discuss your driver implementation here, such that the Software Design section is isolated to talk about high level workings rather than inner working of your project.
Software Design
Show your software design. For example, if you are designing an MP3 Player, show the tasks that you are using, and what they are doing at a high level. Do not show the details of the code. For example, do not show exact code, but you may show psuedocode and fragments of code. Keep in mind that you are showing DESIGN of your software, not the inner workings of it.
Implementation
This section includes implementation, but again, not the details, just the high level. For example, you can list the steps it takes to communicate over a sensor, or the steps needed to write a page of memory onto SPI Flash. You can include sub-sections for each of your component implementation.
Testing & Technical Challenges
Describe the challenges of your project. What advise would you give yourself or someone else if your project can be started from scratch again? Make a smooth transition to testing section and described what it took to test your project.
Sensor and I/O
Group Members
Design & Implementation
We are using Maxbotix LV-EZ Ultrasonic sensors (MB1000). The configuration of the sensor is 3:1 that is three sensors in the front separated by 60 degrees apart and one in the rear. The ultrasonic sensors mounted on the car are used to detect the obstacle on its route. These sensors are connected to the SJOne board and work with a 5.0V power supply. The SJ One board then sends the sensors message with the help of CAN bus.
The pin description of Maxbotix LV-EZ Ultrasonic sensors is as follows:
Pin 1-BW- Unused, leave disconnected or connect to circuit common ground.
Pin 2-PW- Digital Proximity Logic, outputs a High/Low logic voltage level depending on proximity detection. High means an object has been detected in the detection zone. Low means no object is present. There is a ~2.5 second delay on acquiring targets and a ~1.5 second delay for releasing a target once detected. This hysteresis improves sensor reliability.
Pin 3-AN- Unused, leave disconnected or connect to circuit common ground.
Pin 4-RX- This pin is internally pulled high. The LV-ProxSonar-EZ will continually measure proximity information and output send to data. Leave the pin disconnected or hold the pin high for proximity information. Hold low to stop all sensor activity and reset acquire timers. Upon returning to a high state, the sensor will initiate a calibration sequence.
Pin 5-TX- The TX output delivers asynchronous serial with an RS232 format, except voltages are 0-Vcc
Pin 6-+5V- Vcc – Operates on 2.5V - 5.5V. Recommended current capability of 3mA for 5V, and 2mA for 3V.
Pin 7-GND- Return for the DC power supply. GND (& Vcc) must be ripple and noise free for best operation.
Hardware Design
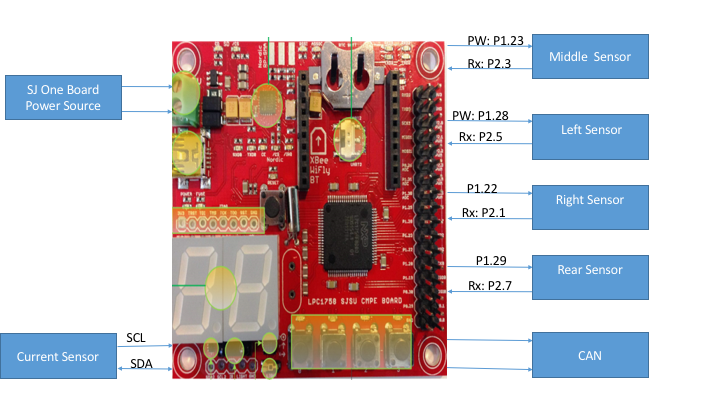
The ultrasonic sensor is interfaced through GPIO, each sensor requires 2 pins, PW and RX, in addition to the two pins required for powering up the sensor. The PW pins for each sensor is configured as an interrupt.
The following table and figure shows the pin connections for all the sensors to the SJOne board.

| Sr.No | SJOne Pin Number | Sensor Pin Function |
|---|---|---|
| 1 | P1.23 | Middle Sensor PW |
| 2 | P 2.3 | Middle Sensor Rx |
| 3 | P 1.28 | Left Sensor PW |
| 4 | P 2.5 | Left Sensor Rx |
| 5 | P1.22 | Right Sensor PW |
| 6 | P 1.29 | Rear Sensor Pw |
| 7 | P 2.7 | Rear Sensor Rx |
The figure below shows the design for the 3D mount for the front sensors.
Ultrasonic Sensor
There are three ultrasonic sensors for the front of the car positioned at different angles to provide a wide ultrasonic "vision" for the car. The mount for the sensors was 3D printed such that we have the flexibility to change the angle of the sensor at a later stage when debugging the sensor.
Hardware Interface
In this section, you can describe how your hardware communicates, such as which BUSes used. You can discuss your driver implementation here, such that the Software Design section is isolated to talk about high level workings rather than inner working of your project.
Software Design
The readings from the sensor is taken in the form of PWM signals with the help of interrupts. The following steps should be performed to take readings and calculating distance from the sensor
1) Configure the PW pin of sensor as input.
2) Configure RX pin of the sensor as output and set it high.
3) Enable the Rising and the Falling edge interrupt on the PW pin of the sensor.
4) Start timer at the rising edge of the interrupt (time T1).
5) At falling Edge of the interrupt stop the timer (time T2).
6) The distance of the obstacle is = (T2-T1)/147 inches.
7) Apply average filter. That is take 3 readings of each sensor and perform average of it.
8) Send this average value in a 10Hz task on CAN bus to Master and IO controller.
Implementation
This section includes implementation, but again, not the details, just the high level. For example, you can list the steps it takes to communicate over a sensor, or the steps needed to write a page of memory onto SPI Flash. You can include sub-sections for each of your component implementation.
Testing & Technical Challenges
Describe the challenges of your project. What advise would you give yourself or someone else if your project can be started from scratch again? Make a smooth transition to testing section and described what it took to test your project.
Master Controller
Group Members
Design & Implementation
The design section can go over your hardware and software design. Organize this section using sub-sections that go over your design and implementation.
Hardware Design
Discuss your hardware design here. Show detailed schematics, and the interface here.
Hardware Interface
In this section, you can describe how your hardware communicates, such as which BUSes used. You can discuss your driver implementation here, such that the Software Design section is isolated to talk about high level workings rather than inner working of your project.
Software Design
Show your software design. For example, if you are designing an MP3 Player, show the tasks that you are using, and what they are doing at a high level. Do not show the details of the code. For example, do not show exact code, but you may show psuedocode and fragments of code. Keep in mind that you are showing DESIGN of your software, not the inner workings of it.
Implementation
This section includes implementation, but again, not the details, just the high level. For example, you can list the steps it takes to communicate over a sensor, or the steps needed to write a page of memory onto SPI Flash. You can include sub-sections for each of your component implementation.
Testing & Technical Challenges
Describe the challenges of your project. What advise would you give yourself or someone else if your project can be started from scratch again? Make a smooth transition to testing section and described what it took to test your project.
Conclusion
Conclude your project here. You can recap your testing and problems. You should address the "so what" part here to indicate what you ultimately learnt from this project. How has this project increased your knowledge?
Project Video
Upload a video of your project and post the link here.
Project Source Code
References
Acknowledgement
Any acknowledgement that you may wish to provide can be included here.
References Used
List any references used in project.
Appendix
You can list the references you used.


