Difference between revisions of "F16: I2Coffee"
(→Parts List & Cost) |
|||
| (50 intermediate revisions by the same user not shown) | |||
| Line 1: | Line 1: | ||
== Abstract == | == Abstract == | ||
| − | Mixing coffee has been a part of many people in their morning. UART Coffee aims to make that process more enjoyable. UART Coffee is a coffee maker machine that allows its user to pick from different types of coffee powders and | + | Mixing coffee has been a part of many people in their morning. [http://www.socialledge.com/sjsu/index.php?title=Embedded_System_Tutorial_UART UART] Coffee aims to make that process more enjoyable. UART Coffee is a coffee maker machine that allows its user to pick from different types of coffee powders and choose their desired coffee temperature. |
== Objectives & Introduction == | == Objectives & Introduction == | ||
| Line 21: | Line 21: | ||
* <b>Mauricio Rivera</b> | * <b>Mauricio Rivera</b> | ||
* Email: mauricio.rivera1993@yahoo.com | * Email: mauricio.rivera1993@yahoo.com | ||
| − | * Design, code development, and | + | * Design, code development, and documentation |
<br> | <br> | ||
| + | == Schedule == | ||
<center> | <center> | ||
| − | |||
{| class="wikitable" | {| class="wikitable" | ||
|- | |- | ||
| Line 65: | Line 65: | ||
! scope="row"| 7 | ! scope="row"| 7 | ||
| 12/16 | | 12/16 | ||
| − | | Finalize project | + | | Finishing touches. |
| − | | <font color=" | + | | <font color="green">Done</font> |
| + | |- | ||
| + | ! scope="row"| 8 | ||
| + | | 12/20 | ||
| + | | Finalize project for demo. | ||
| + | | <font color="green">Done</font> | ||
|} | |} | ||
</center> | </center> | ||
| + | == Parts List & Cost == | ||
<center> | <center> | ||
| − | |||
{| class="wikitable" | {| class="wikitable" | ||
|- | |- | ||
| Line 105: | Line 110: | ||
| 3 | | 3 | ||
| $0.30 | | $0.30 | ||
| + | |- | ||
| + | ! scope="row"| Water valve | ||
| + | | 1 | ||
| + | | $3 | ||
| + | |- | ||
| + | ! scope="row"| Water continer | ||
| + | | 3 | ||
| + | | $0.10 | ||
|} | |} | ||
</center> | </center> | ||
| + | |||
| + | == System Design == | ||
| + | <center> | ||
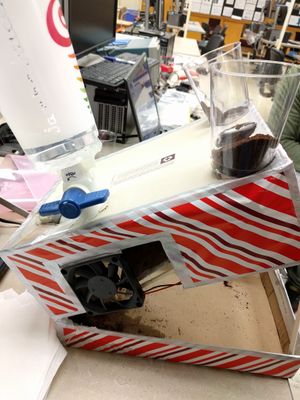
| + | [[File:CmpE146_F16_T3_UARTCoffee.jpg|300px|thumb|left|Figure 1. UART Coffee System Design]] | ||
| + | </center> | ||
| + | <br> | ||
| + | <br> | ||
| + | <br> | ||
| + | <br> | ||
| + | <br> | ||
| + | <br> | ||
| + | <br> | ||
| + | <br> | ||
| + | <br> | ||
| + | <br> | ||
| + | <br> | ||
| + | <br> | ||
| + | <br> | ||
| + | <br> | ||
| + | <br> | ||
| + | <br> | ||
| + | <br> | ||
| + | <br> | ||
| + | <br> | ||
| + | <br> | ||
| + | <br> | ||
| + | <br> | ||
| + | <br> | ||
| + | <br> | ||
| + | <br> | ||
== Design & Implementation == | == Design & Implementation == | ||
| − | |||
=== Hardware Design === | === Hardware Design === | ||
<b>Block diagram</b> | <b>Block diagram</b> | ||
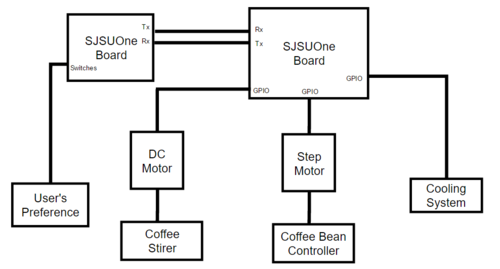
| − | [[File: | + | [[File:CmpE146_F16_T3_BlockDiagram.PNG|500px|thumb|left|Figure 2. UART Coffee's block diagram]] |
| − | |||
| − | |||
| − | |||
| − | |||
| − | |||
| − | |||
| − | |||
| − | |||
| − | |||
| − | |||
| − | |||
| − | |||
| − | |||
| − | |||
| − | |||
| − | |||
| − | |||
| − | |||
| − | |||
<b>Hardware Pin Out</b> | <b>Hardware Pin Out</b> | ||
{| class="wikitable" | {| class="wikitable" | ||
| Line 149: | Line 172: | ||
|- | |- | ||
! scope="row"| Cooling Fan | ! scope="row"| Cooling Fan | ||
| − | | P0. | + | | P0.0 |
| GPIO | | GPIO | ||
|- | |- | ||
| − | ! scope="row"| | + | ! scope="row"| Stirring Motor |
| − | | P0. | + | | P0.1 |
| GPIO | | GPIO | ||
|- | |- | ||
|} | |} | ||
| − | </ | + | |
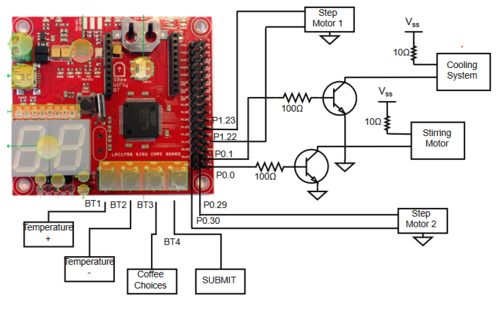
| + | [[File:CmpE146_F16_T3_UARTCoffeeCircuit.PNG|500px|thumb|left|Figure 3. Full Circuit for the harware and SJ One Board]] | ||
| + | |||
| + | === Hardware Interface === | ||
| + | <b>Hardware Used</b> | ||
| + | <ul> | ||
| + | <li>Transistor (st953)</li> | ||
| + | <li>Resistors(10Ω and 100Ω)</li> | ||
| + | <li>5v DC Motor</li> | ||
| + | <li>12V Fan</li> | ||
| + | <li>5v Step Motor</li> | ||
| + | <li>Water Valve</li> | ||
| + | <li>Bread Board</li> | ||
| + | <li>Jumper Cables</li> | ||
| + | </ul> | ||
| + | <br> | ||
| + | |||
| + | <b>Interfacing</b> | ||
| + | <br> | ||
| + | The coffee making machine uses [http://www.socialledge.com/sjsu/index.php?title=Embedded_System_Tutorial_UART UART]to establish communication between two microcontrollers using their Tx and Rx pins, more specifically UART2. The first SJSUOne board is used to control the motor to stir the coffee, step motor for coffee powder flow, and the cooling system. The second microcontroller is used to control the switches for user interaction and also to transmit temperature data to the first board. Since the boards can only supply 3.3V, a transistor connected to 5V was used so that the different I/O components can receive their appropriate voltage. The stepper motors have more wires than the regular DC motors, so more than one pin was needed to use them. The only non-electronic component of our design is the water valve, this is because of security measures. | ||
| + | |||
| + | <br> | ||
| + | <br> | ||
| + | <br> | ||
| + | <br> | ||
| + | <br> | ||
| + | <br> | ||
| + | |||
=== Software Design === | === Software Design === | ||
| − | |||
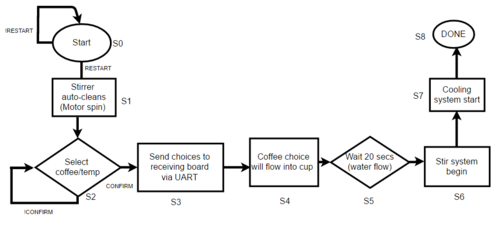
| − | The software of this machine is designed to interact with the user so that the user's needs are met. The buttons on the board are programmed to control the options for coffee beans, temperature, and the mixing. | + | The software of this machine is designed to interact with the user so that the user's needs are met. The buttons on the board are programmed to control the options for coffee beans, temperature, and the mixing. During the UART transmission (9600bps), the transmitting board sends a 10-bit message to the receiving board that includes the user's choices. After receiving the message, the receiving boards takes over and begins the coffee mixing process. |
| + | [[File:CmpE146_F16_T3_UARTCoffeeStateDiagram.PNG|500px|thumb|left|Figure 4. UART Coffee State Diagram]] | ||
<br> | <br> | ||
<br> | <br> | ||
<br> | <br> | ||
| + | <br> | ||
| + | <br> | ||
| + | <br> | ||
| + | <br> | ||
| + | <br> | ||
| + | <br> | ||
| + | <br> | ||
| + | <br> | ||
| + | <br> | ||
| + | <br> | ||
| + | <br> | ||
| + | <br> | ||
| + | |||
=== Implementation === | === Implementation === | ||
| − | |||
| − | |||
| − | |||
<b>Motors and Transistor Interface</b> | <b>Motors and Transistor Interface</b> | ||
| − | [[File: | + | [[File:CmpE146_F16_T3_TransistorMotor.PNG|500px|thumb|left|Figure 5. Transistors and Motors connected.]] |
<b>Connecting Transitor to I/O component</b> | <b>Connecting Transitor to I/O component</b> | ||
<ol> | <ol> | ||
<li>Connect power supply (5V) to bread board</li> | <li>Connect power supply (5V) to bread board</li> | ||
| − | <li>Emmitter is connected to resistor ( | + | <li>Emmitter is connected to resistor (100 Ohms)</li> |
<li>Resistor connects to board's GPIO pin</li> | <li>Resistor connects to board's GPIO pin</li> | ||
<li>Base pin Connected to component's ground</li> | <li>Base pin Connected to component's ground</li> | ||
| Line 201: | Line 261: | ||
<br> | <br> | ||
<br> | <br> | ||
| + | |||
| + | <b size="6">Sytem Operation Procedure</b> | ||
| + | <ol> | ||
| + | <li>Press START Button on the the receiver board</li> | ||
| + | <li>Transmitter board can select options (Temperature and Coffee type)</li> | ||
| + | <li>User confirms options by pressing button 4, CONFIRM</li> | ||
| + | <li>Transmitter board sends 10-bit message to receiver with all the options</li> | ||
| + | <li>Receiver takes control of operations</li> | ||
| + | <li>Starts pumping out selected coffee powder</li> | ||
| + | <li>Sleeps for 10 seconds to wait for water to be pured in</li> | ||
| + | <li>Activates stirring mechanism for 5 seconds</li> | ||
| + | <li>Activated cooling system to achieve desired temperature</li> | ||
| + | <li>Coffee is now READY</li> | ||
| + | </ol> | ||
== Testing & Technical Challenges== | == Testing & Technical Challenges== | ||
| Line 221: | Line 295: | ||
== Conclusion == | == Conclusion == | ||
| − | |||
| − | The | + | The UART Coffee making machine was a learning experience for both of us. We learned to interface different components to the microcontroller even if the microcontroller's 3.3V was insufficient. The hardest part of this project was getting the UART communication between the two boards, however, working together made it easier because one partner was able to check the other person's work. A non-techincal hurdle we faced was timing because we both had different schedules due to finals, so working together was only possible after finals. Overall, we are pleased with our project's results and the knowledge we picked up and reinforced along the way. |
=== Project Video === | === Project Video === | ||
| − | + | * [https://www.youtube.com/watch?v=oaSOQO89uX4 Video Demo] | |
=== Project Source Code === | === Project Source Code === | ||
* [https://sourceforge.net/projects/sjsu/files/CmpE_S2016/ Sourceforge Source Code Link] | * [https://sourceforge.net/projects/sjsu/files/CmpE_S2016/ Sourceforge Source Code Link] | ||
| − | |||
=== Acknowledgement === | === Acknowledgement === | ||
We would like to thank Preet and Professor Ozemek for helping us throughout the class. Also, thank Kenneth and Amy for supporting us during the days that we worked on this project. Finally, we want to thank professor Harry Li for allowing us to use Engr 268 as a working space. | We would like to thank Preet and Professor Ozemek for helping us throughout the class. Also, thank Kenneth and Amy for supporting us during the days that we worked on this project. Finally, we want to thank professor Harry Li for allowing us to use Engr 268 as a working space. | ||
=== References Used === | === References Used === | ||
| − | + | *[http://www.socialledge.com/sjsu/index.php?title=Embedded_System_Tutorial_UART UART] | |
=== Appendix === | === Appendix === | ||
| − | + | *[http://www.nxp.com/documents/user_manual/UM10360.pdf LPC1758 Datasheet] | |
Latest revision as of 06:37, 23 December 2016
Contents
Abstract
Mixing coffee has been a part of many people in their morning. UART Coffee aims to make that process more enjoyable. UART Coffee is a coffee maker machine that allows its user to pick from different types of coffee powders and choose their desired coffee temperature.
Objectives & Introduction
The objective of this project was to create a coffee making machine that was included two microcontrollers communicating with each other. A list of high-level objectives will be listed below.
- Establish communication between 2 microcontrollers using UART
- User interaction with the machine through the use of the buttons
- Alarm user when the coffee has reached the desired temperature
- Learn to interface different I/O components with the SJSU One board
- Program servo motors to allow flow of the different coffee flavors
- Attach a cooling system so that the coffee's temperature drops if it is desired
- Add a DC Motor so we are able to stir the coffee
Team Members & Responsibilities
- Man Hin Wong
- Email: wongmanhin@msn.com
- Implementation, code development, and testing
- Mauricio Rivera
- Email: mauricio.rivera1993@yahoo.com
- Design, code development, and documentation
Schedule
| Week# | Date | Task | Actual |
|---|---|---|---|
| 1 | 11/4 | Finalize schedule and materials. | Done |
| 2 | 11/11 | Design schematic with slave and master board. | Done |
| 3 | 11/18 | Test code and enhance it. | Done |
| 4 | 11/25 | Debug and enhance code. | Done |
| 5 | 12/2 | Start building project. | Done |
| 6 | 12/9 | Test prototype. | Done |
| 7 | 12/16 | Finishing touches. | Done |
| 8 | 12/20 | Finalize project for demo. | Done |
Parts List & Cost
| Item | Quantity | Cost (1) |
|---|---|---|
| SJSU One Board | 2 | $80 |
| 5V DC Motors | 2 | $2 |
| 5V Servos | 2 | $3 |
| Shoe Box | 1 | $0 |
| 12V Fan | 1 | $2 |
| Transistor (ST953) | 2 | $1 |
| Resistors | 3 | $0.30 |
| Water valve | 1 | $3 |
| Water continer | 3 | $0.10 |
System Design
Design & Implementation
Hardware Design
Block diagram
Hardware Pin Out
| I/O | Pin(s) | Name |
|---|---|---|
| Step Motor 1 | P0.29, P0.30 | GPIO |
| Step Motor 2 | P1.22, P1.23 | GPIO |
| Cooling Fan | P0.0 | GPIO |
| Stirring Motor | P0.1 | GPIO |
Hardware Interface
Hardware Used
- Transistor (st953)
- Resistors(10Ω and 100Ω)
- 5v DC Motor
- 12V Fan
- 5v Step Motor
- Water Valve
- Bread Board
- Jumper Cables
Interfacing
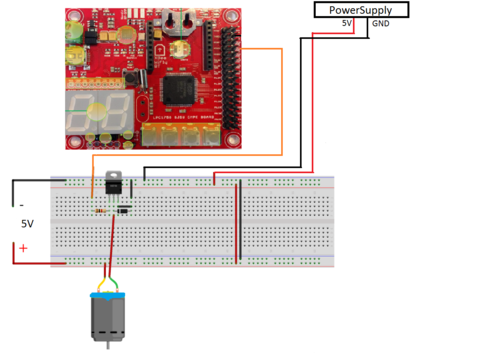
The coffee making machine uses UARTto establish communication between two microcontrollers using their Tx and Rx pins, more specifically UART2. The first SJSUOne board is used to control the motor to stir the coffee, step motor for coffee powder flow, and the cooling system. The second microcontroller is used to control the switches for user interaction and also to transmit temperature data to the first board. Since the boards can only supply 3.3V, a transistor connected to 5V was used so that the different I/O components can receive their appropriate voltage. The stepper motors have more wires than the regular DC motors, so more than one pin was needed to use them. The only non-electronic component of our design is the water valve, this is because of security measures.
Software Design
The software of this machine is designed to interact with the user so that the user's needs are met. The buttons on the board are programmed to control the options for coffee beans, temperature, and the mixing. During the UART transmission (9600bps), the transmitting board sends a 10-bit message to the receiving board that includes the user's choices. After receiving the message, the receiving boards takes over and begins the coffee mixing process.
Implementation
Motors and Transistor Interface
Connecting Transitor to I/O component
- Connect power supply (5V) to bread board
- Emmitter is connected to resistor (100 Ohms)
- Resistor connects to board's GPIO pin
- Base pin Connected to component's ground
- Component's Vcc connected to power supply
- Collector pin goes to power supply's ground
Sytem Operation Procedure
- Press START Button on the the receiver board
- Transmitter board can select options (Temperature and Coffee type)
- User confirms options by pressing button 4, CONFIRM
- Transmitter board sends 10-bit message to receiver with all the options
- Receiver takes control of operations
- Starts pumping out selected coffee powder
- Sleeps for 10 seconds to wait for water to be pured in
- Activates stirring mechanism for 5 seconds
- Activated cooling system to achieve desired temperature
- Coffee is now READY
Testing & Technical Challenges
My Issue #1
Some of the GPIO Pins cannot support enough current or voltage for our I/O devices. For example, when wanting to control a motor by the board, we couldn't get it done by simply connecting directly to the board because the pin supplies 3.3V and 0.1A.
Solution: Connecting a transistor between the motor and the SJSUOne board allowed the board to have control over the device and activate it when needed.
My Issue #2
Our coffee machine encountered a problem when wanting the coffee powder to slide down to the cup. This did not let the powder get to the cup, so our design could not function correctly.
Solution: We tilted our design to a 45-degree angle to that our ramp is steep enough to get the coffee powder into the cup.
My Issue #3
We wanted to have a water control system so that our coffee machine can provide water. Adding liquids to the design can be dangerous because it can cause a short circuit and mess the entire project up.
Solution: We added a water valve to the opposite side of the circuit. This allowed enough space between any wire and the water.
Conclusion
The UART Coffee making machine was a learning experience for both of us. We learned to interface different components to the microcontroller even if the microcontroller's 3.3V was insufficient. The hardest part of this project was getting the UART communication between the two boards, however, working together made it easier because one partner was able to check the other person's work. A non-techincal hurdle we faced was timing because we both had different schedules due to finals, so working together was only possible after finals. Overall, we are pleased with our project's results and the knowledge we picked up and reinforced along the way.
Project Video
Project Source Code
Acknowledgement
We would like to thank Preet and Professor Ozemek for helping us throughout the class. Also, thank Kenneth and Amy for supporting us during the days that we worked on this project. Finally, we want to thank professor Harry Li for allowing us to use Engr 268 as a working space.
