Difference between revisions of "S16: Dan"
Proj 146u2 (talk | contribs) (→Project Video) |
(→Grading Criteria) |
||
| (153 intermediate revisions by one other user not shown) | |||
| Line 1: | Line 1: | ||
| − | = | + | = Syringe Pump = |
| − | |||
| − | |||
| − | |||
| − | |||
| − | |||
| − | |||
| − | |||
| − | |||
| − | |||
| − | |||
| − | |||
| − | |||
== Abstract == | == Abstract == | ||
| − | The project will use an Android application to determine how much liquid a | + | The project will use an Android application to determine how much liquid the syringe outputs using a pump powered by a stepper motor. The application will communicate with a Bluetooth module attached to the SJ One board which will control the stepper motor driver to determine how many steps the stepper motor will take on the syringe pump. The application takes in the direction for outputting liquid and reversing the position and the number of milliliters for output. The application has details about the syringe pump's position so the user does not have to remember what position the pump is in. The SJ One board is programmed with two tasks, one for receiving the UART signals from the phone and the other for telling the stepper motor drive how many steps to take with the stepper motor. A queue is used to determine when the shared data can be used by each task. The program initially has the terminal and Bluetooth task at higher priorities than the stepper motor drive task, but the queue can make either of the two main tasks wait. The stepper motor and SJ One board are powered with a 24V DC power supply and USB to micro USB wall adapter. |
== Objectives & Introduction == | == Objectives & Introduction == | ||
| Line 21: | Line 9: | ||
=== Team Members & Responsibilities === | === Team Members & Responsibilities === | ||
* Nicholas Foulk | * Nicholas Foulk | ||
| − | ** | + | ** Documentation/diagrams |
| + | ** Ordering Parts | ||
| + | ** SJSUOne Board Bluetooth Communications | ||
* Anson Jiang | * Anson Jiang | ||
| − | ** | + | ** Android Application with Bluetooth Communications |
| + | ** Debugging | ||
| + | ** Documentation | ||
* Danny Luong | * Danny Luong | ||
| + | ** Syringe Pump task | ||
| + | ** Documentation | ||
| + | ** Debugging | ||
| + | |||
== Schedule == | == Schedule == | ||
| − | |||
{| class="wikitable" | {| class="wikitable" | ||
| Line 42: | Line 37: | ||
| Order Parts | | Order Parts | ||
| Completed (4/20) | | Completed (4/20) | ||
| − | | It was much more challenging to order the 3D parts than expected. | + | | (4/17) It was much more challenging to order the 3D parts than expected. Most of the initial parts have been ordered. <br> (5/4) We ordered parts like hex bolt, bearing, and a coupling to make our design more complete. <br> |
|- | |- | ||
! scope="row"| 2 | ! scope="row"| 2 | ||
| Line 48: | Line 43: | ||
| 4/15 | | 4/15 | ||
| Create Block Diagram, Flow Charts, Pseudo Code, Schematic | | Create Block Diagram, Flow Charts, Pseudo Code, Schematic | ||
| − | | | + | | Completed (5/20) |
| − | | The schematic is completed, but the flow charts and pseudo code have been delayed because of parts. Bluetooth programming was moved forward. | + | | (4/15)The initial schematic is completed, but the flow charts and pseudo code have been delayed because of parts.<br> Bluetooth programming was moved forward. We are not sure what else to add in terms of flow charts. <br> (5/20) We decided to make an in-depth software block diagram for showing the entire process of communication. <br> |
|- | |- | ||
! scope="row"| 3 | ! scope="row"| 3 | ||
| Line 55: | Line 50: | ||
| 4/22 | | 4/22 | ||
| Build syringe pump and work on stepper motor programming | | Build syringe pump and work on stepper motor programming | ||
| − | | Completed | + | | Completed (4/21) |
| − | | Parts are getting delivered and they all will arrive by the 26th of April. | + | | (4/12) Parts are getting delivered and they all will arrive by the 26th of April. <br> They have arrived and we built it. The next portion is setting up the stepper motor with the system. <br> We have found at this point we need additional parts.<br> (5/4) We have realized we are missing a needed and hex bolt bearing have ordered it. <br> (5/13) We decided on trying to attach a hose to the end of the syringe and bought the parts for it. <br> |
|- | |- | ||
! score="row"| 4 | ! score="row"| 4 | ||
| Line 63: | Line 58: | ||
| Work on bluetooth communication between SJ one board and Android device | | Work on bluetooth communication between SJ one board and Android device | ||
| Completed (4/30) | | Completed (4/30) | ||
| − | | Bluetooth module was easy to purchase. We moved forward with writing the Android application. | + | | (4/23) Bluetooth module was easy to purchase. We moved forward with writing the Android application. <br> (5/2) We are have written an elementary design to start testing out the process. <br> (5/10) We decided on two methods of software design, one with automatic reversal of the syringe and<br> the other with user enabled direction reversal. |
|- | |- | ||
! score="row"| 5 | ! score="row"| 5 | ||
| Line 69: | Line 64: | ||
| 5/8 | | 5/8 | ||
| Work on Android device control for syringe pump | | Work on Android device control for syringe pump | ||
| − | | | + | | Completed (4/30) |
| − | | (5/1)We have a list of options for users to decide how many steps they want to take with the stepper motor, but we have no correlation with an amount of liquid dispersed yet. | + | | (5/1)We have a list of options for users to decide how many steps they want to take with the stepper motor,<br> but we have no correlation with an amount of liquid dispersed yet. |
|- | |- | ||
! score="row"| 6 | ! score="row"| 6 | ||
| Line 76: | Line 71: | ||
| 5/16 | | 5/16 | ||
| Test syringe pump for accuracy and Android device control | | Test syringe pump for accuracy and Android device control | ||
| − | | | + | | Completed (5/10) |
| − | | | + | | We have pushed out liquid from the syringe into a cup for testing. We have counted the number of steps it <br>takes to empty a syringe. We have counting the number of steps for filling a syringe.<br> (5/20) We made adjustments to make the project more presentable. <br> |
|- | |- | ||
|} | |} | ||
| Line 90: | Line 85: | ||
! scope="col"| Description | ! scope="col"| Description | ||
! scope="col"| No. of Items | ! scope="col"| No. of Items | ||
| − | |||
! scope="col"| Price | ! scope="col"| Price | ||
|- | |- | ||
| Line 97: | Line 91: | ||
| Used for android app communication with the SJSU One Board | | Used for android app communication with the SJSU One Board | ||
| 1 | | 1 | ||
| − | |||
|$19.99 | |$19.99 | ||
|- | |- | ||
| Line 104: | Line 97: | ||
| Interfacing between SJSUOne Board and Stepper Motor | | Interfacing between SJSUOne Board and Stepper Motor | ||
| 1 | | 1 | ||
| − | |||
|$22.45 | |$22.45 | ||
|- | |- | ||
| Line 111: | Line 103: | ||
| | | | ||
| 1 | | 1 | ||
| − | |||
|$14.11 | |$14.11 | ||
|- | |- | ||
| Line 118: | Line 109: | ||
| Used for sucking and ejecting liquid in a thin stream | | Used for sucking and ejecting liquid in a thin stream | ||
| 1 | | 1 | ||
| − | |||
|$7.99 | |$7.99 | ||
|- | |- | ||
| Line 126: | Line 116: | ||
| 1 | | 1 | ||
| | | | ||
| − | |||
|- | |- | ||
! score="row"| 6 | ! score="row"| 6 | ||
| Line 133: | Line 122: | ||
| 1 | | 1 | ||
| | | | ||
| − | |||
|- | |- | ||
! score="row"| 7 | ! score="row"| 7 | ||
| Line 139: | Line 127: | ||
| Used for CNC applications, LM8UU | | Used for CNC applications, LM8UU | ||
| 1 | | 1 | ||
| − | |||
|$10.59 | |$10.59 | ||
|- | |- | ||
| Line 146: | Line 133: | ||
| User on the shaft of the stepper motor for turning the metal rod. | | User on the shaft of the stepper motor for turning the metal rod. | ||
| 1 | | 1 | ||
| − | |||
|$21.45 | |$21.45 | ||
|- | |- | ||
| Line 154: | Line 140: | ||
| For powering the SJ one board and stepper motor driver without the use of a USB connection. | | For powering the SJ one board and stepper motor driver without the use of a USB connection. | ||
| 1 | | 1 | ||
| − | |||
|$15.94 | |$15.94 | ||
|- | |- | ||
| Line 161: | Line 146: | ||
| For turning the circuit on and off without unplugging the power supply. | | For turning the circuit on and off without unplugging the power supply. | ||
| 1 | | 1 | ||
| − | |||
|$4.00 | |$4.00 | ||
|- | |- | ||
| Line 168: | Line 152: | ||
| Holding the top side of the syringe | | Holding the top side of the syringe | ||
| 1 | | 1 | ||
| − | |||
|Varies | |Varies | ||
|- | |- | ||
| Line 175: | Line 158: | ||
| Holding the bottom side of the syringe | | Holding the bottom side of the syringe | ||
| 1 | | 1 | ||
| − | |||
|Varies | |Varies | ||
|- | |- | ||
| Line 182: | Line 164: | ||
| Holding the rods in between the syringe and stepper motor | | Holding the rods in between the syringe and stepper motor | ||
| 1 | | 1 | ||
| − | |||
|Varies | |Varies | ||
|- | |- | ||
| Line 189: | Line 170: | ||
| Mounting the stepper motor at level with the rods to the push the syringe. | | Mounting the stepper motor at level with the rods to the push the syringe. | ||
| 1 | | 1 | ||
| − | |||
|Varies | |Varies | ||
| + | |- | ||
| + | ! score="row"| 15 | ||
| + | | Female Luer | ||
| + | | Connecting the syringe to a plastic tube. | ||
| + | | 1 | ||
| + | |$10.99 | ||
| + | |- | ||
| + | ! score="row"| 16 | ||
| + | | Male Luer | ||
| + | | Connecting the plastic tube to a needle. | ||
| + | | 1 | ||
| + | |$10.99 | ||
| + | |- | ||
| + | ! score="row"| 17 | ||
| + | | Syringe Needle | ||
| + | | Needle for outputting liquid. | ||
| + | | 10 | ||
| + | |$6.99 | ||
| + | |- | ||
| + | ! score="row"| 18 | ||
| + | | Hack Saw | ||
| + | | Cutting metal rod. | ||
| + | | 1 | ||
| + | |$15.99 | ||
| + | |- | ||
| + | ! score="row"| 19 | ||
| + | | Hex Bolt | ||
| + | | Rotating the metal rod. | ||
| + | | 1 | ||
| + | |$1.99 | ||
|- | |- | ||
|} | |} | ||
== Design & Implementation == | == Design & Implementation == | ||
| − | The design section | + | The design section goes over hardware, software design, and implementation. |
=== Hardware Design === | === Hardware Design === | ||
| − | + | Here we have a schematic of the connections we have with the SJ one board and the stepper motor driver and blue tooth module. The stepper motor is already drawn in. Most of the connections on the stepper motor driver are built onto the driver board. | |
| + | [[File:CMPE146_Dan_SyringePump.jpg|center|800px|thumb|Figure 1. Syringe Pump]] | ||
| + | [[File:System_Design_Top_Level_Version_1.png|800px|center|thumb|Figure 2. Top Level Diagram]] | ||
| + | [[File:System_Design_Version_5.png|thumb|center|800px|Figure 3. Schematic of HC-06 Bluetooth Module and A4988 Stepper Motor Driver]] | ||
| − | + | === Hardware Interface === | |
| − | + | Here is a detailed list of all of the hardware connections made between the SJ One Board, stepper motor driver, and stepper motor.<br> | |
| − | |||
| + | Stepper Motor Driver<br> | ||
| + | *GND is connected to a female plug<br> | ||
| + | *Vcc is connected to a female plug<br> | ||
| − | + | [[File:CMPE146_Dan_Nema_17_Stepper_Motor.jpg|200px|thumb|right|Figure 4. Nema 17 Stepper Motor]] | |
| − | + | Stepper motor wires connected to stepper motor driver<br> | |
| + | *A+<br> | ||
| + | *A-<br> | ||
| + | *B+<br> | ||
| + | *B-<br> | ||
| − | + | [[File:CMPE146_Dan_A4988.jpg|200px|thumb|right|Figure 5. A4988 Stepper Motor]] | |
| − | |||
| − | |||
| − | |||
| − | |||
| − | |||
| − | |||
| − | + | Bluetooth Connection HC 06 Module with SJ One Board<br> | |
| + | *Pin 0.0 was used as an UART TX pin. <br> | ||
| + | *Pin 0.1 was used as an UART RX pin. <br> | ||
| − | + | [[File:CMPE146_Dan_HC06-BT.jpg|200px|thumb|right|Figure 6. HC-06 Bluetooth Module]] | |
| − | |||
| − | + | Six SJSUOne pins were used for controlling the stepper motor driver,not including power and ground pins.<br> | |
| − | + | *Pin 2.0 was used as an output GPIO pin for the stepper motor driver's enable pin that allows for motor control when LOW.<br> | |
| + | *Pin 2.1 was used as an output GPIO pin for the stepper motor driver's ms1 pin that allows for the configuration of full,half,quarter,eighth,sixteenth steps of the motor.<br> | ||
| + | *Pin 2.2 was used as an output GPIO pin for the stepper motor driver's ms2 pin that allows for the configuration of full,half,quarter,eighth,sixteenth steps of the motor.<br> | ||
| + | *Pin 2.3 was used as an output GPIO pin for the stepper motor driver's ms3 pin that allows for the configuration of full,half,quarter,eighth,sixteenth steps of the motor.<br> | ||
| + | *Pin 2.4 was used as an output GPIO pin for the stepper motor driver's step procedure that allows the motor to do one step (if ms1,ms2,ms3 are LOW) on a LOW to HIGH transition.<br> | ||
| + | *Pin 2.5 was used as an input and output GPIO pin for the stepper motor driver's direction that allows for the motor to go in the forward direction when HIGH and the backward direction when LOW.<br> | ||
| − | + | === Software Design === | |
| − | + | [[File:Software_State_Diagram_Version_2.png|600px|center|thumb|Figure 7. Software FlowChart of Syringe Pump]] | |
| − | |||
=== Implementation === | === Implementation === | ||
| − | + | Here are the sub-sections of our project. | |
| + | ===== Android application ===== | ||
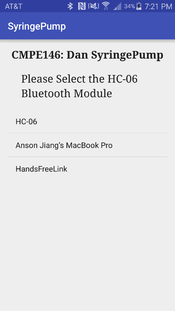
| − | + | [[File:CMPE146_Dan_AndroidMenuActivity.png|175px|thumb|right|Figure 8. Syringe Pump Control]] | |
| + | The application accepts user input that is between 0 to 30 (max amount of liquid per our syringe) to represent a milliliter equivalent output. The input needs to be rounded to the nearest .5mL (how accurate our product will be). The application converts the mL output to an appropriate number of letters to be sent through the Bluetooth UART connection on the SJ One board to decode in a later step. The software protocol is to send the amount of liquid to the SJSU One board starting with an 'x' byte to signal the start of data transfer. Then the appropriate letters are sent ('a' = 1 step, 'b' = 10 steps, 'c' = 100 steps, 'd' = 1000 steps) afterwards until the exact amount is sent and then a byte 'y' is sent to signal the end of the data transfer. After the data is done being sent, the application will disable input until the stepper motor task sends a byte to signal that the process is complete to allow for another execution. The user has the ability to change the direction the stepper motor is turning so the syringe holder can be pulled back when done. | ||
| − | + | ===== Bluetooth receiver task ===== | |
| − | + | The task is designed to wait for a message from the Android application and handle the data transfer. It will discard all bytes sent until a start byte of 'x' is sent and it will enter a loop to receive all of the letters and translate it to the equivalent liquid output to calculate the total amount of liquid to be output from the syringe. It will discard all other bytes that are not part of the decoding key and will exit the loop once a done byte of 'y' is sent. The program will then multiply the amount of mL of the requested output with the number of steps per milliliter to determine the result and send it in a queue. | |
| − | + | [[File:CMPE146_Dan_AndroidMainActivity.png|175px|thumb|right|Figure 9. Main Menu]] | |
| − | |||
| − | |||
| − | + | ===== Stepper Motor task ===== | |
| − | |||
| − | + | This task will wait forever until data from the Bluetooth receiver task is put into the queue. The stepper motor task will take the amount of steps data from the queue and create a low to high transition on the step pin. The motor steps amount an appropriate number of times to push the syringe to dispense the liquid. The task is looped to allow the user to continue sending requests until the they press the on-app button to finish their session. | |
| − | + | == Testing & Technical Challenges == | |
| − | + | Describe the challenges of your project. What advice would you give yourself or someone else if your project can be started from scratch again? | |
| − | Describe the challenges of your project. What | ||
Make a smooth transition to testing section and described what it took to test your project. | Make a smooth transition to testing section and described what it took to test your project. | ||
| − | + | === Technical Challenges === | |
| + | |||
| + | ===== Ordering parts and keeping track of what is being order ===== | ||
| + | |||
| + | Getting 3D printed parts on time was hard since most places needed atleast a week for production and shipping. We needed to focus on other aspects of our project while waiting for it. There are so many parts in our project that you are bound to forget to order something or order a wrong part. It is crucial to to start ordering parts as early as possible in our opinion because we didn't realize we were missing components until we started building. There were two separate times in the project when we had to order more parts. In addition, the parts were expensive and doing some shopping could potentially help reduce the cost. | ||
| + | |||
| + | ===== Part Compatibility ===== | ||
| + | |||
| + | The metal rod we ordered was 1 meter long and a 300-330 millimeter portion need to be cut for the system, so we went to a store to buy a hack saw. Cutting the metal rod took ages and the cut didn't come out as smooth as we had hoped. We would suggest finding a store that would do the cutting for you. The metal rod also had a tight fit with the hex bolt on the second 3D printed part. At first the hex bolt took a few attempts to break and the smoothness of the rotation can effect output measurements.The couple holding the shaft of the stepper motor and metal rod wasn't tight enough. We had to force it to clamp down on the metal rod to make it spin. | ||
| + | |||
| + | ===== Soldering Issues ===== | ||
| + | |||
| + | The pins needed to be soldered to the stepper motor driver for the power and SJ one board connections. Soldering the wires directly to the holes of the board caused problems because the wires became unstable and loose often. Soldering the wires was only required for the power supply and stepper motor connections to the stepper motor driver. As a result of the wires become loose, the stepper motor wires needed to be cut shorter every time they need to be re-soldered. | ||
| + | |||
| + | ===== Troubleshooting ===== | ||
| − | + | Sometimes the SJ one board doesn't power up properly or the stepper motor connections aren't working causing us to have to reset the system. Stepper motors are inherently inaccurate because they don't have a feedback loop and our program needed to be adjusted a number of times because of it. The UART communication caused us a few issues because of the translation between character and integers because UART requires byte transfers. | |
| − | |||
| − | |||
| + | ===== Accuracy ===== | ||
| − | + | Stepper motors have no feedback loop and are known for being less precise so we sometimes have trouble getting the output as accurate as we want it.Making sure you have an accurate relational number between steps and milliliters is crucial for getting an accurate output no matter how much you are trying to output. Since there is no feedback loop in stepper motors we are not constantly tracking the position the syringe is currently in and as a result we have to set a static starting position at start up every time or find a method of back tracking what has been done. | |
| − | |||
| − | === | + | === Testing === |
| − | |||
| − | + | Once the system was setup we attached the tube with luers because outputting liquid was easier with it as opposed to a needle. We found it easier to connect the SJ One board to one computer and another computer attached to the phone application since separate people worked on each component. The two people made adjustments by communicating what they wanted and reworked the software flow process to better the system. During the times when the system didn't work at the beginning of the day we used a multi meter to find unusual behavior. | |
| − | |||
== Conclusion == | == Conclusion == | ||
| − | + | Once it was confirmed we had all of the parts we needed and the hardware was set up, the programming was all we had to worry about. We made introductory designs for each task and the phone application, but made lots of changes throughout the project. We eventually stuck with giving the user the choice to choose the direction and amount of liquid to be output from the syringe. This approach required more error checking and a fail safe design to make sure the user cannot go too far or too close with the syringe holder and break the pump. There were a lot of different methods tried for sending UART signals to the board, but we stuck with a loop that breaks down the input by 1s,10s,100s, and 1000s of steps on the phone application side. The Bluetooth task had to be altered multiple times to accept the large amount of UART signals in a short period of time. | |
=== Project Video === | === Project Video === | ||
| + | |||
Upload a video of your project and post the link here. | Upload a video of your project and post the link here. | ||
| − | // | + | Project Demo Video: |
| − | 1. | + | https://www.youtube.com/watch?v=dI20_U0IZW8 |
| − | 2. | + | |
| − | 3. | + | === Learning Outcomes === |
| − | 4. | + | |
| − | 5. | + | 1. Knowledge of stepper motors and stepper motor driver. <br> |
| + | 2. Bluetooth communication. <br> | ||
| + | 3. Android application development with bluetooth. <br> | ||
| + | 4. Interfacing hardware and software. <br> | ||
| + | 5. Experience using uart<br> | ||
| + | 6. Experience using queues<br> | ||
| + | 7. Powering SJ one board and stepper motor driver using power supply. <br> | ||
=== Project Source Code === | === Project Source Code === | ||
| − | * [https://sourceforge.net/projects/ | + | |
| + | * [https://sourceforge.net/projects/real-time-syringe-pump/ Sourceforge Source Code Link] | ||
| + | * [https://github.com/ans0nJ/CMPE146.git Github Source Code Link] | ||
== References == | == References == | ||
| − | === | + | === Acknowledgements === |
| − | + | ||
| + | We would like to thank our professor, Preet Kang, for giving us advice on what we can do to make our project better and keep us motivated throughout the process of doing it. The advice of boxing the hardware to make it look like a sellable product was helpful. We would also like to thank him for giving us the background knowledge needed to make the Real Time Operating System program running on our SJ One board. | ||
=== References Used === | === References Used === | ||
| − | |||
| − | + | ||
| − | + | NEMA 17 Stepper Motor Datasheet | |
| + | http://www.pbclinear.com/Download/DataSheet/Stepper-Motor-Support-Document.pdf | ||
| + | |||
| + | A4988 Stepper Motor Driver Datasheet | ||
| + | https://cdn.sparkfun.com/datasheets/Robotics/A4988-Datasheet.pdf | ||
| + | |||
| + | Stepper Motor Driver Schematic | ||
| + | https://cdn.sparkfun.com/datasheets/Robotics/BigEasyDriver_v16.pdf | ||
| + | |||
| + | HC-06 Bluetooth Module Datasheet | ||
| + | ftp://imall.iteadstudio.com/Modules/IM120723010/DS_IM120723010.pdf | ||
| + | |||
| + | Android Bluetooth Documentation | ||
| + | https://developer.android.com/guide/topics/connectivity/bluetooth.html | ||
Latest revision as of 20:06, 26 May 2016
Contents
Syringe Pump
Abstract
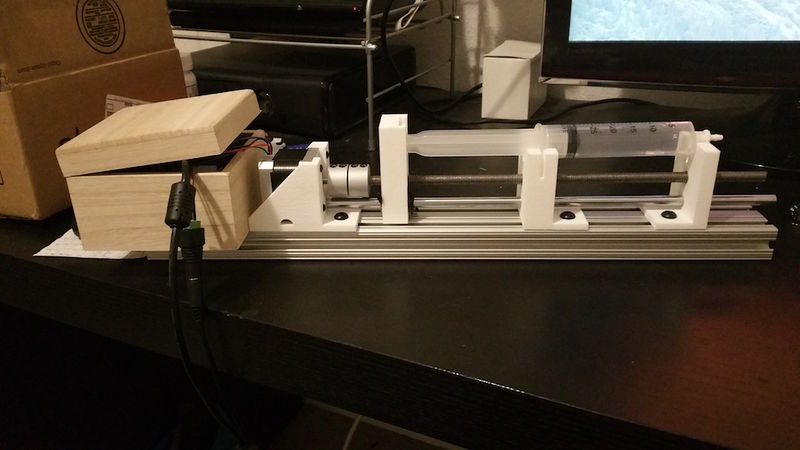
The project will use an Android application to determine how much liquid the syringe outputs using a pump powered by a stepper motor. The application will communicate with a Bluetooth module attached to the SJ One board which will control the stepper motor driver to determine how many steps the stepper motor will take on the syringe pump. The application takes in the direction for outputting liquid and reversing the position and the number of milliliters for output. The application has details about the syringe pump's position so the user does not have to remember what position the pump is in. The SJ One board is programmed with two tasks, one for receiving the UART signals from the phone and the other for telling the stepper motor drive how many steps to take with the stepper motor. A queue is used to determine when the shared data can be used by each task. The program initially has the terminal and Bluetooth task at higher priorities than the stepper motor drive task, but the queue can make either of the two main tasks wait. The stepper motor and SJ One board are powered with a 24V DC power supply and USB to micro USB wall adapter.
Objectives & Introduction
Show list of your objectives. This section includes the high level details of your project. You can write about the various sensors or peripherals you used to get your project completed.
Team Members & Responsibilities
- Nicholas Foulk
- Documentation/diagrams
- Ordering Parts
- SJSUOne Board Bluetooth Communications
- Anson Jiang
- Android Application with Bluetooth Communications
- Debugging
- Documentation
- Danny Luong
- Syringe Pump task
- Documentation
- Debugging
Schedule
| Week# | Start Date | End Date | Tasks | Status | Result |
|---|---|---|---|---|---|
| 1 | 4/7 | 4/9 | Order Parts | Completed (4/20) | (4/17) It was much more challenging to order the 3D parts than expected. Most of the initial parts have been ordered. (5/4) We ordered parts like hex bolt, bearing, and a coupling to make our design more complete. |
| 2 | 4/8 | 4/15 | Create Block Diagram, Flow Charts, Pseudo Code, Schematic | Completed (5/20) | (4/15)The initial schematic is completed, but the flow charts and pseudo code have been delayed because of parts. Bluetooth programming was moved forward. We are not sure what else to add in terms of flow charts. (5/20) We decided to make an in-depth software block diagram for showing the entire process of communication. |
| 3 | 4/16 | 4/22 | Build syringe pump and work on stepper motor programming | Completed (4/21) | (4/12) Parts are getting delivered and they all will arrive by the 26th of April. They have arrived and we built it. The next portion is setting up the stepper motor with the system. We have found at this point we need additional parts. (5/4) We have realized we are missing a needed and hex bolt bearing have ordered it. (5/13) We decided on trying to attach a hose to the end of the syringe and bought the parts for it. |
| 4 | 4/23 | 4/31 | Work on bluetooth communication between SJ one board and Android device | Completed (4/30) | (4/23) Bluetooth module was easy to purchase. We moved forward with writing the Android application. (5/2) We are have written an elementary design to start testing out the process. (5/10) We decided on two methods of software design, one with automatic reversal of the syringe and the other with user enabled direction reversal. |
| 5 | 5/1 | 5/8 | Work on Android device control for syringe pump | Completed (4/30) | (5/1)We have a list of options for users to decide how many steps they want to take with the stepper motor, but we have no correlation with an amount of liquid dispersed yet. |
| 6 | 5/9 | 5/16 | Test syringe pump for accuracy and Android device control | Completed (5/10) | We have pushed out liquid from the syringe into a cup for testing. We have counted the number of steps it takes to empty a syringe. We have counting the number of steps for filling a syringe. (5/20) We made adjustments to make the project more presentable. |
Parts List & Cost
Give a simple list of the cost of your project broken down by components. Do not write long stories here.
| Part No. | Name | Description | No. of Items | Price |
|---|---|---|---|---|
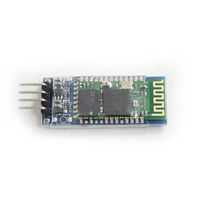
| 1 | HC-06 Bluetooth Module | Used for android app communication with the SJSU One Board | 1 | $19.99 |
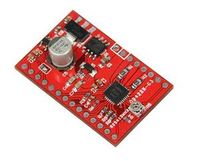
| 2 | Stepper motor driver | Interfacing between SJSUOne Board and Stepper Motor | 1 | $22.45 |
| 3 | Stepper motor | 1 | $14.11 | |
| 4 | Syringe | Used for sucking and ejecting liquid in a thin stream | 1 | $7.99 |
| 5 | T-Slotted Extrusion | Part of the syringe holder for dispensing the proper amount of liquid | 1 | |
| 6 | Linear Motion Shaft | 8mm Shaft, 330m in length, steel | 1 | |
| 7 | Linear Bearings | Used for CNC applications, LM8UU | 1 | $10.59 |
| 8 | Rigid Coupling | User on the shaft of the stepper motor for turning the metal rod. | 1 | $21.45 |
| 9 | DC output power supply | For powering the SJ one board and stepper motor driver without the use of a USB connection. | 1 | $15.94 |
| 10 | Inline switch | For turning the circuit on and off without unplugging the power supply. | 1 | $4.00 |
| 11 | 3D printed part #1 Syringe Mount | Holding the top side of the syringe | 1 | Varies |
| 12 | 3D printed part #2 Rod Barrel | Holding the bottom side of the syringe | 1 | Varies |
| 13 | 3D printed part #3 Rod plunger | Holding the rods in between the syringe and stepper motor | 1 | Varies |
| 14 | 3D printed part #4 Stepper motor mount | Mounting the stepper motor at level with the rods to the push the syringe. | 1 | Varies |
| 15 | Female Luer | Connecting the syringe to a plastic tube. | 1 | $10.99 |
| 16 | Male Luer | Connecting the plastic tube to a needle. | 1 | $10.99 |
| 17 | Syringe Needle | Needle for outputting liquid. | 10 | $6.99 |
| 18 | Hack Saw | Cutting metal rod. | 1 | $15.99 |
| 19 | Hex Bolt | Rotating the metal rod. | 1 | $1.99 |
Design & Implementation
The design section goes over hardware, software design, and implementation.
Hardware Design
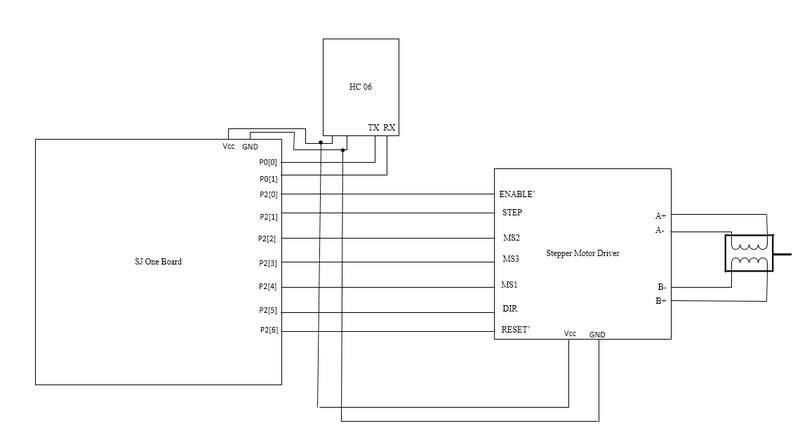
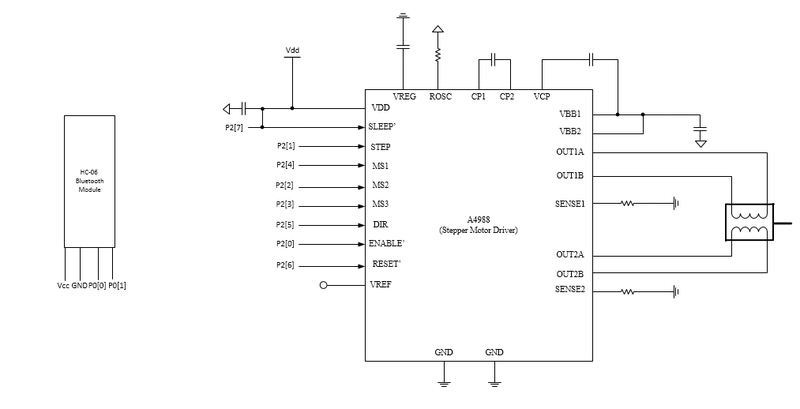
Here we have a schematic of the connections we have with the SJ one board and the stepper motor driver and blue tooth module. The stepper motor is already drawn in. Most of the connections on the stepper motor driver are built onto the driver board.
Hardware Interface
Here is a detailed list of all of the hardware connections made between the SJ One Board, stepper motor driver, and stepper motor.
Stepper Motor Driver
- GND is connected to a female plug
- Vcc is connected to a female plug
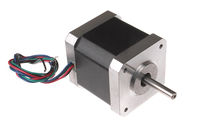
Stepper motor wires connected to stepper motor driver
- A+
- A-
- B+
- B-
Bluetooth Connection HC 06 Module with SJ One Board
- Pin 0.0 was used as an UART TX pin.
- Pin 0.1 was used as an UART RX pin.
Six SJSUOne pins were used for controlling the stepper motor driver,not including power and ground pins.
- Pin 2.0 was used as an output GPIO pin for the stepper motor driver's enable pin that allows for motor control when LOW.
- Pin 2.1 was used as an output GPIO pin for the stepper motor driver's ms1 pin that allows for the configuration of full,half,quarter,eighth,sixteenth steps of the motor.
- Pin 2.2 was used as an output GPIO pin for the stepper motor driver's ms2 pin that allows for the configuration of full,half,quarter,eighth,sixteenth steps of the motor.
- Pin 2.3 was used as an output GPIO pin for the stepper motor driver's ms3 pin that allows for the configuration of full,half,quarter,eighth,sixteenth steps of the motor.
- Pin 2.4 was used as an output GPIO pin for the stepper motor driver's step procedure that allows the motor to do one step (if ms1,ms2,ms3 are LOW) on a LOW to HIGH transition.
- Pin 2.5 was used as an input and output GPIO pin for the stepper motor driver's direction that allows for the motor to go in the forward direction when HIGH and the backward direction when LOW.
Software Design
Implementation
Here are the sub-sections of our project.
Android application
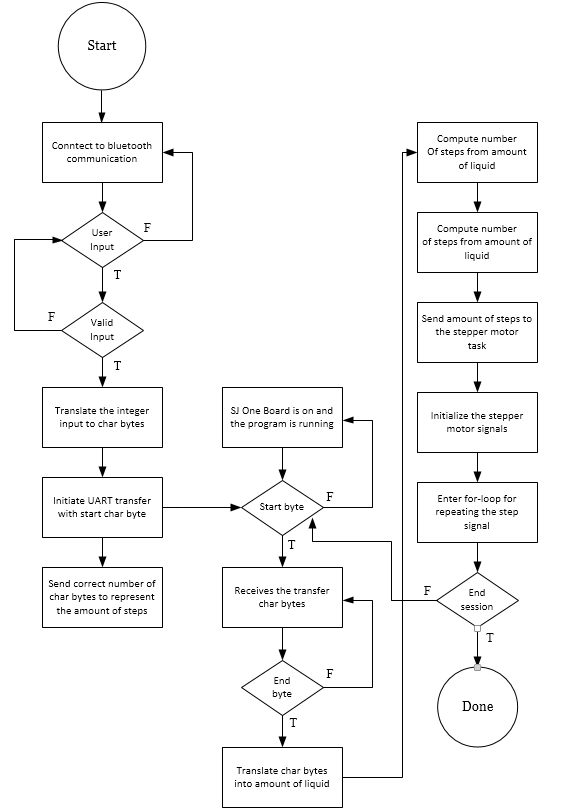
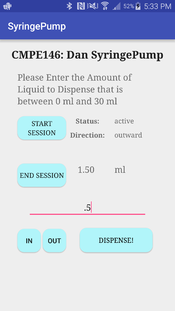
The application accepts user input that is between 0 to 30 (max amount of liquid per our syringe) to represent a milliliter equivalent output. The input needs to be rounded to the nearest .5mL (how accurate our product will be). The application converts the mL output to an appropriate number of letters to be sent through the Bluetooth UART connection on the SJ One board to decode in a later step. The software protocol is to send the amount of liquid to the SJSU One board starting with an 'x' byte to signal the start of data transfer. Then the appropriate letters are sent ('a' = 1 step, 'b' = 10 steps, 'c' = 100 steps, 'd' = 1000 steps) afterwards until the exact amount is sent and then a byte 'y' is sent to signal the end of the data transfer. After the data is done being sent, the application will disable input until the stepper motor task sends a byte to signal that the process is complete to allow for another execution. The user has the ability to change the direction the stepper motor is turning so the syringe holder can be pulled back when done.
Bluetooth receiver task
The task is designed to wait for a message from the Android application and handle the data transfer. It will discard all bytes sent until a start byte of 'x' is sent and it will enter a loop to receive all of the letters and translate it to the equivalent liquid output to calculate the total amount of liquid to be output from the syringe. It will discard all other bytes that are not part of the decoding key and will exit the loop once a done byte of 'y' is sent. The program will then multiply the amount of mL of the requested output with the number of steps per milliliter to determine the result and send it in a queue.
Stepper Motor task
This task will wait forever until data from the Bluetooth receiver task is put into the queue. The stepper motor task will take the amount of steps data from the queue and create a low to high transition on the step pin. The motor steps amount an appropriate number of times to push the syringe to dispense the liquid. The task is looped to allow the user to continue sending requests until the they press the on-app button to finish their session.
Testing & Technical Challenges
Describe the challenges of your project. What advice would you give yourself or someone else if your project can be started from scratch again? Make a smooth transition to testing section and described what it took to test your project.
Technical Challenges
Ordering parts and keeping track of what is being order
Getting 3D printed parts on time was hard since most places needed atleast a week for production and shipping. We needed to focus on other aspects of our project while waiting for it. There are so many parts in our project that you are bound to forget to order something or order a wrong part. It is crucial to to start ordering parts as early as possible in our opinion because we didn't realize we were missing components until we started building. There were two separate times in the project when we had to order more parts. In addition, the parts were expensive and doing some shopping could potentially help reduce the cost.
Part Compatibility
The metal rod we ordered was 1 meter long and a 300-330 millimeter portion need to be cut for the system, so we went to a store to buy a hack saw. Cutting the metal rod took ages and the cut didn't come out as smooth as we had hoped. We would suggest finding a store that would do the cutting for you. The metal rod also had a tight fit with the hex bolt on the second 3D printed part. At first the hex bolt took a few attempts to break and the smoothness of the rotation can effect output measurements.The couple holding the shaft of the stepper motor and metal rod wasn't tight enough. We had to force it to clamp down on the metal rod to make it spin.
Soldering Issues
The pins needed to be soldered to the stepper motor driver for the power and SJ one board connections. Soldering the wires directly to the holes of the board caused problems because the wires became unstable and loose often. Soldering the wires was only required for the power supply and stepper motor connections to the stepper motor driver. As a result of the wires become loose, the stepper motor wires needed to be cut shorter every time they need to be re-soldered.
Troubleshooting
Sometimes the SJ one board doesn't power up properly or the stepper motor connections aren't working causing us to have to reset the system. Stepper motors are inherently inaccurate because they don't have a feedback loop and our program needed to be adjusted a number of times because of it. The UART communication caused us a few issues because of the translation between character and integers because UART requires byte transfers.
Accuracy
Stepper motors have no feedback loop and are known for being less precise so we sometimes have trouble getting the output as accurate as we want it.Making sure you have an accurate relational number between steps and milliliters is crucial for getting an accurate output no matter how much you are trying to output. Since there is no feedback loop in stepper motors we are not constantly tracking the position the syringe is currently in and as a result we have to set a static starting position at start up every time or find a method of back tracking what has been done.
Testing
Once the system was setup we attached the tube with luers because outputting liquid was easier with it as opposed to a needle. We found it easier to connect the SJ One board to one computer and another computer attached to the phone application since separate people worked on each component. The two people made adjustments by communicating what they wanted and reworked the software flow process to better the system. During the times when the system didn't work at the beginning of the day we used a multi meter to find unusual behavior.
Conclusion
Once it was confirmed we had all of the parts we needed and the hardware was set up, the programming was all we had to worry about. We made introductory designs for each task and the phone application, but made lots of changes throughout the project. We eventually stuck with giving the user the choice to choose the direction and amount of liquid to be output from the syringe. This approach required more error checking and a fail safe design to make sure the user cannot go too far or too close with the syringe holder and break the pump. There were a lot of different methods tried for sending UART signals to the board, but we stuck with a loop that breaks down the input by 1s,10s,100s, and 1000s of steps on the phone application side. The Bluetooth task had to be altered multiple times to accept the large amount of UART signals in a short period of time.
Project Video
Upload a video of your project and post the link here.
Project Demo Video: https://www.youtube.com/watch?v=dI20_U0IZW8
Learning Outcomes
1. Knowledge of stepper motors and stepper motor driver.
2. Bluetooth communication.
3. Android application development with bluetooth.
4. Interfacing hardware and software.
5. Experience using uart
6. Experience using queues
7. Powering SJ one board and stepper motor driver using power supply.
Project Source Code
References
Acknowledgements
We would like to thank our professor, Preet Kang, for giving us advice on what we can do to make our project better and keep us motivated throughout the process of doing it. The advice of boxing the hardware to make it look like a sellable product was helpful. We would also like to thank him for giving us the background knowledge needed to make the Real Time Operating System program running on our SJ One board.
References Used
NEMA 17 Stepper Motor Datasheet http://www.pbclinear.com/Download/DataSheet/Stepper-Motor-Support-Document.pdf
A4988 Stepper Motor Driver Datasheet https://cdn.sparkfun.com/datasheets/Robotics/A4988-Datasheet.pdf
Stepper Motor Driver Schematic https://cdn.sparkfun.com/datasheets/Robotics/BigEasyDriver_v16.pdf
HC-06 Bluetooth Module Datasheet ftp://imall.iteadstudio.com/Modules/IM120723010/DS_IM120723010.pdf
Android Bluetooth Documentation https://developer.android.com/guide/topics/connectivity/bluetooth.html
