Difference between revisions of "S15: Drone"
Proj user20 (talk | contribs) (→Software Design) |
Proj user20 (talk | contribs) (→Remote Controller) |
||
| (31 intermediate revisions by the same user not shown) | |||
| Line 13: | Line 13: | ||
== Team Members & Responsibilities == | == Team Members & Responsibilities == | ||
| − | + | 1. Bhushan Gopala Reddy | |
| − | PID tuning and Software analysis | + | *PID tuning and Software analysis |
| − | + | 2. Karthik Govindaswamy | |
| − | + | *Sensors and report | |
| − | + | 3. Rishikesh Nagare | |
| − | Report and PWM design | + | *Report and PWM design |
| − | + | 4. Mayur Salve | |
| − | Mechanical design and PID analysis | + | *Mechanical design and PID analysis |
| − | + | 5. Manuj Shinkar | |
| − | Mechanical design, code integration and Remote controller interface | + | *Mechanical design, code integration and Remote controller interface |
== Introduction == | == Introduction == | ||
| Line 308: | Line 308: | ||
===System Design=== | ===System Design=== | ||
| − | |||
| + | |||
| + | <table> | ||
| + | <tr> | ||
| + | <td align="center"> | ||
| + | [[File:S15 244 SystemDesign.PNG|700px|thumb|left|Fig 4. System Block Diagram]] | ||
| + | </td> | ||
| + | <td valign="top" align="justify" width=800px> | ||
The quadcopter's flight controller system is discussed in the block diagram shown on the left. The subsystem consists of following: | The quadcopter's flight controller system is discussed in the block diagram shown on the left. The subsystem consists of following: | ||
*SJ-One Board | *SJ-One Board | ||
| Line 318: | Line 324: | ||
The power is fed to the motors using the power distribution board. The power comes from 3 Cell 11.1V LIPO battery Pack. | The power is fed to the motors using the power distribution board. The power comes from 3 Cell 11.1V LIPO battery Pack. | ||
| − | < | + | </td> |
| + | </tr> | ||
| + | </table> | ||
| − | |||
===Hardware=== | ===Hardware=== | ||
==== Frame ==== | ==== Frame ==== | ||
| Line 358: | Line 365: | ||
[[File:S15_244_G6_10DOF_IMUsensor.jpg|200px|thumb|left|Fig 9. MPU-9150 Breakout Board]] | [[File:S15_244_G6_10DOF_IMUsensor.jpg|200px|thumb|left|Fig 9. MPU-9150 Breakout Board]] | ||
The Inertial Measurement Unit (IMU) is an integrated sensor device which measures accleration and tilt by Accelerometer, angular velocity and orientation by Gyroscope and gravitational forces by Magnetometer. Inertial Measurement Unit by Adafruit provides 10 DOF(actually 11) i.e 3-axis accelerometer, 3-axis gyroscope, 3-axis magnetometer barometric pressure sensor and temperature sensor. These values are sent to SJ-1 board over I2C, where the further processing is done by SJ-1 board to determine the angular position and orientation of the Quadcopter. | The Inertial Measurement Unit (IMU) is an integrated sensor device which measures accleration and tilt by Accelerometer, angular velocity and orientation by Gyroscope and gravitational forces by Magnetometer. Inertial Measurement Unit by Adafruit provides 10 DOF(actually 11) i.e 3-axis accelerometer, 3-axis gyroscope, 3-axis magnetometer barometric pressure sensor and temperature sensor. These values are sent to SJ-1 board over I2C, where the further processing is done by SJ-1 board to determine the angular position and orientation of the Quadcopter. | ||
| − | <br><br><br><br><br><br> | + | <br><br><br><br><br><br><br> |
==== Remote Controller ==== | ==== Remote Controller ==== | ||
| Line 365: | Line 372: | ||
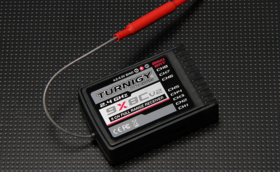
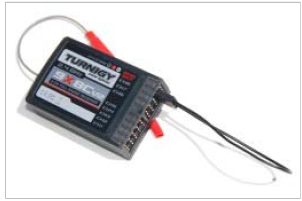
[[File:S15_244_G6_RC_receiver.PNG|280px|thumb|right|Fig 11. RC Receiver]] | [[File:S15_244_G6_RC_receiver.PNG|280px|thumb|right|Fig 11. RC Receiver]] | ||
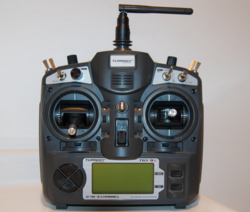
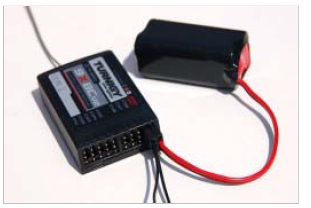
The new transmission module (TGY-9X) is of type FHSS (Frequency-hopping spread spectrum) and uses frequency hopping. This technique has a high transmission reliability because it is insensitive to interference. It has a plastic casing of compact type. Its handling is excellent and the sleeves are adjustable. The antenna is directional. 167x34mm LCD screen (black and white) is fairly well mixed and makes a pretty good readability in daylight. 6 keys allow access to many menus, selection and settings. | The new transmission module (TGY-9X) is of type FHSS (Frequency-hopping spread spectrum) and uses frequency hopping. This technique has a high transmission reliability because it is insensitive to interference. It has a plastic casing of compact type. Its handling is excellent and the sleeves are adjustable. The antenna is directional. 167x34mm LCD screen (black and white) is fairly well mixed and makes a pretty good readability in daylight. 6 keys allow access to many menus, selection and settings. | ||
| − | <br><br><br><br><br><br><br><br><br> | + | <br><br><br><br><br><br><br><br><br><br><br> |
===== Binding Procedure ===== | ===== Binding Procedure ===== | ||
| Line 405: | Line 412: | ||
<table> | <table> | ||
<tr> | <tr> | ||
| − | <td valign="left" width= | + | <td valign="left" width=500px> |
[[File:S15_244_G6_HW_Interface.jpg|800px|thumb|center|Fig 15. Hardware Interface]] | [[File:S15_244_G6_HW_Interface.jpg|800px|thumb|center|Fig 15. Hardware Interface]] | ||
</td> | </td> | ||
| Line 448: | Line 455: | ||
</tr> | </tr> | ||
</table> | </table> | ||
| + | |||
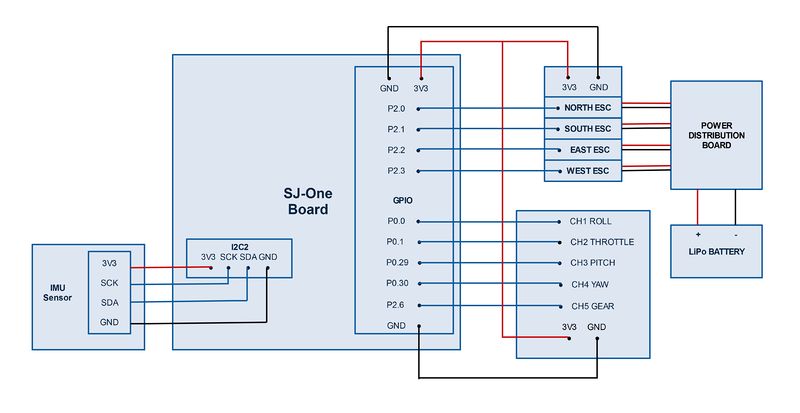
| + | The diagram above shows the hardware interfacing of various components with the flight controller board. The 4000mAh LiPo battery is used to supply power to SJOne board, the receiver and all the four ESCs and motors. Special care was taken to ensure a common grounding between all the components. | ||
=== Software Design === | === Software Design === | ||
| Line 453: | Line 462: | ||
<tr> | <tr> | ||
<td valign="top" align="justify" width=400px> | <td valign="top" align="justify" width=400px> | ||
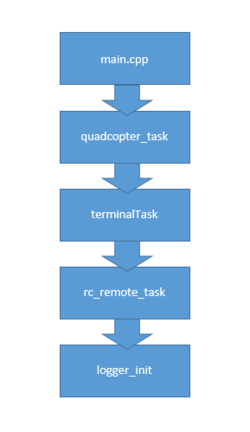
| − | Main.cpp - This is the entry point of the all the modules. There are 4 tasks running with | + | Main.cpp - This is the entry point of the all the modules. There are 4 tasks running with quad-copter task with highest priority and terminal task being the next highest and so on. |
| − | The | + | The quad-copter is the main task which process all the data. |
* Initializes the Adafruit 10-DOF IMU | * Initializes the Adafruit 10-DOF IMU | ||
| Line 462: | Line 471: | ||
* Update propeller values | * Update propeller values | ||
* Compute pitch, roll and yaw throttle. | * Compute pitch, roll and yaw throttle. | ||
| − | * Applying throttle values if the | + | * Applying throttle values if the quad-copter is armed. |
* Indicating error if any the above process take more time. | * Indicating error if any the above process take more time. | ||
| Line 472: | Line 481: | ||
</td> | </td> | ||
<td align="center"> | <td align="center"> | ||
| − | [[File:S15_244_G6_Code_Flow.png|250px]] | + | [[File:S15_244_G6_Code_Flow.png|250px|thumb|right|Fig 16. Software Code Flow]] |
</td> | </td> | ||
</tr> | </tr> | ||
</table> | </table> | ||
| + | |||
The computeThrottleValues() is used to calculate the pitch, roll and yaw throttle by using the using the PID algorithm that need to be applied to the motors. | The computeThrottleValues() is used to calculate the pitch, roll and yaw throttle by using the using the PID algorithm that need to be applied to the motors. | ||
This API uses the current values of the sensors and the applied pitch, roll and yaw values from the RC.<br> | This API uses the current values of the sensors and the applied pitch, roll and yaw values from the RC.<br> | ||
| − | [[File:S15_244_G6_computeThrottleValues.PNG|800px|thumb|left| Code snippet of PID calculation for pitch, roll and yaw]]<br><br><br><br><br><br><br><br><br><br><br> | + | [[File:S15_244_G6_computeThrottleValues.PNG|800px|thumb|left|Fig 17.Code snippet of PID calculation for pitch, roll and yaw]]<br><br><br><br><br><br><br><br><br><br><br> |
This code applies the calculated pitch, roll and yaw throttle to the respective motors to stabilize the flight of the quad-copter. | This code applies the calculated pitch, roll and yaw throttle to the respective motors to stabilize the flight of the quad-copter. | ||
| − | [[File:S15_244_G6_ApplyThrottleValue.PNG|800px|thumb|left| Code snippet for applying the motor values]]<br><br><br><br><br><br><br><br><br> | + | [[File:S15_244_G6_ApplyThrottleValue.PNG|800px|thumb|left|Fig 18.Code snippet for applying the motor values]]<br><br><br><br><br><br><br><br><br> |
| Line 490: | Line 500: | ||
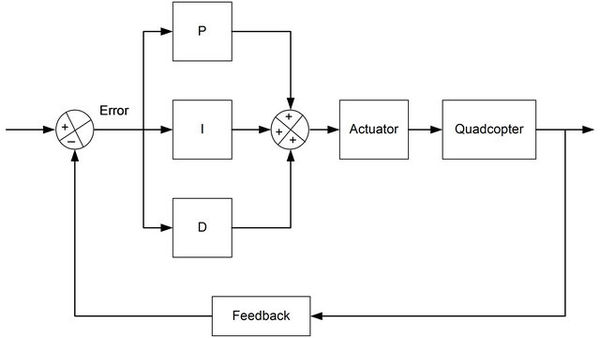
PID (proportional-integral-derivative) is a closed-loop control system that tries to get the actual result from IMU sensors closer to the desired result from the RC transmitter by computing the output values. The popularity of PID controllers can be attributed partly to their robust performance in a wide range of operating conditions and partly to their functional simplicity, which allows engineers to operate them in a simple, straightforward manner. | PID (proportional-integral-derivative) is a closed-loop control system that tries to get the actual result from IMU sensors closer to the desired result from the RC transmitter by computing the output values. The popularity of PID controllers can be attributed partly to their robust performance in a wide range of operating conditions and partly to their functional simplicity, which allows engineers to operate them in a simple, straightforward manner. | ||
| − | [[File:S15_244_G6_PID_closedloop.jpg|600px|thumb|center|Fig | + | [[File:S15_244_G6_PID_closedloop.jpg|600px|thumb|center|Fig 19. Block diagram of PID]] |
==== PID formula ==== | ==== PID formula ==== | ||
| − | [[File:S15_244_G6_PID_formula.png|400px|center|Fig | + | [[File:S15_244_G6_PID_formula.png|400px|center|Fig 20. PID]] |
There are 3 variables in a PID controller, namely P(Proportional), I(Integral), and D (Derivative). P depends on the present error, I on the accumulation of past errors, and D is a prediction of future errors, based on current rate of change of the Quadcopter. | There are 3 variables in a PID controller, namely P(Proportional), I(Integral), and D (Derivative). P depends on the present error, I on the accumulation of past errors, and D is a prediction of future errors, based on current rate of change of the Quadcopter. | ||
| Line 528: | Line 538: | ||
To obtain the control and stability of the quadcopter we do the following, for example consider we are doing it for pitch axis, the user provides some input to the quadcopter which becomes the requested value, at the same time sensor outputs the present value for the pitch axis for the quadcopter. The three alogorithms P, I and D finds the difference between the requested and the present values which is calculated as an error and apply these values on the motor which are the applied values to reduce the error. Similarly it is done for other 2 axis i.e Roll and Yaw to obtain the overall stability of the Quadcopter. | To obtain the control and stability of the quadcopter we do the following, for example consider we are doing it for pitch axis, the user provides some input to the quadcopter which becomes the requested value, at the same time sensor outputs the present value for the pitch axis for the quadcopter. The three alogorithms P, I and D finds the difference between the requested and the present values which is calculated as an error and apply these values on the motor which are the applied values to reduce the error. Similarly it is done for other 2 axis i.e Roll and Yaw to obtain the overall stability of the Quadcopter. | ||
| − | [[File:S15_244_G6_pid_per_axis.png|750px|thumb|center|Fig | + | [[File:S15_244_G6_pid_per_axis.png|750px|thumb|center|Fig 20. PID per axis]] |
There were few parameter which were addressed while writing the PID algorithm | There were few parameter which were addressed while writing the PID algorithm | ||
| Line 542: | Line 552: | ||
=== Flight Controller === | === Flight Controller === | ||
| − | [[File:S15_244_G6_SJOne.PNG|250px|thumb|right|Fig | + | [[File:S15_244_G6_SJOne.PNG|250px|thumb|right|Fig 22. SJ-One Board]] |
| − | [[File:S15_244_G6_front.jpg|250px|thumb|left|Fig | + | [[File:S15_244_G6_front.jpg|250px|thumb|left|Fig 21. front view of Quadcopter]] |
| − | [[File:S15_244_G6_topview.jpg|250px|thumb|left|Fig | + | [[File:S15_244_G6_topview.jpg|250px|thumb|left|Fig 23. Top view of Quadcopter]] |
Fight controller is a brain of any Quadcopter or multicopter. In our project, we have used SJ-One board as our flight controller, it continuously reads data from IMU sensors and inputs from RC transmitter. The flight controller performs algorithmic calculation received from sensors and RC and apply these adjustments on each rotor. Quadcopter has 4 degrees of freedom i.e pitch, roll , yaw and altitude, and with the flight controller each degree of freedom can be controlled by adjusting the thrusts on each rotor and keep the quadcopter balanced. | Fight controller is a brain of any Quadcopter or multicopter. In our project, we have used SJ-One board as our flight controller, it continuously reads data from IMU sensors and inputs from RC transmitter. The flight controller performs algorithmic calculation received from sensors and RC and apply these adjustments on each rotor. Quadcopter has 4 degrees of freedom i.e pitch, roll , yaw and altitude, and with the flight controller each degree of freedom can be controlled by adjusting the thrusts on each rotor and keep the quadcopter balanced. | ||
| Line 591: | Line 601: | ||
=== Testing of 10DOF IMU === | === Testing of 10DOF IMU === | ||
---- | ---- | ||
| − | [[File:S15_244_G6_9DOFrazor.jpg|300px|thumb|left|Fig . IMU Razor 9DOF]] | + | [[File:S15_244_G6_9DOFrazor.jpg|300px|thumb|left|Fig 24. IMU Razor 9DOF]] |
We tested the IMU with an application called IMU Razor 9DOF. This application shows the simulation of our IMU sensor. It displays values of pitch, roll and yaw.<br><br><br> | We tested the IMU with an application called IMU Razor 9DOF. This application shows the simulation of our IMU sensor. It displays values of pitch, roll and yaw.<br><br><br> | ||
| Line 597: | Line 607: | ||
=== Testing of PID === | === Testing of PID === | ||
---- | ---- | ||
| − | [[File: S15_244_G6_testrig_latest.jpg|250px|thumb|right|Fig . Testing of PID]] | + | [[File: S15_244_G6_testrig_latest.jpg|250px|thumb|right|Fig 25. Testing of PID]] |
The testing of PID was done for each axis separately. We started with pitch axis. We used two wooden planks and hooks two hold the quad on the east and west so that our pitch axis is free. Slowly started to increase the value of P. At some point the pitch axis was oscillating constantly. The amplitude of oscillation should neither increase or decrease. Then we started increasing the values of D till the overshoot is reduced to an acceptable level. Then we increased the value of I till the final error is zero. The quad is very sensitive to the value of I. After the pitch axis we tuned the PID for the roll axis. We used some tuning methods such as Zeigler Nicholas and Cohen Coon to tune the PID. After the pitch and roll we tested the yaw axis. We tied the quad to a rope and held it in the air so that the quad is free in the yaw axis.<br><br><br><br><br><br> | The testing of PID was done for each axis separately. We started with pitch axis. We used two wooden planks and hooks two hold the quad on the east and west so that our pitch axis is free. Slowly started to increase the value of P. At some point the pitch axis was oscillating constantly. The amplitude of oscillation should neither increase or decrease. Then we started increasing the values of D till the overshoot is reduced to an acceptable level. Then we increased the value of I till the final error is zero. The quad is very sensitive to the value of I. After the pitch axis we tuned the PID for the roll axis. We used some tuning methods such as Zeigler Nicholas and Cohen Coon to tune the PID. After the pitch and roll we tested the yaw axis. We tied the quad to a rope and held it in the air so that the quad is free in the yaw axis.<br><br><br><br><br><br> | ||
=== Testing the Quadcopter flight === | === Testing the Quadcopter flight === | ||
---- | ---- | ||
| − | [[File:S15_244_G6_flight_test.jpg|200px|thumb|left|Fig . Testing the Quadcopter]] | + | [[File:S15_244_G6_flight_test.jpg|200px|thumb|left|Fig 26. Testing the Quadcopter]] |
We tied the quad with a rope to a wooden plank. One person was holding the plank. We slowly increased the throttle so that the quadcopter lifts up. The person holding the wooden plank could control the quadcopter so the it doesn't hit somewhere and get damaged. | We tied the quad with a rope to a wooden plank. One person was holding the plank. We slowly increased the throttle so that the quadcopter lifts up. The person holding the wooden plank could control the quadcopter so the it doesn't hit somewhere and get damaged. | ||
| Line 617: | Line 627: | ||
==== Glitch in one of the motor values ==== | ==== Glitch in one of the motor values ==== | ||
| − | One of the motor was experiencing glitch. We found out that the input of roll from the transmitter is giving a spike at constant intervals. The receiver was getting a pulse of more than 2000ms. We wrote a software filter to get rid of the glitch. | + | One of the motor was experiencing glitch. We found out that the input of roll from the transmitter is giving a spike at constant intervals. The receiver was getting a pulse of more than 2000ms. We wrote a software filter to get rid of the glitch.<br><br> |
==== I2C short in SDA and SCL ==== | ==== I2C short in SDA and SCL ==== | ||
| Line 624: | Line 634: | ||
== Conclusion == | == Conclusion == | ||
| − | + | This project provided us with practical experience on the firmware that goes into making an Unmanned Aerial Vehicle(UAV). We were able to successfully design a quadcopter assembly which used sensor readings and input from values to compute the PID values. The SJOne flight control board was programmed with this PID algorithm. We have successfully tuned the PID for pitch and roll axis. We were able to get the quadcopter in air. However, the flight was not stable because the yaw axis was not tuned. | |
=== Project Video === | === Project Video === | ||
| Line 634: | Line 644: | ||
== References == | == References == | ||
=== Acknowledgement === | === Acknowledgement === | ||
| − | Thanks a lot to Professor Preetpal Kang who provided us with the basic code framework, which helped us have a great start. Thanks to Brett Beauregard | + | Thanks a lot to Professor Preetpal Kang who provided us with the basic code framework, which helped us have a great start. Thanks to Brett Beauregard whose article <I>PID for beginners</I> was very helpful for writing the PID firmware. |
=== References Used === | === References Used === | ||
Latest revision as of 06:59, 25 May 2015
Contents
- 1 DRONE
- 2 Objectives
- 3 Team Members & Responsibilities
- 4 Introduction
- 5 Schedule
- 6 Parts List & Cost
- 7 Backup Parts List & Cost
- 8 Design & Implementation
- 9 Testing & Technical Challenges
- 10 Conclusion
- 11 References
DRONE
Objectives
The idea is to design an Quadcopter capable of sustaining a stable flight via wireless communication. The goals of the project can be divided mainly into the following four parts:
- To interface IMU 10-dof sensor to SJ-One Board and decode the readings coming from sensor.
- To interface the 8Channel Turnigy receiver with our SJ-One and normalize and scale those readings.
- To use SJ-One Board as the Flight control board which takes readings continuously from the sensor and the receiver to compute the PID values.
- To give the computed PWM values to all the four ESCs.
This should enable the Quadcopter to have a balanced flight.
Team Members & Responsibilities
1. Bhushan Gopala Reddy
- PID tuning and Software analysis
2. Karthik Govindaswamy
- Sensors and report
3. Rishikesh Nagare
- Report and PWM design
4. Mayur Salve
- Mechanical design and PID analysis
5. Manuj Shinkar
- Mechanical design, code integration and Remote controller interface
Introduction
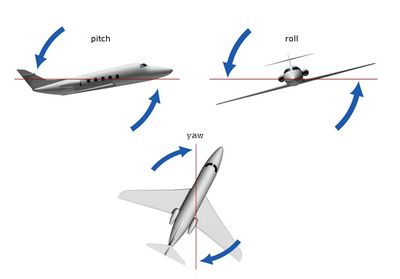
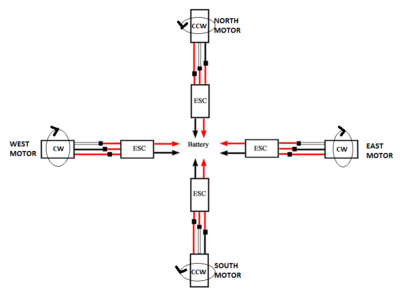
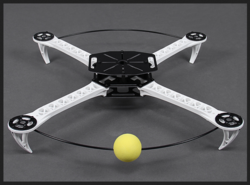
Basics of Quadcopter
|
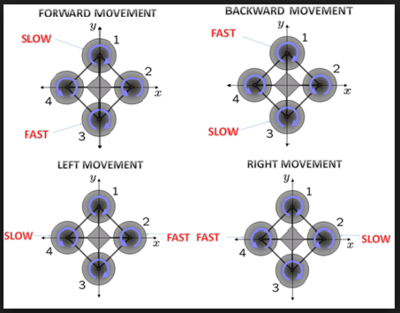
|
Motor1 will spin faster and Motor3 will spin slower resulting in an forward tilt of the Quadcopter.
Motor1 will spin slower and Motor3 will spin faster resulting in an backward tilt of the Quadcopter.
Motor2 will spin faster and Motor4 will spin slower resulting in an leftward tilt of the Quadcopter.
Motor2 will spin slower and Motor4 will spin faster resulting in an rightward tilt of the Quadcopter. |
Arming/Disarming the Quadcopter
Arming/disarming facility in Quadcopters is a precautionary measure provided to prevent the motors from spinning accidentally. Imagine if the transmitter is on full throttle and we switch on the power supply. Quadcopter propellers are the last thing you want to be near. Arming/disarming facility is quintessential to prevent anyone from getting hurt as well as to prevent damage to the quadcopter.
The gear channel is used to arm or disarm the Quadcopter. A simple toggle switch on the transmitter is used to switch between these modes.
Schedule
| Sl.No | Start Date | End Date | Task | Status | Actual Completion Date |
|---|---|---|---|---|---|
| 1 | 03/17/2015 | 03/24/2015 | Order parts for quad-copter | Completed | 03/24/2015 |
| 2 | 03/25/2015 | 03/27/2015 | Assemble quad-copter | Completed | 03/27/2015 |
| 3 | 03/28/2015 | 03/31/2015 | Test quad-copter design and stability with the help of flight control board(KK 2.1.5) | Completed | 03/31/2015 |
| 4 | 04/01/2015 | 04/07/2015 | Study quad-copter's software framework provided by Preet | Completed | 04/07/2015 |
| 5 | 04/08/2015 | 04/09/2015 | Calibrate all the ESC's | Completed | 04/09/2015 |
| 6 | 04/10/2015 | 04/14/2015 | Interface Motors and RC to SJ-One Board and testing | Completed | 04/14/2015 |
| 7 | 04/15/2015 | 04/18/2015 | Scale the throttle,pitch,roll and yaw to the appropriate range | Completed | 04/18/2015 |
| 8 | 04/19/2015 | 04/21/2015 | Understand the behavior of 10DOF IMU sensor and code flow. | Completed | 04/21/2015 |
| 9 | 04/22/2015 | 04/25/2015 | Interface and test the orientation of the all the senor values using Spark-fun IMU Razor 9DOF AHRS code | Completed | 04/25/2015 |
| 10 | 04/26/2015 | 05/30/2015 | Understand PID and it's implementation | Completed | 05/30/2015 |
| 11 | 05/01/2015 | 05/24/2015 | Tune PID for pitch, roll and yaw. Final testing! | Ongoing | 05/24/2015 |
Parts List & Cost
| Item# | Part Desciption | Manufacturer | Qty | Cost |
|---|---|---|---|---|
| 1 | SJ One Board | 1 | $80.00 | |
| 1 | Motors and Propellers | Tiger Motors | 1 | $89.99 |
| 1 | 10-DOF IMU Sensor | Adafruit | 1 | $29.95 |
| 2 | Afro ESC 30 Amp Speed Controller (SimonK Firmware) | Turnigy | 4 | $56 |
| 3 | Turnigy 9X 9Ch Transmitter w/ Module & 8ch Receiver (Mode 2) (v2 Firmware) | Turnigy | 1 | $59.99 |
| 4 | Turnigy nano-tech 4000mAh 3S1P 25-50C Lipo Pack | Turnigy | 1 | $26.90 |
| 5 | Hobbyking SK450 Glass Fiber Quadcopter Frame 450mm | Hobbyking | 1 | $17.99 |
| 6 | Landing Kit set | Hobbyking | 1 | $9.49 |
| 7 | Hobbyking Quadcopter Power distribution board | Hobbyking | 1 | $3.39 |
| 8 | Hobbyking Lipoly low voltage alarm | Hobbyking | 1 | $2.15 |
| 9 | Turnigy Battery Strap | Turnigy | 1 | $1.59 |
| 13 | 3.5 mm bullet heads for power break distribution board | Hobbyking | 1 | $1.83 |
| 14 | iMax B6 Battery Charger | iMax | 1 | $33.46 |
| 15 | UART to USB serial cable | 1 | $6.99 | |
| TOTAL | $419.72 |
Backup Parts List & Cost
| Item# | Part Desciption | Manufacturer | Qty |
|---|---|---|---|
| 1 | Motors and Propellers | Tiger Motors | 1 |
| 2 | Afro ESC 30 Amp Speed Controller (SimonK Firmware) | Turnigy | 2 |
| 3 | Turnigy nano-tech 3000mAh 3S1P 25-50C Lipo Pack | Turnigy | 1 |
| 4 | Hobbyking SK450 Glass Fiber Quadcopter Frame 450mm | Hobbyking | 1 |
| 5 | KK2.1 Flight Controller Board (for testing) | Hobbyking | 1 |
Design & Implementation
This section describes the hardware and software implementation. The quadcopter consist of the main frame, flight controller board (SJ-One Board), motors with ESC and the battery system. The Airframe used in this project is Hobbyking SK450 Glass Fiber Quadcopter Frame 450mm.
System Design
|
The quadcopter's flight controller system is discussed in the block diagram shown on the left. The subsystem consists of following:
The power is fed to the motors using the power distribution board. The power comes from 3 Cell 11.1V LIPO battery Pack. |
Hardware
Frame
The Quadcopter frame must be symmetrical to make the code simpler to implement and avoid any unnecessary complications. Ours is the SK450 Glass Fiber Frame of size 450mm. This is a high quality glass fiber frame while the arms are constructed from ultra durable polyamide nylon. This quad not only looks great, its very well thought out as well. Assembly is a breeze with pre-threaded brass sleeves for all of the frame bolts, so no lock-nuts are required. It utilizes one size of bolt for the entire build, making the hardware very easy to keep in order and only requiring one size of hex wrench to assemble.
SJ-One Board
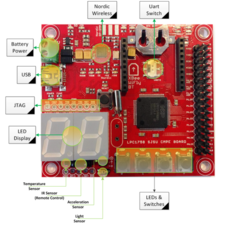
The flight control board used for this project is SJ-One Board. This control board will receive values continuously from the sensor and remote. The values applied from the RC and the current sensor values are used to calculate the values to be applied to the propellers. The SJ-One board uses ARM Cortex -M3 MPU to calculate few hundred times a second.
Brushless Motors and Propellers
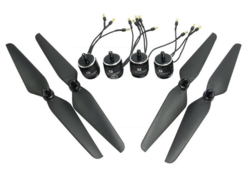
Brushless motors are the best when it comes to speed and low power consumption. The motors used for this project are AIR Gear 350 brushless motors. These motors have 920Kv rating and have low noise and high speed response. The propellers used came with the same motors and were self tightening and bullets holders. The motors are made of good quality material and are suitable for 1400-1700 g quadcopter.
The propellers dimensions are as follows:
Diameter - 9.4 inch
Thread Pitch - 4.5 inch
ESC(Electronic speed control)
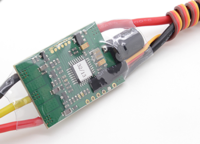
The PWM signals generated by the Flight control board is fed to the ESC's which provide signal to the motors. The ESCs are running on SimonK firmware which gives a smooth power response and is suitable for multi-rotor use without the need to program or adjust settings.
Calibration
The calibration of the ESC's were done manually. Below is the step wise discussion of manual calibration method.
- First, remove all propellers! Disconnect the power to the ESCs. Connect the ESC PWM input directly to the receiver's throttle channel, or to a servo tester.
- Set the radio throttle or servo tester to the highest position, then connect power to the ESC. The motor should produce a series of initialization beeps increasing in pitch, followed by another beep
matching the pitch of the last initialization beep. This indicates that the calibration mode has been entered, and the pulse length has been learned.
- Move the stick or knob to the lowest position. Two beeps of the same pitch should be emitted. This indicates that the low pulse length has been learned. If the RC Car-style reversible mode has been
enabled (RC_PULS_NEUTRAL), move the stick or knob to the center, and wait for three beeps. This indicates that the neutral (center) pulse length has been learned.
- The ESC will then save the settings and exit calibration mode. If the input is still at the same position, the ESC will arm (producing a higher pitched, long beep), and function normally.
Inertial Measurement Unit
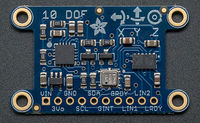
The Inertial Measurement Unit (IMU) is an integrated sensor device which measures accleration and tilt by Accelerometer, angular velocity and orientation by Gyroscope and gravitational forces by Magnetometer. Inertial Measurement Unit by Adafruit provides 10 DOF(actually 11) i.e 3-axis accelerometer, 3-axis gyroscope, 3-axis magnetometer barometric pressure sensor and temperature sensor. These values are sent to SJ-1 board over I2C, where the further processing is done by SJ-1 board to determine the angular position and orientation of the Quadcopter.
Remote Controller
The new transmission module (TGY-9X) is of type FHSS (Frequency-hopping spread spectrum) and uses frequency hopping. This technique has a high transmission reliability because it is insensitive to interference. It has a plastic casing of compact type. Its handling is excellent and the sleeves are adjustable. The antenna is directional. 167x34mm LCD screen (black and white) is fairly well mixed and makes a pretty good readability in daylight. 6 keys allow access to many menus, selection and settings.
Binding Procedure
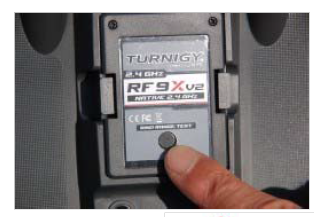
- Insert the special cable (loop) in the channel 'BAT' of the receiver and not in the channel 'BIND' as indicated. Connect power supply to the receiver in position 'BIND' and wait until the LED flashes red.
- Press the button 'Test Range bind' the transmission module (back of radio) and, without releasing it, turn on the transmitter, the LED will stop flashing and remain lit constantly.
- Release the button and turn off the radio module. Then remove the special cord and disconnect the receiver battery, the receiver is ready.
- The effect is immediate and does not allow more than 3sec button 'test range bind' button.
| Pin Number | Function |
| P0.1 | RC-Ch1 - Roll |
| P0.30 | RC-Ch2 - Throttle |
| P0.0 | RC-Ch3 - Pitch |
| P0.29 | RC-Ch4 - Yaw |
| P2.6 | RC-Ch5 - Gear |
Note: Use a LiPo battery pack of 11.1V 2500mAh to power the transmitter. This is very convenient to use as opposed to using (8x) AA batteries which discharge quickly.
Hardware Interface
|
|
The diagram above shows the hardware interfacing of various components with the flight controller board. The 4000mAh LiPo battery is used to supply power to SJOne board, the receiver and all the four ESCs and motors. Special care was taken to ensure a common grounding between all the components.
Software Design
|
Main.cpp - This is the entry point of the all the modules. There are 4 tasks running with quad-copter task with highest priority and terminal task being the next highest and so on. The quad-copter is the main task which process all the data.
The RC remote task is equally important
|
The computeThrottleValues() is used to calculate the pitch, roll and yaw throttle by using the using the PID algorithm that need to be applied to the motors.
This API uses the current values of the sensors and the applied pitch, roll and yaw values from the RC.
This code applies the calculated pitch, roll and yaw throttle to the respective motors to stabilize the flight of the quad-copter.
Flowchart
PID Controller
PID (proportional-integral-derivative) is a closed-loop control system that tries to get the actual result from IMU sensors closer to the desired result from the RC transmitter by computing the output values. The popularity of PID controllers can be attributed partly to their robust performance in a wide range of operating conditions and partly to their functional simplicity, which allows engineers to operate them in a simple, straightforward manner.
PID formula
There are 3 variables in a PID controller, namely P(Proportional), I(Integral), and D (Derivative). P depends on the present error, I on the accumulation of past errors, and D is a prediction of future errors, based on current rate of change of the Quadcopter.
The effect of P,I and D
- Proportional Gain Coefficients
Kp = Proportional element of the PID, reduces large part of the overall error.
- Increasing Kp will overshoot and oscillate, but reach the desired state faster.
- Increasing Kp will reduce steady state error, but after a certain limit, increasing Kp will only increase the overshoot.
- Kp reduces the rise time.
- Integral Gain Coefficients
Ki = Integral element of the PID, reduces the final error accumulated over time.
- Ki eliminates the steady state error, but after a certain limit, increasing Ki will only increase the overshoot.
- Ki reduces the rise time.
- Derivative Gain Coefficients
Kd = Derivative element of the PID, counteracts Kp, and Ki when the output changes quickly.
- Kd decreases the overshoot.
- Kd reduces the settling time.
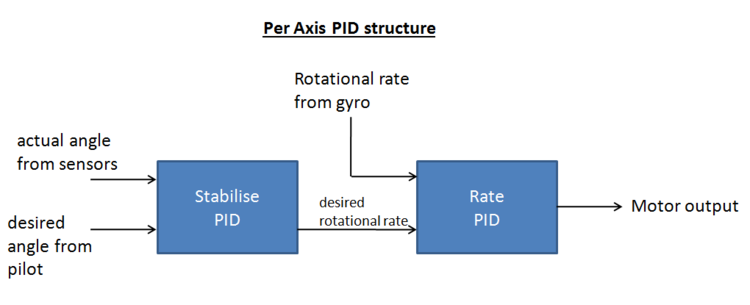
To obtain the control and stability of the quadcopter we do the following, for example consider we are doing it for pitch axis, the user provides some input to the quadcopter which becomes the requested value, at the same time sensor outputs the present value for the pitch axis for the quadcopter. The three alogorithms P, I and D finds the difference between the requested and the present values which is calculated as an error and apply these values on the motor which are the applied values to reduce the error. Similarly it is done for other 2 axis i.e Roll and Yaw to obtain the overall stability of the Quadcopter.
There were few parameter which were addressed while writing the PID algorithm
- Sample Time - The PID algorithm functions best if it is evaluated at a regular interval. If the algorithm is aware of this interval, we can also simplify some of the internal math.
- Derivative Kick - Not the biggest deal, but easy to get rid of, so we’re going to do just that.
- On-The-Fly Tuning Changes - A good PID algorithm is one where tuning parameters can be changed without jolting the internal workings.
- Reset Windup Mitigation -We’ll go into what Reset Windup is, and implement a solution with side benefits
- On/Off (Auto/Manual) - In most applications, there is a desire to sometimes turn off the PID controller and adjust the output by hand, without the controller interfering
- Initialization - When the controller first turns on, we want a “bumpless transfer.” That is, we don’t want the output to suddenly jerk to some new value
- Controller Direction - This last one isn’t a change in the name of robustness per se. it’s designed to ensure that the user enters tuning parameters with the correct sign.
Flight Controller
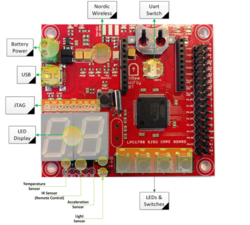
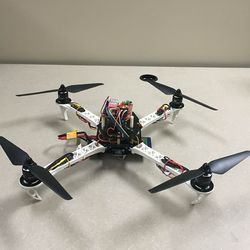
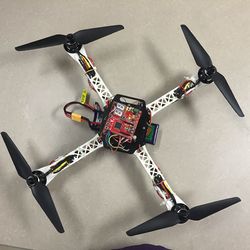
Fight controller is a brain of any Quadcopter or multicopter. In our project, we have used SJ-One board as our flight controller, it continuously reads data from IMU sensors and inputs from RC transmitter. The flight controller performs algorithmic calculation received from sensors and RC and apply these adjustments on each rotor. Quadcopter has 4 degrees of freedom i.e pitch, roll , yaw and altitude, and with the flight controller each degree of freedom can be controlled by adjusting the thrusts on each rotor and keep the quadcopter balanced.
Implementation
This section includes implementation, but again, not the details, just the high level. For example, you can list the steps it takes to communicate over a sensor, or the steps needed to write a page of memory onto SPI Flash. You can include sub-sections for each of your component implementation.
Overall System Algorithm
- Initialize all the tasks
- If no errors arm the quadcopter by the channel 5 on RC (errors are found on LED display)
- Update the sensor data and send them to SJ-One board
- Similarly update RC input and send them to SJ-One board.
- Run PID algorithm continuously on sensor data and RC data to generate PID coefficients for each axis(Pitch, Roll and Yaw).
- Apply the PID coefficients on motors through ESC's to obtain the self balance of the quadcopter.
- repeat from step 3 until the quadcopter is disarmed.
Remote Control transmitter
- The input is sent from RC transmitter to RC receiver.
- We are using 4 channels for Throttle, Pitch, Roll and Yaw and 5th channel for arming and disarming the quadcopter.
- All the channels from the receiver is connected to 5 GPIO pins and Interrupts are enabled for each pin.
- Time is recorded when there is a rising edge and the time is recorded when there is a falling edge on the corresponding pin.
- The difference is recorded to find the width of the pulse which is between 1 ms and 2000 ms.
- Normalized value is calculated using scaling factor and pulse width. Below are the range of normalized value
- Throttle 0 to 100
- Pitch -45 to 45
- Roll -45 to 45
- Yaw -45 to 45
IMU sensors
- calibrate the sensors and find the offset
- Read sensor data of accelerometer, gyroscope and magnetometer at 100HZ
- Add the offset to the raw data from sensors
- Covert the raw data into expected data required by PID algorithm before sending it to SJ-One board(for example gyro data is converted from degress per second into radians per second, accelerometer data is divided by 16)
- repeat from step 2
Testing & Technical Challenges
Testing of 10DOF IMU
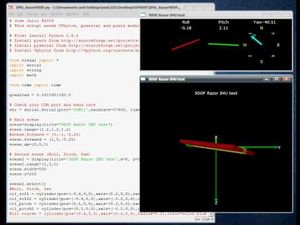
We tested the IMU with an application called IMU Razor 9DOF. This application shows the simulation of our IMU sensor. It displays values of pitch, roll and yaw.
Testing of PID
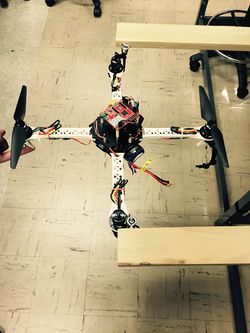
The testing of PID was done for each axis separately. We started with pitch axis. We used two wooden planks and hooks two hold the quad on the east and west so that our pitch axis is free. Slowly started to increase the value of P. At some point the pitch axis was oscillating constantly. The amplitude of oscillation should neither increase or decrease. Then we started increasing the values of D till the overshoot is reduced to an acceptable level. Then we increased the value of I till the final error is zero. The quad is very sensitive to the value of I. After the pitch axis we tuned the PID for the roll axis. We used some tuning methods such as Zeigler Nicholas and Cohen Coon to tune the PID. After the pitch and roll we tested the yaw axis. We tied the quad to a rope and held it in the air so that the quad is free in the yaw axis.
Testing the Quadcopter flight
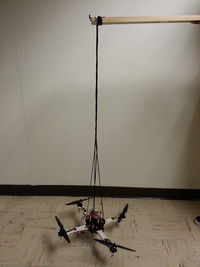
We tied the quad with a rope to a wooden plank. One person was holding the plank. We slowly increased the throttle so that the quadcopter lifts up. The person holding the wooden plank could control the quadcopter so the it doesn't hit somewhere and get damaged.
Issues Faced
Power supply to the SJOne Board
We could not supply power to the board from the battery pack because it had of higher current output. We supplied power to the board from one of the ESC's. The ESC's had a built in battery eliminator circuit which has an output of 5V. By adding extra source to power up the board would have increased extra weight of the quadcopter.
ESC lost calibration
One of the ESC lost the calibration and it was not responding properly to the PID values. We replaced the ESC but still the problem was there. Later we found the all the ESC's have to be calibrated at the same throttle level i.e 1064ms to 1864ms.
Glitch in one of the motor values
One of the motor was experiencing glitch. We found out that the input of roll from the transmitter is giving a spike at constant intervals. The receiver was getting a pulse of more than 2000ms. We wrote a software filter to get rid of the glitch.
I2C short in SDA and SCL
Frequently encountered I2C short, we experienced this problem till the end of the project but could not find exact reason for I2C short. We solved this problem by resetting the board 2-3 times.
Conclusion
This project provided us with practical experience on the firmware that goes into making an Unmanned Aerial Vehicle(UAV). We were able to successfully design a quadcopter assembly which used sensor readings and input from values to compute the PID values. The SJOne flight control board was programmed with this PID algorithm. We have successfully tuned the PID for pitch and roll axis. We were able to get the quadcopter in air. However, the flight was not stable because the yaw axis was not tuned.
Project Video
Upload a video of your project and post the link here.
Tuning of pitch axis for the Quadcopter https://www.youtube.com/watch?v=Ztgx5FDS018
References
Acknowledgement
Thanks a lot to Professor Preetpal Kang who provided us with the basic code framework, which helped us have a great start. Thanks to Brett Beauregard whose article PID for beginners was very helpful for writing the PID firmware.
References Used
- Preetpal Kang, Professor of CMPE 244, Computer Engineering, Charles W. Davidson College of Engineering, San Jose State University, Feb-May 2015.
- http://www.instructables.com/id/Basic-Quads-Systems-My-Easy-Quad-Build/step1/Basic-Quads-Systems-My-Easy-Quad-Build/
- http://www.hobbyking.com/hobbyking/store/index.asp
- http://brettbeauregard.com/blog/2011/04/improving-the-beginners-pid-introduction/
