Difference between revisions of "S15: Motion-Controlled RC Car"
(→Design & Implementation) |
(→Implementation) |
||
| (131 intermediate revisions by the same user not shown) | |||
| Line 1: | Line 1: | ||
| − | === | + | == Motion-Controlled RC Car == |
| − | |||
| − | |||
| − | |||
| − | |||
| − | |||
| − | |||
| − | |||
| − | |||
| − | |||
| − | |||
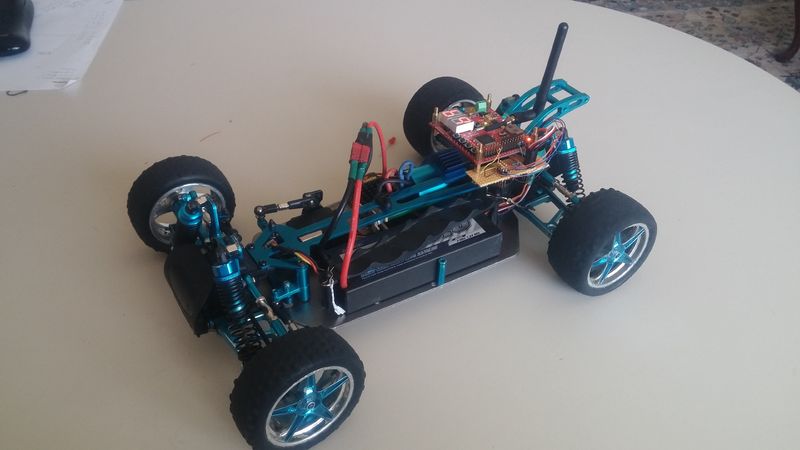
| − | + | [[File:S15_146_G3_IMG_RCcar.jpg|800px|center]] | |
== Abstract == | == Abstract == | ||
| − | The Motion-Controlled RC Car will allow inexperienced users to drive a high-performance RC vehicle. This is accomplished with a tilt controller, which is more intuitive than a traditional RC transmitter, and a | + | The Motion-Controlled RC Car will allow inexperienced users to drive a high-performance RC vehicle. This is accomplished with a tilt controller, which is more intuitive than a traditional RC transmitter, and a slip-limiting system that will reduce the potential for crashes. |
== Objectives & Introduction == | == Objectives & Introduction == | ||
| − | + | High performance RC vehicles can be difficult to control because of their immense power and are typically expensive to repair. The goal of this project is to create both a wireless tilt controller and a traction control system for a high-performance RC car. From an engineering standpoint, the project can be broken into three major objectives. | |
| + | |||
| + | |||
| + | 1. Nordic wireless communication | ||
| + | |||
| + | 2. Measurement of front and rear axle speed | ||
| + | |||
| + | 3. Pulse-width modulated control of motor and servo | ||
| + | |||
| + | |||
=== Team Members & Responsibilities === | === Team Members & Responsibilities === | ||
| − | * Shangming Wang - Mesh Communication | + | * Shangming Wang - Mesh Communication, Report writing, testing |
| − | * Daniel Khawaja - Wheel speed capture | + | * Daniel Khawaja - Wheel speed capture, RC car maintenance, PWM |
== Schedule == | == Schedule == | ||
| Line 29: | Line 28: | ||
|- | |- | ||
! scope="col"| Week# | ! scope="col"| Week# | ||
| − | ! scope="col"| Date | + | ! scope="col"| Start Date |
| + | ! scope="col"| End Date | ||
! scope="col"| Task | ! scope="col"| Task | ||
| − | ! scope="col"| | + | ! scope="col"| Status |
| − | ! scope="col"| | + | ! scope="col"| Completion Date |
|- | |- | ||
! scope="row"| 0 | ! scope="row"| 0 | ||
| 4/10 | | 4/10 | ||
| − | | Obtain | + | | 4/24 |
| − | | Completed | + | | Obtain Hall sensors |
| − | | | + | | Not Completed |
| + | | --- | ||
|- | |- | ||
! scope="row"| 1 | ! scope="row"| 1 | ||
| 4/20 | | 4/20 | ||
| + | | 4/27 | ||
| Find PWM parameters, Test mesh communication | | Find PWM parameters, Test mesh communication | ||
| − | | PWM: 4/ | + | | Completed |
| − | + | | PWM: 4/27 Mesh: 5/4 | |
|- | |- | ||
! scope="row"| 2 | ! scope="row"| 2 | ||
| 4/27 | | 4/27 | ||
| − | | Implement PWM control, Finalize mesh communication, | + | | 5/4 |
| − | | PWM: Mesh: | + | | Implement PWM control, Finalize mesh communication, Obtain photo interrupters |
| − | + | | Completed | |
| + | | PWM: 5/4 Mesh: 5/13 Photo: 5/14 | ||
|- | |- | ||
! scope="row"| 3 | ! scope="row"| 3 | ||
| 5/4 | | 5/4 | ||
| + | | 5/11 | ||
| Implement motion control, Modify RC for 2wd and mount wheel speed sensors | | Implement motion control, Modify RC for 2wd and mount wheel speed sensors | ||
| − | | Motion: Modification: | + | | Completed |
| − | + | | Motion: 5/13 Modification: 5/15 | |
|- | |- | ||
| − | ! scope="row"| | + | ! scope="row"| 4 |
| 5/11 | | 5/11 | ||
| + | | 5/18 | ||
| Finish wheel speed capture, Test and polish traction control parameters | | Finish wheel speed capture, Test and polish traction control parameters | ||
| − | | Capture: T.C.: | + | | Completed |
| − | + | | Capture: 5/23 T.C.: 5/25 | |
| + | |||
|- | |- | ||
| − | ! scope="row"| | + | ! scope="row"| 5 |
| 5/18 | | 5/18 | ||
| − | | | + | | 5/25 |
| − | | Completed | + | | Implement extra features |
| − | | | + | | Not Completed |
| + | | --- | ||
|} | |} | ||
| Line 99: | Line 106: | ||
=== Hardware Design === | === Hardware Design === | ||
| − | |||
| − | === Hardware Interface === | + | [[File:S15_146_G3_IMG_1.png|400px|center]] |
| − | + | ||
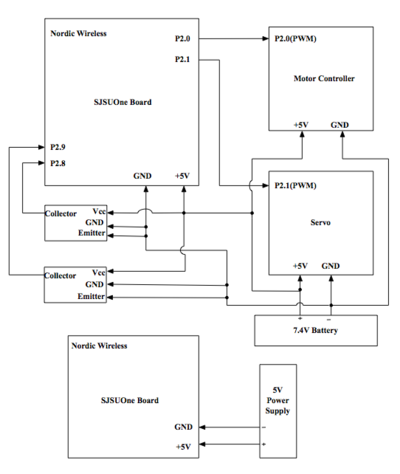
| + | A high-level schematic of the electronics involved in this project | ||
| + | |||
| + | Our hardware design began with connecting the Sj-One board with the servo and motor controller controller that were built into the model car. | ||
| + | |||
| + | === Hardware Interfaces === | ||
| + | The Transmitting Module used the following interfaces: | ||
| + | * [http://www.socialledge.com/sjsu/index.php?title=Embedded_System_I2C_Tutorial I2C Bus] | ||
| + | ** Used for reading the orientation value from accelerometer sensor | ||
| + | *[http://www.socialledge.com/sjsu/index.php?title=Embedded_System_Tutorial_SPI SPI Bus] | ||
| + | ** Used for transmit commands from Nordic wireless sensor to receiving board | ||
| + | |||
| + | |||
| + | The Receiving Interface used the following interfaces: | ||
| + | *[http://www.socialledge.com/sjsu/index.php?title=Embedded_System_Tutorial_SPI SPI Bus] | ||
| + | ** Used for receive commands from Nordic wireless sensor from transmitting board | ||
| + | *[http://www.socialledge.com/sjsu/index.php?title=Embedded_System_Tutorial_GPIO GPIO] | ||
| + | ** Used to read the axle speed from the front and rear | ||
| + | ** Used to pass PWM signal to the motor and the servo | ||
| + | |||
| + | === SJOne === | ||
| + | [[File:S15_146_G3_IMG_SJOne.png|center]] | ||
| + | |||
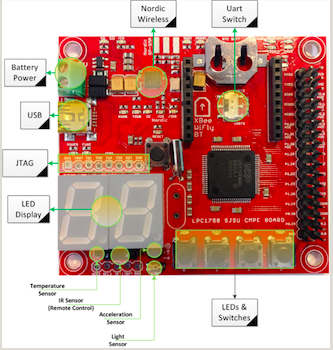
| + | Our project used two [http://http://www.socialledge.com/sjsu/index.php?title=SJ_One_Board SJOne boards], both running FreeRTOS. For our project we used the built-in Nordic Wireless system, Accelerometer, GPIO, and PWM functions. | ||
| + | |||
| + | === Servo, Motor & Motor Controller === | ||
| + | [[File:S15_146_g3_pwmInterfacedElectronics.jpg|460px|center]] | ||
| + | |||
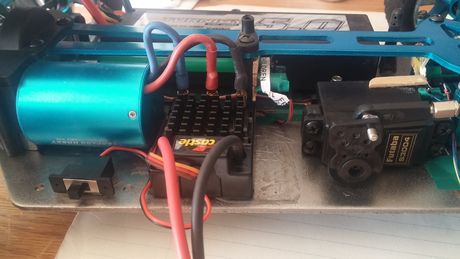
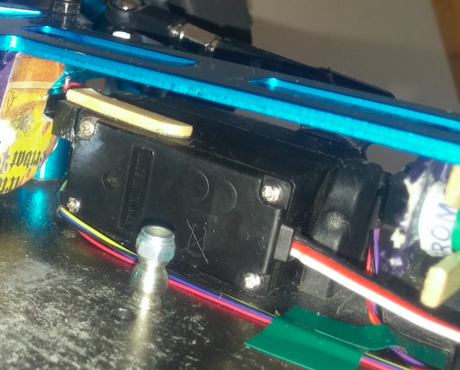
| + | The servo used in this project was a Futaba S3004 and the motor, already built into the model car, was a Leopard Hobby 3300Kv brushless motor. The Castle Sidewinder 3 motor controller and the Futaba servo were both controlled using pulse widths ranging from 1 to 2miliseconds. A width of 1.5 miliseconds was a 0% signal, 1 milisecond was -100%, and 2 miliseconds was +100%. The motor controller included a 5v regulated output, so it was used to power all the electronics on the vehicle. | ||
| + | |||
| + | === Photo Interrupter === | ||
| + | [[File:S15_146_G3_IMG_photoInt.png|200px|center]] | ||
| + | |||
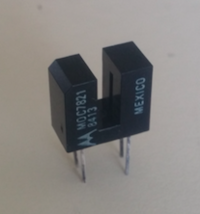
| + | The photo interrupters we chose were the Motorola MOC7821. These devices contain an infrared LED and an infrared-controlled transistor. When the gap between the LED and the sensor is open the transistor turns on and allows current to flow. When an object passes through the space between the LED and the sensor the transistor turns off and behaves like an open circuit. | ||
=== Software Design === | === Software Design === | ||
| − | + | ||
| + | |||
| + | '''Transmitting Module''' | ||
| + | |||
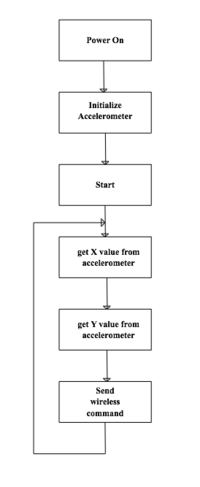
| + | The transmitter first reads the accelerometer data in both the x and y directions and encodes them in an integer. That integer is sent to the vehicle using the Nordic Wireless system. | ||
| + | |||
| + | [[File:S15_146_G3_IMG_flowchart_transmit.png|200px|center]] | ||
| + | |||
| + | '''Receiving Module''' | ||
| + | |||
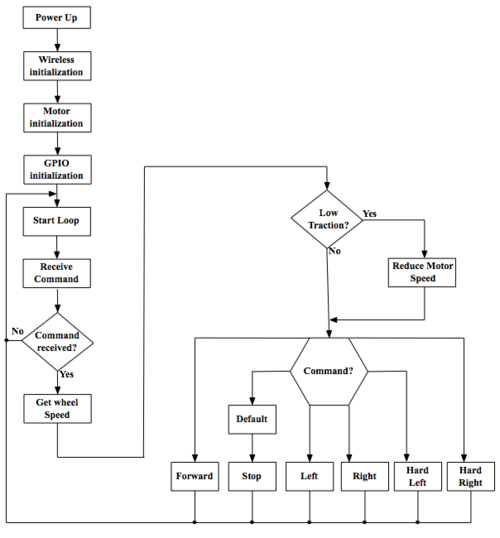
| + | The SJ One board on the vehicle, waiting to receive data, accepts the integer. The vehicle reads the wheel speeds at the front and rear axle. This is done by reading the signal from the photo interrupters many times in a row and incrementing a counter each time the signal transitions between high and low. One counter holds the number of transitions read from the front axle and the other counter holds the number of transitions at the rear axle and the task determines if the vehicle is in a low traction situation based on the two counter values. The car then translates the encoded command using one of two throttle maps, based on the traction situation, and uses that to set motor speed and servo angle. | ||
| + | |||
| + | [[File:S15_146_G3_IMG_flowchart_receive.png|500px|center]] | ||
=== Implementation === | === Implementation === | ||
| − | + | ||
| + | '''Accelerometer''' | ||
| + | |||
| + | The built-in sensor that reads the tilt direction of the SJ One board. | ||
| + | |||
| + | *Step 1: Initialize accelerometer sensor. | ||
| + | |||
| + | *Step 2: Read X and Y axis from the sensor and get the orientation of the board. | ||
| + | |||
| + | Read X value: | ||
| + | Function X-axis Range | ||
| + | Forward -200 <= x < 200 | ||
| + | Left -500 <= x < -200 | ||
| + | Right 200 <= x < 500 | ||
| + | Hard Left x >= 500 | ||
| + | Hard Right x <= -500 | ||
| + | |||
| + | Read Y value: | ||
| + | Num Speed Y-axis Range | ||
| + | 0 7.5 -150 <= y < 150 | ||
| + | 1 7.9 150 <= y < 250 | ||
| + | 2 8.3 250 <= y < 400 | ||
| + | 3 8.7 400 <= y < 550 | ||
| + | 4 9.1 550 <= y < 700 | ||
| + | 5 9.5 700 <= y < 850 | ||
| + | 6 9.9 y >= 850 | ||
| + | |||
| + | *Step 3: Encode the function and speed number as a single integer and pass them to the wireless task. | ||
| + | |||
| + | |||
| + | '''Nordic Wireless''' (nRF24L01). | ||
| + | |||
| + | The Nordic wireless sensor is built-in on SJOne Board. It used to send and receive data from one SJOne to other. For our project, it is used to send an encoded x and y tilt of the control board to the board on the vehicle. The following steps were taken to implement the Nordic wireless system | ||
| + | |||
| + | *Step 1: Configure the wireless node address and wireless channel number in sys_config.h file. (Make sure both boards have the same channel) | ||
| + | |||
| + | *Step 2: Used mesh_set_node_address() function to set both sending and receiving address. In our project, the car address is set to 300. | ||
| + | |||
| + | *Step 3: On the sending side, it used wireless_send(addr, protocol, data, size of data, max_hops) function to send the data from SJOne board. | ||
| + | |||
| + | *Step 4: On the receiving side, it used wireless_get_rx_pkt() function to catch the data coming from the wireless. | ||
| + | |||
| + | |||
| + | '''Photo Interrupters''' (MOC7821). | ||
| + | |||
| + | [[File:S15_146_G3_IMG_motor.png|500px|left]] [[File:S15_146_G3_IMG_servo.png|460px|center]] | ||
| + | |||
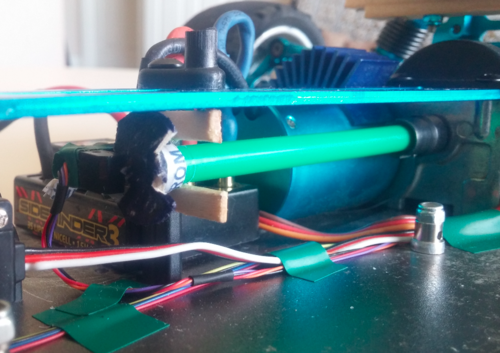
| + | The photo interrupters are used to monitor wheel rotation. An interrupter was mounted around a disk attached to the output of each differential. In the photos above the rear wheel speed sensor assembly and the front wheel speed sensor assembly are on the left and right, respectively. Notches were cut into the disks so that as they spun the outputs of the interrupters would rise and fall. The SJ One board monitored these signals using its GPIO inputs and counted the rising edges over a set period of time to determine the speed of the axle. Being a rear-drive vehicle, the rear axle rotates faster than the front in a slip condition, and the program responds by reducing throttle. | ||
== Testing & Technical Challenges == | == Testing & Technical Challenges == | ||
| − | |||
| − | |||
| − | + | === Issue #1 === | |
| + | The first issue that we ran into involved our implementation of the Nordic wireless system. During the early stages of the project, we wrote and tested our features in separate C or C++ programs. Using the provided libraries and functions, we designed transmitting and receiving programs to test the wireless. During testing, the first packet sent without issue, but any following packets took up to 30 seconds to send. This is because the libraries and functions that we were relying on were designed to be used within the structured FreeRTOS environment. Using them without the work that FreeRTOS does in the background causes them to misbehave. | ||
| + | |||
| + | === Issue #2 === | ||
| + | The Motorola MOC7821 photo interrupters that we purchased had very little documentation. We found information about the sensor side of the part, but nothing about the LEDs that make up the infrared emitters. Two of the interrupter's LEDs burnt out before we found the correct dropout voltage and amperage. We recommend that future students obtain access to a variable power supply and test the LEDs by slowly increasing voltage from zero until the dropout voltage is found. | ||
| + | |||
| + | === Issue #3 === | ||
| + | This issue was never resolved. Our initial design goal was to implement the timer's capture system so that the rising edges of the photo interrupters' signals could be counted without consuming CPU cycles. The initialization process seemed straightforward but any time we attempted to modify the lower 4 bits of the Counter Control Register it caused an error that triggered a reboot of the system. After many hours of research and guessing no solution was found so we made our own function that, at the price of many CPU cycles, used the GPIO pins to accomplish the same goal. | ||
| + | |||
| + | |||
| + | |||
| + | Any project of this type will encounter roadblocks such as these. These issues, as well as many smaller bugs, were discovered and resolved using frequent testing. Each task was broken down into as small of a block as we could devise a test for. For example, the photo interrupters were tested in four stages. First we tested the sensor side using an infrared television remote. Once we knew the sensor was working we tested the LEDs using an infrared sensitive camera. The whole package was then tested on a bread board, and finally tested again once installed on the model car. | ||
| − | + | This multi-tiered testing approach was also applied to our software design process. Testing was an integral part of our design and frequent testing helped us to catch bugs sooner and solve them faster by shrinking the amount of code that could be contributing to the problem. | |
| − | |||
== Conclusion == | == Conclusion == | ||
| − | + | ||
| + | Though this project was ultimately successful, it was a struggle. Poor planning coupled with an injury from a car accident and an untrustworthy online retailer all pushed the timeline for the project. We were severely behind schedule and were able to successfully complete the project by abandoning the "capture" peripheral and placing the load on the CPU by using the GPIO pins. This project taught a lesson in proper scheduling and planning. | ||
| + | |||
| + | However, that was not the only lesson. In our implementation we were forced to execute, in a best case situation, over 500 lines of code in between each command between the transmitter and the receiver. The delay that the extra code caused in the controlling of the vehicle was barely noticeable, and helped us to see just how blazingly fast modern micro controllers actually are. The thought of a micro controller being slower and "less capable" than a computer is, in most cases, incorrect. | ||
=== Project Video === | === Project Video === | ||
| Line 131: | Line 240: | ||
=== Acknowledgement === | === Acknowledgement === | ||
Any acknowledgement that you may wish to provide can be included here. | Any acknowledgement that you may wish to provide can be included here. | ||
| − | |||
| − | |||
| − | |||
=== References Used === | === References Used === | ||
| − | + | http://www.nxp.com/documents/user_manual/UM10360.pdf | |
| + | |||
| + | http://www.socialledge.com/sjsu/images/d/de/2012SJOneBoardSchematic.pdf | ||
| + | |||
| + | http://www.datasheetspdf.com/PDF/MOC7821/613725/1 | ||
| + | |||
| + | http://www.socialledge.com/sjsu/index.php?title=PWM_Motor_Controller_Interface | ||
| + | |||
| + | http://www.socialledge.com/sjsu/index.php?title=SJ_One_Board | ||
| − | = | + | http://www.socialledge.com/sjsu/index.php?title=Low_Powered_Mesh_Network_stack |
| − | |||
Latest revision as of 03:37, 27 May 2015
Contents
Motion-Controlled RC Car
Abstract
The Motion-Controlled RC Car will allow inexperienced users to drive a high-performance RC vehicle. This is accomplished with a tilt controller, which is more intuitive than a traditional RC transmitter, and a slip-limiting system that will reduce the potential for crashes.
Objectives & Introduction
High performance RC vehicles can be difficult to control because of their immense power and are typically expensive to repair. The goal of this project is to create both a wireless tilt controller and a traction control system for a high-performance RC car. From an engineering standpoint, the project can be broken into three major objectives.
1. Nordic wireless communication
2. Measurement of front and rear axle speed
3. Pulse-width modulated control of motor and servo
Team Members & Responsibilities
- Shangming Wang - Mesh Communication, Report writing, testing
- Daniel Khawaja - Wheel speed capture, RC car maintenance, PWM
Schedule
| Week# | Start Date | End Date | Task | Status | Completion Date |
|---|---|---|---|---|---|
| 0 | 4/10 | 4/24 | Obtain Hall sensors | Not Completed | --- |
| 1 | 4/20 | 4/27 | Find PWM parameters, Test mesh communication | Completed | PWM: 4/27 Mesh: 5/4 |
| 2 | 4/27 | 5/4 | Implement PWM control, Finalize mesh communication, Obtain photo interrupters | Completed | PWM: 5/4 Mesh: 5/13 Photo: 5/14 |
| 3 | 5/4 | 5/11 | Implement motion control, Modify RC for 2wd and mount wheel speed sensors | Completed | Motion: 5/13 Modification: 5/15 |
| 4 | 5/11 | 5/18 | Finish wheel speed capture, Test and polish traction control parameters | Completed | Capture: 5/23 T.C.: 5/25 |
| 5 | 5/18 | 5/25 | Implement extra features | Not Completed | --- |
Parts List & Cost
| Qty | Description | Total Cost |
|---|---|---|
| 50 | Jumper Wires | $3.00 |
| 1 | Prototype Board | $1.00 |
| 1 | Turnigy 500mAh Battery | $40.00 |
| 2 | Wireless Antenna | $6.00 |
| 1 | Remote Control Car | $150.00 |
| 2 | SJOne Board | $160.00 |
| 2 | Motorola MOC7821 Photo Interrupter | $4.00 |
| Total Cost | $364 |
Design & Implementation
Hardware Design
A high-level schematic of the electronics involved in this project
Our hardware design began with connecting the Sj-One board with the servo and motor controller controller that were built into the model car.
Hardware Interfaces
The Transmitting Module used the following interfaces:
- I2C Bus
- Used for reading the orientation value from accelerometer sensor
- SPI Bus
- Used for transmit commands from Nordic wireless sensor to receiving board
The Receiving Interface used the following interfaces:
- SPI Bus
- Used for receive commands from Nordic wireless sensor from transmitting board
- GPIO
- Used to read the axle speed from the front and rear
- Used to pass PWM signal to the motor and the servo
SJOne
Our project used two SJOne boards, both running FreeRTOS. For our project we used the built-in Nordic Wireless system, Accelerometer, GPIO, and PWM functions.
Servo, Motor & Motor Controller
The servo used in this project was a Futaba S3004 and the motor, already built into the model car, was a Leopard Hobby 3300Kv brushless motor. The Castle Sidewinder 3 motor controller and the Futaba servo were both controlled using pulse widths ranging from 1 to 2miliseconds. A width of 1.5 miliseconds was a 0% signal, 1 milisecond was -100%, and 2 miliseconds was +100%. The motor controller included a 5v regulated output, so it was used to power all the electronics on the vehicle.
Photo Interrupter
The photo interrupters we chose were the Motorola MOC7821. These devices contain an infrared LED and an infrared-controlled transistor. When the gap between the LED and the sensor is open the transistor turns on and allows current to flow. When an object passes through the space between the LED and the sensor the transistor turns off and behaves like an open circuit.
Software Design
Transmitting Module
The transmitter first reads the accelerometer data in both the x and y directions and encodes them in an integer. That integer is sent to the vehicle using the Nordic Wireless system.
Receiving Module
The SJ One board on the vehicle, waiting to receive data, accepts the integer. The vehicle reads the wheel speeds at the front and rear axle. This is done by reading the signal from the photo interrupters many times in a row and incrementing a counter each time the signal transitions between high and low. One counter holds the number of transitions read from the front axle and the other counter holds the number of transitions at the rear axle and the task determines if the vehicle is in a low traction situation based on the two counter values. The car then translates the encoded command using one of two throttle maps, based on the traction situation, and uses that to set motor speed and servo angle.
Implementation
Accelerometer
The built-in sensor that reads the tilt direction of the SJ One board.
- Step 1: Initialize accelerometer sensor.
- Step 2: Read X and Y axis from the sensor and get the orientation of the board.
Read X value:
Function                   X-axis Range
 Forward                 -200 <= x < 200
 Left                    -500 <= x < -200
 Right                    200 <= x < 500
 Hard Left                  x >= 500
 Hard Right                 x <= -500

Read Y value:
Num  Speed                 Y-axis Range
 0    7.5                 -150 <= y < 150
 1    7.9                  150 <= y < 250
 2    8.3                  250 <= y < 400
 3    8.7                  400 <= y < 550
 4    9.1                  550 <= y < 700
 5    9.5                  700 <= y < 850
 6    9.9                    y >= 850
- Step 3: Encode the function and speed number as a single integer and pass them to the wireless task.
Nordic Wireless (nRF24L01).
The Nordic wireless sensor is built-in on SJOne Board. It used to send and receive data from one SJOne to other. For our project, it is used to send an encoded x and y tilt of the control board to the board on the vehicle. The following steps were taken to implement the Nordic wireless system
- Step 1: Configure the wireless node address and wireless channel number in sys_config.h file. (Make sure both boards have the same channel)
- Step 2: Used mesh_set_node_address() function to set both sending and receiving address. In our project, the car address is set to 300.
- Step 3: On the sending side, it used wireless_send(addr, protocol, data, size of data, max_hops) function to send the data from SJOne board.
- Step 4: On the receiving side, it used wireless_get_rx_pkt() function to catch the data coming from the wireless.
Photo Interrupters (MOC7821).
The photo interrupters are used to monitor wheel rotation. An interrupter was mounted around a disk attached to the output of each differential. In the photos above the rear wheel speed sensor assembly and the front wheel speed sensor assembly are on the left and right, respectively. Notches were cut into the disks so that as they spun the outputs of the interrupters would rise and fall. The SJ One board monitored these signals using its GPIO inputs and counted the rising edges over a set period of time to determine the speed of the axle. Being a rear-drive vehicle, the rear axle rotates faster than the front in a slip condition, and the program responds by reducing throttle.
Testing & Technical Challenges
Issue #1
The first issue that we ran into involved our implementation of the Nordic wireless system. During the early stages of the project, we wrote and tested our features in separate C or C++ programs. Using the provided libraries and functions, we designed transmitting and receiving programs to test the wireless. During testing, the first packet sent without issue, but any following packets took up to 30 seconds to send. This is because the libraries and functions that we were relying on were designed to be used within the structured FreeRTOS environment. Using them without the work that FreeRTOS does in the background causes them to misbehave.
Issue #2
The Motorola MOC7821 photo interrupters that we purchased had very little documentation. We found information about the sensor side of the part, but nothing about the LEDs that make up the infrared emitters. Two of the interrupter's LEDs burnt out before we found the correct dropout voltage and amperage. We recommend that future students obtain access to a variable power supply and test the LEDs by slowly increasing voltage from zero until the dropout voltage is found.
Issue #3
This issue was never resolved. Our initial design goal was to implement the timer's capture system so that the rising edges of the photo interrupters' signals could be counted without consuming CPU cycles. The initialization process seemed straightforward but any time we attempted to modify the lower 4 bits of the Counter Control Register it caused an error that triggered a reboot of the system. After many hours of research and guessing no solution was found so we made our own function that, at the price of many CPU cycles, used the GPIO pins to accomplish the same goal.
Any project of this type will encounter roadblocks such as these. These issues, as well as many smaller bugs, were discovered and resolved using frequent testing. Each task was broken down into as small of a block as we could devise a test for. For example, the photo interrupters were tested in four stages. First we tested the sensor side using an infrared television remote. Once we knew the sensor was working we tested the LEDs using an infrared sensitive camera. The whole package was then tested on a bread board, and finally tested again once installed on the model car.
This multi-tiered testing approach was also applied to our software design process. Testing was an integral part of our design and frequent testing helped us to catch bugs sooner and solve them faster by shrinking the amount of code that could be contributing to the problem.
Conclusion
Though this project was ultimately successful, it was a struggle. Poor planning coupled with an injury from a car accident and an untrustworthy online retailer all pushed the timeline for the project. We were severely behind schedule and were able to successfully complete the project by abandoning the "capture" peripheral and placing the load on the CPU by using the GPIO pins. This project taught a lesson in proper scheduling and planning.
However, that was not the only lesson. In our implementation we were forced to execute, in a best case situation, over 500 lines of code in between each command between the transmitter and the receiver. The delay that the extra code caused in the controlling of the vehicle was barely noticeable, and helped us to see just how blazingly fast modern micro controllers actually are. The thought of a micro controller being slower and "less capable" than a computer is, in most cases, incorrect.
Project Video
Upload a video of your project and post the link here.
Project Source Code
References
Acknowledgement
Any acknowledgement that you may wish to provide can be included here.
References Used
http://www.nxp.com/documents/user_manual/UM10360.pdf
http://www.socialledge.com/sjsu/images/d/de/2012SJOneBoardSchematic.pdf
http://www.datasheetspdf.com/PDF/MOC7821/613725/1
http://www.socialledge.com/sjsu/index.php?title=PWM_Motor_Controller_Interface
http://www.socialledge.com/sjsu/index.php?title=SJ_One_Board
http://www.socialledge.com/sjsu/index.php?title=Low_Powered_Mesh_Network_stack
