Difference between revisions of "S15: Real Time Brake Assist (RTBA)"
Proj user10 (talk | contribs) (→Team Members & Responsibilities) |
Proj user10 (talk | contribs) (→Objectives & Introduction) |
||
| (168 intermediate revisions by the same user not shown) | |||
| Line 1: | Line 1: | ||
| − | |||
| − | |||
| − | |||
| − | |||
| − | |||
| − | |||
| − | |||
| − | |||
| − | |||
| − | |||
| − | |||
| − | |||
== Real Time Brake Assist (RTBA) == | == Real Time Brake Assist (RTBA) == | ||
| + | This wiki report is the project documentation for an embedded software project done at SJSU during Spring'15 for the course of CmpE 244. | ||
== Abstract == | == Abstract == | ||
| − | Real time brake assist is an automotive application that helps the | + | Real time brake assist is an automotive application that helps the driver avoid a front end collision by calculating the safe braking distance with respect to the car in the front. The system makes use of a LiDAR sensor for judging the car’s proximity to the car ahead of it and uses the diagnostic port (OBDII) to pull up the car’s current speed from the ECU. Based on the collected data, it calculates the safe braking distance and provides visual indicators to alert the driver. This system works between the speed range of 20 mph to 60 mph. Below 20 mph it acts as a proximity detector. It detects an obstacle up to 130 ft in the front. |
| − | it and uses the diagnostic port (OBDII) to pull up the car’s current speed from the ECU. Based on the collected data, it | ||
| − | the safe braking distance and | ||
== Objectives & Introduction == | == Objectives & Introduction == | ||
| Line 31: | Line 18: | ||
**Safety Warning | **Safety Warning | ||
*Additional Features: | *Additional Features: | ||
| − | ** | + | **Filtering out false warning triggers when proximity distance is too short. |
| + | **Sound alert in addition to image. | ||
| + | **Speed indicator text view will go through color change depending on normal or warning event. | ||
| + | **PWM as well as I2C codes are both provided for Lidar. | ||
| + | **Changed boring normal font to big digital font for better looking indicators. | ||
| + | **7-Segment display on the SJ-One board shows the car's speed(mph) in real time. | ||
| + | **When the obstacle is out of range the proximity is zero. | ||
| + | **When there is an error reading over the LiDAR sensor, the proximity becomes maximum i.e. 255. | ||
=== Team Members & Responsibilities === | === Team Members & Responsibilities === | ||
| Line 37: | Line 31: | ||
** Architecture Design, Hardware & Software Development, Integration | ** Architecture Design, Hardware & Software Development, Integration | ||
* '''Julio Fuentes''' | * '''Julio Fuentes''' | ||
| − | ** I2C Communication, Hardware Development | + | ** I2C Communication, Hardware Development, System Integration |
* '''Shaw Ken Chang''' | * '''Shaw Ken Chang''' | ||
| − | ** Android App | + | ** Android App/Bluetooth bridge, System Integration, brake algorithm, new features. |
* '''Naghma Anwar''' | * '''Naghma Anwar''' | ||
** CAN Communication, Software Development | ** CAN Communication, Software Development | ||
== Schedule == | == Schedule == | ||
| − | + | The table below shows our schedule as planned before we started working on the project. Then in another table column, we wrote down the actual result so that readers can see the planned vs. actual goals. The point of the schedule is for readers to assess what to expect and how to pace themselves if they are doing a similar project. | |
{| class="wikitable" | {| class="wikitable" | ||
| Line 103: | Line 97: | ||
| | | | ||
* As of 04/06/15 | * As of 04/06/15 | ||
| − | ** | + | ** Basic code to fetch speed using CAN was written |
** Ready for testing | ** Ready for testing | ||
|- | |- | ||
| Line 126: | Line 120: | ||
* Start testing for CAN communication between OBD2 port and SJOne board | * Start testing for CAN communication between OBD2 port and SJOne board | ||
* Start testing for I2C communication between LiDAR-lite and SJOne board | * Start testing for I2C communication between LiDAR-lite and SJOne board | ||
| − | | | + | | Completed |
| | | | ||
*As of 4/21/2015 | *As of 4/21/2015 | ||
** Bluetooth android bridge: rewrite the android UI and android bluetooth read function for more stable communication. | ** Bluetooth android bridge: rewrite the android UI and android bluetooth read function for more stable communication. | ||
| − | ** I2C communication | + | ** I2C communication successfully established between LiDAR and SJOne board |
| + | ** CAN communication throwing error | ||
|- | |- | ||
! scope="row"| 7 | ! scope="row"| 7 | ||
| Line 139: | Line 134: | ||
* Display this information on android app to notify the user | * Display this information on android app to notify the user | ||
* Assign different colors to each state: Yellow (safe distance), Orange (safe but not too safe), Red (danger zone, car should stop immediately) | * Assign different colors to each state: Yellow (safe distance), Orange (safe but not too safe), Red (danger zone, car should stop immediately) | ||
| − | | | + | | Completed |
| | | | ||
| + | * As of 5/11/2015 | ||
| + | ** Final algorithm developed. | ||
| + | ** Took longer than expected because of stuck CAN communication | ||
| + | ** The problem was: We were not using correct hardware filter | ||
| + | ** We got correct ids by observing the replies from the car using a car OBD reader. | ||
|- | |- | ||
! scope="row"| 8 | ! scope="row"| 8 | ||
| Line 149: | Line 149: | ||
* Fine tune the distance and speed | * Fine tune the distance and speed | ||
* Make android app more informative and user friendly by adding sound alerts | * Make android app more informative and user friendly by adding sound alerts | ||
| − | | | + | | Completed |
| | | | ||
| + | * As of 5/11/2015 | ||
| + | ** Sound Alert added to the android app | ||
| + | ** Testing was done for the safe braking distance. Success! | ||
|- | |- | ||
! scope="row"| 9 | ! scope="row"| 9 | ||
| Line 157: | Line 160: | ||
| | | | ||
* Final Testing | * Final Testing | ||
| − | | | + | * Do the minor bug fixes in the code |
| + | | Completed | ||
| | | | ||
| + | * Success | ||
|- | |- | ||
! scope="row"| 10 | ! scope="row"| 10 | ||
| − | | 05/ | + | | 05/11/15 |
| 05/25/15 | | 05/25/15 | ||
| − | | | + | | |
| + | * Finish the project report | ||
* Project Demo | * Project Demo | ||
| Scheduled | | Scheduled | ||
| | | | ||
| + | * Good Luck! | ||
|} | |} | ||
== Parts List & Cost == | == Parts List & Cost == | ||
| − | + | A list of the cost of our project broken down by components. | |
{| class="wikitable" | {| class="wikitable" | ||
|- | |- | ||
| Line 229: | Line 236: | ||
| $12.99 | | $12.99 | ||
|- | |- | ||
| + | ! scope="row"| 8 | ||
| + | | Bluetooth Module | ||
| + | | Sparkfun | ||
| + | | RN41-XV | ||
| + | | 1 | ||
| + | | $29.99 | ||
| + | |- | ||
| + | ! scope="row"| | ||
| + | | Total | ||
| + | | | ||
| + | | | ||
| + | | | ||
| + | | $227.77 | ||
|} | |} | ||
== Design & Implementation == | == Design & Implementation == | ||
| − | |||
| − | |||
=== Hardware Design === | === Hardware Design === | ||
| + | The Real Time Brake Assist hardware consists of the three boards. The SJ-ONE board provides the LPC1758 ARM based CPU with the integrated CAN and I2C interface controllers used for communication. The second board referred as “Board #1” in the hardware diagram provides the CAN PHY, 12V to 5V voltage regulation and the I2C differential driver. The third board is located in the front of the car and provides power and proper I2C connectivity to the Lidar laser distance sensor. The user interface is implemented through an android based device that connects to the SJ-ONE board through a Bluetooth module. | ||
==== Hardware Diagram ==== | ==== Hardware Diagram ==== | ||
| − | [[File:S15 244 Grp9 | + | [[File:S15 244 Grp9 hwdiagram2.jpg|800px]] |
| + | |||
| + | == Main board prototype == | ||
| + | |||
| + | [[File:S15 244 Grp9 main brd.jpg]] | ||
| + | |||
| + | == Hardware Interface == | ||
| + | === '''Interface to Lidar Laser Distance Sensor''' === | ||
| + | The Lidar laser distance sensor requires 5V and I2C interface operating at a maximum rate of 100Kbps for communication. To provide a reliable and low cost communication to the sensor, a PCA9615 differential driver was chosen. The PCA9615 provides the noise immunity and capability to drive long cables necessary for this application. For cable connectivity, a standard CAT5 RJ45 cable was used because of its low cost and twisted pair connectivity for differential signals. | ||
| + | The diagram below shows the connectivity of the differential pairs. In order to provide the maximum differential swing, VDDB1 and VDDB2 should be connected to 5V and use 120ohms for R1 and 60 ohms for R2. VDDA1 and VDDA2 should be pulled up to 3.3V as required by the I2C interface. The PCA9615 provides separate voltage pins for the I2C interface which should be 3.3V and for the differential signaling it should be 5V. | ||
| + | The Lidar laser sensor used in this project is capable of measuring distances of 130ft which makes it suitable for this project. | ||
| + | |||
| + | |||
| + | [[File:S15 244 Grp9 diff interface.jpg|800px|Diff Signals for I2C]] | ||
| + | |||
| + | |||
| + | [[File:S15 244 Grp9 sensor mod.jpg]] | ||
| + | |||
| + | ==== RJ45 Cable Interface ==== | ||
| + | |||
| + | The RJ45 cable and connections should be selected so that each of the differential signals is connected to a corresponding twisted pair. Also, 5V power and ground should be connected so that they use a twisted pair and therefore keep the capacitive coupling through the cabling. | ||
| + | The figure below shows the RJ45 pin assignment, as well as the twisted pair cable coloring found in traditional CAT5 cables. | ||
| + | |||
| + | |||
| + | [[File:S15 244 Grp9 RJ45 conn.jpg|600px|RJ45 Connectivity]] | ||
| + | |||
| + | == CAN Interface == | ||
| + | |||
| + | Since 2005 all light and medium duty vehicles in North America support CAN over the OBDII connectors. The CAN data rates supported by vehicles are either 250Kbit or 500Kbit per second. For this project we used 500Kbit per second data rate. | ||
| + | To support 500Kbit per second data rate accurately, the SJ-One board had to be provided with an external 4Mhz crystal. Also, the clock initialization function had to be modified to support a 4Mhz external crystal. | ||
| + | The CAN1 interface of the SJ-One board was used with a low cost TJA1050 external PHY. Since the PHY was powered with 5V, a resistor divider had to be used to reduce the 5V data output of the PHY to 3.3V. This was done to protect the 3.3V input from the SJ-One board. | ||
| + | The connectivity to the OBDII connector was done with an off the shelf extender cable where in addition to the CAN signals, 12V was regulated down to power the 5V PHY and also the Lidar laser sensor to measure the distance. The picture below show the implementation of the CAN interface. | ||
| + | |||
| + | |||
| + | [[File:S15 244 Grp9 CAN.jpg|800px]] | ||
| + | |||
| + | == 29 ID per J1939 Standard == | ||
| − | + | For vehicles, a higher layer protocol resides above the CAN frames and it is specified in the SAE J1939 standards. To send and receive messages, the extended 29 bit identifier must be used. The format of the 29 bit identifier used in vehicles is shown in the picture below. | |
| − | |||
| − | + | [[File:S15 244 Grp9 29bitframe.jpg]] | |
| − | |||
| − | === Implementation === | + | == Validation of CAN Interface == |
| − | This | + | |
| + | The CAN interface was first validated by using a CAN analyzer from Microchip. Both data requests for information on the coolant temperature as well as responses to the PID for coolant temperature (0x05) were verified. The analyzer proved to be a useful tool also to ensure an error free bus. The picture below shows two nodes responding to the request for coolant temperature. | ||
| + | |||
| + | |||
| + | [[File:S15 244 Grp9 coolant data.jpg]] | ||
| + | |||
| + | == Software Implementation == | ||
| + | The following diagram shows the complete architecture of our software design. We have four main tasks running on the scheduler with proximity_task given the higher priority. It is given a semaphore from the calculateSBD_task whenever it successfully gets the speed value from the canQ. There are three queues to store and share the data among these four tasks. The ui_task receives all the data from the queues and sends it to the android app for display and alert features. | ||
| + | [[File:S15 244 Grp9 SoftArchi.PNG]] | ||
| + | === Braking Distance Algorithm === | ||
| + | We can determine how far a vehicle will travel while braking, by using some dominant factors like, the friction coefficient u ( nominal value on dry road is 0.8 ), braking deceleration g, and car velocity v. In this algorithm we assumed constant deceleration of 32 ft/s^2. The equation becomes, d = ( v * v ) / ( 2 * u * g ) | ||
| + | |||
| + | [[File:S15 244 Grp9 SBD.PNG]] | ||
| + | |||
| + | == Bluetooth/Android Bridge == | ||
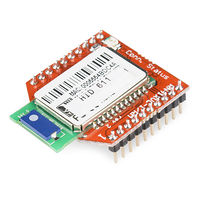
| + | [[File:S15_244_Grp9_RN41XV.jpg|200px|Bluetooth Module]] | ||
| + | |||
| + | For this project we chose RN41XV Bluetooth module. This is a Bluetooth module with Zigbee footprint and it fits SJSUone board perfectly. This is one of the main reason why we use this module. We can easily access the Bluetooth module through UART 2 or UART3 – depending on the board setting. | ||
| + | |||
| + | Features of RN41XV: | ||
| + | * Fully certified Bluetooth® version 2.1 module, supports version 2.1 + Enhanced Data Rate (EDR) | ||
| + | * Backwards-compatible with Bluetooth version 2.0, 1.2, and 1.1 | ||
| + | * Pin compatible with widely used 2 x 10 (2mm) socket typically used for 802.15.4 applications | ||
| + | * Low power: 30 mA connected, < 10 mA sniff mode | ||
| + | * UART (SPP or HCI) and USB (HCI only) data connection interfaces | ||
| + | * Sustained SPP data rates: 240 Kbps (slave), 300 Kbps (master) | ||
| + | * HCI data rates: 1.5 Mbps sustained, 3.0 Mbps burst in HCI mode | ||
| + | * Embedded Bluetooth stack profiles included (requires no host stack): GAP, SDP, RFCOMM, and L2CAP protocols, with SPP, HID and DUN profile support | ||
| + | * Bluetooth SIG certified | ||
| + | * Chip antenna on-board | ||
| + | |||
| + | Since we are using android to connect to the module, having SPP support is important. There are many projects on the web describing how to connect android to a Bluetooth module and they are more or less similar. The things that differs are only hardware specifications such as the range and what types of protocols and profiles it can support. | ||
| + | Based on the specification sheet, RN41XV has range up to 100 meters, this is plenty for our application. We expect that users will use an android phone to connect to the main embedded device within 1m-2m distance. | ||
| + | |||
| + | ===Testing Bluetooth Bridge=== | ||
| + | ====Test Strategy:==== | ||
| + | # Functionality test1: Using PC terminal app and android terminal app, check the range and see if data can be transferred as expected. | ||
| + | # Functionality test2: Setup the module to communicate with SJSUone board through UART3 port and then connect the module to android phone using android terminal app. | ||
| + | # Functionality test3: Do the same thing as test2 but use our own android app instead. | ||
| + | |||
| + | === Android Application Design === | ||
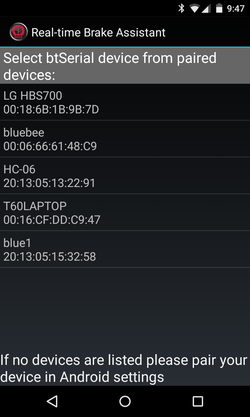
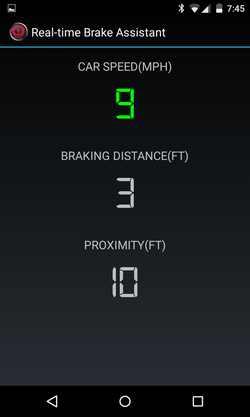
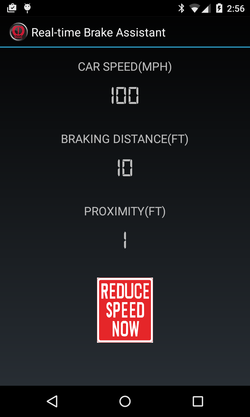
| + | The objective for our application UI is to be make it simple and easy to use. The following screen captures shows different modes of UI: | ||
| + | |||
| + | [[File:S15_244_Grp9_android_ui_connect_device.png|250px|connect]] | ||
| + | [[File:S15_244_Grp9_android_ui_normal.png|250px|normal]] | ||
| + | [[File:S15_244_Grp9_android_ui_warning.png|250px|warning]] | ||
| + | |||
| + | |||
| + | This application has the following components: | ||
| + | # Initial page to select a bluetooth module to connect to. | ||
| + | # Bluetooth communication manager to read and parse bytes of data when there are data on the buffer ready to be read. | ||
| + | # Indicators to show the car speed in mph, calculated safe braking distance in ft based on the current speed, and the proximity sensor reading in units of ft. | ||
| + | # Indicator to warn the user when the car's distance is less than the safe braking distance. The indicators include a warning image telling the user to slow down and also sound alert to warn the user with beeping sounds. This is particularly useful because drivers do not need to take their eyes off the road. The text color also changes to red when warning mode triggers, make it easier for the driver to tell the speed needs to be reduced. | ||
| + | |||
| + | === Android Application Implementation === | ||
| + | To get started with bluetooth programming on android, we consult the official developer website (http://developer.android.com/guide/topics/connectivity/bluetooth.html). Essentially we picked and choose the code we need from the tutorials and examples as a base framework for a bluetooth capable application. In this application we only have two source java files, MainActivity.java and DeviceListActivity.java. At launch, the MainActivity class will call the DeviceListActivity class to display a list of discovered device and prompt users to select a bluetooth device to connect to, if successful, the application will jump to the indicator page where it shows the speed, safe distance, and proximity values. Those values was fetched using SJSUone board from the OBDII CAN port then outputted to android through UART/Bluetooth communication. For more details, look at the source code link included in the later section of this document. | ||
| + | |||
| + | General steps to add bluetooth capability to an android program : | ||
| + | #Add bluetooth permission in the application manifest file. | ||
| + | #Setup bluetooth. | ||
| + | ##Get the BluetoothAdapter. | ||
| + | ##Enable Bluetooth - first check if bluetooth is enabled and if it's not then we will create an Intent to request for enabling bluetooth. | ||
| + | ##Discover Bluetooth and Manage Connection | ||
| + | #Fetch the data bytes from bluetoothsocket streams. | ||
| + | |||
| + | Other feature added: | ||
| + | #The warning part of this application uses imageView and View API's setvisibility to display a warning sign and vice versa. | ||
| + | #The font of the speed, safe braking distance, and proximity data was changed to a digital font that looks like 7 segment display. This is done by downloading a 7 seg digital font and place it in the resource file and then declare the following code in the onCreate method of the MainActivity: ''Typeface tf = Typeface.createFromAsset(getAssets(),"fonts/digital-7.ttf"); carSpeedDataTextView.setTypeface(tf); brakingDistDataTextView.setTypeface(tf); proximityDataTextView.setTypeface(tf);'' | ||
| + | #The warning alert sound was added to the android application as an additional feature. This is made possible by calling mediaPlayer library and play the sound only when warning should happen(safe distance > proximity distance). | ||
| + | |||
| + | ====Steps to communicate from SJSUone Board to the Android App==== | ||
| + | #Setup bluetooth module and SJSUone Board connection (Zigbee socket using UART3 ports) | ||
| + | #Setup SJSUone Board through FW: | ||
| + | ##Instantiate the UART3 object | ||
| + | ##printf to UART3 port if received OBDII values from CAN | ||
| + | #Connect bluetooth module through android app | ||
| + | #Read data and parse data correspondingly | ||
== Testing & Technical Challenges == | == Testing & Technical Challenges == | ||
| − | + | There were several technical challenges in this project. One of the objectives was to use one SJ-One boards to be more like a real system where there is one processor. This offered the challenge of how to communicate to the laser sensor since it had to be mounted at the front of the car. We opted for using a differential buffer to drive 14ft of cable. A low cost wireless controller with an I2C interface to the laser sensor would be the right way to go to market this product, but this would take some time to develop. | |
| − | + | ||
| + | The biggest challenge in the Real Time Brake Assist project was establishing communication with the car through the CAN interface. First we had to determine if the communication to the test car was at 250 or 500Kbps and then use an external crystal which is required when using the SJ-One board's CAN controller at higher than 100Kbps. Proper communication with the car requires determining the right source and destination address to request information like vehicle speed from the car. Having access to the SAE J1939 standard in very important but may be costly. Another option is to learn the communication with the car by examining what a car OBDII reader is doing. This is the option we chose. | ||
| + | |||
| + | == Issues Found == | ||
| + | |||
| + | === External Crystal Implementation === | ||
| + | We first attempted to install several 12Mhz crystals with different load capacitance. We properly enabled the use of the external crystal. We also probed the waveform with an oscilloscope, but the board would never come up. We then used two different 4Mhz crystals and both of them worked. With the 12Mhz crystal the board would appear to come up when we set the clock init functions as if it was a 24Mhz crystal. The only thing is that the console would display the wrong characters because of the baud rate. It could be that the PLL can't work with the settings determined with the 12Mhz crystal by the code. We did not have time to investigate further. So we continued the project with the 4Mhz crystal and got very accurate 500Khz operation from the CAN interface. | ||
| + | |||
| + | === CAN Broadcast Address === | ||
| + | The broadcast address of 0x7DF referred on the Wikipedia (http://en.wikipedia.org/wiki/OBD-II_PIDs) is for 11 bit communication and is outdated. This broadcast address does not work with modern cars which use 29 bit ID. The information on broadcast address for 29 bit communication for vehicles is in the SAE J1939 standard. The documentation is sold and not freely available. To bypass this blocking issue, we used an OBDII reader and examined what it was sending to find the particular broadcast and response address for the Honda Accord and Honda Civic used for testing. | ||
| + | |||
| + | === Flooding of CAN Messages to the SJ-ONE board=== | ||
| + | After establishing communication with the car, we noticed that we were receiving only a couple of replies from two different nodes in the car. This was due to the fact that we did not have the hardware filter implemented. The CAN controller was flooded with messages from the car and was dropping most of the packets. After resolving a software bug in the code, the hardware filter was properly implemented and the SJ-ONE board stopped dropping packets. The log below shows the failing case. | ||
| + | |||
| + | :CAN INIT | ||
| + | :TXCNT=1 RXCNT=3 RXDROP=0 | ||
| + | :Received Coolant Temp: 0X18DAF11D | ||
| + | :PID = 0X5, Temp = 65 | ||
| + | :TXCNT=2 RXCNT=12 RXDROP=2528 | ||
| + | :Received Coolant Temp: 0X18DAF111 | ||
| + | :PID = 0X5, Temp = 65 | ||
| + | :TXCNT=3 RXCNT=13 RXDROP=5066 | ||
| + | :TXCNT=4 RXCNT=13 RXDROP=7602 | ||
| + | :TXCNT=5 RXCNT=14 RXDROP=10131 | ||
| + | :TXCNT=6 RXCNT=15 RXDROP=12664 | ||
| + | :TXCNT=7 RXCNT=16 RXDROP=15202 | ||
| + | :TXCNT=8 RXCNT=17 RXDROP=17730 | ||
| + | :TXCNT=9 RXCNT=18 RXDROP=20261 | ||
| + | :TXCNT=10 RXCNT=19 RXDROP=22798 | ||
| + | :TXCNT=11 RXCNT=20 RXDROP=25332 | ||
| + | :TXCNT=12 RXCNT=21 RXDROP=27866 | ||
| + | |||
| + | === Incorrect Value Displayed on Android Application === | ||
| + | This happens in the beginning when we first tried to integrate all of the components together. The output was incorrect with our initial SJSUone firmware because the software was sending floating point values to the android when android was expecting integer bytes. Later we change the output to unsigned integer char and that solved the issue. Other solutions could be done on the android end where we can convert the floating point values to strings. Another problem we see with our initial firmware is that we thought a value was passed correctly but it was not. We were supposed to assign a value to a variable but we didn't so we got a value of 0 for the proximity value. This is fixed by simply assigning the value fetched from freeRTOS queue correctly. | ||
| − | + | There's another incorrect value display problem after we added some code to fix the problem where the warning sound will stop when it's not expected. During the warning, the value of sensors are stuck and not updating. This is because the sound play fix was to use a delay loop inside the bluetooth receive message handler and since the delay was much longer than message receiving rate, it blocks the handlers from outputing values correctly. The fix is to remove the delay loop in the handler and add some checking mechanisms to reduce delay time in the handler. | |
| − | === | + | === Sound Stops Playing on Android Application When Not Expected to === |
| − | + | The warning sound was supposed to play forever as long as proximity distance is less than safe distance. This is because a new mediaPlayer object was programmed to be called and started every single time we get a valid message on the bluetooth connection stream buffer. After some researching, the problem and solution was found. Basically this problem is caused by instantiating too many mediaPlayer object without releasing the object from the memory. The garbage collector will come in and kill the mediaPlayer process to free up memory. The fix is basically to actually release the object after starting the mediaPlayer object. But we need to have some delay in order for a beep sound to come out. If the delay is too short, the object would be released before the beep sound can be outputted to the speaker. | |
== Conclusion == | == Conclusion == | ||
| − | + | ||
| + | The Real Time Brake assist project allowed us to take the CAN interface knowledge that we learned in CMPE 244 and apply it to a real world application. We learned how important is to have the CAN hardware filter implementation in a very active CAN bus like the one found in vehicles. The project also allowed us to implement a real time multi-tasking environment with multiple data collection like proximity and speed. Data had to be collected, processed and sent to a smart phone through Bluetooth. | ||
| + | The Real Time Brake Assist prototype built in this project has proven a concept of a real time application that is not far away from becoming a real product. This project has also shown as the value of team work and the value of collaboration which are skills that will benefit us in the future. | ||
| + | |||
=== Project Video === | === Project Video === | ||
| − | + | [https://www.youtube.com/watch?v=h4MpLU3NBKE&feature=youtu.be/ Demo Video] | |
=== Project Source Code === | === Project Source Code === | ||
| − | * [https:// | + | * [https://gitlab.com/sahilkataria/real_time_brake_assist/ Embedded System Source Code Link] |
| + | * [https://gitlab.com/ShawKenChang/real_time_brake_assist_android_app/ Android App Gitlab Link] | ||
== References == | == References == | ||
=== Acknowledgement === | === Acknowledgement === | ||
| − | + | ||
| + | We would like to thank Preet Kang for his constant support and encouragement and for providing us the required knowledge and tools like Hyperload and APIs that allowed us to complete the project in a short time. | ||
=== References Used === | === References Used === | ||
| − | + | ||
| + | LPC176x/5x User manual version 3.1 (I2C and CAN controller reference). | ||
| + | |||
| + | Information about Vehicle PIDs http://en.wikipedia.org/wiki/OBD-II_PIDs | ||
| + | |||
| + | Introduction to SAE J1939 http://www.kvaser.com/about-can/higher-layer-protocols/j1939-introduction/ | ||
| + | |||
| + | BOSCH CAN Specification V2.0 | ||
=== Appendix === | === Appendix === | ||
| Line 277: | Line 451: | ||
* I2C Differential Buffer [[File:S15 244 Grp9 PCA9615.pdf| PCA9615]] | * I2C Differential Buffer [[File:S15 244 Grp9 PCA9615.pdf| PCA9615]] | ||
* Laser Distance Sensor [[File:S15 244 Grp9 Laser.pdf]] | * Laser Distance Sensor [[File:S15 244 Grp9 Laser.pdf]] | ||
| + | *Bluetooth Module [[File:S15_244_Grp9_RN41XV.pdf]] | ||
Latest revision as of 05:03, 25 May 2015
Contents
- 1 Real Time Brake Assist (RTBA)
- 2 Abstract
- 3 Objectives & Introduction
- 4 Schedule
- 5 Parts List & Cost
- 6 Design & Implementation
- 7 Main board prototype
- 8 Hardware Interface
- 9 CAN Interface
- 10 29 ID per J1939 Standard
- 11 Validation of CAN Interface
- 12 Software Implementation
- 13 Bluetooth/Android Bridge
- 14 Testing & Technical Challenges
- 15 Issues Found
- 16 Conclusion
- 17 References
Real Time Brake Assist (RTBA)
This wiki report is the project documentation for an embedded software project done at SJSU during Spring'15 for the course of CmpE 244.
Abstract
Real time brake assist is an automotive application that helps the driver avoid a front end collision by calculating the safe braking distance with respect to the car in the front. The system makes use of a LiDAR sensor for judging the car’s proximity to the car ahead of it and uses the diagnostic port (OBDII) to pull up the car’s current speed from the ECU. Based on the collected data, it calculates the safe braking distance and provides visual indicators to alert the driver. This system works between the speed range of 20 mph to 60 mph. Below 20 mph it acts as a proximity detector. It detects an obstacle up to 130 ft in the front.
Objectives & Introduction
What we would like to accomplish is the following:
- Provide a user friendly solution to brake assistance by analyzing car's data through OBD-II.
- Lidar to detect distance.
- OBD-II interface with SJSU One Board.
- Special I2C circuitry for wiring the lidar from the front of the car to inside of the car.
- Provide a simple mobile application which reads the OBD-II data through bluetooth as additional feature to the braking solution. It would provide the following indicators:
- Car Speed(mph)
- Braking Distance(ft)
- Proximity(ft)
- Safety Warning
- Additional Features:
- Filtering out false warning triggers when proximity distance is too short.
- Sound alert in addition to image.
- Speed indicator text view will go through color change depending on normal or warning event.
- PWM as well as I2C codes are both provided for Lidar.
- Changed boring normal font to big digital font for better looking indicators.
- 7-Segment display on the SJ-One board shows the car's speed(mph) in real time.
- When the obstacle is out of range the proximity is zero.
- When there is an error reading over the LiDAR sensor, the proximity becomes maximum i.e. 255.
Team Members & Responsibilities
- Sahil Kataria
- Architecture Design, Hardware & Software Development, Integration
- Julio Fuentes
- I2C Communication, Hardware Development, System Integration
- Shaw Ken Chang
- Android App/Bluetooth bridge, System Integration, brake algorithm, new features.
- Naghma Anwar
- CAN Communication, Software Development
Schedule
The table below shows our schedule as planned before we started working on the project. Then in another table column, we wrote down the actual result so that readers can see the planned vs. actual goals. The point of the schedule is for readers to assess what to expect and how to pace themselves if they are doing a similar project.
| Week # | Start Date | End Date | Task | Status | Result |
|---|---|---|---|---|---|
| 1 | 03/10/15 | 03/16/15 |
|
Completed |
|
| 2 | 03/17/15 | 03/23/15 |
|
Completed |
|
| 3 | 03/24/15 | 03/30/15 |
|
Completed |
|
| 4 | 03/31/15 | 04/06/15 |
|
Completed |
|
| 5 | 04/07/15 | 04/13/15 |
|
Completed |
|
| 6 | 04/14/15 | 04/20/15 |
|
Completed |
|
| 7 | 04/21/15 | 04/27/15 |
|
Completed |
|
| 8 | 04/28/15 | 05/04/15 |
|
Completed |
|
| 9 | 05/05/15 | 05/11/15 |
|
Completed |
|
| 10 | 05/11/15 | 05/25/15 |
|
Scheduled |
|
Parts List & Cost
A list of the cost of our project broken down by components.
| Item# | Part Desciption | Vendor | Part Number | Qty | Cost |
|---|---|---|---|---|---|
| 1 | LIDAR Lite | sparkfun.com | SEN-13167 | 1 | $89.95 |
| 2 | SJOne Board | SCE | 1 | $80.00 | |
| 3 | I2C Diff Buffer | NXP | PCA9615DPJ | 2 | $2.99 |
| 4 | CAN Trasceiver | Philips | TJA1050T | 1 | $1.03 |
| 5 | 12V-5V DC-DC REG | Murata | 7805SR-C | 1 | $9.90 |
| 6 | 3.3V LDO REG | ON Semiconductor | NCP4683DSQ33T1G | 1 | $0.92 |
| 7 | Prototype board | Twin Industries | 800-45 | 1 | $12.99 |
| 8 | Bluetooth Module | Sparkfun | RN41-XV | 1 | $29.99 |
| Total | $227.77 |
Design & Implementation
Hardware Design
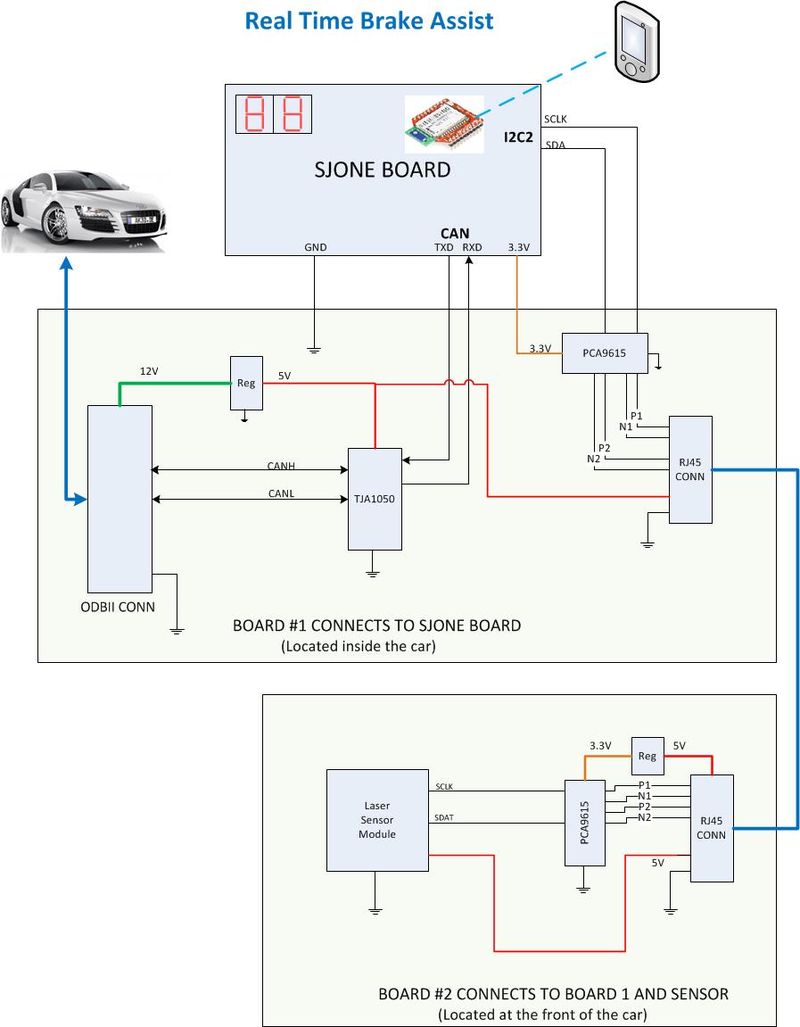
The Real Time Brake Assist hardware consists of the three boards. The SJ-ONE board provides the LPC1758 ARM based CPU with the integrated CAN and I2C interface controllers used for communication. The second board referred as “Board #1” in the hardware diagram provides the CAN PHY, 12V to 5V voltage regulation and the I2C differential driver. The third board is located in the front of the car and provides power and proper I2C connectivity to the Lidar laser distance sensor. The user interface is implemented through an android based device that connects to the SJ-ONE board through a Bluetooth module.
Hardware Diagram
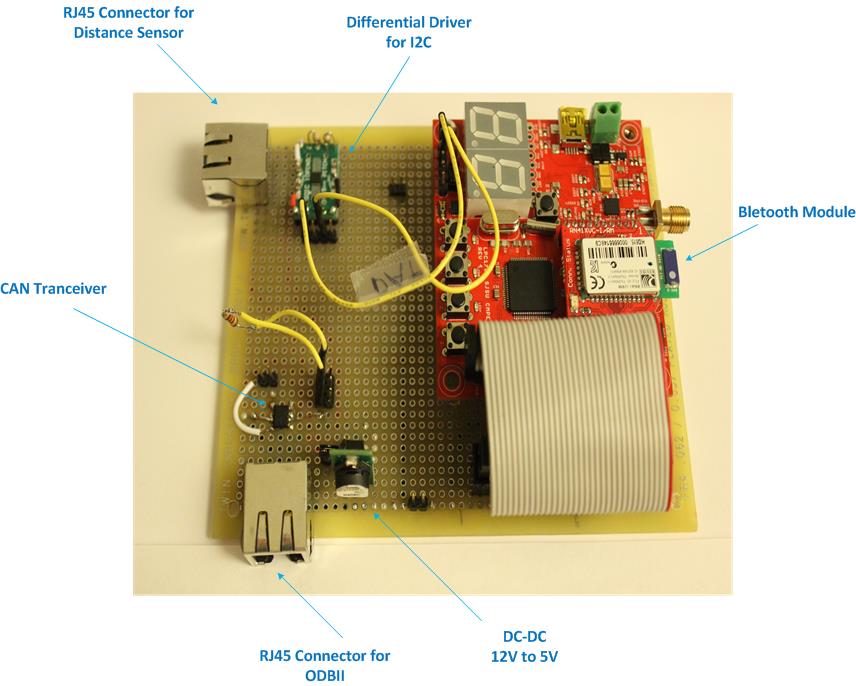
Main board prototype
Hardware Interface
Interface to Lidar Laser Distance Sensor
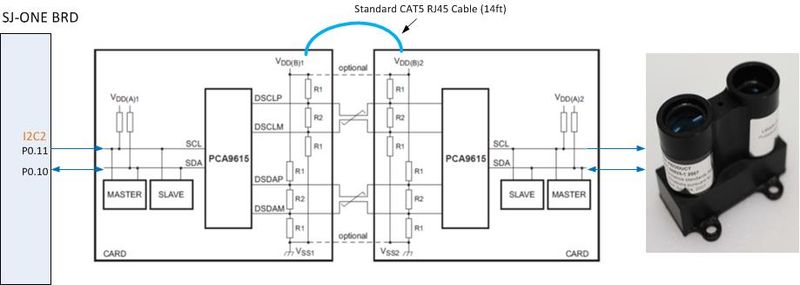
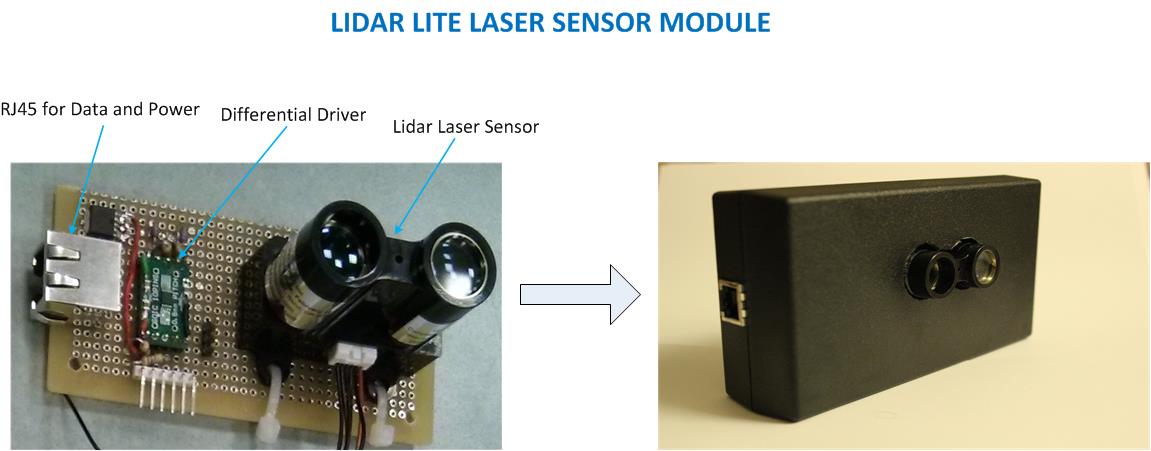
The Lidar laser distance sensor requires 5V and I2C interface operating at a maximum rate of 100Kbps for communication. To provide a reliable and low cost communication to the sensor, a PCA9615 differential driver was chosen. The PCA9615 provides the noise immunity and capability to drive long cables necessary for this application. For cable connectivity, a standard CAT5 RJ45 cable was used because of its low cost and twisted pair connectivity for differential signals. The diagram below shows the connectivity of the differential pairs. In order to provide the maximum differential swing, VDDB1 and VDDB2 should be connected to 5V and use 120ohms for R1 and 60 ohms for R2. VDDA1 and VDDA2 should be pulled up to 3.3V as required by the I2C interface. The PCA9615 provides separate voltage pins for the I2C interface which should be 3.3V and for the differential signaling it should be 5V. The Lidar laser sensor used in this project is capable of measuring distances of 130ft which makes it suitable for this project.
RJ45 Cable Interface
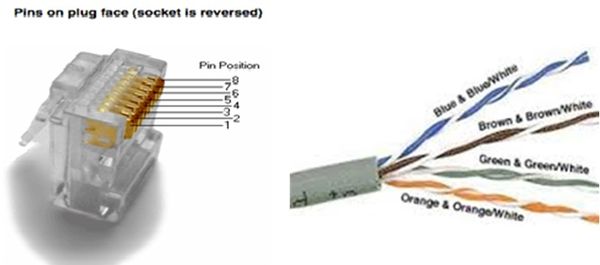
The RJ45 cable and connections should be selected so that each of the differential signals is connected to a corresponding twisted pair. Also, 5V power and ground should be connected so that they use a twisted pair and therefore keep the capacitive coupling through the cabling. The figure below shows the RJ45 pin assignment, as well as the twisted pair cable coloring found in traditional CAT5 cables.
CAN Interface
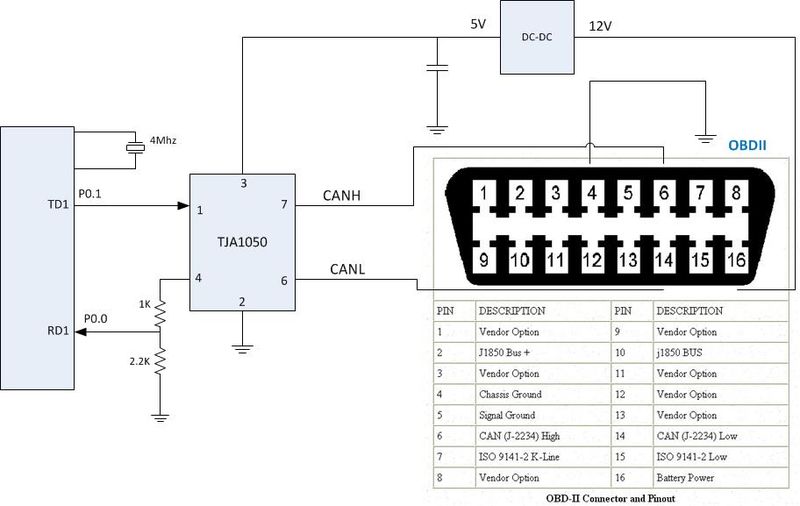
Since 2005 all light and medium duty vehicles in North America support CAN over the OBDII connectors. The CAN data rates supported by vehicles are either 250Kbit or 500Kbit per second. For this project we used 500Kbit per second data rate. To support 500Kbit per second data rate accurately, the SJ-One board had to be provided with an external 4Mhz crystal. Also, the clock initialization function had to be modified to support a 4Mhz external crystal. The CAN1 interface of the SJ-One board was used with a low cost TJA1050 external PHY. Since the PHY was powered with 5V, a resistor divider had to be used to reduce the 5V data output of the PHY to 3.3V. This was done to protect the 3.3V input from the SJ-One board. The connectivity to the OBDII connector was done with an off the shelf extender cable where in addition to the CAN signals, 12V was regulated down to power the 5V PHY and also the Lidar laser sensor to measure the distance. The picture below show the implementation of the CAN interface.
29 ID per J1939 Standard
For vehicles, a higher layer protocol resides above the CAN frames and it is specified in the SAE J1939 standards. To send and receive messages, the extended 29 bit identifier must be used. The format of the 29 bit identifier used in vehicles is shown in the picture below.
Validation of CAN Interface
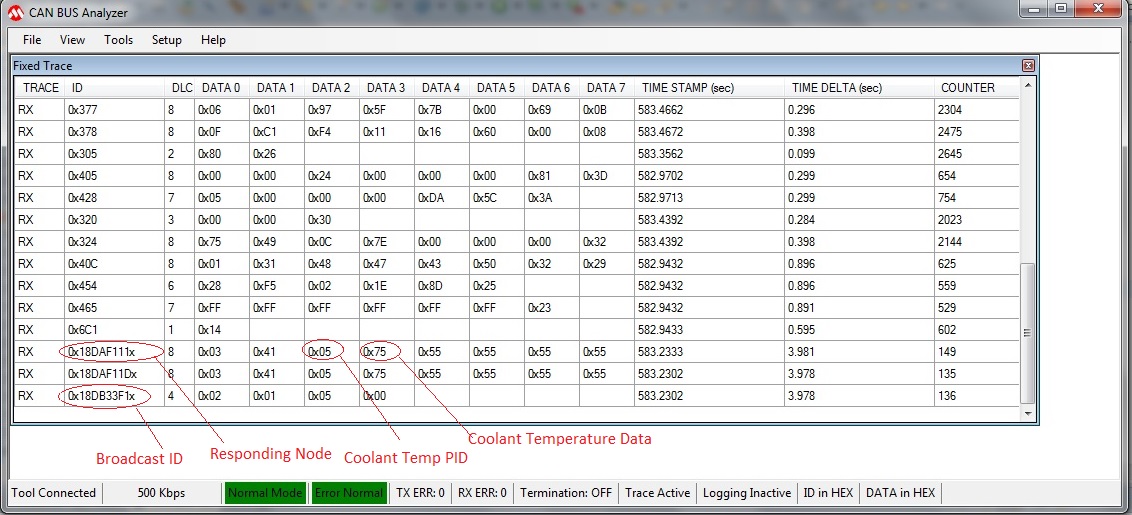
The CAN interface was first validated by using a CAN analyzer from Microchip. Both data requests for information on the coolant temperature as well as responses to the PID for coolant temperature (0x05) were verified. The analyzer proved to be a useful tool also to ensure an error free bus. The picture below shows two nodes responding to the request for coolant temperature.
Software Implementation
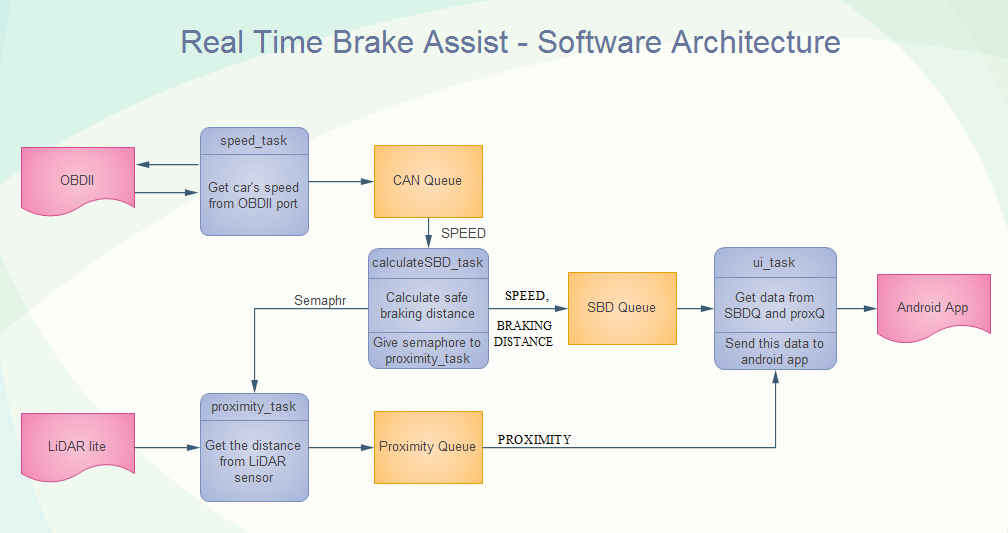
The following diagram shows the complete architecture of our software design. We have four main tasks running on the scheduler with proximity_task given the higher priority. It is given a semaphore from the calculateSBD_task whenever it successfully gets the speed value from the canQ. There are three queues to store and share the data among these four tasks. The ui_task receives all the data from the queues and sends it to the android app for display and alert features.
Braking Distance Algorithm
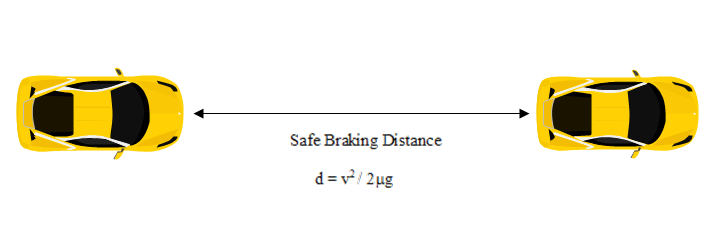
We can determine how far a vehicle will travel while braking, by using some dominant factors like, the friction coefficient u ( nominal value on dry road is 0.8 ), braking deceleration g, and car velocity v. In this algorithm we assumed constant deceleration of 32 ft/s^2. The equation becomes, d = ( v * v ) / ( 2 * u * g )
Bluetooth/Android Bridge
For this project we chose RN41XV Bluetooth module. This is a Bluetooth module with Zigbee footprint and it fits SJSUone board perfectly. This is one of the main reason why we use this module. We can easily access the Bluetooth module through UART 2 or UART3 – depending on the board setting.
Features of RN41XV:
- Fully certified Bluetooth® version 2.1 module, supports version 2.1 + Enhanced Data Rate (EDR)
- Backwards-compatible with Bluetooth version 2.0, 1.2, and 1.1
- Pin compatible with widely used 2 x 10 (2mm) socket typically used for 802.15.4 applications
- Low power: 30 mA connected, < 10 mA sniff mode
- UART (SPP or HCI) and USB (HCI only) data connection interfaces
- Sustained SPP data rates: 240 Kbps (slave), 300 Kbps (master)
- HCI data rates: 1.5 Mbps sustained, 3.0 Mbps burst in HCI mode
- Embedded Bluetooth stack profiles included (requires no host stack): GAP, SDP, RFCOMM, and L2CAP protocols, with SPP, HID and DUN profile support
- Bluetooth SIG certified
- Chip antenna on-board
Since we are using android to connect to the module, having SPP support is important. There are many projects on the web describing how to connect android to a Bluetooth module and they are more or less similar. The things that differs are only hardware specifications such as the range and what types of protocols and profiles it can support. Based on the specification sheet, RN41XV has range up to 100 meters, this is plenty for our application. We expect that users will use an android phone to connect to the main embedded device within 1m-2m distance.
Testing Bluetooth Bridge
Test Strategy:
- Functionality test1: Using PC terminal app and android terminal app, check the range and see if data can be transferred as expected.
- Functionality test2: Setup the module to communicate with SJSUone board through UART3 port and then connect the module to android phone using android terminal app.
- Functionality test3: Do the same thing as test2 but use our own android app instead.
Android Application Design
The objective for our application UI is to be make it simple and easy to use. The following screen captures shows different modes of UI:
This application has the following components:
- Initial page to select a bluetooth module to connect to.
- Bluetooth communication manager to read and parse bytes of data when there are data on the buffer ready to be read.
- Indicators to show the car speed in mph, calculated safe braking distance in ft based on the current speed, and the proximity sensor reading in units of ft.
- Indicator to warn the user when the car's distance is less than the safe braking distance. The indicators include a warning image telling the user to slow down and also sound alert to warn the user with beeping sounds. This is particularly useful because drivers do not need to take their eyes off the road. The text color also changes to red when warning mode triggers, make it easier for the driver to tell the speed needs to be reduced.
Android Application Implementation
To get started with bluetooth programming on android, we consult the official developer website (http://developer.android.com/guide/topics/connectivity/bluetooth.html). Essentially we picked and choose the code we need from the tutorials and examples as a base framework for a bluetooth capable application. In this application we only have two source java files, MainActivity.java and DeviceListActivity.java. At launch, the MainActivity class will call the DeviceListActivity class to display a list of discovered device and prompt users to select a bluetooth device to connect to, if successful, the application will jump to the indicator page where it shows the speed, safe distance, and proximity values. Those values was fetched using SJSUone board from the OBDII CAN port then outputted to android through UART/Bluetooth communication. For more details, look at the source code link included in the later section of this document.
General steps to add bluetooth capability to an android program :
- Add bluetooth permission in the application manifest file.
- Setup bluetooth.
- Get the BluetoothAdapter.
- Enable Bluetooth - first check if bluetooth is enabled and if it's not then we will create an Intent to request for enabling bluetooth.
- Discover Bluetooth and Manage Connection
- Fetch the data bytes from bluetoothsocket streams.
Other feature added:
- The warning part of this application uses imageView and View API's setvisibility to display a warning sign and vice versa.
- The font of the speed, safe braking distance, and proximity data was changed to a digital font that looks like 7 segment display. This is done by downloading a 7 seg digital font and place it in the resource file and then declare the following code in the onCreate method of the MainActivity: Typeface tf = Typeface.createFromAsset(getAssets(),"fonts/digital-7.ttf"); carSpeedDataTextView.setTypeface(tf); brakingDistDataTextView.setTypeface(tf); proximityDataTextView.setTypeface(tf);
- The warning alert sound was added to the android application as an additional feature. This is made possible by calling mediaPlayer library and play the sound only when warning should happen(safe distance > proximity distance).
Steps to communicate from SJSUone Board to the Android App
- Setup bluetooth module and SJSUone Board connection (Zigbee socket using UART3 ports)
- Setup SJSUone Board through FW:
- Instantiate the UART3 object
- printf to UART3 port if received OBDII values from CAN
- Connect bluetooth module through android app
- Read data and parse data correspondingly
Testing & Technical Challenges
There were several technical challenges in this project. One of the objectives was to use one SJ-One boards to be more like a real system where there is one processor. This offered the challenge of how to communicate to the laser sensor since it had to be mounted at the front of the car. We opted for using a differential buffer to drive 14ft of cable. A low cost wireless controller with an I2C interface to the laser sensor would be the right way to go to market this product, but this would take some time to develop.
The biggest challenge in the Real Time Brake Assist project was establishing communication with the car through the CAN interface. First we had to determine if the communication to the test car was at 250 or 500Kbps and then use an external crystal which is required when using the SJ-One board's CAN controller at higher than 100Kbps. Proper communication with the car requires determining the right source and destination address to request information like vehicle speed from the car. Having access to the SAE J1939 standard in very important but may be costly. Another option is to learn the communication with the car by examining what a car OBDII reader is doing. This is the option we chose.
Issues Found
External Crystal Implementation
We first attempted to install several 12Mhz crystals with different load capacitance. We properly enabled the use of the external crystal. We also probed the waveform with an oscilloscope, but the board would never come up. We then used two different 4Mhz crystals and both of them worked. With the 12Mhz crystal the board would appear to come up when we set the clock init functions as if it was a 24Mhz crystal. The only thing is that the console would display the wrong characters because of the baud rate. It could be that the PLL can't work with the settings determined with the 12Mhz crystal by the code. We did not have time to investigate further. So we continued the project with the 4Mhz crystal and got very accurate 500Khz operation from the CAN interface.
CAN Broadcast Address
The broadcast address of 0x7DF referred on the Wikipedia (http://en.wikipedia.org/wiki/OBD-II_PIDs) is for 11 bit communication and is outdated. This broadcast address does not work with modern cars which use 29 bit ID. The information on broadcast address for 29 bit communication for vehicles is in the SAE J1939 standard. The documentation is sold and not freely available. To bypass this blocking issue, we used an OBDII reader and examined what it was sending to find the particular broadcast and response address for the Honda Accord and Honda Civic used for testing.
Flooding of CAN Messages to the SJ-ONE board
After establishing communication with the car, we noticed that we were receiving only a couple of replies from two different nodes in the car. This was due to the fact that we did not have the hardware filter implemented. The CAN controller was flooded with messages from the car and was dropping most of the packets. After resolving a software bug in the code, the hardware filter was properly implemented and the SJ-ONE board stopped dropping packets. The log below shows the failing case.
- CAN INIT
- TXCNT=1 RXCNT=3 RXDROP=0
- Received Coolant Temp: 0X18DAF11D
- PID = 0X5, Temp = 65
- TXCNT=2 RXCNT=12 RXDROP=2528
- Received Coolant Temp: 0X18DAF111
- PID = 0X5, Temp = 65
- TXCNT=3 RXCNT=13 RXDROP=5066
- TXCNT=4 RXCNT=13 RXDROP=7602
- TXCNT=5 RXCNT=14 RXDROP=10131
- TXCNT=6 RXCNT=15 RXDROP=12664
- TXCNT=7 RXCNT=16 RXDROP=15202
- TXCNT=8 RXCNT=17 RXDROP=17730
- TXCNT=9 RXCNT=18 RXDROP=20261
- TXCNT=10 RXCNT=19 RXDROP=22798
- TXCNT=11 RXCNT=20 RXDROP=25332
- TXCNT=12 RXCNT=21 RXDROP=27866
Incorrect Value Displayed on Android Application
This happens in the beginning when we first tried to integrate all of the components together. The output was incorrect with our initial SJSUone firmware because the software was sending floating point values to the android when android was expecting integer bytes. Later we change the output to unsigned integer char and that solved the issue. Other solutions could be done on the android end where we can convert the floating point values to strings. Another problem we see with our initial firmware is that we thought a value was passed correctly but it was not. We were supposed to assign a value to a variable but we didn't so we got a value of 0 for the proximity value. This is fixed by simply assigning the value fetched from freeRTOS queue correctly.
There's another incorrect value display problem after we added some code to fix the problem where the warning sound will stop when it's not expected. During the warning, the value of sensors are stuck and not updating. This is because the sound play fix was to use a delay loop inside the bluetooth receive message handler and since the delay was much longer than message receiving rate, it blocks the handlers from outputing values correctly. The fix is to remove the delay loop in the handler and add some checking mechanisms to reduce delay time in the handler.
Sound Stops Playing on Android Application When Not Expected to
The warning sound was supposed to play forever as long as proximity distance is less than safe distance. This is because a new mediaPlayer object was programmed to be called and started every single time we get a valid message on the bluetooth connection stream buffer. After some researching, the problem and solution was found. Basically this problem is caused by instantiating too many mediaPlayer object without releasing the object from the memory. The garbage collector will come in and kill the mediaPlayer process to free up memory. The fix is basically to actually release the object after starting the mediaPlayer object. But we need to have some delay in order for a beep sound to come out. If the delay is too short, the object would be released before the beep sound can be outputted to the speaker.
Conclusion
The Real Time Brake assist project allowed us to take the CAN interface knowledge that we learned in CMPE 244 and apply it to a real world application. We learned how important is to have the CAN hardware filter implementation in a very active CAN bus like the one found in vehicles. The project also allowed us to implement a real time multi-tasking environment with multiple data collection like proximity and speed. Data had to be collected, processed and sent to a smart phone through Bluetooth. The Real Time Brake Assist prototype built in this project has proven a concept of a real time application that is not far away from becoming a real product. This project has also shown as the value of team work and the value of collaboration which are skills that will benefit us in the future.
Project Video
Project Source Code
References
Acknowledgement
We would like to thank Preet Kang for his constant support and encouragement and for providing us the required knowledge and tools like Hyperload and APIs that allowed us to complete the project in a short time.
References Used
LPC176x/5x User manual version 3.1 (I2C and CAN controller reference).
Information about Vehicle PIDs http://en.wikipedia.org/wiki/OBD-II_PIDs
Introduction to SAE J1939 http://www.kvaser.com/about-can/higher-layer-protocols/j1939-introduction/
BOSCH CAN Specification V2.0
Appendix
- CAN Transceiver File:S15 244 Grp9 TJA1050.pdf
- I2C Differential Buffer File:S15 244 Grp9 PCA9615.pdf
- Laser Distance Sensor File:S15 244 Grp9 Laser.pdf
- Bluetooth Module File:S15 244 Grp9 RN41XV.pdf
