Difference between revisions of "S14: Quadcopter"
Proj user12 (talk | contribs) (→Remote Control Transmitter and Receiver) |
(→Project Source Code) |
||
| (194 intermediate revisions by 2 users not shown) | |||
| Line 1: | Line 1: | ||
| − | |||
| − | |||
| − | |||
| − | |||
| − | |||
| − | |||
| − | |||
| − | |||
| − | |||
| − | |||
| − | |||
| − | |||
== '''Quadcopter''' == | == '''Quadcopter''' == | ||
| Line 38: | Line 26: | ||
=== Basics === | === Basics === | ||
---- | ---- | ||
| − | [[File: | + | [[File:CmpE244_S14_Quadcopter_Propeller_direction2.JPG|400px|thumb|right|Fig 2. Propeller rotating direction]] |
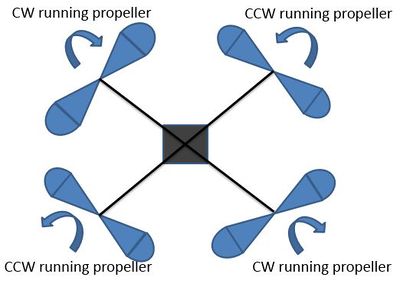
Quadcopter is one of the successful aerial vehicles which support vertical take-off and landing.It has 4 rotors - 2 run clockwise(CW) and 2 counter-clockwise(CCW). This is to cancel out the torque generated by a set of rotors running in any one direction. | Quadcopter is one of the successful aerial vehicles which support vertical take-off and landing.It has 4 rotors - 2 run clockwise(CW) and 2 counter-clockwise(CCW). This is to cancel out the torque generated by a set of rotors running in any one direction. | ||
| − | [[File: | + | [[File:CmpE244_S14_Quadcopter_Quad_config.JPG|200px|thumb|center|Fig 1. Quadcopter Orientation]] |
There are two types of orientation for a quadcopter : + configuration and X configuration. Our design is an X configuration as it allows unblocked front view for mounting a camera. | There are two types of orientation for a quadcopter : + configuration and X configuration. Our design is an X configuration as it allows unblocked front view for mounting a camera. | ||
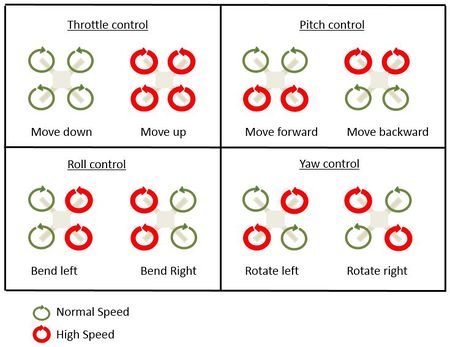
The quadcopter motion in the 3 axis is known as Pitch, Roll and Yaw. | The quadcopter motion in the 3 axis is known as Pitch, Roll and Yaw. | ||
Pitch is the ascending or descending motion. Roll is tilting towards the left or right. Yaw is rotating left or right. | Pitch is the ascending or descending motion. Roll is tilting towards the left or right. Yaw is rotating left or right. | ||
| − | [[File: | + | [[File:CmpE244_S14_Quadcopter_RPY.JPG|400px|thumb|center|Fig 3. Pitch, Roll and Yaw movement]] |
<br/> | <br/> | ||
| − | [[File: | + | [[File:CmpE244_S14_Quadcopter_Quad_motion1.JPG|450px|thumb|right|Fig 5. Quadcopter motion in different axis]] |
=== Quadcopter Modes === | === Quadcopter Modes === | ||
| Line 58: | Line 46: | ||
=== Arming/Disarming the Quadcopter === | === Arming/Disarming the Quadcopter === | ||
---- | ---- | ||
| − | [[File: | + | [[File:CmpE244_S14_Quadcopter_Arm_disarm1.JPG|300px|thumb|left|Fig 4. RC Arm Disarm]] |
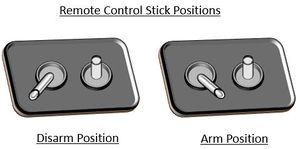
We need to take certain safety precautions for every quad-copter. We don't want the quad-copter to accidentally arm while being transported or not in use and similarly we don't want it to disarm when flying. Arming a quad-copter indicates that when throttle is raised, the motors will begin to spin and disarming a quad-copter indicates that motors won't spin. | We need to take certain safety precautions for every quad-copter. We don't want the quad-copter to accidentally arm while being transported or not in use and similarly we don't want it to disarm when flying. Arming a quad-copter indicates that when throttle is raised, the motors will begin to spin and disarming a quad-copter indicates that motors won't spin. | ||
On most commercially available quad-copters, arming is done with a full-right yaw and no throttle, while disarming is done with a full-left yaw and no throttle. The positions can be swapped as per user preference. | On most commercially available quad-copters, arming is done with a full-right yaw and no throttle, while disarming is done with a full-left yaw and no throttle. The positions can be swapped as per user preference. | ||
| + | <br/> | ||
<br/> | <br/> | ||
<br/> | <br/> | ||
| Line 236: | Line 225: | ||
---- | ---- | ||
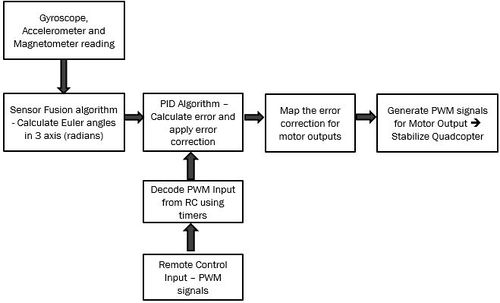
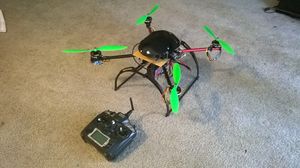
| − | [[File: | + | [[File:CmpE244_S14_Quadcopter_System_design2.JPG|600px|thumb|left|Fig 6. System Design Diagram]] |
| − | |||
| − | |||
| − | |||
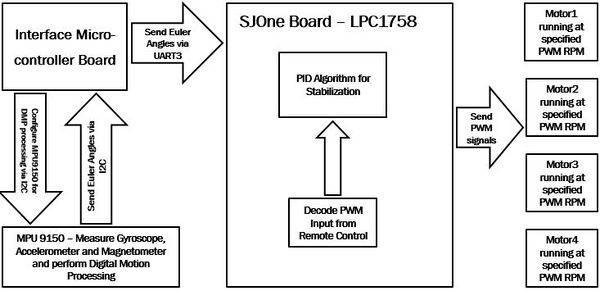
MPU9150 (sensor board) and the RC receiver are the primary inputs to the system. The sensor board measures the real-time orientation of the platform and transmits the data to the main controller board using UART serial protocol. The SJOne board receives the data from the sensor board and compares it with the data received from the RC receiver. The values are scaled down to the same range and then compared to obtain the difference. This difference is termed as error. | MPU9150 (sensor board) and the RC receiver are the primary inputs to the system. The sensor board measures the real-time orientation of the platform and transmits the data to the main controller board using UART serial protocol. The SJOne board receives the data from the sensor board and compares it with the data received from the RC receiver. The values are scaled down to the same range and then compared to obtain the difference. This difference is termed as error. | ||
Depending on the magnitude of the error, appropriate corrective coefficients are chosen by the PID loop and the correction is sent to the actuator command sub system to be integrated into the motor commands. These corrections change the orientation of the platform and therefore reduce the error in orientation of the platform. The closed loop feedback system as described above ensures stability of the aerial platform. | Depending on the magnitude of the error, appropriate corrective coefficients are chosen by the PID loop and the correction is sent to the actuator command sub system to be integrated into the motor commands. These corrections change the orientation of the platform and therefore reduce the error in orientation of the platform. The closed loop feedback system as described above ensures stability of the aerial platform. | ||
| − | + | ||
| − | + | [[File:CmpE244_S14_Quadcopter_Mpu9150.JPG|100px|thumb|right|Fig 7. MPU-9150 Breakout Board]] | |
| − | + | ||
<br/> | <br/> | ||
=== Hardware === | === Hardware === | ||
---- | ---- | ||
| − | ==== MPU-9150 ==== | + | ==== Inertial Measurement Unit - MPU-9150 ==== |
---- | ---- | ||
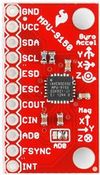
| − | + | The Inertial Measurement Unit (IMU) is an integrated sensor device comprised of Accelerometer, Gyroscope and Magnetometer. This measures the velocity, orientation and gravitational forces of the Quadcopter. The angular measurements are sent to the controlling device which calculates the changes to be applied to individual motor speed. | |
| − | The MPU-9150 consists of a 3-axis | + | The MPU-9150 consists of a 3-axis Accelerometer, 3axis Gyroscope and a 3 axis Magnetometer. It is a one chip IMU solution with onboard Motion processor for sensor fusion. Though it inherently supports on board Sensor Fusion, the IP is undisclosed. Therefore we used the library for arduino by Pansenti. (https://github.com/Pansenti) |
The 6 axis sensor fusion (accel+gyro) is done on the MPU and sent to an arduino where the magnetometer data is used for YAW correction. | The 6 axis sensor fusion (accel+gyro) is done on the MPU and sent to an arduino where the magnetometer data is used for YAW correction. | ||
The arduino transmits the orientation data over UART which is recieved by the SJONE for further processing. | The arduino transmits the orientation data over UART which is recieved by the SJONE for further processing. | ||
| − | + | To check its working condition, we used the modified Razor-IMU GUI written in python. The code parses the serial data from the IMU and displays the orientation in real-time using Vpython.(video and code to be linked). | |
| − | |||
==== Remote Control Transmitter and Receiver ==== | ==== Remote Control Transmitter and Receiver ==== | ||
---- | ---- | ||
| − | [[File: | + | [[File:CmpE244_S14_Quadcopter_Rc.JPG|250px|thumb|left|Fig 8. Remote Control]] |
| + | [[File:CmpE244_S14_Quadcopter_Receiver1.JPG|300px|thumb|right|Fig 9. Receiver module]] | ||
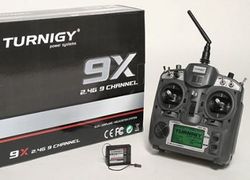
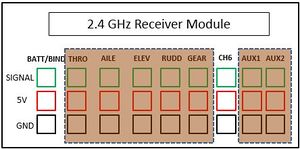
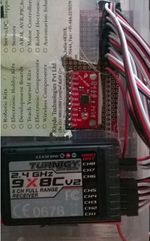
We are using 8 channel remote control to maneuver the quadcopter. The channels used are as below: | We are using 8 channel remote control to maneuver the quadcopter. The channels used are as below: | ||
| Line 274: | Line 260: | ||
#AUX1 - Used to control P gain co-efficient for any one of the 3 axis. | #AUX1 - Used to control P gain co-efficient for any one of the 3 axis. | ||
#AUX2 - Used to control I/D gain co-efficient in sync with the AUX1 channel axis. | #AUX2 - Used to control I/D gain co-efficient in sync with the AUX1 channel axis. | ||
| + | <br/> | ||
| + | |||
| + | ==== Brushless Motors ==== | ||
| + | ---- | ||
| + | [[File:CmpE244_S14_Quadcopter_Motors.jpg|250px|thumb|right|Fig 11. Brushless DC Motors]] | ||
| + | |||
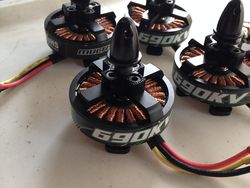
| + | Brushless motors spin at higher speeds and consumer less power than the DC motors. Its energy efficient as it doesn’t lose much energy like the DC motors. The kv rating on the motor indicates how many RPM the motor can rotate for a given number of volts. It comes with various accessories to ensure that the propeller locks onto the shaft without causing any slip. | ||
| + | |||
| + | The motors (Turnigy Multistar outrunners) used for this project have a higher power system. Each motor has 22 poles, high quality parts, precision balanced for smooth running and is designed for maximising Multi-rotor performance. | ||
| + | |||
| + | [[File:CmpE244_S14_Quadcopter_Esc.JPG|270px|thumb|left|Fig 10. Electronic Speed Controller]] | ||
| + | |||
| + | ==== Electronic Speed Controllers ==== | ||
| + | ---- | ||
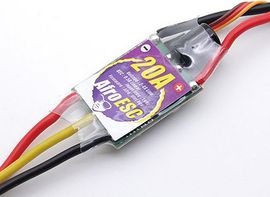
| + | The brushless motors are normally 3 phased, so direct supply of DC power will not turn the motors. The Electronic Speed Controllers (ESC) comes are interfaced to the motors which generating three high frequency signals with different but controllable phases continually which helps the motors to spin. The PWM signal generated by the microcontroller is fed to the ESC, which in turn provide signal to motor operation. It is recommended to that the ESC rating is atleast twice than the motor current rating to avoid any mishap. | ||
| + | |||
| + | The AFRO ESC used for this project comes with jitter-free hardware PWM input, high efficiency and smooth power response. The ESCs come with multi-rotor specific SimonK firmware preloaded, which is specifically designed for multi-rotor aerial platforms. | ||
| + | |||
| + | [[File:CmpE244_S14_Quadcopter_Fc.JPG|250px|thumb|right|Fig 13. Flight Controller - SJOne Board]] | ||
| + | |||
| + | ==== Flight Controller ==== | ||
| + | [[File:CmpE244_S14_Quadcopter_Frame.JPG|270px|thumb|left|Fig 12. Quadcopter Frame]] | ||
| + | ---- | ||
| + | |||
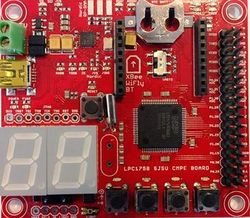
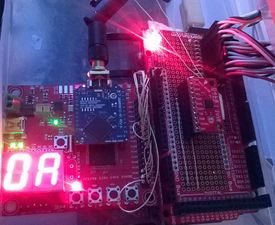
| + | SJOne Board is programmed to behave as the Flight controller, acting like the brain for controlling the Quadcopter. This microcontroller continuously receives data from the sensor and remote control and performs calculations to make adjustments to each motor thereby keeping the Quadcopter level. The calculations are run few hundred times a second in order to keep the Quadcopter perfectly balanced. Auxiliary microcontroller is used to just send the sensor data to the main board via UART protocol. | ||
| + | |||
| + | ==== Frame ==== | ||
| + | ---- | ||
| + | |||
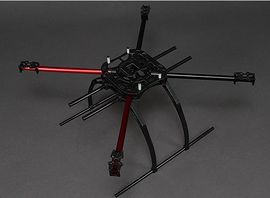
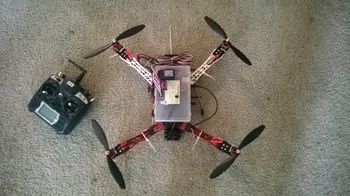
| + | Frame is the structure which houses all the components together. It comes in different shapes and material. The frame material should be rigid enough to absorb vibration from motors, which in turn reduces the noise in the sensors. Carbon Fiber is the most rigid and vibration absorbent but expensive. It is still the best when considering long term benefits. Aluminium is lighter but is prone to vibrations coming from the motor and causes noise in the sensors. Wood absorbs vibrations better but is not rigid enough to survive a high impact crash. | ||
| + | |||
| + | Battery pack is the power source for the Quadcopter. Lithium Polymer (LiPo) battery is preferred because it is light and its current ratings meet the motor power requirements well. Nickel Metal Hydride (NiMH) is also preferred as they are cheaper, but a lot heavier than LiPo Battery. | ||
| + | <br/> | ||
<br/> | <br/> | ||
<br/> | <br/> | ||
| Line 279: | Line 298: | ||
=== Hardware Interface === | === Hardware Interface === | ||
---- | ---- | ||
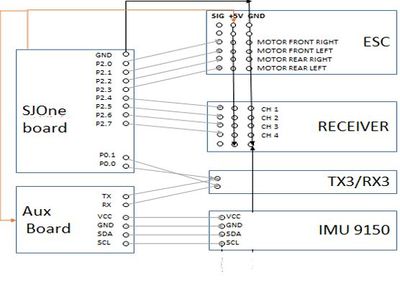
| + | [[File:CmpE244_S14_Quadcopter_Connections1.JPG|350px|thumb|left|Fig 14. SJ-One Board Pin Connections]] | ||
| + | [[File:CmpE244_S14_Quadcopter_Connections3.JPG|400px|thumb|right|Fig 15. Hardware Components Interface]] | ||
| − | + | '''Design Consideration''' | |
| + | # UART communication protocol for reading sensor data and telemetry | ||
| + | # Pulse Width Modulation(PWM) signal generation for motor control | ||
| + | # GPIO Interrupts to decode PWM signals from Remote Control channels | ||
| − | |||
| − | |||
| − | |||
| − | |||
| − | + | ''' Pin Connections ''' | |
---- | ---- | ||
| − | |||
{| class="wikitable" | {| class="wikitable" | ||
| Line 308: | Line 327: | ||
|} | |} | ||
<br/> | <br/> | ||
| − | |||
| − | |||
| − | === Software | + | === Software Architecture === |
---- | ---- | ||
| + | [[File:CmpE244_S14_Quadcopter_Sw_arch.JPG|500px|thumb|left|Fig 16. Software Architecture]] | ||
| − | + | The software framework adopted for this project is sequential. Even though multiple tasks are involved, the microprocessor used in the system is single core and therefore all tasks are executed sequentially. Running multiple parallel tasks in a sequential processor results in time-slicing which is not desirable in a real-time system. Therefore all executions are programmed to be serial and interrupts are used to switch context to independent high critical tasks when required. | |
| + | |||
| + | Object oriented programming concepts (OOPS) are employed to ensure code modularity. C++ is a high level general purpose compiled programming language which supports both high level and low level features. The software is completely coded in C++ utilizing OOPS concepts to ensure readability and efficiency. | ||
| + | |||
| + | Real-time operating systems (RTOS) play a vital role in ensuring synchronization with multiple processes while maintaining hard deadlines for execution of each process. FreeRTOS is a free open-source microkernel real-time operating system developed for embedded applications. FreeRTOS is used in this project to ensure synchronization between the various tasks under execution. The operating system runs on the main microcontroller on SJOne board and schedules processes (known as tasks in FreeRTOS) based on priority and resource requirement. | ||
| + | |||
| + | === PID Controller === | ||
---- | ---- | ||
| − | + | For our flight controller algorithm, we are using a PID controller. PID (proportional, integral, derivative) controller is a feedback control system which attempts to minimize the error in the output using three values: P, I and D i.e. the proportional, integral and derivative values. Each of the terms have a gain co-efficiencalled Kp(Proportional gain co-efficient), Ki (Integral gain co-efficient) and Kd (Differential gain co-efficient). Kp acts like a multiplier to the input to match the set point given by the user in remote control. A simple example which demonstrates the behaviour of Kp would be the gas pedal in any automotive. | |
| − | + | I is the integral of the error accumulated over time. When the Quadcopter tries to achieve the remote set point, the P gain overshoots and undershoots for a long time to achieve stability. I term helps helps to achieve the set point faster reducing overshoot and undershoot. Ki gain co-efficient helps the I term achieve stability faster. | |
| − | ==== Converting Remote Control Data to Motor Speed ==== | + | D is the rate at which the error has sustained over time. This term gives a large correction to achieve set point quickly, thereby making the Quadcopter reach stability abruptly. This term makes the Quadcopter highly reactive for any minor changes. Kd is the gain co-efficient. This term is highly unpredictable as incorrect value flips the Quadcopter and sometimes make is behave violently. |
| − | + | ||
| − | # Get the RC data. | + | P, I and D co-efficient for Pitch, Roll and Yaw axis need to practically measured for every quadcopter configuration and then the values need to be tuned for stability. |
| + | PID tuning makes the Quadcopter takeoff, fly and land smoother. Without proper PID tuning the Quadcopter is nowhere near to flying mode. | ||
| + | |||
| + | === Implementation === | ||
| + | ---- | ||
| + | ====Overall System Algorithm==== | ||
| + | #Initialize the system and check for any errors. If found, display on the board LED and do not arm the system. | ||
| + | #If no errors, arm the system and wait for user input. | ||
| + | #Update the sensor values to the variables assigned. Update the remote control channel values to the variables assigned. | ||
| + | #Constantly run the PID calculation loop on sensor values and user input and generate the PID output in terms of throttle on the motors. | ||
| + | #Decode this throttle value and assign the run duty cycle in the form of PWM signal to each of the motors. Goto step 3. | ||
| + | |||
| + | ====Remote Control Signal Processing==== | ||
| + | #Initialize every channel input interrupt. Set all delta variables to zero. | ||
| + | #When an interrupt occurs on rising edge, note the system time and store it as rise time. | ||
| + | #When an interrupt occurs on falling edge, note the system time and store it as falling time. | ||
| + | #Calculate the difference between the two times which gives the delta value. | ||
| + | #Store this in the remote control channel variable and reset the delta value to zero. Goto step 2. | ||
| + | |||
| + | ====Converting Remote Control Data to Motor Speed==== | ||
| + | # Get the RC data in terms of numbers. | ||
# Scale up/down this value using a pre-decided curve. (Linear/Exponential) | # Scale up/down this value using a pre-decided curve. (Linear/Exponential) | ||
# Convert this value into angles. | # Convert this value into angles. | ||
# Apply PID on Roll/Pitch/Yaw RC command (Using the angles calculated by IMU (Inertial Measurement Unit) as the PID input and angles calculated from the previous step as the desired setpoint) | # Apply PID on Roll/Pitch/Yaw RC command (Using the angles calculated by IMU (Inertial Measurement Unit) as the PID input and angles calculated from the previous step as the desired setpoint) | ||
| − | # Use these angles to adjust motor speeds and direction (Add/Subract to Throttle Command) | + | # Use these angles to adjust motor speeds and direction (Add/Subract to Throttle Command). Goto step 1. |
| − | === | + | == System Integration == |
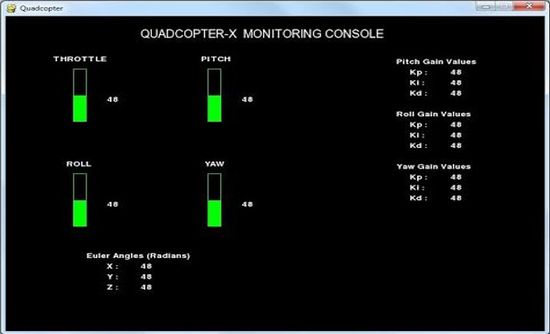
| − | + | [[File:CmpE244_S14_Quadcopter_Gui.JPG|550px|thumb|right|Fig 19. Quadcopter Monitoring GUI]] | |
| + | [[File:CmpE244_S14_Quadcopter_Si1.JPG|300px|thumb|left|Fig 17. Mechanical Assembly]] | ||
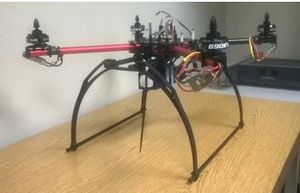
| + | [[File:CmpE244_S14_Quadcopter_Si.jpg|300px|thumb|left|Fig 20. Integrated System - Main Quadcopter]] | ||
| + | |||
| + | [[File:CmpE244_S14_Quadcopter_Sys_elec.JPG|275px|thumb|center|Fig 18. System Electronics - Flight Controller]] | ||
| + | |||
| + | The electrical circuit is first built for the Quadcopter and checked for proper working of motors and propellers. Without connecting the propellers the motors are mounted on the assembled frame and all the electronic components are wired up as shown in the wiring schematics. The code is then put on the microcontroller and tested to check if the arming and disarming mechanism works. Once all individual checks are successful, the response of the motors for all different axis variation is checked with minimum throttle. Once the values of the motor rpm matches as per the PID loop conventions, Quadcopter tuning begins. | ||
| + | |||
| + | |||
| + | [[File:CmpE244_S14_Quadcopter_Sys_receiver.JPG|150px|thumb|left|Fig 21. System Electronics - RC Receiver and IMU]] | ||
| + | |||
| + | [[File:CmpE244_S14_Quadcopter_Backup.jpg|350px|thumb|right|Fig 22. Backup Quadcopter]] | ||
| + | |||
| + | |||
| + | === PID Tuning === | ||
| + | ---- | ||
| + | |||
| + | It is very much required to understand the effect of each PID parameter and then start tuning the Quadcopter. To tune the parameters, Roll axis is first selected with all values equal to zero. The gains in all other axis are made zero. The Quadcopter is tied down such that it is able to move only in the Roll axis. Using the unused channels, the gain values are slowly induced in small increments into the Quadcopter and the response is noted. The P gain is increased first, then I gain and then lastly D gain. | ||
| + | |||
| + | A soft point is noted down for each of these values and then hardcoded for it to achieve stability in the axis being tested. The same procedure is repeated for Pitch and Yaw axis. It is very important to note that the Quadcopter will need to be tied down in the axis being tested. | ||
| − | + | Once all the gain values are found, the Quadcopter is now ready for flying. With the observed values, the Quadcopter tries to fly with stability. During the flight further variations can be observed and the gain values are fine tuned to achieve smoother take off, hovering and landing capability. | |
== Testing & Technical Challenges == | == Testing & Technical Challenges == | ||
| − | |||
| − | === | + | === Unit Test and System Test Conditions === |
| + | |||
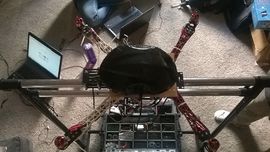
| + | [[File:CmpE244_S14_Quadcopter_Test_rig.jpg|270px|thumb|right|Fig 23. Test Rig - Front View]] | ||
| + | [[File:CmpE244_S14_Quadcopter_Test_rig2.jpg|270px|thumb|right|Fig 24. Test Rig - Top View]] | ||
| + | |||
| + | |||
| + | {| class="wikitable" | ||
| + | |- | ||
| + | ! scope="col"|Sl. No | ||
| + | ! scope="col"|Test Case | ||
| + | ! scope="col"|Test Description | ||
| + | ! scope="col"|Result | ||
| + | |- | ||
| + | | scope="row"|1||Individual Motor check||Check for Arming and Disarming of Individual Motor, test for full throttle and load condition||All motors '''PASSED''' | ||
| + | |- | ||
| + | | scope="row"|2||Individual Propeller check for thrust||Check each propeller direction and thrust generation direction||Propeller check '''PASSED''' | ||
| + | |- | ||
| + | | scope="row"|3||RC Channel PWM decoding check||Check for decoded values of all channels used. The value should be 1000 microsecs for min throttle and 2000 for max throttle||PWM decoding '''PASSED''' | ||
| + | |- | ||
| + | | scope="row"|4||IMU Data Check ||Check for IMU data parsing and PID loop calculation||IMU check '''PASSED''' | ||
| + | |- | ||
| + | | scope="row"|5||RC Arm/Disarm check ||Check for Arming and Disarming of the system using Remote Control||RC Arm/Disarm check '''PASSED''' | ||
| + | |- | ||
| + | | scope="row"|6||ESC Calibration check ||Check for ESC calibration to respond to min and max RC stick values||ESC Calibration '''PASSED''' | ||
| + | |- | ||
| + | | scope="row"|7||PID Response check ||Check for Motor counter action to change in angle in Roll, Pitch and Yaw axis||PID Response '''PASSED''' | ||
| + | |- | ||
| + | | scope="row"|8||PID Tuning check ||Check for stability of the system in individual axis||PID Tuning '''IN PROGRESS''' | ||
| + | |||
| + | |- | ||
| + | |||
| + | |} | ||
| + | === Challenges and Learning === | ||
| + | ---- | ||
| + | |||
| + | Getting a quadcopter to fly smoothly isn't a smooth process at all. But failures do teach us a lot. Listed below are some of the issues we faced during the course of this project. | ||
| + | |||
| + | ==== Quadcopter Assembly ==== | ||
| + | ---- | ||
# '''Unexpected Throttle''': Throttle seems to shoot to maximum without command. Solution - Order new remote control (:O) | # '''Unexpected Throttle''': Throttle seems to shoot to maximum without command. Solution - Order new remote control (:O) | ||
# '''Bricked ESC''': Tried flashing SimonK Firmware into ESC for faster update rate. ESC didnt respond! Solution - Buy a whole new set ESCs (!) | # '''Bricked ESC''': Tried flashing SimonK Firmware into ESC for faster update rate. ESC didnt respond! Solution - Buy a whole new set ESCs (!) | ||
| Line 345: | Line 445: | ||
# '''Magnetic Interference''' on Compass:Motors create really intense magnetic fields which interferes with the magnetometers magnetic field. As a result magnetometer readings are affected. Magnetometer needs to be kept at an elevation to avoid this. | # '''Magnetic Interference''' on Compass:Motors create really intense magnetic fields which interferes with the magnetometers magnetic field. As a result magnetometer readings are affected. Magnetometer needs to be kept at an elevation to avoid this. | ||
| − | === Quadcopter Software === | + | ==== Quadcopter Software ==== |
| + | ---- | ||
# '''UART FIFO''': If messages longer than 16 bytes is transmitted over UART, then all characters exceeding 16 bytes are lost. This issue is yet to be resolved. Looking into it. | # '''UART FIFO''': If messages longer than 16 bytes is transmitted over UART, then all characters exceeding 16 bytes are lost. This issue is yet to be resolved. Looking into it. | ||
## (4/23)Resolved this by using Interrupts and queues. The polling method created a time delay causing some data to be lost. | ## (4/23)Resolved this by using Interrupts and queues. The polling method created a time delay causing some data to be lost. | ||
| Line 357: | Line 458: | ||
# '''Motors jerk effect''': Motors stalled for a fraction of a second and lost control. Initialization of angles every iteration in IMU data parsing was commented and the effect vanished. | # '''Motors jerk effect''': Motors stalled for a fraction of a second and lost control. Initialization of angles every iteration in IMU data parsing was commented and the effect vanished. | ||
# '''PID loop''': Additional changes for P,I and D terms incorporated as per Multiwii 2.1 code. | # '''PID loop''': Additional changes for P,I and D terms incorporated as per Multiwii 2.1 code. | ||
| + | # '''Performance issues''': Each iteration of complete loop was taking more than 25 milliseconds. Testing revealed that setting values on 7-segment display was slowing it down. | ||
== Future Enhancement == | == Future Enhancement == | ||
| + | [[File:CmpE244_S14_Quadcopter_Gimbal.jpg|200px|thumb|left|Fig 25. Gimbal Camera]] | ||
| + | [[File:CmpE244_S14_Quadcopter_Barometer.jpg|100px|thumb|right|Fig 26. Barometric Pressure Sensor]] | ||
| + | |||
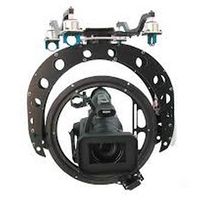
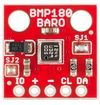
| + | Once the Quadcopter achieves stable and smooth hovering capabilities, a Gimbal camera mount can be put on the Quadcopter which would be used to take Aerial Photography. Additional sensors like Ultrasonic range finder can be incorporated to avoid collisions. A Barometer can be interfaced to ensure that the Quadcopter doesn’t lose its altitude when it is made to hover at a certain height. | ||
| − | + | GPS capabilities can be incorporated which would help in autonomous take-off and landing capabilities based on GPS co-ordinates between two places. In case of any problems during the flight, a failsafe mode can be programmed so that it safely returns back to the base. | |
== Conclusion == | == Conclusion == | ||
| Line 369: | Line 475: | ||
=== Project Video === | === Project Video === | ||
| − | Upload a video of your project and post the link here. | + | Upload a video of your project and post the link here. - '''In Post production stage....releasing shortly''' |
=== Project Source Code === | === Project Source Code === | ||
| − | + | * [https://sourceforge.net/projects/sjsu/files/CmpE244_SJSU_S2014/ Project source code is available at SourceForge] | |
== References == | == References == | ||
=== Acknowledgement === | === Acknowledgement === | ||
| − | + | The hardware components were procured from HobbyKing, ebay, Amazon, getFPV, HomeDepot and various other sources for this project. Thanks to Preetpal Kang for teaching this class and inspiring, guiding and support us with our coursework and project. Thanks to entire team who helped and supported each other during all stages of the project and spending weekends and extra hours to get all parts of the project working. | |
=== References Used === | === References Used === | ||
| + | # Preetpal Kang, Lecture notes of CMPE 244, Computer Engineering, Charles W. Davidson College of Engineering, San Jose State University, Feb-May 2014. | ||
| + | # en.wikipedia.org/ | ||
# https://github.com/Pansenti | # https://github.com/Pansenti | ||
# https://code.google.com/p/sf9domahrs/ | # https://code.google.com/p/sf9domahrs/ | ||
# http://www.rcgroups.com/forums/showthread.php?t=1284741 | # http://www.rcgroups.com/forums/showthread.php?t=1284741 | ||
| + | # http://www.rcgroups.com/forums/showthread.php?t=1375728 | ||
# http://blog.oscarliang.net/quadcopter-pid-explained-tuning/ | # http://blog.oscarliang.net/quadcopter-pid-explained-tuning/ | ||
# http://aeroquad.com/showthread.php?1167-Stable-Mode-Explained | # http://aeroquad.com/showthread.php?1167-Stable-Mode-Explained | ||
| Line 389: | Line 498: | ||
# http://www.modelflight.com.au/blog/how-to-fly-remote-control-quadcopter/ | # http://www.modelflight.com.au/blog/how-to-fly-remote-control-quadcopter/ | ||
# http://www.thorlabs.com/tutorials.cfm?tabID=33653 | # http://www.thorlabs.com/tutorials.cfm?tabID=33653 | ||
| − | + | # http://www.hobbyking.com/hobbyking/store/index.asp | |
| − | + | # https://www.sparkfun.com/ | |
| − | + | # http://aeroquad.com/forum.php | |
Latest revision as of 23:37, 6 August 2014
Contents
- 1 Quadcopter
- 2 Abstract
- 3 Objective and Scope
- 4 Team Members & Responsibilities
- 5 Introduction
- 6 Schedule
- 7 Parts List & Cost
- 8 Backup Parts & cost
- 9 Design & Implementation
- 10 System Integration
- 11 Testing & Technical Challenges
- 12 Future Enhancement
- 13 Conclusion
- 14 References
Quadcopter
Abstract
Applications for smaller Unmanned Aerial Vehicle (UAV) have significantly increased in recent decades. Quadcopter is one of the most successful vertical take-off and landing vehicle with autonomous flight control and stable hovering capabilities. These prominent features have led to a rise in Quadcopter research in universities as well as industries. Quadcopter project engages people from Electrical, Mechanical and Computer science background with knowledge on various concepts like Control systems, Real-Time Embedded Systems, Robotics and Navigation. This web-page provides you detailed information on the mechanics of Quadcopter, Concepts of Flight control along with programming and testing for stable flight.
A Quadcopter (Quad-rotor helicopter) is a multi-rotor aerial vehicle that is lifted and propelled by four rotors. The thrust generated by the propellers lifts the Quadcopter while the flight controller system govern the rotor speed for attitude control. A wireless remote control is used to interact with the flight controller system for changing the flight path. We begin by explain the basics of Quadcopter mechanics, then sections explaining the mechanical design approach, algorithms and parameters used for stable flight control, and lastly the testing and tuning mechanism.
Objective and Scope
Our objective is to assemble the Quadcopter, then design and build a flight controller system that stabilizes the flight and accept commands from a hobbyist remote control during its flight.
The scope of our project can be divided into three parts:
- Design and build interfaces to all the on-board electronic sensor such as IMU, barometer and distance sensors
- Design and build interfaces to telemetry and radio modules to communicate with remote control and the computer
- Process the various sensor inputs and control the brushless motors on board using an electronic speed control system to stabilize the Quadcopter
Team Members & Responsibilities
- Sree Harsha
- PWM Design, Remote Control Input, Quadcopter assembly
- Balaji
- Sensor Data Processing, Quadcopter Assembly
- Divya Kamath
- Flight Controller Design, Code Integration
Introduction
Basics
Quadcopter is one of the successful aerial vehicles which support vertical take-off and landing.It has 4 rotors - 2 run clockwise(CW) and 2 counter-clockwise(CCW). This is to cancel out the torque generated by a set of rotors running in any one direction.
There are two types of orientation for a quadcopter : + configuration and X configuration. Our design is an X configuration as it allows unblocked front view for mounting a camera. The quadcopter motion in the 3 axis is known as Pitch, Roll and Yaw.
Pitch is the ascending or descending motion. Roll is tilting towards the left or right. Yaw is rotating left or right.
Quadcopter Modes
Most commercially available quadcopters work in one of two possible modes:
- Aerobatic Mode: This mode allows you to perform spins and flips on the quadcopter. The accelerometer is not necessary in this case.
- Attitute/Stable Mode: This is the preferred mode for beginners and this is the mode our quadcopter will run in. In this mode, data from accelerometer and gyro sensor is combined to calculate the quadcopter angle. Once the remote control stick is moved to non-idle location, the quadcopter angle is changed accordingly and held at the angle. Unlike the aerobatic mode, no spins or flips will be performed.
Arming/Disarming the Quadcopter
We need to take certain safety precautions for every quad-copter. We don't want the quad-copter to accidentally arm while being transported or not in use and similarly we don't want it to disarm when flying. Arming a quad-copter indicates that when throttle is raised, the motors will begin to spin and disarming a quad-copter indicates that motors won't spin.
On most commercially available quad-copters, arming is done with a full-right yaw and no throttle, while disarming is done with a full-left yaw and no throttle. The positions can be swapped as per user preference.
Schedule
| Sl. No | Start Date | End Date | Task | Status | Actual Completion Date |
|---|---|---|---|---|---|
| 1 | 2/28 | 2/28 | Order Components and Make a schedule | Component Ordering Partially Completed (critical components done), Motors pending. (Update 4/14 - All components ordered) | 3/7/2014 |
| 2 | 3/1 | 3/30 | Components Procurement. | Motors arrived but don't fit into the frame. Got motor mounts from Century Heli shop, drilled holes to fit the motors, backup IMU arrived.(Update 4/14 - All components ordered) | 3/21/2014. |
| 3 | 2/20 | 3/15 | Establish communication with all sensors and validate data | IMU done. | 3/14/2014 |
| 4 | 2/28 | 3/5 | Establish communication with radio module of remote control | Coding complete. Testing in progress with Radio remote and receiver.(Update 4/21 - Remote Control Communication Successful | 4/19 |
| 5 | 2/28 | 3/5 | Speed control of motors | Flashed SimonKK firmware to ESC. One of the ESC went kaput and 2 others have problem running at slower speeds. Tested with another set and motors work fine. Ordered Afro ESC with pre SimonKK firmware flashed. Another frame, radio and few other components ordered as backup. | 3/29/2014 |
| 6 | 2/28 | 3/25 | Flight Controller Algorithm (PID Controller) | Coding. Playing with the coefficients.
|
4/25 |
| 7 | 3/15 | 3/30 | Create tasks and integrate complete code | In progress
|
4/23/2014 |
| 8 | 4/10 | 4/10 | Assemble quadcopter | Complete. Initial flight test with reference flight controller shows jitters with radio PWM input. Magnetometer goes crazy because of motor magnetic field. Control system and sensors will now be placed on an elevated platform. | 3/29/2014 |
| 9 | 4/10 | 4/18 | Initial testing and tweaks | In progress
Update 4/25 - Initial testing on ground shows that motor speed for corresponding change in sensor and RC is as expected. Next step is to connect to the motors and see how the quad behaves. |
4/25 |
| 10 | 4/15 | - End | Final Testing | Started 4/25
Update 4/28
Update 5/8
Update 5/9
Update 5/10
Update 5/16
- Testing in progress |
Parts List & Cost
| Qty | Description | Manufacturer | Part Number | Total Cost |
|---|---|---|---|---|
| 4 | Afro ESC 20Amp Multi-rotor Motor Speed Controller (SimonK Firmware) | Afro ESC | 9192000131-0 | $50.00 |
| 4 | Turnigy Multistar 4822-690Kv 22Pole Multi-Rotor Outrunner | Turnigy | 9392000004 | $129.80 |
| 1 | Inertial measurement unit (IMU) MPU-9150 | Sparkfun | SEN-11486 | $40.00 |
| 1 | SJOne Board | Preet | LPC1758 SJSU CmpE Board | $80.00 |
| 1 | Turnigy 9X 9Ch Transmitter w/ Module & 8ch Receiver (Mode 2) (v2 Firmware) | Turnigy | TX-9X-M2 | $69.97 |
| 1 | Turnigy nano-tech 6000mah 4S 25~50C Lipo Pack | Turnigy | N6000.4S.25 | $55.75 |
| 1 | AQ-600 Carbon Fiber Quadcopter Frame 550mm | HobbyKing | 047000006 | $93.27 |
| 2 | 10x4.5MR, 10x4.5MRP Propellers, Prop Adapter Ring Set | APC | $26.94 | |
| 1 | Hobbyking Multi-Rotor Power Distribution Board | HobbyKing | 9171000180 | $2.20 |
| Accessories(Wires, bolt+nut, foamboard, prototype board, glue, zip tags, double sided tape, insulation tape) | $50.00 | |||
| Total Cost (excluding backup parts, shipping and taxes) | $597.93 |
Backup Parts & cost
| Qty | Description | Manufacturer | Part Number | Total Cost |
|---|---|---|---|---|
| 1 | Turnigy 5600mAh 4S 14.8V 60C Hardcase Pack (Removable Leads) | Turnigy | $59.79 | |
| 1 | Invensence 9150 IMU Breakout board | ebay | $17.00 | |
| 4 | Electronic Speed Controller (ESC) | Turnigy | Plush 25 | Borrowed |
| 1 | DX6i 6 Channel 2.4Ghz Tx/Rx Remote Control | Spektrum | DX6i | Borrowed |
| 1 | Quadcopter frame | HJ MWC | $21.26 | |
| 1 | Motor mounts | Century Heli | $25.94 | |
| 1 | Afro ESC 20Amp Multi-rotor Motor Speed Controller (SimonK Firmware) | Afro ESC | 9192000131-0 | $12.49 |
| 1 | Turnigy Multistar 4822-690Kv 22Pole Multi-Rotor Outrunner | Turnigy | 9392000004 | $32.45 |
| Total Cost (excluding shipping and taxes) | $169.11 |
Design & Implementation
System Design
MPU9150 (sensor board) and the RC receiver are the primary inputs to the system. The sensor board measures the real-time orientation of the platform and transmits the data to the main controller board using UART serial protocol. The SJOne board receives the data from the sensor board and compares it with the data received from the RC receiver. The values are scaled down to the same range and then compared to obtain the difference. This difference is termed as error.
Depending on the magnitude of the error, appropriate corrective coefficients are chosen by the PID loop and the correction is sent to the actuator command sub system to be integrated into the motor commands. These corrections change the orientation of the platform and therefore reduce the error in orientation of the platform. The closed loop feedback system as described above ensures stability of the aerial platform.
Hardware
Inertial Measurement Unit - MPU-9150
The Inertial Measurement Unit (IMU) is an integrated sensor device comprised of Accelerometer, Gyroscope and Magnetometer. This measures the velocity, orientation and gravitational forces of the Quadcopter. The angular measurements are sent to the controlling device which calculates the changes to be applied to individual motor speed.
The MPU-9150 consists of a 3-axis Accelerometer, 3axis Gyroscope and a 3 axis Magnetometer. It is a one chip IMU solution with onboard Motion processor for sensor fusion. Though it inherently supports on board Sensor Fusion, the IP is undisclosed. Therefore we used the library for arduino by Pansenti. (https://github.com/Pansenti) The 6 axis sensor fusion (accel+gyro) is done on the MPU and sent to an arduino where the magnetometer data is used for YAW correction. The arduino transmits the orientation data over UART which is recieved by the SJONE for further processing. To check its working condition, we used the modified Razor-IMU GUI written in python. The code parses the serial data from the IMU and displays the orientation in real-time using Vpython.(video and code to be linked).
Remote Control Transmitter and Receiver
We are using 8 channel remote control to maneuver the quadcopter. The channels used are as below:
- Roll/Aileron - Controls the aircraft's right/left movement
- Pitch/Elevation - Moves the copter front/back
- Throttle - Increases the thrust output of the motors. This controls the height at which the Quadcopter should fly.
- Yaw/Rudder - Causes movement about the vertical axis. This changes the direction in which the aircraft is pointing.
- Gear - Used as a on/off switch for tuning the Gain values of PID loop. When 'ON', the AUX1 and AUX2 values from the remote are loaded to 2 of the gain values.
- Channel 6 - Not used
- AUX1 - Used to control P gain co-efficient for any one of the 3 axis.
- AUX2 - Used to control I/D gain co-efficient in sync with the AUX1 channel axis.
Brushless Motors
Brushless motors spin at higher speeds and consumer less power than the DC motors. Its energy efficient as it doesn’t lose much energy like the DC motors. The kv rating on the motor indicates how many RPM the motor can rotate for a given number of volts. It comes with various accessories to ensure that the propeller locks onto the shaft without causing any slip.
The motors (Turnigy Multistar outrunners) used for this project have a higher power system. Each motor has 22 poles, high quality parts, precision balanced for smooth running and is designed for maximising Multi-rotor performance.
Electronic Speed Controllers
The brushless motors are normally 3 phased, so direct supply of DC power will not turn the motors. The Electronic Speed Controllers (ESC) comes are interfaced to the motors which generating three high frequency signals with different but controllable phases continually which helps the motors to spin. The PWM signal generated by the microcontroller is fed to the ESC, which in turn provide signal to motor operation. It is recommended to that the ESC rating is atleast twice than the motor current rating to avoid any mishap.
The AFRO ESC used for this project comes with jitter-free hardware PWM input, high efficiency and smooth power response. The ESCs come with multi-rotor specific SimonK firmware preloaded, which is specifically designed for multi-rotor aerial platforms.
Flight Controller
SJOne Board is programmed to behave as the Flight controller, acting like the brain for controlling the Quadcopter. This microcontroller continuously receives data from the sensor and remote control and performs calculations to make adjustments to each motor thereby keeping the Quadcopter level. The calculations are run few hundred times a second in order to keep the Quadcopter perfectly balanced. Auxiliary microcontroller is used to just send the sensor data to the main board via UART protocol.
Frame
Frame is the structure which houses all the components together. It comes in different shapes and material. The frame material should be rigid enough to absorb vibration from motors, which in turn reduces the noise in the sensors. Carbon Fiber is the most rigid and vibration absorbent but expensive. It is still the best when considering long term benefits. Aluminium is lighter but is prone to vibrations coming from the motor and causes noise in the sensors. Wood absorbs vibrations better but is not rigid enough to survive a high impact crash.
Battery pack is the power source for the Quadcopter. Lithium Polymer (LiPo) battery is preferred because it is light and its current ratings meet the motor power requirements well. Nickel Metal Hydride (NiMH) is also preferred as they are cheaper, but a lot heavier than LiPo Battery.
Hardware Interface
Design Consideration
- UART communication protocol for reading sensor data and telemetry
- Pulse Width Modulation(PWM) signal generation for motor control
- GPIO Interrupts to decode PWM signals from Remote Control channels
Pin Connections
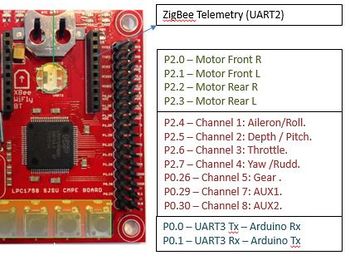
| Sl. No | Port and Pin Number | Pin Type | Purpose |
|---|---|---|---|
| 1 | P0.0 and P0.1 | UART 3 | IMU Communication (Arduino) |
| 2 | P2.4, P2.5, P2.6, P2.7, P0.26, P0.29, P0.30 | GPIO Input | Remote Control Receiver Input |
| 3 | P2.0, P2.1, P2. 2, P2.3 | PWM | PWM output to motors |
| 4 | P2.8, P2.9 | UART2 | ZigBee telemetry |
Software Architecture
The software framework adopted for this project is sequential. Even though multiple tasks are involved, the microprocessor used in the system is single core and therefore all tasks are executed sequentially. Running multiple parallel tasks in a sequential processor results in time-slicing which is not desirable in a real-time system. Therefore all executions are programmed to be serial and interrupts are used to switch context to independent high critical tasks when required.
Object oriented programming concepts (OOPS) are employed to ensure code modularity. C++ is a high level general purpose compiled programming language which supports both high level and low level features. The software is completely coded in C++ utilizing OOPS concepts to ensure readability and efficiency.
Real-time operating systems (RTOS) play a vital role in ensuring synchronization with multiple processes while maintaining hard deadlines for execution of each process. FreeRTOS is a free open-source microkernel real-time operating system developed for embedded applications. FreeRTOS is used in this project to ensure synchronization between the various tasks under execution. The operating system runs on the main microcontroller on SJOne board and schedules processes (known as tasks in FreeRTOS) based on priority and resource requirement.
PID Controller
For our flight controller algorithm, we are using a PID controller. PID (proportional, integral, derivative) controller is a feedback control system which attempts to minimize the error in the output using three values: P, I and D i.e. the proportional, integral and derivative values. Each of the terms have a gain co-efficiencalled Kp(Proportional gain co-efficient), Ki (Integral gain co-efficient) and Kd (Differential gain co-efficient). Kp acts like a multiplier to the input to match the set point given by the user in remote control. A simple example which demonstrates the behaviour of Kp would be the gas pedal in any automotive.
I is the integral of the error accumulated over time. When the Quadcopter tries to achieve the remote set point, the P gain overshoots and undershoots for a long time to achieve stability. I term helps helps to achieve the set point faster reducing overshoot and undershoot. Ki gain co-efficient helps the I term achieve stability faster.
D is the rate at which the error has sustained over time. This term gives a large correction to achieve set point quickly, thereby making the Quadcopter reach stability abruptly. This term makes the Quadcopter highly reactive for any minor changes. Kd is the gain co-efficient. This term is highly unpredictable as incorrect value flips the Quadcopter and sometimes make is behave violently.
P, I and D co-efficient for Pitch, Roll and Yaw axis need to practically measured for every quadcopter configuration and then the values need to be tuned for stability. PID tuning makes the Quadcopter takeoff, fly and land smoother. Without proper PID tuning the Quadcopter is nowhere near to flying mode.
Implementation
Overall System Algorithm
- Initialize the system and check for any errors. If found, display on the board LED and do not arm the system.
- If no errors, arm the system and wait for user input.
- Update the sensor values to the variables assigned. Update the remote control channel values to the variables assigned.
- Constantly run the PID calculation loop on sensor values and user input and generate the PID output in terms of throttle on the motors.
- Decode this throttle value and assign the run duty cycle in the form of PWM signal to each of the motors. Goto step 3.
Remote Control Signal Processing
- Initialize every channel input interrupt. Set all delta variables to zero.
- When an interrupt occurs on rising edge, note the system time and store it as rise time.
- When an interrupt occurs on falling edge, note the system time and store it as falling time.
- Calculate the difference between the two times which gives the delta value.
- Store this in the remote control channel variable and reset the delta value to zero. Goto step 2.
Converting Remote Control Data to Motor Speed
- Get the RC data in terms of numbers.
- Scale up/down this value using a pre-decided curve. (Linear/Exponential)
- Convert this value into angles.
- Apply PID on Roll/Pitch/Yaw RC command (Using the angles calculated by IMU (Inertial Measurement Unit) as the PID input and angles calculated from the previous step as the desired setpoint)
- Use these angles to adjust motor speeds and direction (Add/Subract to Throttle Command). Goto step 1.
System Integration
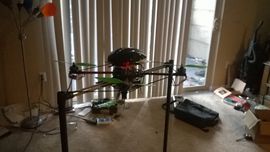
The electrical circuit is first built for the Quadcopter and checked for proper working of motors and propellers. Without connecting the propellers the motors are mounted on the assembled frame and all the electronic components are wired up as shown in the wiring schematics. The code is then put on the microcontroller and tested to check if the arming and disarming mechanism works. Once all individual checks are successful, the response of the motors for all different axis variation is checked with minimum throttle. Once the values of the motor rpm matches as per the PID loop conventions, Quadcopter tuning begins.
PID Tuning
It is very much required to understand the effect of each PID parameter and then start tuning the Quadcopter. To tune the parameters, Roll axis is first selected with all values equal to zero. The gains in all other axis are made zero. The Quadcopter is tied down such that it is able to move only in the Roll axis. Using the unused channels, the gain values are slowly induced in small increments into the Quadcopter and the response is noted. The P gain is increased first, then I gain and then lastly D gain.
A soft point is noted down for each of these values and then hardcoded for it to achieve stability in the axis being tested. The same procedure is repeated for Pitch and Yaw axis. It is very important to note that the Quadcopter will need to be tied down in the axis being tested.
Once all the gain values are found, the Quadcopter is now ready for flying. With the observed values, the Quadcopter tries to fly with stability. During the flight further variations can be observed and the gain values are fine tuned to achieve smoother take off, hovering and landing capability.
Testing & Technical Challenges
Unit Test and System Test Conditions
| Sl. No | Test Case | Test Description | Result |
|---|---|---|---|
| 1 | Individual Motor check | Check for Arming and Disarming of Individual Motor, test for full throttle and load condition | All motors PASSED |
| 2 | Individual Propeller check for thrust | Check each propeller direction and thrust generation direction | Propeller check PASSED |
| 3 | RC Channel PWM decoding check | Check for decoded values of all channels used. The value should be 1000 microsecs for min throttle and 2000 for max throttle | PWM decoding PASSED |
| 4 | IMU Data Check | Check for IMU data parsing and PID loop calculation | IMU check PASSED |
| 5 | RC Arm/Disarm check | Check for Arming and Disarming of the system using Remote Control | RC Arm/Disarm check PASSED |
| 6 | ESC Calibration check | Check for ESC calibration to respond to min and max RC stick values | ESC Calibration PASSED |
| 7 | PID Response check | Check for Motor counter action to change in angle in Roll, Pitch and Yaw axis | PID Response PASSED |
| 8 | PID Tuning check | Check for stability of the system in individual axis | PID Tuning IN PROGRESS |
Challenges and Learning
Getting a quadcopter to fly smoothly isn't a smooth process at all. But failures do teach us a lot. Listed below are some of the issues we faced during the course of this project.
Quadcopter Assembly
- Unexpected Throttle: Throttle seems to shoot to maximum without command. Solution - Order new remote control (:O)
- Bricked ESC: Tried flashing SimonK Firmware into ESC for faster update rate. ESC didnt respond! Solution - Buy a whole new set ESCs (!)
- Propeller Issue: Didnt check propeller specs before ordering. Had to return.
- Specifications were not clear for the products ordered online: Motors were too big for the frame. Different countries follow different metrics. Need to be careful while assembling parts ordered from different websites.
- Magnetic Interference on Compass:Motors create really intense magnetic fields which interferes with the magnetometers magnetic field. As a result magnetometer readings are affected. Magnetometer needs to be kept at an elevation to avoid this.
Quadcopter Software
- UART FIFO: If messages longer than 16 bytes is transmitted over UART, then all characters exceeding 16 bytes are lost. This issue is yet to be resolved. Looking into it.
- (4/23)Resolved this by using Interrupts and queues. The polling method created a time delay causing some data to be lost.
- Rear Right motor was always high and not responding to any input. The issue was that while computing PID we must be measuring the change in value from the center value, but instead we were measuring change from the minimum value.
- Uint to int: A lot of calculation needed the use of integer but we were using unsigned integer types. Hence values were not right.
- Pitch vs motor speed: Change in pitch was causing an opposite change in motor speed. We interchanged the signs for the front and rear motors and resolved this issue.
- IMU Disconnected: Quadcopter goes crazy if the IMU is not connected. Junk values are updated as PID and quadcopter flies away ramming to ceilings! Fixed this terrible bug by introducing a check to see if IMU is connected, if not flight controller loop is not run.
- Motor PWM Percentage: PWM percentage was not calculated based on motor frequency. Fixed this by introducing a formula dependent on motor frequency.
- RC Limits: RC limits are different for arming/disarming and for proper working. We were using the same limits and as a result accidental arm/disarm took place.
- Gain co-efficients: Changed from int to float.
- Motors jerk effect: Motors stalled for a fraction of a second and lost control. Initialization of angles every iteration in IMU data parsing was commented and the effect vanished.
- PID loop: Additional changes for P,I and D terms incorporated as per Multiwii 2.1 code.
- Performance issues: Each iteration of complete loop was taking more than 25 milliseconds. Testing revealed that setting values on 7-segment display was slowing it down.
Future Enhancement
Once the Quadcopter achieves stable and smooth hovering capabilities, a Gimbal camera mount can be put on the Quadcopter which would be used to take Aerial Photography. Additional sensors like Ultrasonic range finder can be incorporated to avoid collisions. A Barometer can be interfaced to ensure that the Quadcopter doesn’t lose its altitude when it is made to hover at a certain height.
GPS capabilities can be incorporated which would help in autonomous take-off and landing capabilities based on GPS co-ordinates between two places. In case of any problems during the flight, a failsafe mode can be programmed so that it safely returns back to the base.
Conclusion
This project helped us to understand the mechanical, electrical and control system configuration that goes into building and flying a Quadcopter (we now understand the phrase "its not rocket science"!!!!!). We understood the PID control mechanism using which the Quadcopter tries to stabilize itself for a smoother flight. This project helped us to gain a lot of practical knowledge about how a system needs to be planned, designed, integrated and tested. It helped us to realize that backup plan is required no matter how organized and foolproof the original planning is followed. It is very much required to do an initial investigation on the Quadcopter parts as it would save a lot of time, effort and money once started. Every stage impacts the previous stage and future stages. If any of the stages goes kaput, it obliterates all the effort spent and we have to start from the beginning. The assembly and programing is half the effort. An equal effort will need to be spent on tuning the Quadcopter without which all the effort goes into vain in case of crash landing.
Project Video
Upload a video of your project and post the link here. - In Post production stage....releasing shortly
Project Source Code
References
Acknowledgement
The hardware components were procured from HobbyKing, ebay, Amazon, getFPV, HomeDepot and various other sources for this project. Thanks to Preetpal Kang for teaching this class and inspiring, guiding and support us with our coursework and project. Thanks to entire team who helped and supported each other during all stages of the project and spending weekends and extra hours to get all parts of the project working.
References Used
- Preetpal Kang, Lecture notes of CMPE 244, Computer Engineering, Charles W. Davidson College of Engineering, San Jose State University, Feb-May 2014.
- en.wikipedia.org/
- https://github.com/Pansenti
- https://code.google.com/p/sf9domahrs/
- http://www.rcgroups.com/forums/showthread.php?t=1284741
- http://www.rcgroups.com/forums/showthread.php?t=1375728
- http://blog.oscarliang.net/quadcopter-pid-explained-tuning/
- http://aeroquad.com/showthread.php?1167-Stable-Mode-Explained
- http://www.ece.ucdavis.edu/~spencer/195/datasheets/PID-Without-a-PhD.pdf
- http://support.motioneng.com/downloads-notes/tuning/pid_overshoot.htm
- http://www.instructables.com/id/RC-Quadrotor-Helicopter/?ALLSTEPS
- http://www.modelflight.com.au/blog/how-to-fly-remote-control-quadcopter/
- http://www.thorlabs.com/tutorials.cfm?tabID=33653
- http://www.hobbyking.com/hobbyking/store/index.asp
- https://www.sparkfun.com/
- http://aeroquad.com/forum.php
