Difference between revisions of "S14: Android based Automation"
Proj user6 (talk | contribs) (→References Used) |
(→Grading Criteria) |
||
| Line 1: | Line 1: | ||
| − | |||
| − | |||
| − | |||
| − | |||
| − | |||
| − | |||
| − | |||
| − | |||
| − | |||
| − | |||
| − | |||
| − | |||
== Project Title == | == Project Title == | ||
Revision as of 19:24, 26 May 2014
Contents
Project Title
ANDROID BASED AUTOMATION
Abstract
This project is to develop an Android application which can be used to switch an electrical appliance On/Off, and notify the status to the user through his mobile device. Here we connect an Android Application running device to the SJSU One board using Bluetooth device and make the board detect the signals coming from the Android device via a Bluetooth module. This board generates operation in according to the incoming signals.
The board will be connected to relays which inturn are powered by 110V power supply. The power supply neutral wire is connected to a relay, where it controls the flow in according to the instruction it gets from the Android application.
Objectives & Introduction
To automate home appliances and electronic devices through an Android Application with the help of a bluetooth interfaced to SJ One Microcontroller.
- Develop an android application with good user interface.
- Build the hardware to draw the 110V into a plug port.
- Connect multiple boards into a network.
- Foolproof processing code for microcontroller.
Team Members & Responsibilities
- SreeHarsha Paturu Gangadhara
- (Android Development)
- Kiran Vaddey
- (FreeRTOS programming & Device Drivers, Hardware)
- Bhargava Kunchanapalli
- (Bluetooth and Android device interface, Tasks Implementation)
Schedule
| Date | Task | Status |
| 2/24 | Project Reviewing | Completed |
| 3/6 | Parts Ordered | Completed |
| 3/13 | Review Data sheets & Bluetooth module interfacing | Completed |
| 3/20 | Installation of Android SDK and Designing a blue print of the application | Completed |
| 3/27 | Android Application development (Continued...) | Completed |
| 4/3 | Interfacing the mobile application with SJ-One Board using Bluetooth module | Completed |
| 4/10 | Setup the interface between the SJ-One Board and External Peripherals | Completed |
| 4/17 | Improving software functionality on Unique Features | Completed |
| 4/24 | Testing and Debugging | Completed |
| 5/1 | Testing and Debugging | Completed |
| 5/8 | Final Demo | Completed |
Parts List & Cost
| Qty | Description | Total Cost |
|---|---|---|
| 1 | HC - 05 Bluetooth UART Module | $10.00 |
| 1 | SJ One Boards | $160.00 |
| 1 | Relay Module | $10.00 |
| 1 | Any Android Phone | $0.00 |
| Total Cost | 180.00 |
Design & Implementation
Hardware Design
Bluetooth Device:
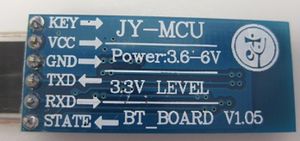
The Bluetooth module being used is the Linvor Bluetooth Module. This is a simple BT – device with the name JY-MCU BT_Board and the version is 1.05
Device and Pin Functionality:
The device comes with 4 pins. The pin functionalities are VCC, GND, Rx & Tx. The bottom of the device labels the 4 pins. The VCC pin is connected to 3.3V power supply. The device is powered and communicated with SJ One micro controller through UART3 Bus. Connections such as VCC, GND, Rx, Tx of device are made to 3.3V, GND, Tx, Rx of controller respectively.
Device in the project:
In this project, we basically used Bluetooth device to do wireless communication with an Android device. Data is sent between Android & BT devices and vice-versa. The Baud Rate rate of the Bluetooth Wireless Communication is set to 9600bps. The Data sent between Android device and BT device is ensured in a proper format to be coordinated with the tasks implemented in the project.
Electrical Switching Circuitry:
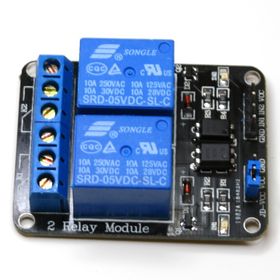
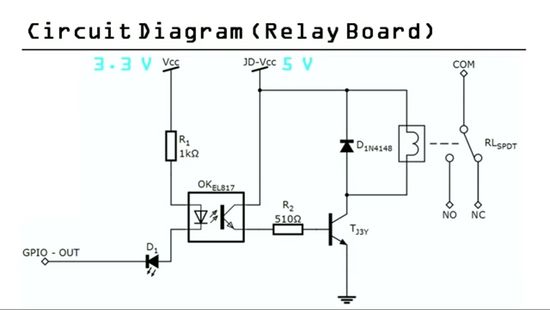
The electrical switching is done using a circuitry which uses relays to switch the lines. The voltage we handle here is 110V and frequency 60Hz. The transistor used in here produce sufficient current that is approximately 200mA with a voltage supply of 9V rather than traditional 5V supply which drives less current when used against SJSU One board and it is used to switch the operation of the relay. The 3.3V supplied by the SJSU One board from the GPIO port is not sufficient to power the relay so the relay control board is been used in this project. As seen below, the circuit consists of a transistor, an LED, and a power supply.
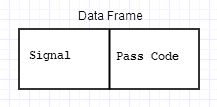
The LED is connected to the control signal to show whether the relay should be turn on or turn off. The transistor acts as a switch to enable and disable the relay depending on the signal received from SJ One board. When the LPC 1768 gets the data frame from the Android application it processes it for signal and pass code where signal is processed in switch_task in our program to act accordingly. The pass code is matched against the codes which are pre-assigned to identify the user.
Hardware Interface
UART Bus:
The UART bus is used to communicate between Bluetooth device and the micro controller. UART pins on the SJ One board are enabled using UART init function API provided by the FreeRTOS. The initialized pins are driven by the UART driver to handle the communication. Each of the UART pin if logic high produce a output voltage of 3.3V and if logic low produce a 0.0V. The SJ One board has a switch between UART-2 & UART-3, to make a selection. If we want to uses both for them then we have to use them as GPIO pins.
GPIO Port:
The GPIO port is used to enable or disable the transistor and the indicator LED. When the LPC1768 micro-controller recognizes a pass code that is sent from the Android, it will send 3.3V through the GPIO which is connected to the relay circuit. Above is the GPIO initialization function. We have used port-0 pins that is P0.0 and P0.1 pins to give a 3.3V voltage to the relay circuit board. First the pins need to be selected and then the direction of the pin needs to be specified. For instance an output pin would be set to a 1 while an input would be set to 0.
Software Design
Android Application:
An important task of this project was to create an Android Application. To start an Android Project, the following software needs to be installed:
Eclipse (Java Edition)
Android SDK
Java SDK
ADT Plugin for Eclipse
The Android SDK package needs to be downloaded which consist of API libraries and developer tools. All the necessary software required for the development of the app was available on android website. Since android is an open source, the android site provides tutorials on all the topics required to develop an app. In our project we used the BluetoothChat sample code available in android SDK and modified the code as per our requirements, Since, I had no prior knowledge of java.
The main files of the project are described below:
LoginActivity.java:
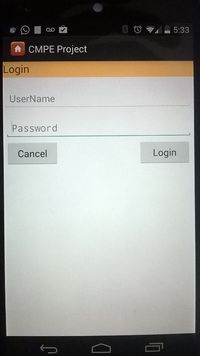
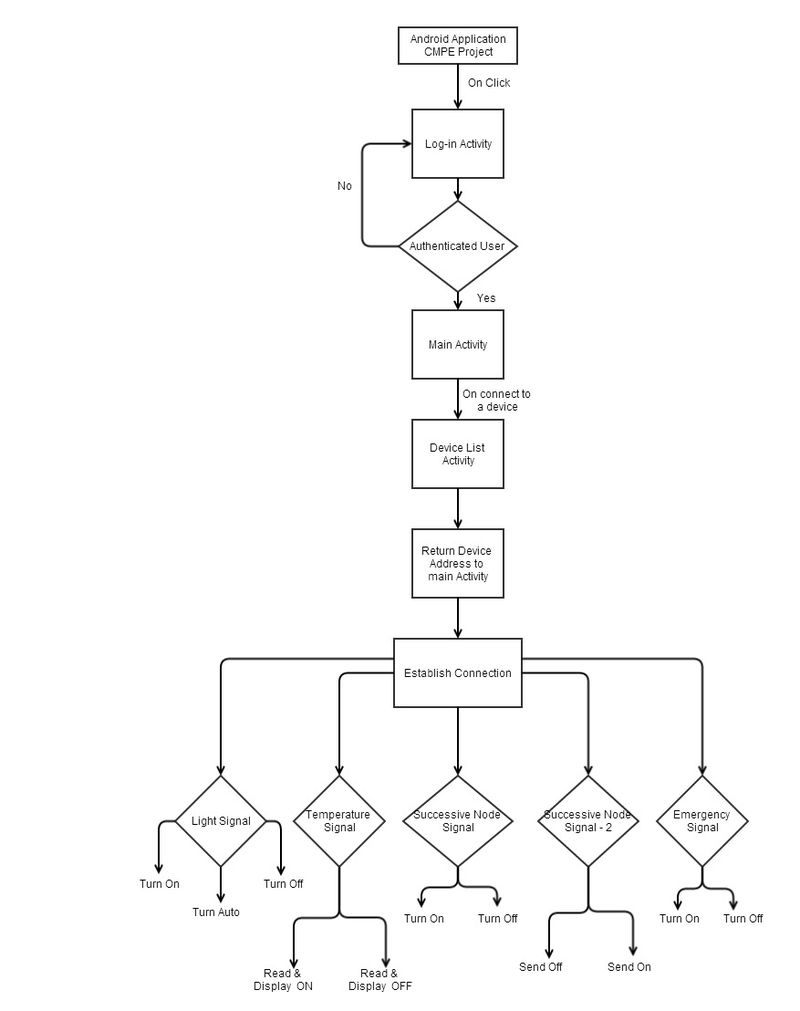
This activity shows the home page of the app i.e. Login page. Here, unless the user log's in successfully he will not be able to set up the bluetooth connection and succeeding tasks required for the working of this project. The sendMessage() function defined here creates an Intent Instance to start an new activity i.e. MainActivity.java and also delivers text message to the new activity.
MainActivity.java:
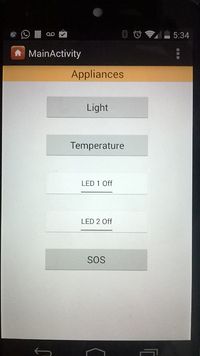
All the main tasks to be carried out are described in this activity. Various functionalities such as setting up the connection, sending and receiving messages to or from the bluetooth device are achieved by the handlers defined here. This activity creates an instance of BluetoothControl.java which is defined below. To trigger the above mentioned tasks we need to provides some form of input interface which in our case are buttons. The CMPE_Project App consists of several buttons and they’re defined in main.xml i.e. the entire layout is defined through drag and drop buttons.
DeviceList.java:
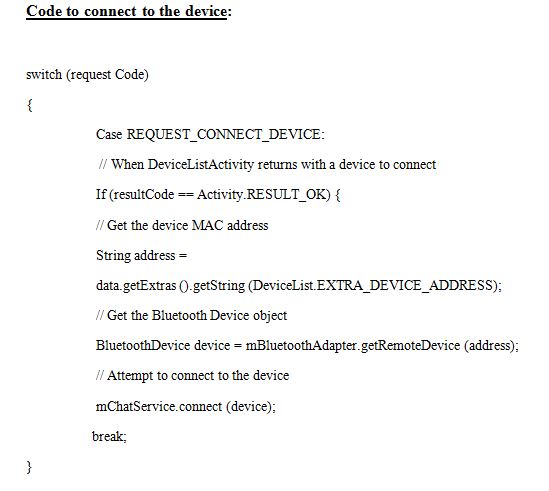
This Activity is defined to make the android device discoverable, enable the bluetooth in the device, search for other bluetooth devices and finally on clicking the device to which you want to connect, it retrieves the name of the device along with its associated MAC Address and send it to the MainActivity.java where the actual connection is setup.
BluetoothConnect.java:
This file is used in establishing Bluetooth connection. A thread is spawned and a connection is setup and initialized to a remote Bluetooth device. AcceptThread listens to the incoming connections like a server. The ConnectThread spawned handles are incoming and outgoing transmissions.
AndroidManifest.xml:
This is the most important file of all. The app package is named in this file. All to activities to be triggered are to be defined here and also used to set permissions.
Strings.xml:
This file is used to define the various string resources used in the .xml files.
Finally all the user interfaces or layouts, menus are defined in the various .xml file associated with the activities and few extra .xml files created in addition.
The steps to be followed to establish Android – Bluetooth connection:
1. Connect Bluetooth Module to the SJone Board.
2. Detect android devices which have their Bluetooth enabled.
3. Login to the Android App made in the Android powered phone.
4. Pair the devices by initiating connection through Bluetooth App made from Android Phone.
5. Once connection is established, there are various functions in the menu to choose from.
6. Data transmission is made possible between Android device and BT device.
7. Data is echoed back from BT device back to the Android device.
8. The necessary data retrieved through BT is stored in an SD card.
Implementation
Hardware Tasks
Switching Task:
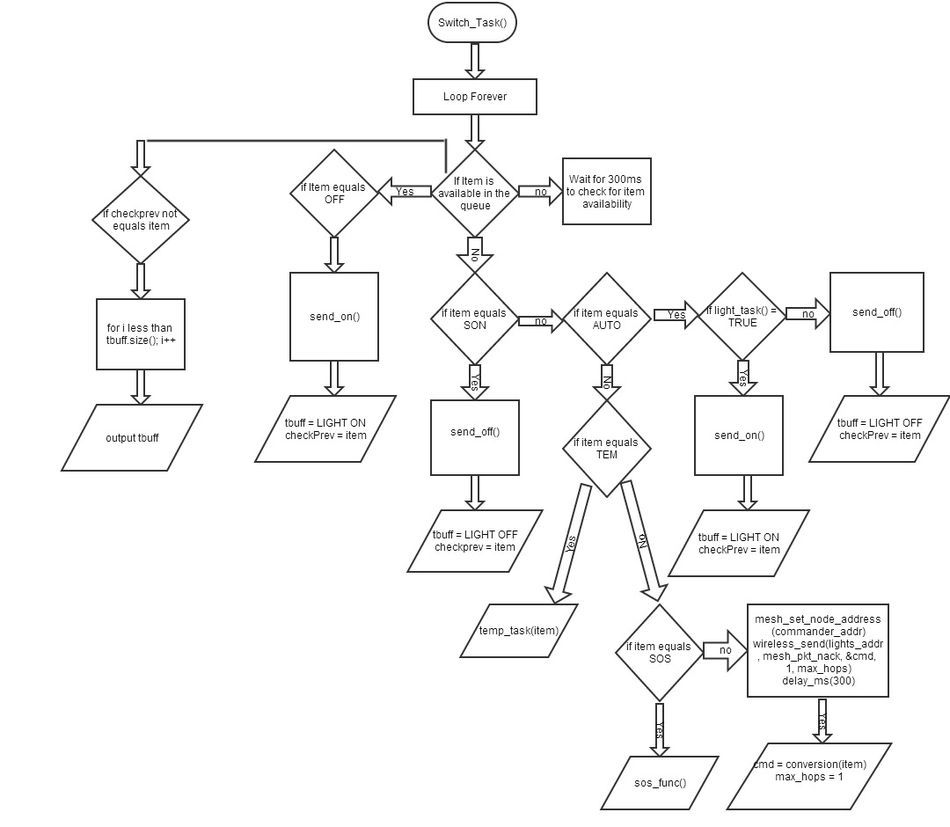
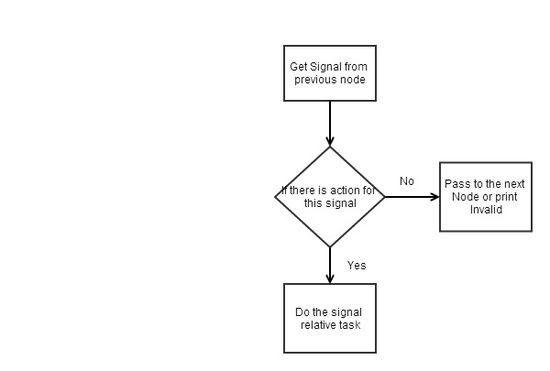
This task is the main processing place in this entire program. The task it performs is that it analyses the data received and does the intended action. This task doesn't take any inputs it gets context switched from get_data task when it receives any data into the queue. It waits for the queue item for 300ms and in case if doesn't receive any information on which it can start the process then it sends the data frame it received to the other SJ One board connected in this network. Where the other SJ One board does the remaining action. This task when it gets the signal from the get_data task it compares the signal in an "if(){}" cascade. It records the previous signal and it compares it with the present signal, in case if both the signals are different then it sends a toast of appropriate action to the Android application. The follow of the function is explain in the following diagram.
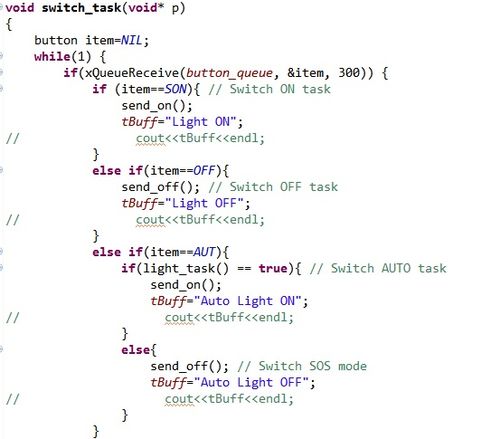
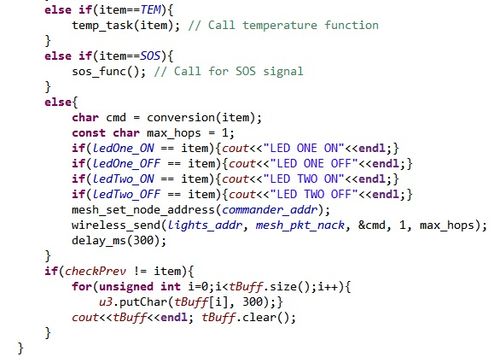
The snippet of the task is as followed for the clear understanding.
Get Data Task:
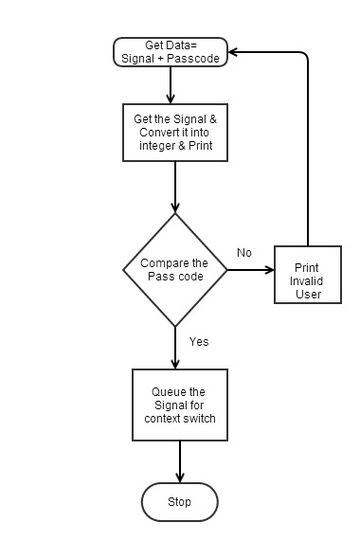
Get data task is where the data frame is received from the Android application. By using the FreeRTOS API's we receive the data from the UART-3 receive wire connection. The data received is in character then we convert it to the format we needed. Then the pass code is compared against the pre-defined codes, if there is a match then we proceed onto add the signal into the queue. The tasks get context switched because the switch task is with higher priority. Once the data is written into the queue then immediately the switch task starts running, where it receives the signal from the queue. The detailed data flow is as follows.
The snippet of the task is as followed for the clear understanding.
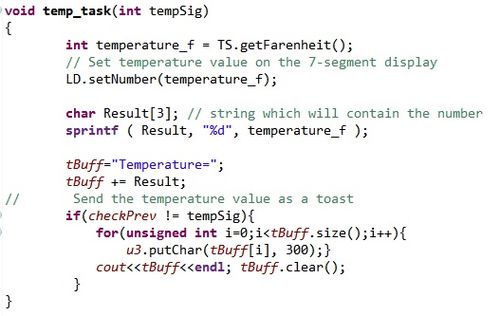
Temperature Task:
In this task we read the temperature sensor values and send it via an SPI bus to the 7-segment display to display it. This task sends a toast to the Android application that the temperature in the place where this SJ One board is present. The code snippet is as follows for reference.
Light Sensor Task:
This function reads the light sensor values and valuates it to our requirements. This is a Boolean function where it returns where the relay should be switched on or off based on the values presented by the sensor. The code snippet is as follows.
SOS Task:
This task transmits SOS i.e. Save Our Souls which is a help signal in case of emergency. It is transmitted as an alternative pattern of Dots and Dashes i.e. electronically 1's and 0's. This function switches relay alternatively by approximately half a second, then the lights all connected to this network would On and Off in a pattern.
Successive Nodes:
The signal received by the switch task checks for the action's relative to the signal. If it doesn't have any action relevant to the received command then it forwards the signal to the successive nodes for the action to be performed. This signal is sent to the other nodes using a Nordic wireless mesh network between them. Then the data is again processed to perform the relative action.
Testing & Technical Challenges
The testing for this project is done on individual tasks like Android application, Bluetooth interface, hardware module and firmware code.
Testing of Bluetooth Device
The device can be tested with the micro controller through AT commands. The micro controller has an LED which indicates whether the device is paired or not. To implement AT-commands the device should be “un-paired”. There are limited AT commands to work with the module. The string “AT” sent to the module replies with “OK”. We can also set the baud rate of the device using AT+BAUDx. AT+VERSION gives the version of the Bluetooth module which is useful to determine what firmware version is being used.
Android Testing
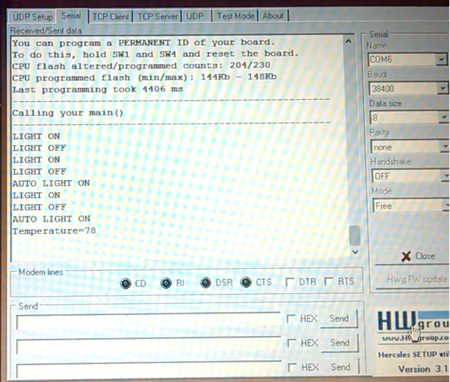
The android app developed was tested by running the code on the android phone. In order to run the code and test, one must go to developer option present in phone settings and enable USB debugging mode. Now we can install the app on the phone by selecting proper SDK target version in the compiler and AndroidManifest.xml file which depends on the android version of the phone which you are using. After the project was successfully built, it's time to test the app with the hardware i.e. whether we are able to send and receive data from the android app. Initially there were some problems such as initiating the bluetooth module so we were not able to transmit data, once, it was fixed we were able to send the data properly to the bluetooth module which in the turn was interfaced with the SJone board via UART3. The data received was being printed on Hercules. Later, the buttons in the mainactivity were configured to transmit numbers on click.
Hardware debugging
In hardware integration the main part is to get the enough driving current in all the wires. The SJ One board doesn't produce the 5V which is required by the relay module. The relay module works on the 5V voltage supply and 60mV of minimum current. The SJ One board GPIO pin provides the 1-3mV of current. The current is first amplified by the op-amp and then it is replaced by a transistor which can amplify the current value in a circuit. Now, the voltage is boosted up to 9V which can produce 200mA current is more than sufficient to drive the circuit.
Firmware Code
The code for the LPC1768 processor is written in C++, this code is stored in a flash device provided on the SJ One Board. The code has to be written in such a way that the all tasks have to be interconnected, so we used queues to communicate between the tasks. The priority of the switching task is more so that the program waits for the queue to be filled. The moment the data is queued there would be context switching, which allows the high priority task to get the control. The data is sent by the android application by concatenating signal to the user or code name, so it is packed into a data frame before sending the signal to the SJ One board. The code is verified by connecting it to the computer and the data flow is observed. The Hercules is used to display the data and the flow. The screen shots of the observations are as attached below.
My Issue #1
The interfacing of the Bluetooth device has itself posed big challenge for us. The module had to be testing before and while the Android App was being tested. The AT commands can be used to test the device and it consumed a lot of time. The data sent and received are to be sent properly to the device buffers and be printed.
My Issue #2
The Android application will display the toasts after sending the signaling command. These toasts have to be sent by the module as response, but the toasts where scrambled. We tried to send the data by delaying the signal by 300ms but it didn't work. Finally we found that we have to send the data only matching the frequency of toasts. So, we compare the previous data and the present data, where only once the previous and present data are different, so at that time we sent the toast data. It worked.
Conclusion
Overall, we got the opportunity to learn and practice all the concepts which we have learnt in class. This project makes use of queues to communicate between the tasks and two wireless protocols to communicate among the system i.e. Bluetooth and Nordic Mesh Network. The usage of semaphores to perform context switching has been explored. The creation and interlinking of tasks, which increases the complexity of the program, where handled successfully and the experience made us learn how to design the data flow before diving into the real software programming. The far more important aspect which we have learnt is how to share and work as a team.
Project Video
Upload a video of your project and post the link here.
Project Source Code
Send me your zipped source code and I will upload this to SourceForge and link it for you.
References
Acknowledgement
Preet Kang
References Used
Android App- https://developer.android.com/guide/index.html
Appendix
You can list the references you used.
