Difference between revisions of "F22: Space Warriors"
(→Game Logic State Machine) |
(→Rajveer Singh Kaushal) |
||
| (20 intermediate revisions by the same user not shown) | |||
| Line 1: | Line 1: | ||
| − | + | [[File:Lumberjack.bmp|200px|Final Result|right]] | |
| − | |||
| − | |||
| − | |||
| − | |||
| − | |||
| − | |||
| − | |||
| − | |||
| − | |||
| − | |||
= Lumberjack = | = Lumberjack = | ||
| − | + | ||
| + | <div><ul> | ||
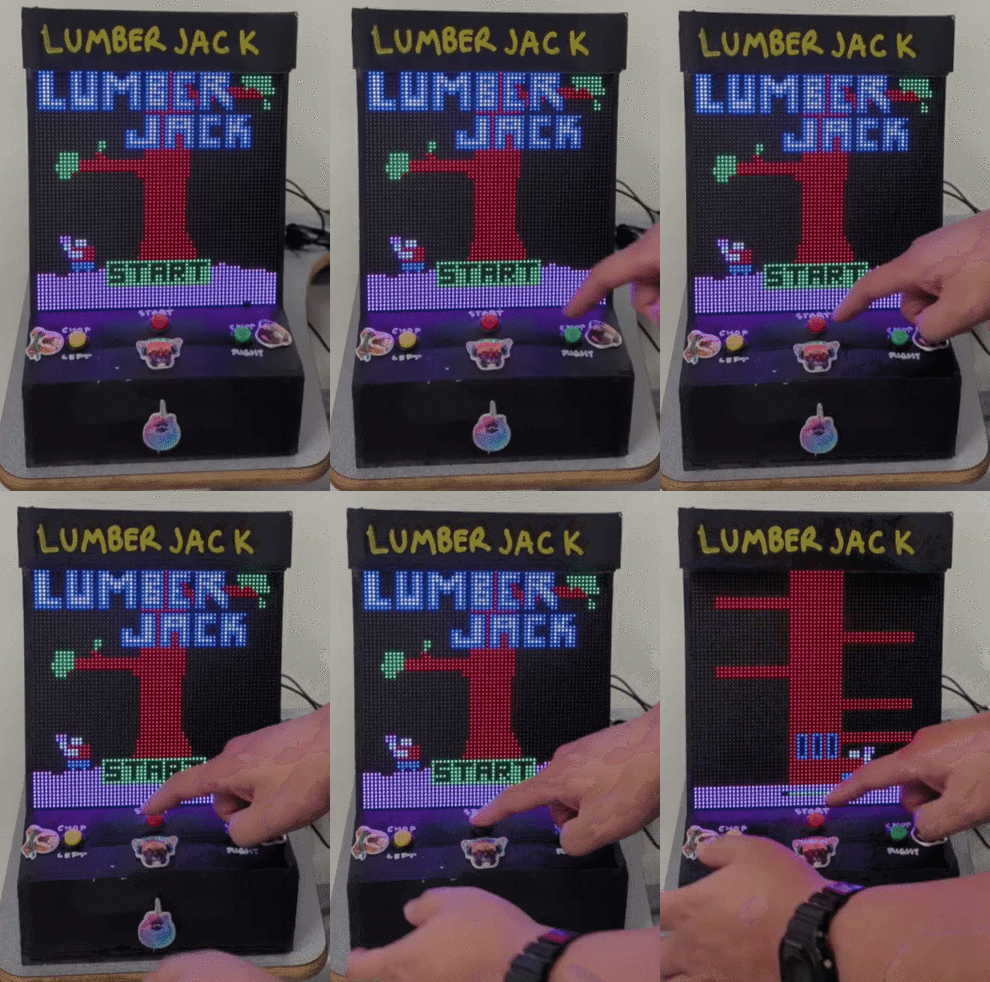
| + | <li style="display: inline-block;">[[File:start_button.gif|thumb|330px|Start Button Press]] </li> | ||
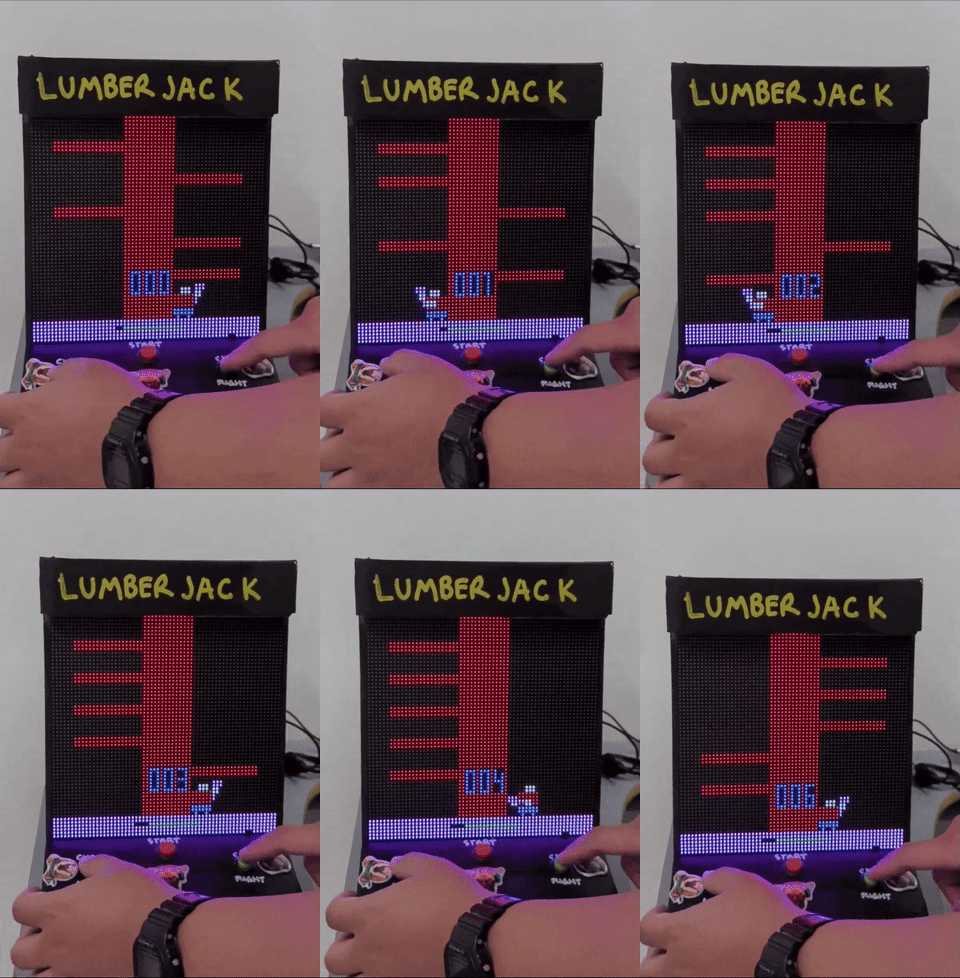
| + | <li style="display: inline-block;">[[File:gameplay.gif|thumb|330px|Gameplay]] </li> | ||
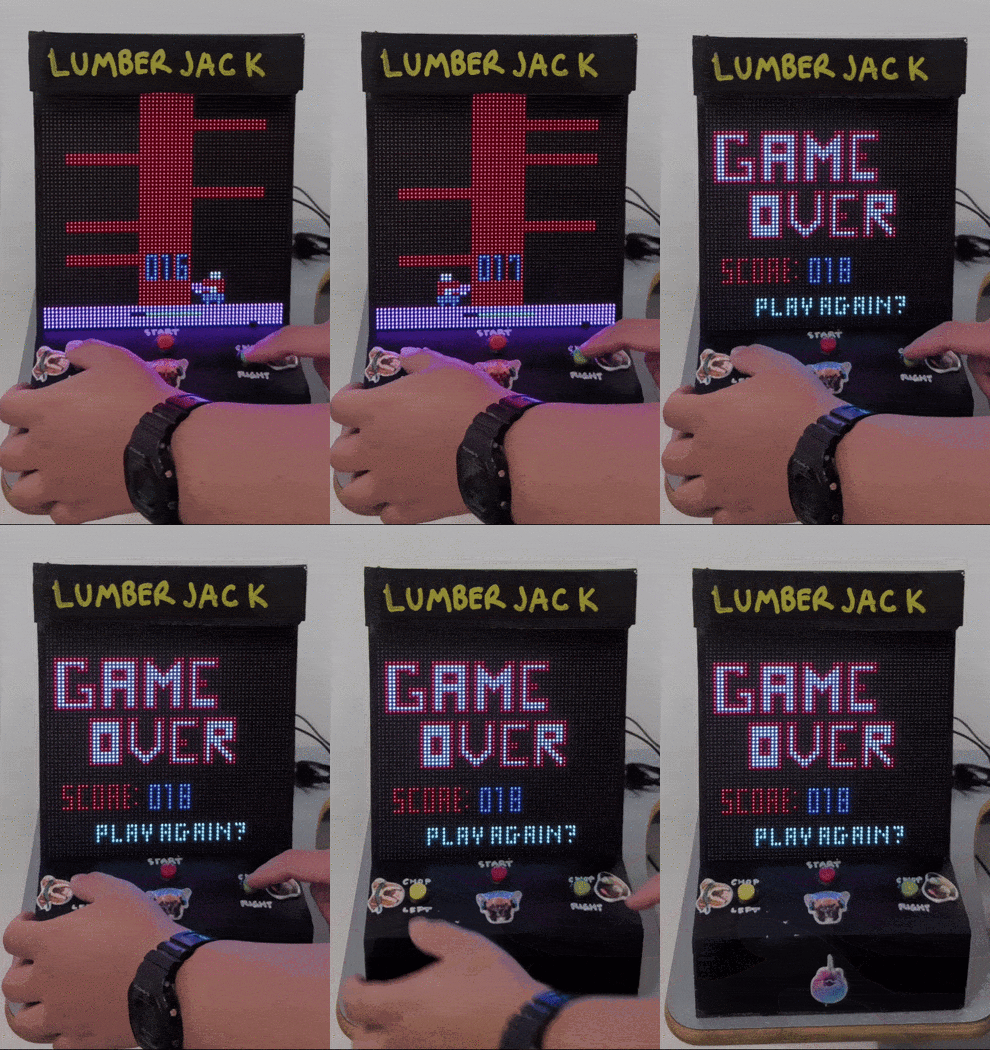
| + | <li style="display: inline-block;">[[File:game_over.gif|thumb|330px|Game Over on collision]] </li> | ||
| + | </ul></div> | ||
== Abstract == | == Abstract == | ||
| Line 47: | Line 42: | ||
====Rajveer Singh Kaushal==== | ====Rajveer Singh Kaushal==== | ||
| − | * | + | * Developed Drivers for MP3 Decoder. |
* Wiki Page Manager. | * Wiki Page Manager. | ||
| − | * Game logic testing and debugging. | + | * Game logic integration, testing and debugging. |
| + | * Syncing game logic and game states wuth music. | ||
== Schedule == | == Schedule == | ||
| Line 277: | Line 273: | ||
{| | {| | ||
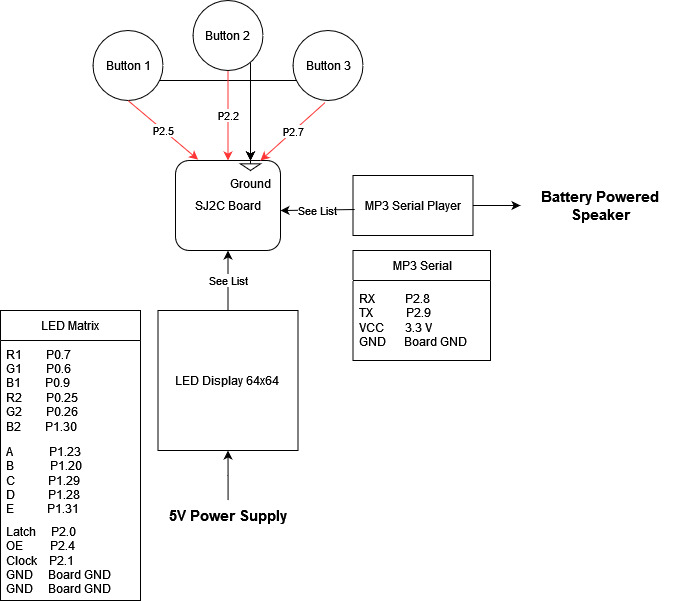
| − | |[[File:Hardware diagram.jpg| | + | |[[File:Hardware diagram.jpg|thumb|none|centre|800x800px|Hardware block diagram]] |
|} | |} | ||
| Line 296: | Line 292: | ||
==== MP3 Serial Player ==== | ==== MP3 Serial Player ==== | ||
| − | + | ||
| + | The MP3 decoder that we used is serial MP3 player model by Catalex (version v1.0.1). It's a simple MP3 player device which is based on a high-quality MP3 audio chip---YX5300. It can support 8k Hz ~ 48k Hz sampling frequency MP3 and WAV file formats. There is a TF card socket on board, so you can plug the micro SD card that stores audio files. MCU can control the MP3 playback state by sending commands to the module via UART port, such as switch songs, change the volume and play mode and so on. | ||
| + | |||
| + | [[File:MP3 Decoder.PNG|500x280px |thumb|center|MP3 Decoder]] | ||
=== Software Design === | === Software Design === | ||
| Line 306: | Line 305: | ||
=== Implementation === | === Implementation === | ||
| − | |||
==== Game Logic State Machine ==== | ==== Game Logic State Machine ==== | ||
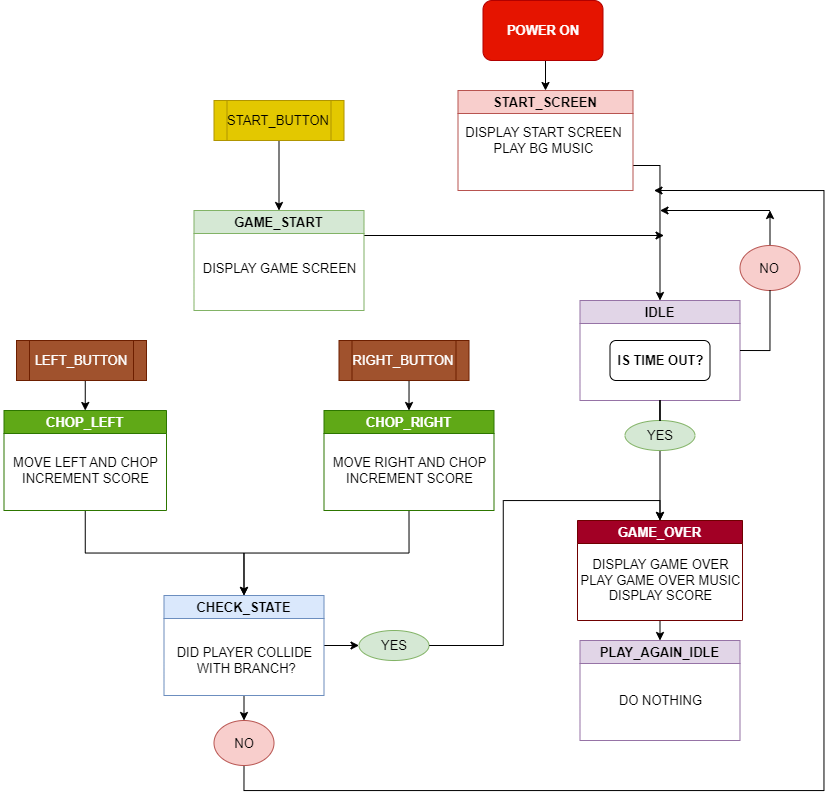
| − | The game logic follows a state machine with eight different states. You can see from | + | The game logic follows a state machine with eight different states. You can see from the diagram below, the flow of states. |
| + | <br> | ||
| + | |||
| + | 1. On power up, the game starts off in the '''START_SCREEN''' state and is the only time this state is reached during a power run. The Background music is played. The only way to move forward to the next state is by pressing the START_BUTTON. This activates a Binary Semaphore Signal to the Start Button Task which changes the state to '''GAME_START'''. | ||
| + | |||
| + | 2. '''GAME_START''' brings up the Gameplay screen and begins the Timer Task which starts the timer countdown. Timer is reset to begin anew. The score is reset to 0. Now users can either press the Left or Right button to move and chop. The state is then set to '''IDLE'''. | ||
| + | |||
| + | 3. '''CHOP_LEFT''' is the state the state machine reaches when the user presses the Left button during gameplay. This increments the score by 1 since a chop is performed regardless of collision. The chop music is played. The state is then set to '''CHECK_STATE'''. | ||
| + | |||
| + | 4. '''CHOP_RIGHT''' is the state the state machine reaches when the user presses the Right button during gameplay. This increments the score by 1 since a chop is performed regardless of collision. The chop music is played. The state is then set to '''CHECK_STATE'''. | ||
| + | |||
| + | 5. '''CHECK_STATE''' state checks if the position of the last item in the branch queue is the same as the player's position. If equal then the state is set to '''GAME_OVER''' else the state is set to '''IDLE'''. | ||
| + | |||
| + | 6. '''IDLE''' state is where the time over condition is checked. If timer has reached 0 then the state is set to '''GAME_OVER''' else the state remains the same. | ||
| + | |||
| + | 7. '''GAME_OVER''' state is reached either when the timer reaches 0 or when the player collides with a branch. The Game over screen is displayed. The Score is displayed. The game over music is played. The state is set to '''PLAY_AGAIN_IDLE'''. | ||
| + | |||
| + | 8. '''PLAY_AGAIN_IDLE''' is only reached post the Game over screen to stay on the same screen until the Start button is pressed again to restart the game. This is the only way to move out this state and to the '''GAME_START''' state. | ||
| + | |||
| + | <br> | ||
[[File:game_state_machine.png|890x890px|thumb|center|Game State Machine]] | [[File:game_state_machine.png|890x890px|thumb|center|Game State Machine]] | ||
<br> | <br> | ||
| + | |||
| + | Below is a snippet of code showing how the Game State Machine Task which runs at a higher priority than all other tasks. | ||
| + | |||
| + | <syntaxhighlight lang="c"> | ||
| + | void game_state_machine__task(void *p) { | ||
| + | init_graphics(); | ||
| + | xSemaphoreGive(start_button_signal); | ||
| + | while (1) { | ||
| + | switch (state) { | ||
| + | case START_SCREEN: { | ||
| + | display_start_screen(); | ||
| + | play_mp3_music_bg(); | ||
| + | state = IDLE; | ||
| + | break; | ||
| + | } | ||
| + | |||
| + | case GAME_START: { | ||
| + | xSemaphoreGive(continue_game); | ||
| + | vTaskResume(timer_task_handle); | ||
| + | vTaskResume(timer_display_handle); | ||
| + | vTaskResume(game_score_handle); | ||
| + | reset_timer(); | ||
| + | reset__game_score(); | ||
| + | initialize_branch_queue(); | ||
| + | clear_all_branches(); | ||
| + | display_game_start(); | ||
| + | display_timer_start(); | ||
| + | update_branch_display(); | ||
| + | move_player_right(); | ||
| + | state = IDLE; | ||
| + | break; | ||
| + | } | ||
| + | |||
| + | case GAME_OVER: { | ||
| + | vTaskSuspend(timer_task_handle); | ||
| + | vTaskSuspend(timer_display_handle); | ||
| + | play_mp3_music_game_over(); | ||
| + | clear_timer(); | ||
| + | display_game_over(); | ||
| + | xSemaphoreGive(start_button_signal); // lets start button restart game again | ||
| + | xSemaphoreTake(continue_game, 0); // prevent left and right buttons from working in game over state | ||
| + | state = PLAY_AGAIN_IDLE; | ||
| + | break; | ||
| + | } | ||
| + | |||
| + | case CHOP_LEFT: { | ||
| + | play_mp3_music_hit(); | ||
| + | move_and_chop_left(); | ||
| + | clear_all_branches(); | ||
| + | update_branch_display(); | ||
| + | update_score(); | ||
| + | extend_time(); | ||
| + | state = CHECK_STATE; | ||
| + | break; | ||
| + | } | ||
| + | |||
| + | case CHOP_RIGHT: { | ||
| + | play_mp3_music_hit(); | ||
| + | move_and_chop_right(); | ||
| + | clear_all_branches(); | ||
| + | update_branch_display(); | ||
| + | update_score(); | ||
| + | extend_time(); | ||
| + | state = CHECK_STATE; | ||
| + | break; | ||
| + | } | ||
| + | |||
| + | case CHECK_STATE: { | ||
| + | |||
| + | if (check_collision_branch() == get__player_position()) { | ||
| + | state = GAME_OVER; | ||
| + | } else { | ||
| + | state = IDLE; | ||
| + | } | ||
| + | break; | ||
| + | } | ||
| + | |||
| + | case IDLE: { | ||
| + | vTaskDelay(100); | ||
| + | if (check_if_time_out()) { | ||
| + | state = GAME_OVER; | ||
| + | } | ||
| + | break; | ||
| + | } | ||
| + | |||
| + | case PLAY_AGAIN_IDLE: { | ||
| + | vTaskDelay(100); | ||
| + | break; | ||
| + | } | ||
| + | } | ||
| + | } | ||
| + | } | ||
| + | </syntaxhighlight> | ||
==== BMP Driver ==== | ==== BMP Driver ==== | ||
| Line 353: | Line 463: | ||
</syntaxhighlight> | </syntaxhighlight> | ||
| + | |||
| + | === Game Tasks === | ||
| + | |||
| + | The game consists of the following tasks: | ||
| + | |||
| + | * '''display_test__task:''' This task updates the display and is essentially what sets the "Refresh rate" of the display. This task runs at the highest priority among all the game tasks. | ||
| + | * '''game_state_machine__task:''' This task runs the game state machine which is responsible for all aspects of the game logic and graphics working together. This is the only other task that runs at the highest priority. | ||
| + | * '''left_button__task:''' This task continuously checks for input from the left button and is only activated during gameplay phase due to a binary semaphore. | ||
| + | * '''right_button__task:''' This task continuously checks for input from the right button and is only activated during gameplay phase due to a binary semaphore. | ||
| + | * '''start_button__task:''' This task continuously checks for input from the start button and is only activated during '''START_SCREEN''' or in '''GAME_OVER''' due to a binary semaphore. | ||
| + | * '''start_timer:''' This task counts down the logical timer (volatile variable) every 100 milliseconds as designed for the game. This task is suspended and resumed only during gameplay. | ||
| + | * '''update_timer_task:''' This task updates the timer bar during gameplay. This task is suspended and resumed only during gameplay. | ||
| + | * '''score_task:''' This task updates the live score during gameplay. This task is suspended until '''GAME_START''' state is reached. | ||
== Testing & Technical Challenges == | == Testing & Technical Challenges == | ||
| − | + | === Display Power supply issues === | |
| − | |||
| − | + | During the earlier phases of the project we were using a generic 5V-4A DC power adapter to directly connect to the power input of the LED matrix. This led to the display being extremely unstable and almost impossible to use for testing and debugging. This also wasted a significant amount of our time. We realized the issue was the power and quickly switched to a buck converter that outputs stable 5V voltage. Furthermore, we also switched from using just jumper wires for data pin connections on the LED Matrix to using a combination of jumper wires and a ribbon cable. This fixed the issue immediately and it worked flawlessly henceforth. | |
| − | === | + | === Timer countdown issue === |
| − | + | ||
| + | When we first implemented the timer, we noticed we needed a way to have the timer begin and display on the screen only during the gameplay and not during the Start screen or game over screen. Since the timer was its own task and not part of the state-machine, we could not control the timer behavior like we did all other elements. Therefore we decided to make use of some FreeRTOS APIs like vTaskSuspend() and vTaskResume() to our advantage. We suspended the task task as soon as it was created and only resumed it when it was required and suspended it again. This ensured the timer bar showed only when necessary and the gamer did not go into game over state every time due to the timer going to 0. | ||
| + | |||
| + | === MP3 music play issues === | ||
| + | |||
| + | We realized the MP3 modules allow for accessing various music files through an index number generated based on file modified time on the SD card. However, if a file is played while another was already playing, the previous music stops and the latest file call proceeds. Unfortunately there is no way to save the song timestamp or the exact point of a song file to later resume from. This forced us to play the background music only during the start screen and not during gameplay because gameplay will be covered by a different sound. | ||
== Conclusion == | == Conclusion == | ||
| − | + | Working on and developing Lumberjack was extremely fun, thought provoking and we never got bored. All the technical challenges allowed us to develop a more practical form of problem solving skills. Working with hardware can be a whole different kind of problem solving skill as we experienced. Overall, we applied almost all concepts we learnt in the CMPE 244 class and learnt even more while working on the project. This opportunity also helped us develop teamwork skills and better time management. We used FreeRTOS practically and by doing so we dived deep into the concepts and developed a concrete foundation of the knowledge. This project also increased our confidence for working on embedded projects or facing interviews. | |
| + | |||
| + | == Appendix == | ||
=== Project Video === | === Project Video === | ||
| − | + | ||
| + | * [https://youtube.com/shorts/z9xpNlDJSKY YouTube Link] | ||
=== Project Source Code === | === Project Source Code === | ||
| Line 374: | Line 504: | ||
== References == | == References == | ||
=== Acknowledgement === | === Acknowledgement === | ||
| − | + | ||
| + | We would like to thank Professor Preetpal Kang for such a unique class and amazing opportunity. This class - CMPE 244 is probably the single most important class for anyone pursuing a career in Embedded systems/Firmware engineering. | ||
=== References Used === | === References Used === | ||
| Line 380: | Line 511: | ||
* [https://en.wikipedia.org/wiki/BMP_file_format BMP Wikipedia] | * [https://en.wikipedia.org/wiki/BMP_file_format BMP Wikipedia] | ||
* [http://elm-chan.org/fsw/ff/00index_e.html FatFs Filesystem Module] | * [http://elm-chan.org/fsw/ff/00index_e.html FatFs Filesystem Module] | ||
| + | * [https://html5games.com/Game/Timberman/a25e37b9-1550-49c9-b383-92ad51b4ecc2 Original game - Timberman] | ||
Latest revision as of 14:21, 16 December 2022
Contents
Lumberjack
Abstract
Lumberjack is a reaction-based game with the objective of chopping down a tree while avoiding the incoming branches. The project will be a re-creation of a mobile game called Timber Guy, using an LED matrix array and momentary switch buttons to interface with the game. Players will continuously cut down a tree by pressing between the left and right buttons to make the character chop the tree. Meanwhile, they must also dodge the descending branches of the tree. By touching the respective buttons on the left or right sides of the LED display, players will move the character to avoid getting hit. Moreover, the players must continuously cut down the tree, which restores the countdown timer, faster than it is depleted. If the player collides with a branch or the countdown is depleted, the game will be considered over.
Objectives & Introduction
The objective of the project was to re-create a mobile game, Timber Guy, designed around FreeRTOS and the SJ2C board. In doing so, our team set out to achieve the following goals:
- Smooth display graphics during game play
- Synchronize game audio with game play
- Utilize the SD card as part of our design
- Further explore synchronization and task prioritization of tasks in an RTOS within a more complex application
Team Members & Responsibilities
Dhanush Babu
- Develop Game Logic.
- Game State Machine handling.
- Develop Drivers for hardware.
- Integrating Hardware and Software
- Game logic testing and debugging.
Nick Tran
- Develop drivers for LED Matrix.
- Develop graphics drivers for displaying defined images to LED Matrix.
- Develop BMP drivers for loading bmp image files from SD card to use with the graphics driver.
- Made the enclosure and body of the system.
- Game logic integration, testing and debugging.
Rajveer Singh Kaushal
- Developed Drivers for MP3 Decoder.
- Wiki Page Manager.
- Game logic integration, testing and debugging.
- Syncing game logic and game states wuth music.
Schedule
| Week# | Start Date | End Date | Task | Status |
|---|---|---|---|---|
| 1 |
|
|
|
|
| 2 |
|
|
|
|
| 3 |
|
|
|
|
| 4 |
|
|
|
|
| 5 |
|
|
|
|
| 6 |
|
|
|
|
| 7 |
|
|
|
|
| 8 |
|
|
|
|
| 9 |
|
|
|
|
| 10 |
|
|
|
|
Parts List & Cost
| Item# | Description | Quantity | Price |
|---|---|---|---|
| 1 |
SJ2C Board |
1 |
$50.00 |
| 2 |
LED Display |
1 |
$85.95 |
| 3 |
Momentary switches |
5 |
$8.99 |
| 4 |
Jumper wires |
Pack |
$6.99 |
| 5 |
5V Power Supply |
1 |
$ 16.99 |
| 6 |
MP3 serial module |
1 |
$ 8.39 |
| 7 |
Game enclosure (wood / paint / adhesive) |
Misc |
$ 30.00 |
Design & Implementation
The design section can go over your hardware and software design. Organize this section using sub-sections that go over your design and implementation.
Hardware Design
Discuss your hardware design here. Show detailed schematics, and the interface here.
Hardware Interface
In this section, you can describe how your hardware communicates, such as which BUSes used. You can discuss your driver implementation here, such that the Software Design section is isolated to talk about high level workings rather than inner working of your project.
LED Matrix Display
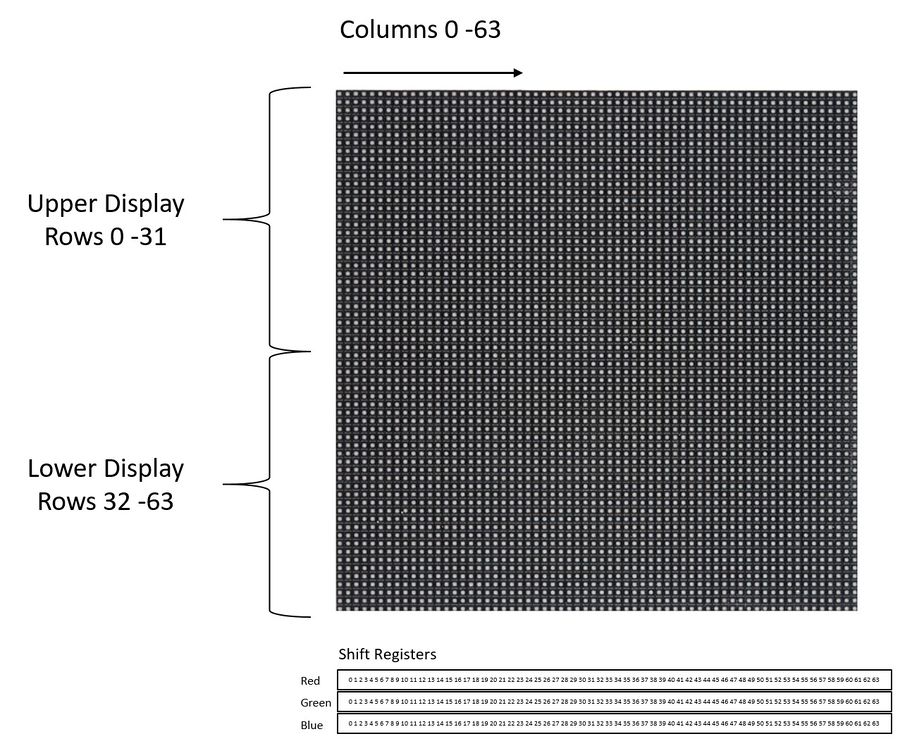
The 64 x 64 LED matrix contains a total of 4096 pixels, with each pixel having 3 channels for red, green, and blue colors. Each group of 32 rows of the display is addressable by using a 5:32 decoder, where each 5-bit address actually selects 2 rows of the 64 x 64 display at a time. Therefore, the display can be considered to be split in two halves -- the upper display containing rows 0 to 31, and the lower half display comprised of rows 32 through 64. To turn each LED on, a HIGH must be asserted on the respective RGB pins and clocked into the respective bit of the 64-bit shift registers, where each bit position is relative to the 64 columns of the display. Since the display is split into two halves, pins R1, G1, and B2 control the color output for the upper display while pins R2, G2, and B2 control the output for the lower half of the matrix.
Momentary Press Buttons
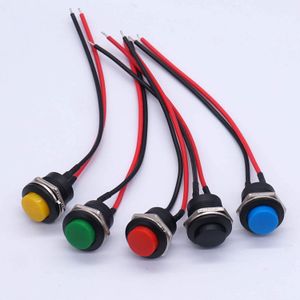
For user input we used Weideer 16mm Push buttons that we found on Amazon. The buttons were tactile and had a amount of switch travel. Each button had two terminals. We connected one terminal of each button to three different GPIO pins on the SJ2 Board to receive input signals. The other terminal was connected to the 3.3V Vcc on the SJ2. Therefore, we enabled pull-down resistors in software for the switches to have no floating input when inactive.
MP3 Serial Player
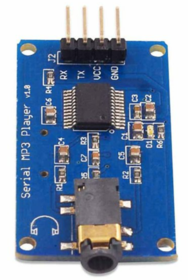
The MP3 decoder that we used is serial MP3 player model by Catalex (version v1.0.1). It's a simple MP3 player device which is based on a high-quality MP3 audio chip---YX5300. It can support 8k Hz ~ 48k Hz sampling frequency MP3 and WAV file formats. There is a TF card socket on board, so you can plug the micro SD card that stores audio files. MCU can control the MP3 playback state by sending commands to the module via UART port, such as switch songs, change the volume and play mode and so on.
Software Design
Show your software design. For example, if you are designing an MP3 Player, show the tasks that you are using, and what they are doing at a high level. Do not show the details of the code. For example, do not show exact code, but you may show psuedocode and fragments of code. Keep in mind that you are showing DESIGN of your software, not the inner workings of it.
Implementation
Game Logic State Machine
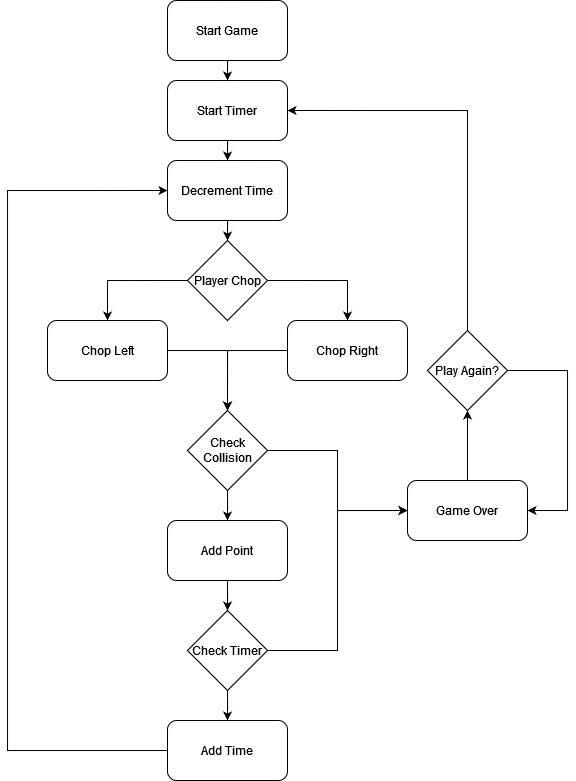
The game logic follows a state machine with eight different states. You can see from the diagram below, the flow of states.
1. On power up, the game starts off in the START_SCREEN state and is the only time this state is reached during a power run. The Background music is played. The only way to move forward to the next state is by pressing the START_BUTTON. This activates a Binary Semaphore Signal to the Start Button Task which changes the state to GAME_START.
2. GAME_START brings up the Gameplay screen and begins the Timer Task which starts the timer countdown. Timer is reset to begin anew. The score is reset to 0. Now users can either press the Left or Right button to move and chop. The state is then set to IDLE.
3. CHOP_LEFT is the state the state machine reaches when the user presses the Left button during gameplay. This increments the score by 1 since a chop is performed regardless of collision. The chop music is played. The state is then set to CHECK_STATE.
4. CHOP_RIGHT is the state the state machine reaches when the user presses the Right button during gameplay. This increments the score by 1 since a chop is performed regardless of collision. The chop music is played. The state is then set to CHECK_STATE.
5. CHECK_STATE state checks if the position of the last item in the branch queue is the same as the player's position. If equal then the state is set to GAME_OVER else the state is set to IDLE.
6. IDLE state is where the time over condition is checked. If timer has reached 0 then the state is set to GAME_OVER else the state remains the same.
7. GAME_OVER state is reached either when the timer reaches 0 or when the player collides with a branch. The Game over screen is displayed. The Score is displayed. The game over music is played. The state is set to PLAY_AGAIN_IDLE.
8. PLAY_AGAIN_IDLE is only reached post the Game over screen to stay on the same screen until the Start button is pressed again to restart the game. This is the only way to move out this state and to the GAME_START state.
Below is a snippet of code showing how the Game State Machine Task which runs at a higher priority than all other tasks.
void game_state_machine__task(void *p) {
  init_graphics();
  xSemaphoreGive(start_button_signal);
  while (1) {
    switch (state) {
    case START_SCREEN: {
      display_start_screen();
      play_mp3_music_bg();
      state = IDLE;
      break;
    }

    case GAME_START: {
      xSemaphoreGive(continue_game);
      vTaskResume(timer_task_handle);
      vTaskResume(timer_display_handle);
      vTaskResume(game_score_handle);
      reset_timer();
      reset__game_score();
      initialize_branch_queue();
      clear_all_branches();
      display_game_start();
      display_timer_start();
      update_branch_display();
      move_player_right();
      state = IDLE;
      break;
    }

    case GAME_OVER: {
      vTaskSuspend(timer_task_handle);
      vTaskSuspend(timer_display_handle);
      play_mp3_music_game_over();
      clear_timer();
      display_game_over();
      xSemaphoreGive(start_button_signal); // lets start button restart game again
      xSemaphoreTake(continue_game, 0);    // prevent left and right buttons from working in game over state
      state = PLAY_AGAIN_IDLE;
      break;
    }

    case CHOP_LEFT: {
      play_mp3_music_hit();
      move_and_chop_left();
      clear_all_branches();
      update_branch_display();
      update_score();
      extend_time();
      state = CHECK_STATE;
      break;
    }

    case CHOP_RIGHT: {
      play_mp3_music_hit();
      move_and_chop_right();
      clear_all_branches();
      update_branch_display();
      update_score();
      extend_time();
      state = CHECK_STATE;
      break;
    }

    case CHECK_STATE: {

      if (check_collision_branch() == get__player_position()) {
        state = GAME_OVER;
      } else {
        state = IDLE;
      }
      break;
    }

    case IDLE: {
      vTaskDelay(100);
      if (check_if_time_out()) {
        state = GAME_OVER;
      }
      break;
    }

    case PLAY_AGAIN_IDLE: {
      vTaskDelay(100);
      break;
    }
    }
  }
}
BMP Driver
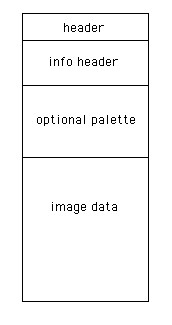
The game graphics were designed in a paint utility mtPaint, saved onto an SD card, and read into memory to display onto the LED matrix. The structure of a bmp file is as illustrated below, the first 54 bytes are header data which contains information such as file identifier codes, file size, and byte offset to the start of the image data. The next section is the info header which contains information such as image width and height. The bmp files generated from mtPaint did not contain any palette information. Lastly, the bmp file format stores an image's pixel data in sequence, row by row, starting from the bottom left corner of an image, and ending in the top right corner. The bmp format stores each pixel using 3 bytes with each byte in blue, green, and red order. It's important to note that each row of an image's data is store in multiples of 4 bytes with padding to fill the extra bytes.
To check for padding bytes:

padding bytes = (image_width * 3 bytes_per_pixel) % 4
Display Driver
The driver iterates through each index of a 64 x 64 array in memory representing the LED display matrix and sets the respective RGB pins high to achieve the range of 3-bit colors possible with the display. Each pixel's RGB value is then clocked into the 64-bit shift registers of each row. In this fashion, when the display is turned on, only one row is displayed at a time. However, because the process repeats so fast between all the rows, our eyes perceive the display as showing one consistent image.
The high level idea of how the display driver works is outlined in the code snippet below:
for(each row, while row is less than 64)
{
  1. turn off the display
  2. Set the 5-bit address to select the row to write to

  for(each col, while col is less than 64)
  {
     3. Check the value for (row, col) in our pixel buffer
     4. If the pixel contains red, green, or blue, set the the respective GPIO to HIGH
     5. Clock the data in
  }
}
6. Turn the display on to show the image
7. Delay -- acts like PWM to adjust screen brightness
8. Turn the display back off -- help to prevent rows 31 and 63 from uneven brightness
Game Tasks
The game consists of the following tasks:
- display_test__task: This task updates the display and is essentially what sets the "Refresh rate" of the display. This task runs at the highest priority among all the game tasks.
- game_state_machine__task: This task runs the game state machine which is responsible for all aspects of the game logic and graphics working together. This is the only other task that runs at the highest priority.
- left_button__task: This task continuously checks for input from the left button and is only activated during gameplay phase due to a binary semaphore.
- right_button__task: This task continuously checks for input from the right button and is only activated during gameplay phase due to a binary semaphore.
- start_button__task: This task continuously checks for input from the start button and is only activated during START_SCREEN or in GAME_OVER due to a binary semaphore.
- start_timer: This task counts down the logical timer (volatile variable) every 100 milliseconds as designed for the game. This task is suspended and resumed only during gameplay.
- update_timer_task: This task updates the timer bar during gameplay. This task is suspended and resumed only during gameplay.
- score_task: This task updates the live score during gameplay. This task is suspended until GAME_START state is reached.
Testing & Technical Challenges
Display Power supply issues
During the earlier phases of the project we were using a generic 5V-4A DC power adapter to directly connect to the power input of the LED matrix. This led to the display being extremely unstable and almost impossible to use for testing and debugging. This also wasted a significant amount of our time. We realized the issue was the power and quickly switched to a buck converter that outputs stable 5V voltage. Furthermore, we also switched from using just jumper wires for data pin connections on the LED Matrix to using a combination of jumper wires and a ribbon cable. This fixed the issue immediately and it worked flawlessly henceforth.
Timer countdown issue
When we first implemented the timer, we noticed we needed a way to have the timer begin and display on the screen only during the gameplay and not during the Start screen or game over screen. Since the timer was its own task and not part of the state-machine, we could not control the timer behavior like we did all other elements. Therefore we decided to make use of some FreeRTOS APIs like vTaskSuspend() and vTaskResume() to our advantage. We suspended the task task as soon as it was created and only resumed it when it was required and suspended it again. This ensured the timer bar showed only when necessary and the gamer did not go into game over state every time due to the timer going to 0.
MP3 music play issues
We realized the MP3 modules allow for accessing various music files through an index number generated based on file modified time on the SD card. However, if a file is played while another was already playing, the previous music stops and the latest file call proceeds. Unfortunately there is no way to save the song timestamp or the exact point of a song file to later resume from. This forced us to play the background music only during the start screen and not during gameplay because gameplay will be covered by a different sound.
Conclusion
Working on and developing Lumberjack was extremely fun, thought provoking and we never got bored. All the technical challenges allowed us to develop a more practical form of problem solving skills. Working with hardware can be a whole different kind of problem solving skill as we experienced. Overall, we applied almost all concepts we learnt in the CMPE 244 class and learnt even more while working on the project. This opportunity also helped us develop teamwork skills and better time management. We used FreeRTOS practically and by doing so we dived deep into the concepts and developed a concrete foundation of the knowledge. This project also increased our confidence for working on embedded projects or facing interviews.
Appendix
Project Video
Project Source Code
References
Acknowledgement
We would like to thank Professor Preetpal Kang for such a unique class and amazing opportunity. This class - CMPE 244 is probably the single most important class for anyone pursuing a career in Embedded systems/Firmware engineering.

