Difference between revisions of "F18: Wireless sensor network"
Proj user22 (talk | contribs) (→Nordic Wireless) |
Proj user22 (talk | contribs) (→Air Quality) |
||
| Line 434: | Line 434: | ||
===== Temp, Humidity, & Humidity sensor ===== | ===== Temp, Humidity, & Humidity sensor ===== | ||
===== Air Quality ===== | ===== Air Quality ===== | ||
| + | hello | ||
=== Software Design === | === Software Design === | ||
Revision as of 20:39, 19 December 2018
Contents
Wireless Sensor Network
Abstract
A wireless sensor network (WSN) consists of collection of sensor nodes. Each individual node consists of MCU with on-board sensors and Nordic wireless mesh for communication, which are distributed to monitor physical or environmental conditions, such as temperature, ambient light, humidity etc. The SJ-One board contains an onboard light intensity sensor, and a custom PCB for the project has a combined Temperature, Pressure, and Humidity sensor and an air quality sensor. These sensor data are transmitted to a network coordinator which is the controls the wireless mesh network. The advantage of a mesh configuration is that the data flow is uninterrupted in the network even if one of the nodes fails. The coordinator board colates the data from all nodes, and displays it on a 16x32 LED matrix.
Objectives & Introduction
Show list of your objectives. This section includes the high level details of your project. You can write about the various sensors or peripherals you used to get your project completed.
Team Members & Responsibilities
- Halak Vyas
- RTC Config (primary), Wireless driver (secondary), Sensor drivers
- Jay Parsana
- Display driver (primary), Sensor drivers
- Prashant Gandhi
- PCB Assembly, PCB Design (review), Sensor drivers
- Tristan French
- Team lead, PCB Design (primary), PCB Assembly (secondary), Display driver (secondary)
- Vatsal Makani
- Wireless driver (Primary), PCB design (secondary), Wiki lead
Schedule
| Week# | Date | Task | Actual |
|---|---|---|---|
| 1 | 10/9 | Tristan
Everyone
|
Tristan
Everyone
|
| 2 | 10/16 | Everyone
|
Everyone
Unforeseen issues
|
| 3 | 10/23 | Vatsal
|
Vatsal
|
| 4 | 10/30 | Halak
Tristan
|
Halak
Tristan
|
| 5 | 11/6 | Halak
Jay
Prashant
Tristan
Vatsal
|
Halak
Jay
Prashant
Tristan
Vatsal
|
| 6 | 11/13 | Halak
Jay
Prashant
Tristan
Vatsal
|
Halak
Jay
Prashant
Tristan
Vatsal
|
| 7 | 11/20 | Halak
Jay
Prashant
Tristan
Vatsal
|
Halak
Jay
Prashant
Tristan
Vatsal
|
| 8 | 11/27 | Halak
Jay
Prashant
Tristan
Vatsal
|
Halak
Jay
Prashant
Tristan
Vatsal
|
| 9 | 12/4 | Halak
Jay
Prashant
Tristan
Vatsal
Everyone
|
Halak
Jay
Prashant
Tristan
Vatsal
Everyone
|
| 10 | 12/11 | Everyone
|
Everyone
|
| 11 | 12/19 | Everyone
|
Everyone
|
Parts List & Cost
Top level BoM
| Item# | Part | Source | Quantity | Unit
Cost($) |
Total
Cost($) |
|---|---|---|---|---|---|
| 1 | SJ One Board | Preet | 5 | 80.00 | 400.00 |
| 2 | Adafruit RGB LED Matrix | LED Matrix | 1 | 24.95 | 24.95 |
| 3 | LED matrix Connector board | LED Matrix | 1 | 1.00 | 1.00 |
| 4 | Led Matrix Power Adapter | N/A (Stock) | 1 | N/A | 0.00 |
| 5 | Air Quality Sensor | Willwin | 4 | 4.50 | 18.00 |
| 6 | Custom Sensor PCB Assembly | In House | 4 | 14.72 | 58.87 |
Total (minus SJ One cost): $102.82
Custom PCB BoM
| Item# | Part | Source | Quantity | Unit
Cost($) |
Total
Cost($) |
|---|---|---|---|---|---|
| 1 | Custom Sensor PCB | JLCPCB | 4 | 0.20 | 0.80 |
| 2 | SMD P, T, H sensor | Digikey | 1 | 6.628 | 6.628 |
| 3 | USB mini-B SMD receptacle | Digikey | 1 | 0.87 | 0.87 |
| 4 | 2-position screw terminal, .1in pitch | Digikey | 1 | 0.595 | 0.595 |
| 5 | 2-pin male header, .1in pitch | Digikey | 2 | 0.099 | 0.198 |
| 6 | 4-pin female header, .1in pitch | Digikey | 1 | 0.45 | 0.45 |
| 7 | 17-pin female header w/ long pins, .1in pitch | Digikey | 2 | 1.719 | 3.438 |
| 8 | Red SMD LED, 0603 | Digikey | 2 | N/A | 0.00 |
| 9 | 100 Ohm SMD resistor, 0603 | Digikey | 1 | 0.30 | 0.30 |
| 10 | 300 Ohm SMD resistor, 0603 | Digikey | 1 | 0.066 | 0.066 |
| 11 | 2.2 kOhm SMD resistor, 0603 | Digikey | 2 | 0.024 | 0.048 |
| 12 | 3.3 kOhm SMD resistor, 0603 | Digikey | 2 | 0.024 | 0.048 |
| 13 | 4.7 kOhm SMD resistor, 0603 | Digikey | 4 | 0.30 | 1.20 |
| 14 | 0.1uF ceramic capacitor, 0603 | Digikey | 2 | 0.038 | 0.076 |
| 15 | SMD Air Quality sensor | Digikey | 1 (optional) | 12.88 | 0.00 |
| 16 | 2-pin jumper, .1in pitch | Digikey | 1 (optional) | 0.45 | 0.00 |
Total: $14.72
Design & Implementation
The design section can go over your hardware and software design. Organize this section using sub-sections that go over your design and implementation.
Hardware Design
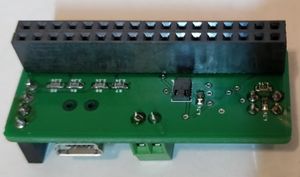
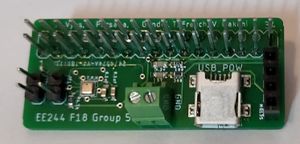
The project is based around the SJ one board, which uses an LPC1758 Arm Core M3 microcontroller. The system design consists of two main devices: a wireless master with a display and a wireless sensor node (of which there are several).
Master Hardware
Node Hardware
Hardware Interface
In this section, you can describe how your hardware communicates, such as which BUSes used. You can discuss your driver implementation here, such that the Software Design section is isolated to talk about high level workings rather than inner working of your project.
LED Matrix
Nordic Wireless
Nordic wireless sensor
Sensors
Light Sensor
Temp, Humidity, & Humidity sensor
Air Quality
hello
Software Design
Master
Node
Show your software design. For example, if you are designing an MP3 Player, show the tasks that you are using, and what they are doing at a high level. Do not show the details of the code. For example, do not show exact code, but you may show psuedocode and fragments of code. Keep in mind that you are showing DESIGN of your software, not the inner workings of it.
Implementation
This section includes implementation, but again, not the details, just the high level. For example, you can list the steps it takes to communicate over a sensor, or the steps needed to write a page of memory onto SPI Flash. You can include sub-sections for each of your component implementation.
Testing & Technical Challenges
Describe the challenges of your project. What advise would you give yourself or someone else if your project can be started from scratch again? Make a smooth transition to testing section and described what it took to test your project.
Include sub-sections that list out a problem and solution, such as:
<Bug/issue name>
1.Merging the sensor data into a single packet and transmitting the packet at Tx section.
2.Incorrect values received at the Rx section with significant delay.
3.Ensuring the receipt of packets from the correct node without data corruption.
4.Calibration of Air Quality Sensor and Temperature/Humidity/Pressure sensor is a challenging part.
5.Unstable/inconsistent display on LED matrix. Suspect it is due to high frequency and poor connections with jumper cables, planning to make simple header breakout for more robust connection.
- Header breakout did not help, investigating possibility of an issue with the matrix itself.
- Issue resolved. The breakout board did end up fixing the connection issue, but an erroneous line of code which set the latch too early was the main problem.
Conclusion
Conclude your project here. You can recap your testing and problems. You should address the "so what" part here to indicate what you ultimately learnt from this project. How has this project increased your knowledge?
Project Video
Upload a video of your project and post the link here.
Project Source Code
References
Acknowledgement
Any acknowledgement that you may wish to provide can be included here.
References Used
List any references used in project.
Appendix
You can list the references you used.

