Difference between revisions of "F18: Flappy Bird"
Proj user18 (talk | contribs) (→Hardware Interface) |
Proj user18 (talk | contribs) (→Hardware Interface) |
||
| Line 372: | Line 372: | ||
The SJ One Board connects to the LED Matrix as well as the external push button through the on-board GPIO pins available. | The SJ One Board connects to the LED Matrix as well as the external push button through the on-board GPIO pins available. | ||
| − | + | <center> | |
| + | <table> | ||
| + | <tr> | ||
| + | <td> | ||
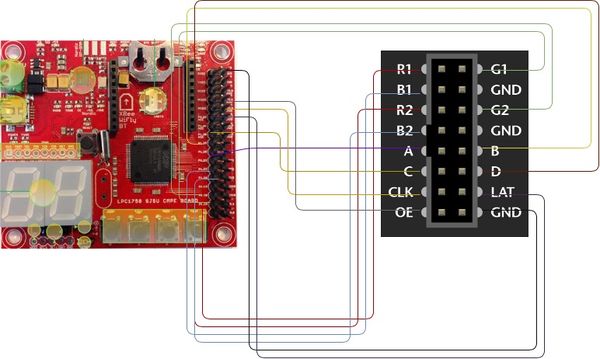
[[File:Block3.jpg|600px|thumb|left|Interface of SJone board with LED Matrix using GPIO]] | [[File:Block3.jpg|600px|thumb|left|Interface of SJone board with LED Matrix using GPIO]] | ||
| + | </td> | ||
| + | <td> | ||
| + | </td> | ||
| + | <td> | ||
| + | </td> | ||
| + | </tr> | ||
| + | </table> | ||
| + | </center> | ||
=== Software Design === | === Software Design === | ||
Revision as of 10:54, 19 December 2018
Contents
Grading Criteria
- How well is Software & Hardware Design described?
- How well can this report be used to reproduce this project?
- Code Quality
- Overall Report Quality:
- Software Block Diagrams
- Hardware Block Diagrams
- Schematic Quality
- Quality of technical challenge and solutions adopted.
Project Title
Flappy Bird - Game using FreeRTOS
Abstract
Flappy Bird is a fun and intuitive mobile game on Android platform driving a lot of people crazy these days. In this game, the player can control the movement of the bird. Pressing the button makes the bird leap upward and on releasing the button the bird will fall freely. In the proposed game design, as soon as the game begins, obstacles will keep appearing from the right side of the screen and move leftwards which will make bird seem to be flying in the forward direction. The goal of this game would be to control the bird, dodging and passing it through as many obstacles as possible. This will run endlessly until the bird hits the obstacle, ground or ceiling. At the beginning of the game, the player is prompted to hit the play button to start the game. Once the Bird is unable to beat the obstacle, the game is concluded and the score for that session is displayed.
Objectives & Introduction
Flappy Bird was designed as a 2D game with simplicity in mind. Hence the primary objective was to develop a game that was a breeze to use for the end user. The push button interfaced with SJ One board acts as an interface between the user and the device which enables the control of the movement of the bird and helps it maneuver and skip the incoming obstacles. The bird continues to gradually descend and reach the bottom of the screen unless an input from the user helps it to fly upwards. The signals received from the button are relayed to the micro controller form the General Purpose I/O Pins. This input is read repeatedly and based on which the x co-ordinate of the bird gets incremented. In parallel the Obstacles are generated with random varying gaps for the bird to pass through them. The game is especially challenging when the user has take care of not letting the bird escape the screen space as well as dodging as many obstacles as possible in order to beat the high score. However, if the either of the challenges are not tackled, the game finishes and displays the current score. There are three components to the entire project:
- 1. The Display : A 32x32 LED Display Matrix acts as the display of the game which is handled using the in-built GPIO pins provided by the manufacturer
- 2. The Controller : The SJ One Board computes the random obstacle generation and handles the movement of the bird from the input button and transfers the information to the display using the GPIO pins
- 3 The Button : The push button interfaced with the game reads the input given by the user and relays to the SJ One board
Team Members & Responsibilities
- Karan Daryani
- PCB Layout Designing
- Obstacle generation driver design
- Artik Shetty
- Bird generation driver design
- Hardware and Product enclosure design
- Mahesh Shinde
- Managing Wiki page
- Collision detection driver design
- Rachit Mathur
- Code Integration(overall tasks integration)
- Switch control implementation
Schedule
| Week# | Date | Task | Status | Actual Completion Date |
|---|---|---|---|---|
| 1 | 09/18/2018 |
|
|
|
| 2 | 10/9/2018 |
|
|
|
| 3 | 10/16/2018 |
|
|
|
| 4 | 10/23/2018 |
|
|
|
| 5 | 10/30/2018 |
|
|
|
| 6 | 11/06/2018 |
|
|
|
| 7 | 11/13/18 |
|
|
|
| 8 | 11/20/18 |
|
|
|
| 9 | 11/27/18 |
|
|
|
| 10 | 12/04/18 |
|
|
|
| 11 | 12/08/18 |
|
|
|
Parts List & Cost
| Item# | Part | Manufacturer | Quantity | Cost($) |
|---|---|---|---|---|
| 1 | SJ One Board | Preet | 1 | 80.00 |
| 2 | Adafruit RGB LED Matrix | LED Matrix | 1 | 62.00 |
| 3 | Power Adapter | Power Supply | 1 | 7.95 |
| 4 | JLC PCB | JLC PCB | 1 | 22.00 |
| 6 | Miscellaneous (Jumper Wires, Connectors, Switches) | Excess Solution | 2.00 |
- Total Cost: $173.95
Design & Implementation
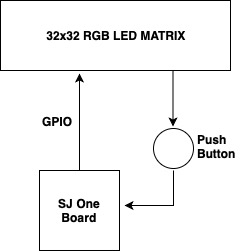
The block diagram for the project given below depicts the flow of the game
Hardware Design
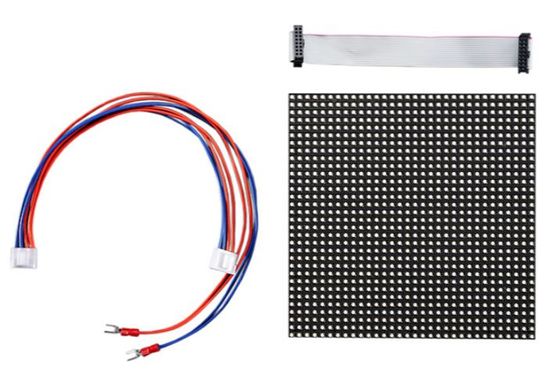
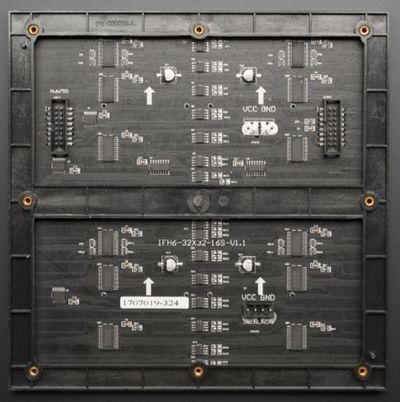
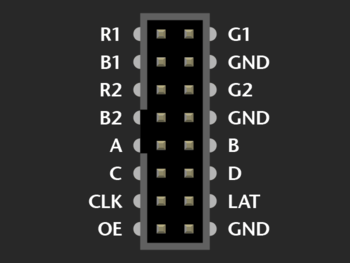
The hardware design employs the use of 32x32 RGB LED matrix panel which is the most important part of the project, this uses four data lines namely A,B,C and D which can be addressed and used to control each LED which has following technical specifications:
Dimensions:
- 190.5mm x 190.5mm x 14mm / 7.5" x 7.5" x 0.55"
- Panel weight with IDC cables and power cable: 357.51g
- 5V regulated power input, 4A max (all LEDs on)
- 5V data logic level input
- 2000 mcd LEDs on 6mm pitch
- 1/16 scan rate
Panel for data in-out with pin description
| Label | Name | Function |
|---|---|---|
| 1 | R1 | High R data |
| 2 | G1 | High G data |
| 3 | B1 | High B data |
| 4 | R2 | Low R data |
| 5 | G2 | Low G data |
| 6 | B2 | Low B data |
| 7 | A | A line selection |
| 8 | B | B line selection |
| 9 | C | C line selection |
| 10 | D | D line selection |
| 11 | CLK | CLOCK |
| 12 | LAT | LATCH |
| 13 | OE | Output Enable |
| 14 | GND | GND |
Printed Circuit Board Design
We have designed and developed a PCB in order to supply power for SJOne board and RGB LED Matrix which is able to provide 5v and 1A supply efficiently.The PCB Layout is designed using the Eagle Software v9.2.2.
The Power Supply circuit has an IC7805 voltage regulator IC and a voltage divider to fulfill the specific power requirements. IC7805 is a linear voltage regulator which has a variable output voltage ranging from 4.8 V to 5.2 V and is suitable for our application. We have used a 12V adapter in order to power our board. This serves for both the current requirements. The circuit was simulated using MultiSim v14.1 software by NI (National Instruments). The simulation helped us understand the working of our circuit before we built and tested it.
Printed Circuit Board also has provisions for the connection of the SJone pin headers and RGB LED Matrix's connector. The connections are as shown in the hardware description diagram. The PCB also has a power switch and LED for indication. The values for the resistors and other active or passive components are as shown in the eagle schematic diagram.
Hardware Interface
The SJ One Board connects to the LED Matrix as well as the external push button through the on-board GPIO pins available.
Software Design
Show your software design. For example, if you are designing an MP3 Player, show the tasks that you are using, and what they are doing at a high level. Do not show the details of the code. For example, do not show exact code, but you may show psuedocode and fragments of code. Keep in mind that you are showing DESIGN of your software, not the inner workings of it.
Implementation
This section includes implementation, but again, not the details, just the high level. For example, you can list the steps it takes to communicate over a sensor, or the steps needed to write a page of memory onto SPI Flash. You can include sub-sections for each of your component implementation.
Testing & Technical Challenges
Describe the challenges of your project. What advise would you give yourself or someone else if your project can be started from scratch again? Make a smooth transition to testing section and described what it took to test your project.
Include sub-sections that list out a problem and solution, such as:
<Bug/issue name>
Discuss the issue and resolution.
Conclusion
Conclude your project here. You can recap your testing and problems. You should address the "so what" part here to indicate what you ultimately learnt from this project. How has this project increased your knowledge?
Project Video
Upload a video of your project and post the link here.
Project Source Code
References
Acknowledgement
Any acknowledgement that you may wish to provide can be included here.
References Used
List any references used in project.
Appendix
You can list the references you used.
